Large Scale Central

Kadee Spacers for Bachmann Cars

I’ve always had trouble body mounting Kadee couplers, mostly because if they are not aligned in the center of the car width, they cause problems. Since I replace plastic wheels with metal ones (which are of course different sizes), the bodies are all at the same height.

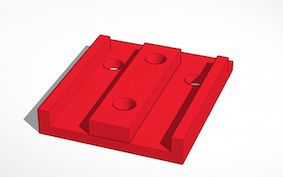
I 3D printed a shim to place the coupler at the proper height and automatically center the coupler. The shim actually straddles the two center sills typical of these cars.

Dick

Do you have a picture?

Do you have an .STL file?

Tom

Pic please.

Dick;

Unless all your cars are of the same make, and have exactly the same underframes, trucks, and wheel sizes; each car can vary in height by anything up to or more than a quarter inch.

To do a dependable and accurate job of body mounting Kadee couplers on rolling stock, it is strongly advisable to treat each car individually, as far as coupler shims are concerned.

“Printing” out shims is not a bad idea, but, you actually require anywhere up to four thicknesses of shims, not just “One thickness does all”

I use simple shims cut from a few different thicknesses of Styrene flat stock. Depending on the coupler you use, the shims usually only need to be 3/4", or 1" wide, so I cut strips of the styrene to these widths, then cut the strips down to the length needed for the draft gear box required.

I only use the centre hole and end hole on the boxes. seldom are the side holes ever of much, or needed use.

To find the centre hole posithin, I simply position an empty draft gear box on the previously mounted shim(s), and while holding it in place, use a drill bit in a pin vice to make a centering “Dent” in the Styrene. I then remove the box, and place the drill bit in the “Dent”, and eyeball the location of the drill bit to the alignment of the two truck mounting points.

If they line up, then I drill the hole, mount the coupler and box, then drill the rear hole using the positioned box as a guide.

I do NOT use the screws that Kadee is supplying, as I find they are overkill/too large for the job. I use screws of the same size as what they used to supply…but depending on the shims and underframes of the car, I choose frome 3 different lengths, which I keep in stock.

I use a suitable drill bit, so that the screws selftap and do not require tapping, or those pointed selftapping screws…or nuts…

Others may wish to do the job “Their way”, but this simple approach has worked on over 6 hundred cars that I have converted over the years.

I have pretty much standardized on the Kadee 906/1906 couplers. They can be used on just about everything… I have converted USTrains, LGB, Bachmann, Lionel, MDC, Delton, Aristo…and also scratch built cars.

I do not promote the use of offset shank couplers, as they do not look good or are they prototypical…yes there have been some used, but are NOT an AAR standard, or used in general practise.

The only car I have not wanted to converted is the USTrains “Giant” auto carriers…and don’t have any desire to try.

I do not take pictures…not interested in that hobby…

Fred Mills
Pics?

Ive cleaned the crap out of this thread. People need to read the “Be Nice” policy again.

I can’t leave you guys unsupervised for even a minute, without you getting into trouble. (https://largescalecentral.com/externals/tinymce/plugins/emoticons/img/smiley-laughing.gif)

Steve, I am surprised at how many times I am allowed to play without adult supervision. Ya know, I just might hurt myself, and I do from time to time.

Here is my first attempt to include a picture. No guarantees, though. This picture adding process is very difficult for this old guy to do.

Here is my first attempt to include a picture. No guarantees, though. This picture adding process is very difficult for this old guy to do.

Got an error code and admonishment to try again later.

I put it in a folder called Bachmann Kadee Coupler in the freight shed.

Dick,

I opened your pic> right click on it> copy image location> back to reply box and opened icon mountain/moon box I pasted the location and set the size at 800x, then ok.

That explains it. I don’t have a “right click” on my Mac! Thanks John for putting the picture on this thread. The picture is a copy of the tinkercad file.

Dick Friedman said:

That explains it. I don’t have a “right click” on my Mac! Thanks John for putting the picture on this thread. The picture is a copy of the tinkercad file.

Benevolent Bob, once gave Mac keystroke equivalents, but I didn’t need them…,

Glad to help.

Dick Friedman said:

That explains it. I don’t have a “right click” on my Mac! Thanks John for putting the picture on this thread. The picture is a copy of the tinkercad file.

One way to right click on a Mac is to press the Ctrl (or Control) key when you tap the mouse button, or the trackpad. Don’t confuse the Ctrl key with the Alt (or Option) key. The Ctrl key on a Mac is not the one next to the space bar, it’s at the far end of the keyboard, on either the right or left side. (https://largescalecentral.com/externals/tinymce/plugins/emoticons/img/smiley-wink.gif)

To right-click on the Mac, all you have to do is use two fingers. Assuming, of course, that you are using an Apple trackpad or Magic Mouse.

Thank you all for helping me out. Now you can see what the shim is and how it functions. If I can find a photo of one mounted on a car, I’ll attach it.