Large Scale Central

J&B RR Construction Log

I’ve been working towards a yard design, with a lot of good advice from Doug, so figured now’s a chance to get additional comments.

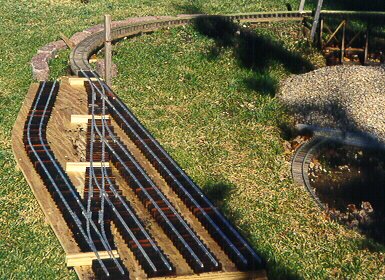
Here’s a close up:

RR Track puts the tracks closer than I will actually have them; I’ll probably just have 4 or 5 tracks; we’ll see when I actually put it down. It will look something like this:

You can see I don’t have a lot of room to get around the tree. I’ll be building a turntable that will go just to the left of the boards in the picture. And, not much room in the other direction.

So, my length is limited, as is my width. Given all that, any comments or advice is appreciated.

Bruce,

If you can bring that yard up off the ground, the tree gets slimmer. Just a thought. An area that has a lot of switching should be higher, if possible, and that sure seems to work to your advantage, concerning the tree.

Ric,
Whoops! Yeah, should have mentioned that. It will be raised a couple of feet. I’m going to try to keep it level with the reverse loop next to it. Should be interesting.

So, as a yardmaster on the IPP&W, what do you think?

haven’t seen any recent episodes of the J&BRR…whassa matter Bruce, getting to cold out for ya?..:wink:

Bruce,

I went back and looked at your old website, knowing that a lot of your railroad has changed, to get a flavor of what your purpose of the railroad is. I really like the point to loop with option for continuous running. I keep getting hung up on that short “caboose track” in the yard by the turntable. I feel like a lot of realestate is being used for that last turnout. I’ve seen where other people have suggested you extend that switching yard lead to become a passing siding or run around and I agree. I think that will give you an escape track and really increase the use of your yard.

Getting back to the “Caboose Track” (I hope I can describe this well enough to be understood), I think you could add a lot of storage and sorting trackage by parralleling the ladder track for the yard with the “Caboose Track” but have it come off of a turnout from the turntable lead. So the end of the “Caboose Track” would be in the same place, but it would be a long track running alongside the ladder track of the yard and tie end to the track going to the turntable. I know you said the actual number of tracks may be less, but long sorting and storage tracks gives lots of options where short tracks suck up space by the areas turnouts take without much use.

Ric, The short answer is I’m not sure. And the longer answer is I don’t understand. :wink: I hate to connect the switch lead to the passing siding…not sure why exactly. Maybe it’s because that’s already “done”… I would agree that the caboose track is “wierd”…and I’d like to have something different…just not sure where to put it. I like your idea of a parallel track, but not sure if I can fit it in. On a somewhat related note, I did elevate the track this weekend. Not a good idea for a one man job, but I eventually overcame the obstacles.

Man, that’s a great picture. I’ve found I never know what is going to work, until I try it for awhile. And as far as fitting all the track in, the one thing you don’t want to do is crowd the tracks.

Haven’t updated the log in awhile…but there has been progress! Of course, I did get the turntable installed last month.

I have the bridge inside now…no sense leaving it out when I can’t get to it. I was delayed a bit getting some rail for my turnouts. Up to now, I’ve been using used code 250 NS that I got as part of a package deal of track and switches. Since I’ve been using the AMS flex track, I really didn’t have a use for the track at all. I tore the ties off of a number of the curved pieces and used these for my curved trestle. Some straight pieces went to be used on the bridge. It looked nice because they were already weathered. The other straight pieces were used to build my turnouts, but I finally ran out and had to get some more. I just finished a set of three switches using some old and new rail, as well as my brass switchstands. Unlike Bart, I build my switches inside. :wink:

So, these switches will be put in place at the entrance to the yard. I still have six more switches to make for the yard itself. I’m not sure how quick I’ll get them done. And, I’m not sure that the weather will cooperate enough to allow me to work outside. Very mild today, but I’m sure that the weekend will be a lot colder as the storm moves this way.

Bruce , those points look damn good . Isn’t it odd how we find things like that attractive , almost artistic ? Anyway , nice looking job .

Mike

Mike,
Thanks, but I must confess - I cheated on the points and the frogs. I did everything for my first switch and found out I wasn’t having that great of a time; so, I started looking at getting the parts. I got a deal from Clem - $5 a pair for the points - they’re already ground down on the ends. He “only” had 11 pairs and I took them all. I bit the bullet and bought the frogs at $15 each…but, I enjoyed building the switches a lot more. These are all nickel silver, so they are a bit tougher than brass or aluminum.

So, after using up all those points, I bought another set of the Llagas Creek ones…they’re cast to fit up snug against the track. Six more to go, and I should be done!

Bruce,

Can you give me some dimensions on your ties, both standard and for your turnouts? Do you cut those or do you buy them cut? Right now, way more than I want to do, but it sure looks good.

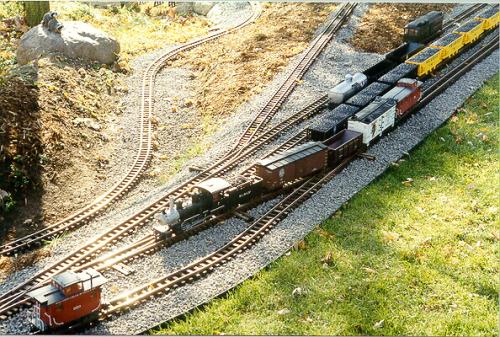
This is how I did my caboose track, don’t have any better photo’s at the moment but it utilized a space at the end of a yard ladder that would have been otherwise wasted space.

Gary,
I like the look of that caboose track! Beautiful looking switches as well - and just about the configuration I’ll be doing. Good looking trackwork all around. Now, is there a handy run around to get the caboose in there? :slight_smile:

Ric,
I have a recipe for the ties and rail lengths. I use 3/8" x 1/2" cedar that I get from Bob at Garden Texture. I know, I could cut my own, but there’s already way too much dust in my workshop. I just cut them to length. Up until now, I was cutting 2 7" pieces for the switch stands, four 5 3/4", three 5 1/4", three 4 3/4", and three 4 1/4". Also some number of 4" pieces to match the length of the AMS ties. I cut these to length from the 24" pieces I get from Bob Kelly.

For the rails, I cut the following, based upon measurements from a Llagas Creek #6 switch:
26 3/8" for the long straight.
26 3/4" for the long curve. Both of these pieces have a 2 1/2" slot ground in them to allow for the points to fit closely. Yes, I know that’s not how the prototype did it. :wink: However, they work quite well, which is what really counts, no? You have to visualize a switch to understand what I mean by long straight and curve…

10 7/8" for the short curve
10 3/4" for the short straight

4" for the straight after the frogs
4 1/2" for the straight piece on the curve

two 4" guard rails

Points are 4 3/4" long but are really cut to fit. I try to make sure that they overlap a tie on the end, so they don’t dip at all. A stip of brass connects them.

Hmm…does that make sense at all? It makes sense to me…sort of… I try to build a set of directions for stuff I build more than one of. That way I can replicate my results later when I have to build another.

Now, having said all that, I’m changing the ties a bit for this next batch of switches. I found a PDF file of some H0n3 templates, and using Scale Print I enlarged them to 1:20. They print out on four pieces of paper - I taped them together and they will require a few more ties than the eleven switches I’ve made to date using those measurements above.

Using my ready made frogs and points, I’ve found it to be fairly straight forward to make all of these switches. Don’t get me wrong, I would have loved to just buy the darn things…but I just could not justify spending over $2,000 on switches. Yet, I didn’t want to make them completely from scratch - although many here have done just that. I did buy a couple of ready made for patterns. :wink: I also bought some “kits”, to help me get started. And, I picked up a few deals along the way. Everything helps.

Thanks, Bruce. I’m just not in the proper attitude to build those turnouts, but was curious of the dimensions. How long is a turnout? I’m use to LGB 1600’s, so you know these things look like monsters to me.

Ric,
Hehe…I know just where you’re coming from. If anyone had told me I’d be making my own turnouts, I would have said they’re crazy. Nope…it’s just me that’s crazy. These are just under 27" long. A lot of the length depends upon how many ties you want on either side of the frogs or points. I do have some longer ones, but I’ll be keeping these short for the yard.

I do have more money then sense…it’s just that my sense is so low, I’m not very rich at all. :wink:

Bruce, your layout is looking great! Nice work on those switches too.

Gary B, great pics of the caboose track!

Sure wish I had space for a yard on my layout. Maybe someday I can figure out a way to run a track down into the lower level of our backyard, and put something in there.

Hi Bruce -

Looks like a lot of good progress this year.

I think your turnout “kit” is a great idea. I built one stub switch in brass just to prove I could, but never tried anything else because I decided to use stainless steel track. I was going to experiment with soldering stainless (some say it can be done) but never had the nerve to try. Buying NS frogs sounds like the answer. If I were to stick with sub style construction would be very easy with the pre-made frog.

Who is Clem, and does he only make code 250? Everything on my pike is 332.

Thanks,

JR

Jon,
Thanks. They’ve certainly cut the cost of the full things…

Clem is from Warrior Run Locomotive Works - http://www.warriorrunlocoworks.com/index.php - I believe they sell some of everything, but I have not seen any points or frogs for code 332. Could be I just haven’t been looking.

Dave Goodson also sells the Llagas Creek stuff, but that is all code 215 or code 250. It is nice stuff, but a tad small for what you’re looking for.

Thanks Bruce -

I’ve bought from Warrior Run at ECLSTS, just didn’t know his name :open_mouth:

Looking at his website, the points and frogs you are buying from him are probably from Llagas Creek, unless he’s doing his own and not putting them on the website.

I might pick up a code 250 frog and play with it. With some shims you might be able to get it to work with 332 rail. Only .0082 inches difference!

OR - I could build switches in code 250 and use Hillman’s adapter joiners.

In any case, I shouldn’t even be thinking of a new project. Plenty of unfinished ones to work on.

JR

Hard to believe it’s January with a high of 73. I’ll take it. After birding this morning, I was able to complete the track to the main yard.

And, got a bit of a start on the yard. Figured out that I had one too many switches, so I’ll probably go with this design.