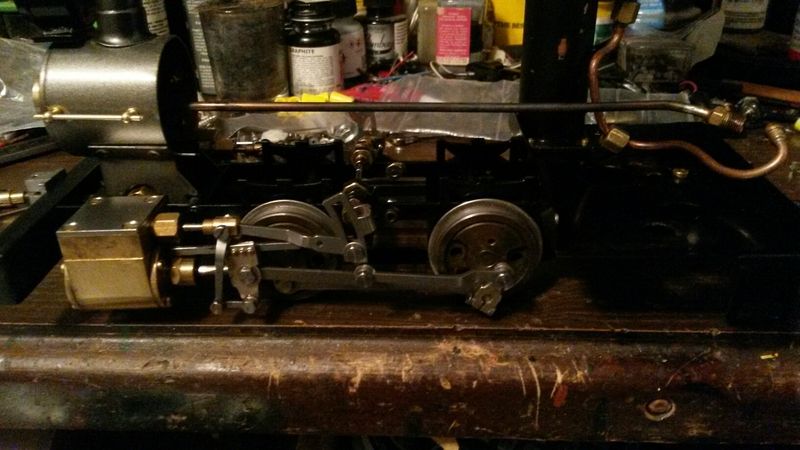
With my used Roundhouse Sammie I got thier Walschaerts valve gear set. The previous owner was looking at ways to install it on the model but never tackled it as it looked like either a new frame or extension brackets were needed. Going by the measurments in the supplied instructions, the shaft that supports the expansion link would side right on top of the frame rail on Sammie, right behind the driver spring detail on the top frame rail. I used the supplied “penguin” bracket as Roundhouse calls them, to support just the expansion link. I angled the bracket rearward and drilled the upper frame rail. Then bolted tight with a small cap screw and nut. I then used the twin nuts on the other end to clamp to the frame. I believe I can mount a second set of “penguin” brackets to hold the rock shaft for the lift links to shift the valve gear. Need to see if Jay can get me 2 more from Roundhouse, otherwise I will have to fabricate a pair. I then reset the valve timing to suit the new motion and tested on air. After a successful test on air, I used a cut off wheel in my dremel to remove a section of the slip eccentric rod on the back side of the rear driver from underneith. This allowed me to slide the old eccentric rods out from behind the rear drivers. Before Sammie is run much on steam, I will put the chassis in my degreasing parts tank and flush all the debris and grit from the rear drivers. For now the valve gear seems to stay in forward gear ok, so I will probably run that way at the steam up in Urbana, IL next Saturday. Mike
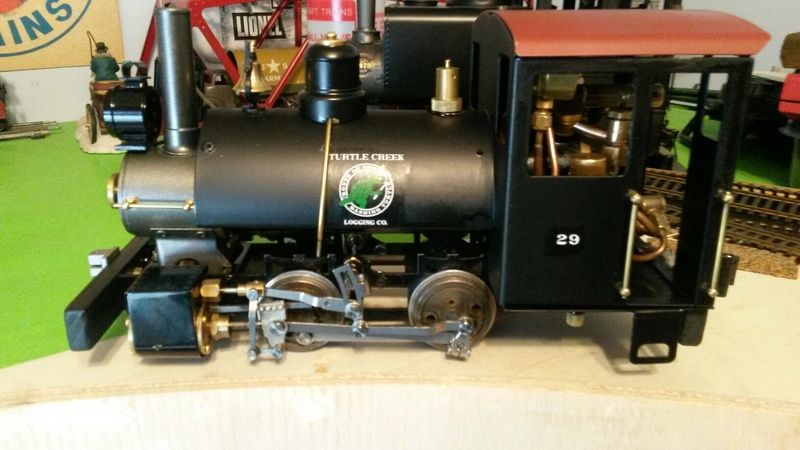
Here is a picture of Sammie back together for now, forward only direction till I get some more brackets and sort out how to control the valve gear, maybe some kind of push/pull rod in the cab instead of the typical lever that Roundhouse uses. The roof is fixed in place on these models, so controls are set to be handled thru the windows, leaving little to no room for the normal Roundhouse manual valve gear control. I will be at the Urbana IL train show steaming on Jim Sanders portable layout, and Sammie will be there. Mike
Well done Mike. Really cool adaption. If you got that far I’m sure you can come up with a bracket and link to lift the radius arm. Looks like the radius arm has a hole in it for just that purpose. Keep up the good work.
It does and I have the lift links and rock shaft. But I used the normal brackets for that shaft that came in the kit to mount the expansion link pivot shaft as the frame isnt tall enough on this model. I am waiting on a second pair of these brackets so I can mount the lift link rock shaft. I will get that step done in due time. Thanks…Mike
Pretty darn cool!!!
Nice work !!
That looks great. I thought about doing the same for mine but never got to it.
It would look really good on your custom Sammie Forney Shawn. Go for it! If we lived closer I would have you weather my Sammie once I get the lift links installed. He needs to be dirty looking now. My blackening solution doesnt want to do much on the side rods. Need to get some of that Nano oil that blackens them. Shiny rods look nice, but ruin the effect on a logging engine, which lost the clean look the day they were delivered! I should have my second headlight to go up on the cab roof in the next day or so. Mike
Mike Toney said:
It would look really good on your custom Sammie Forney Shawn. Go for it! If we lived closer I would have you weather my Sammie once I get the lift links installed. He needs to be dirty looking now. My blackening solution doesnt want to do much on the side rods. Need to get some of that Nano oil that blackens them. Shiny rods look nice, but ruin the effect on a logging engine, which lost the clean look the day they were delivered! I should have my second headlight to go up on the cab roof in the next day or so. Mike
Try neo Lube from Micro mark. The stuff works great and looks good.
I was planning to get some of that Shawn, That is what I ment, was that Neo lube to darken the rods. Mike

