Large Scale Central

EBT Robertsdale Layout Build Log

BTW, here’s a shot of my trestle as I redid the spikes a few years ago.

In the foreground you have the spikes put in with the spiker. 3/8" spikes, 2 per each side of the rail. The rest of the trestle shows my 1/2" spikes rising up in revolt. At one time they were flush with the rail, but winter drives them out. Not so bad with the 3/8" spikes.

Thanks for all the info Bruce, and for trying out 1/2"spikes for me. I may set up a jig to emulate the “spiker” this weekend and see how the ties look when spiking without pre drilling. My fear is that the plastic will bulge without it.

As for bending them over, that’s easy. I’m using 3/8" thick ties so they should protrude out the bottom almost an 1/8". Lay the switch, flip it over and start bending over the spike tips.

I’ll report back after the weekend activities…

Bruce Chandler said:

D’oh. I do have some 1/2" spikes. (http://www.largescalecentral.com/externals/tinymce/plugins/emoticons/img/smiley-embarassed.gif)

I loaded a few and tried it. After I load the spikes I just pressed them against the hammer head to push them back even, then whacked them with the hammer. Seems to set against the rail just fine. Again, much better than using pliers.

Although the next part would be trying to figure out how to bend them over after you get them in…

Since Switchcrafters only recommends the 3/8ths spike, and I did ask him once if it would work with the 1/2 inch spike, and he firmly said, “No,” I was reluctant to admit that I routinely use the 1/2 inch spike. I think that it works just as well with the half inch spike as it does with the 3/8 spike. He probably has a reason for recommending that size, but so far, I haven’t been able to sus it out, and I just go happily on my way, using the 1/2 inch spike.

Now, as to whether it would work with the synthetic wood, I don’t know. My gut says yes, but I have no experience to back that up. I suppose that you could get a bigger hammer. (http://www.largescalecentral.com/externals/tinymce/plugins/emoticons/img/smiley-innocent.gif)(http://www.largescalecentral.com/externals/tinymce/plugins/emoticons/img/smiley-laughing.gif)(http://www.largescalecentral.com/externals/tinymce/plugins/emoticons/img/smiley-surprised.gif)

With the spikes going in at an angle, I don’t see the necessity for bending them over, especially if you use the steel, and not the stainless steel spikes. The steel will rust into the wood, forming a firm bond that will last long after I have any use for it.

Heh. Good luck simply bending those spikes. At least the ones I have. I can bend them using one pair of pliers to hold them as I use the other pair to bend them over…but they’re not in a tie, either. Maybe I just need to work out some more? (http://www.largescalecentral.com/externals/tinymce/plugins/emoticons/img/smiley-embarassed.gif)

I wonder if somebody has come up with a jig to hold them in place while you whack them with a hammer?

Randy Lehrian Jr. said:

Thanks for all the info Bruce, and for trying out 1/2"spikes for me. I may set up a jig to emulate the “spiker” this weekend and see how the ties look when spiking without pre drilling. My fear is that the plastic will bulge without it.

As for bending them over, that’s easy. I’m using 3/8" thick ties so they should protrude out the bottom almost an 1/8". Lay the switch, flip it over and start bending over the spike tips.

I’ll report back after the weekend activities…

Randy, I’d worry that doing that would loosen the spikes on the rail. A better approach might be to just use a Dremmel and cut the spike ends off. Remember that the rail will use up about an eighth inch of the spike, so you might not have anything poking out of the tie.

And, on yet another note…

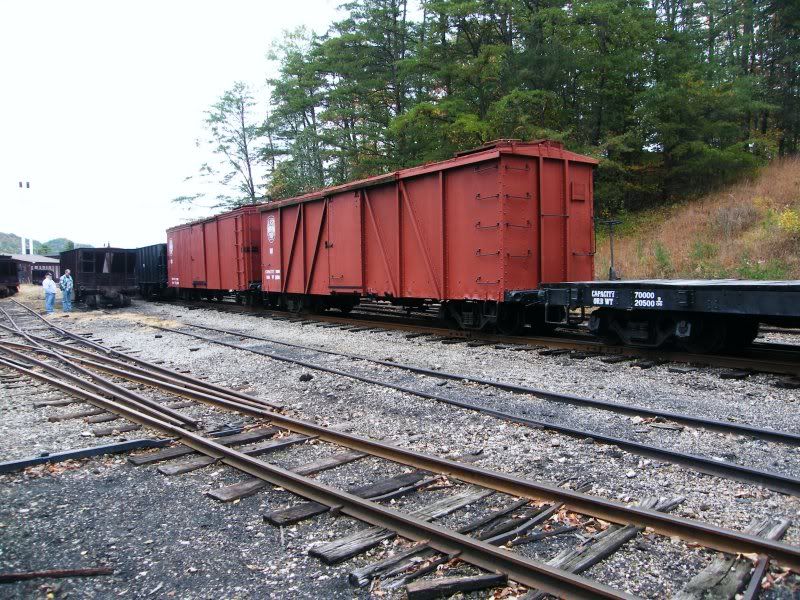
Where are the boxcars??? (http://www.largescalecentral.com/externals/tinymce/plugins/emoticons/img/smiley-cry.gif)

You do know that our Benevolent Dictator makes a fantastic EBT boxcar kit? (More than a bit of assembly required)

Ric Golding said:

Randy,

I understand your desire to cast the frogs out of aluminum. Almost seems like a sub-hobby of the model railroading. But the question of durability keeps me thinking. Wondering if you could cast a frog out of JB Weld? That stuff is pretty durable. This is really interesting to watch.

I made a switch frog out of Bondo, and after a few years it actually fractured and part of it fell out. So the next year I rebuilt the switch and used JB Quick, the 5 minute set version of JB Weld. The frog lasted several years until I took the switch out of service, to go with a wider radius switch. The frog is still in good shape. Of course, your mileage may vary.

Picture of the switch when new BTW.

Bruce Chandler said:

And, on yet another note…

Where are the boxcars??? (http://www.largescalecentral.com/externals/tinymce/plugins/emoticons/img/smiley-cry.gif)

You do know that our Benevolent Dictator makes a fantastic EBT boxcar kit? (More than a bit of assembly required)

Bruce,

I keep asking Bob for a kit, but he doesn’t seem to have any. (Didn’t you mention you had a couple left?) Anyway, those are too small - you need a BIG boxcar.

(Don Niday’s 36’ std gauge boxcar kit, on 3’ gauge trucks. It makes the Accucraft hoppers look small.)

Steve Featherkile said:

Randy Lehrian Jr. said:
. . .

As for bending them over, that’s easy. I’m using 3/8" thick ties so they should protrude out the bottom almost an 1/8". Lay the switch, flip it over and start bending over the spike tips.

I’ll report back after the weekend activities…

Randy, I’d worry that doing that would loosen the spikes on the rail. A better approach might be to just use a Dremmel and cut the spike ends off. Remember that the rail will use up about an eighth inch of the spike, so you might not have anything poking out of the tie.

When I spiked track, I used steel spikes and wooden ties. The track was in solid shape several years later, as the spikes rusted into the wood. The heads would break off if you tried to pull them out!

With plastic ties, you have a whole new ballgame. I believe that the guy who made the turnouts sold by Llagas, which had plastic ties, would bend the spikes over under the ties as they protruded out of the bottom.

Yes, I would worry about loosening them as you bend them. I’d probably turn the whole thing over when it was finished and bash each one at 45 deg with a drift (small flat-head punch, piece of rod, etc.)
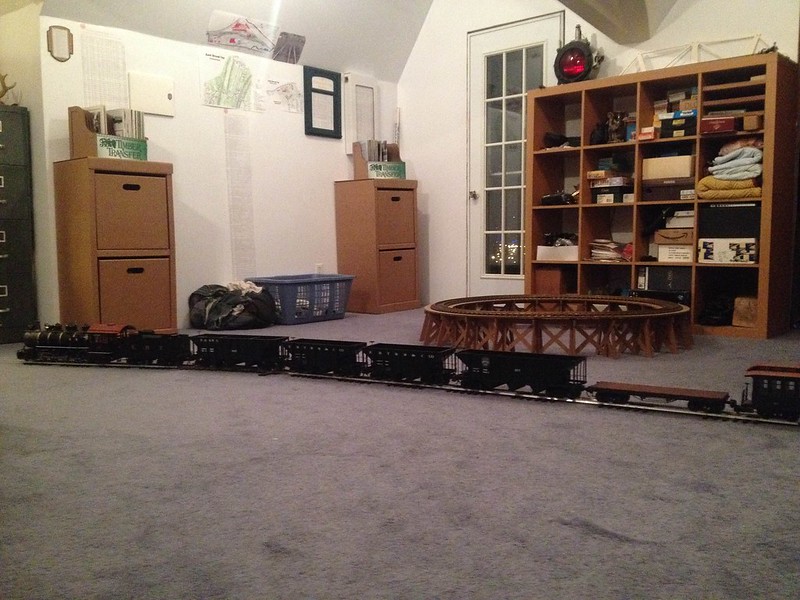
Bruce, I apologize for a wimpy consist. (http://www.largescalecentral.com/externals/tinymce/plugins/emoticons/img/smiley-embarassed.gif)(http://www.largescalecentral.com/externals/tinymce/plugins/emoticons/img/smiley-wink.gif)Let me explain that picture. The flat was my first G scale car 5 years ago. An Aristo. I picked up the Bachman coach about two 2 years ago for $25. I knew it was the wrong scale but figured the trucks were worth that. Now fast forward to a year ago And I decided to really invest in the hobby while at the same time being bit hard by the EBT bug. I splurged on #12. I Bought the Accucraft and Rich Yoder 3 bays, 3 and 1 months respectively before ECLSTS and the two bays for $70 each at york. That’s the long way of saying the budget is blown for trains this year. Putting in the railroad is all the more I can do for now. (http://www.largescalecentral.com/externals/tinymce/plugins/emoticons/img/smiley-undecided.gif)

However, those might need to go on the short list. Perhaps if Pete and I both put an order in, Bob would be inspired to get some kits together in the name of efficiency.

As for the spike bending, I’ll do just as Pete described. I’'l probably hold the switch on its side (standing on the tie ends) and use a hammer and drift. I’m not at all worried about the spike loosening or moving. This plastic is seriously dense and though.

I have decided on a big shift in plans though. When I tried to take my first wax positive out of the mold this AM it broke and fell apart. I ned to try a different wax or this or that, but the point is it’s taking too long. I’m going to have some brass frog point water-jet cut at a local shop. Similar to these that Switchcrafters sells.

The reason I’m having them made is I still want to build #7 switches and theirs are only even numbers. . This should get me building switches and some track on the ground.I’ll have to play with casting later. Today I finished building my switch assembly Jig, and tomorrow I’ll cut a bunch of ties to length. Thanks for all the suggestions comments and ideas!

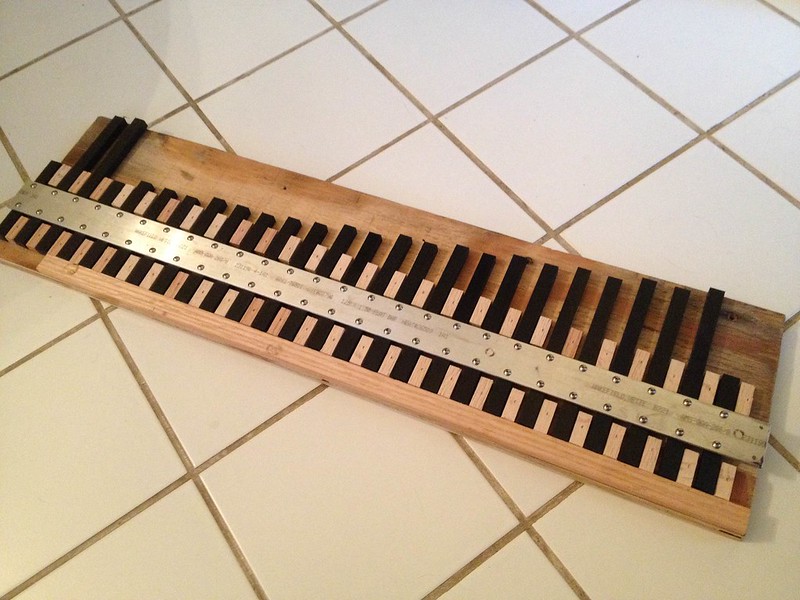
A quick update, and the last until spikes start going in ties. I mentioned above that I finished my assembly Jig. Below is a photo showing some ties sitting in place and also the aluminum bar that will be screwed to each tie with two #4 brass screws. I’ve also cut up enough ties to get about 4 switches built and the have been delivered jig side. Just a matter of how soon I will be able to get my frog tips from the machine shop.

Switch assembly Jig

(http://www.largescalecentral.com/externals/tinymce/plugins/emoticons/img/smiley-embarassed.gif)

Although the next part would be trying to figure out how to bend them over after you get them in…

There was an article in GRW on how to make a jig for bending spikes over.

I’'l probably hold the switch on its side (standing on the tie ends) and use a hammer and drift.

Not sure it’s strong enough upright as you describe. You’d have to turn it over and bash the others using the curved side. Lay it flat on its back!

Why bother with the brass frog? I’ve always used bent rail.

Instead of an alum strip underneath, the old way was to use the same wood, as a stretcher under the rails. If you nail them to the ties from underneath, they stay where put!

Pete, yup, thats why I did. The nails I used to nail the ties to the “stretcher” were copper nails, and I bent them suckers over. I had also put urethane glue between my ties and stretcher, jut to make sure I overkilled that darn thing.

Looking good so far. I picked up a bunch of the switchcrafter frogs for when I get the courage to build my switches.

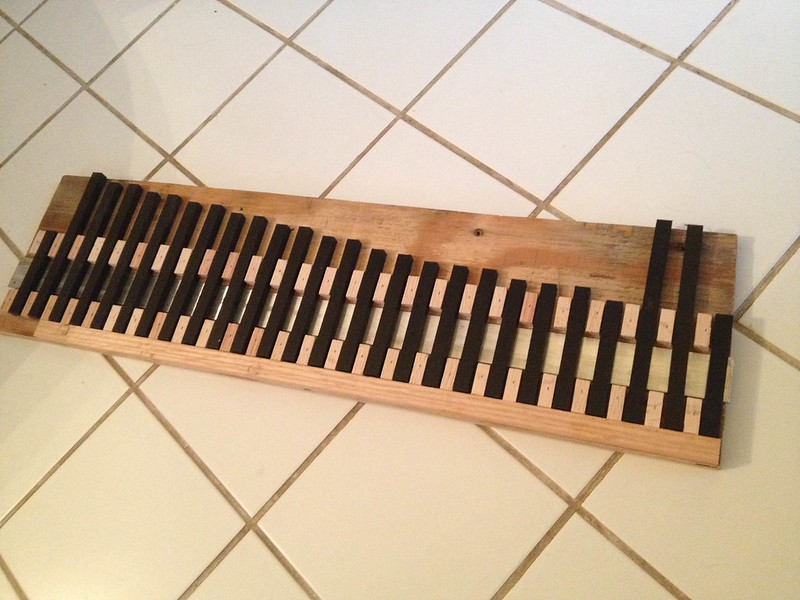
Ok , I finally made some more notable progress. In this first photo you can see the 1/8" by 1.5" aluminum bar that I’m using for the stretcher. When I drilled it, I did 2 at once clamped together so now I have a template. The ties were also all pre-drilled. Again this wasn’t very bad just set up a jig with stops and run them all through once for each hole position. I used 7/16" #4 stainless screws to attach the ties and they seem to have bit very well. This whole set up makes for a very ridged assembly which won’t allow the ties to move at all. I feared with 2 separate stretchers the thing could rack and twist. (Kind of like a scissor lift) Davids glue method would remedy this if I were using wood, but since I’m not I decided for a stout mechanical method.

IMG_1349

IMG_1348

In the second view I’ve turned it over in the jig and I’m now ready to put the stock rail down tonight. I won’t be able to go further since I’m still waiting for my frog tips from the shop. I do want to throw a coat of paint on these to make them match the tie strips. I want to paint the tie strips too (I’m scared about UV after Kevin’s thread on AMS ties) so color isn’t an issue. Just not sure exactly what color EBT ties and ballast were. I’m thinking mostly black from the coal dust? There aren’t many color photos showing this. And non from the 20’s that I’m modeling.

Nice work Randy. Are the ties dado cut for the stretcher, or does it extend below the bottom of the ties?

When using the “spiker” to build a switch, it’ll set 8 spikes in every tie, or 4 on each rail, 2 to a side. I found this makes the switch very rigid. The only type switches that I build that need a “stretcher” or spline are the stub switches, since none of the rail is continuous to hold it together.

Most creosoted ties are black or dark brown, depending on the density of the wood used. They may have some gray in them as they age, plus oil spots from locomotives, but that’s over kill. At one time I was letting them soak in a dark brown stain, Lately I’ve been using used motor oil on them since I have an abundance of that stuff in the spring…(http://www.largescalecentral.com/externals/tinymce/plugins/emoticons/img/smiley-wink.gif)

Since your using PVC a dark brown color should work.

Nice work. That should outlast you…(http://www.largescalecentral.com/externals/tinymce/plugins/emoticons/img/smiley-wink.gif)

Thanks Guys,

John, the ties are not cut out. The bar just sits on top of them. I wouldn’t want to make the tie weaker by putting in a thin section. I drilled the holes very precisely so that the force things to line up square. The jig is dattoed out to accept the plate when you flip it. Now I’ll have a nice solid surface to spike on.

Ken, you were right on the money when you mentioned the stub switches. I like over kill and consistency so they all get the same treatment. I’ll have lots more switches to build once we move so I won’t want to stop and redo these in 10 years. I also agree with the colors you are talking about for creosoted ties, but the EBT used untreated, so I don’t have a great reference for that. I’m just thinking all the coal dust would have still made them black?

Some look gray, some dark brown, some look black.