Large Scale Central

Durango & Jasper track plan and build

From my experience, I know my curves moved laterally (up to an inch) and there is no way to ensure they return the same way, meaning gaps can be over size.

I approach the layout as a whole and allow movement. I use curves to break long tangents which can be most disruptive.

I would be wary of making cuts on curves.

Good Luck,

John

John Caughey said:

From my experience, I know my curves moved laterally (up to an inch) and there is no way to ensure they return the same way, meaning gaps can be over size.

I approach the layout as a whole and allow movement. I use curves to break long tangents which can be most disruptive.

I would be wary of making cuts on curves.

Good Luck,

John

No matter where you put these cuts, if’n it were me, I’d put some slip joints on those rail ends to keep the rails in alignment. Don’t count on the tie strips to maintain alignment.

Why not just use the existing ends of the flex track for those expansion joints?

Jim

Did you enlarge the hole you used to screw the track down …some will enlarge the hole and place a washer and leave the screw loose , so the track can move a little.

Then you can say you have a couple loose screws! (http://largescalecentral.com/externals/tinymce/plugins/emoticons/img/smiley-wink.gif)

I don’t think I need to change any of my behavior to have loose screws!

I’m impersonating Daniel Smith here so may be wrong, but his approach seems to be to keep the ties in a known spot, and let the rails move only in the direction of the rails, with the minimum gaps necessary for the max temperature. I don’t have enough experience to know whether that’s the best approach or not, and it may also be an approach that works for a limited temperature range (in my case that’s from about 35 to about 105, with our track put in about halfway in that range).

So we very carefully, as we laid track, butted the track ends up as close as possible (i.e. no gap at all) at the track boundaries, using the plastic joiners, and then cut gaps for the rails to expand into, even on the curves. Note that we also added extra nails to hold the ties on either side of the new gaps so they don’t move at all.

If/when it screws up I’ll update this thread so a lesson can be learned.

Cheers!

If you can keep the ties completely fixed and only the rails move, you will either get big gaps or kinks, or both.

Pretty hard to fight the laws of physics.

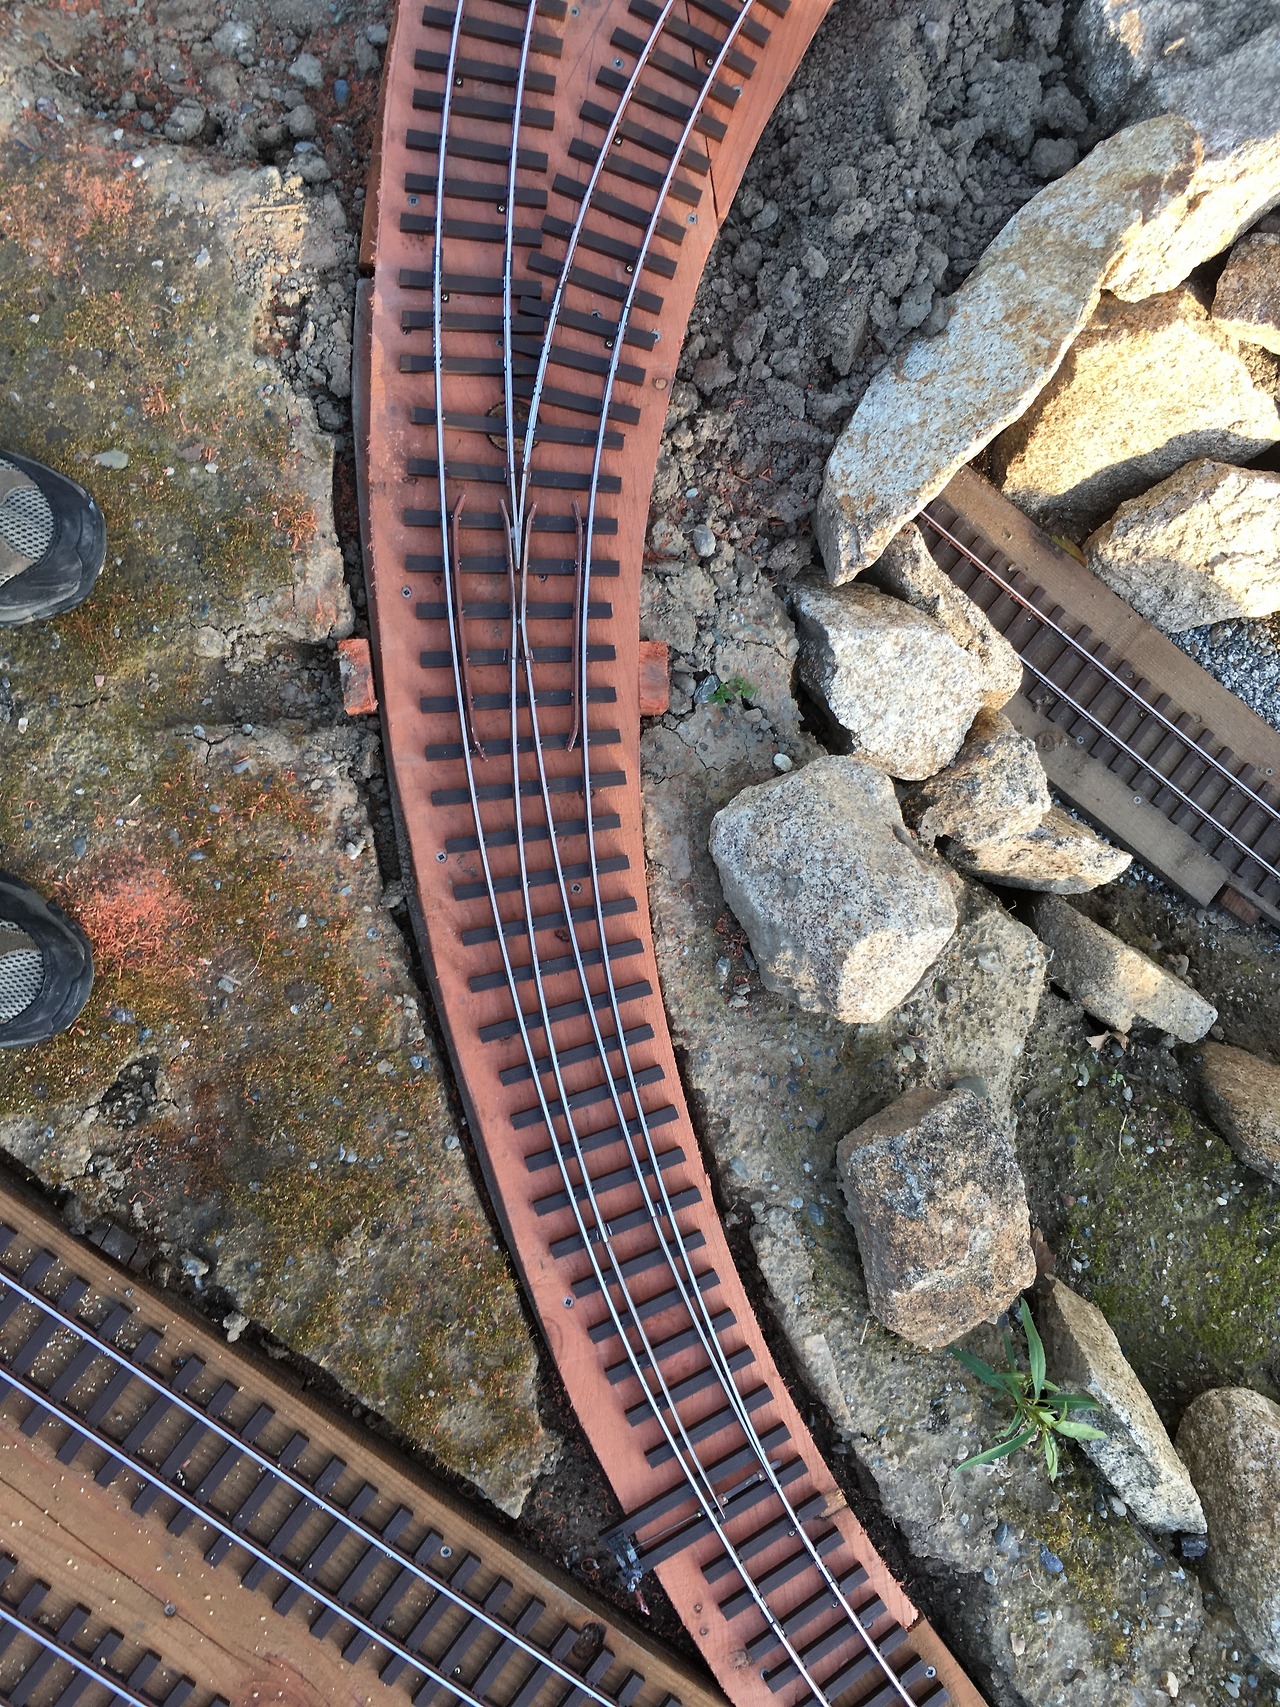
Adding gaps was a good idea, but why butt the rails and then cut gaps? I guess the “nails” around the gaps are really tie spikes? I think you will find that over time, if you cut gaps on curves, the nails won’t maintain a smooth curve at the gap.

One thing I’ve seen over the years is the progression of “thought”. In the early days people bolted everything down to keep anything from moving. Normally if the ties were solidly fixed, the rails began to rip out of the ties.

The next “school of thought” was that ok, fix the ties, but let the rails slide. Well, the specter of physics rears it’s head again, as while it seems to make sense, the issue is that the friction of the rails in the ties is not consistent (for many reasons), and you are back to big gaps in places and kinks in other areas.

Finally, the evolution has come to most that you loosely locate the ties, and let things move like the real trains do. Many people will try to argue that our scale does not work like the 1:1: but it does.

If you look at the prototype, they go to the effort to do the complete opposite of letting the rails slide in the ties, and lock the rails to the ties.

One of the big issues we have is the radically different expansion of the rails vs. the ties. By locking them together at multiple points, then the ballast is the thing controlling the movement of the track, again like the real thing.

Anyway, you have 3 different expansion coefficients going on now, the rails, the ties and the boards. Your temperatures might be mild enough that virtually anything works, but a good inspection at the temperature extremes is what will tell.

In any case, your workmanship is superb so if anyone has the chance of success, you will. (But I still would recommend SplitJaws at your gaps)

Regards, Greg

Thanks Greg. You present the problems nicely. Of course it all comes down to how much expansion difference over how long a span, etc. I’m a bit nervous about all of it :-). Physics has a history of being pretty unforgiving.

The good news is that nothing is permanent… if you experience problems you can make changes.

I do have a friend that insisted on having narrow strips of concrete for the track base, and GLUING the track to the concrete.

Now some people have worked out how to do this, solid base, drainage, rebar throughout, especially between sections.

Well a few years later, the concrete moved, so it was no longer level side to side and worse, the sections of concrete were no longer level from section to section. The concrete was not reinforced, and the area was actually in a depression so ground water did not help either.

So the sections that lifted pulled the rails out of the ties of the lower sections… and torqued stuff up… Also installed with no expansion gaps in the full sun, so even gauge problems. (All LGB sectional track, so no rail sliding possible)

Basically the whole thing needs to be torn out after considerable expense for the concrete laying and LGB track.

Just the results of trying too hard to not let stuff “breathe”…

Your construction should not have these severe problems.

Greg

This is why I like the floating method. Just let your track float on top of ballast and not use boards as a base to support and secure the track. I have used stone dust for years and never had any issues with movement or expansion. If I have, its not very noticeable. My layout can see winter temperatures well below zero and summer temperatures can hit 100. I get tropical storms to blizzards and the track has lasted through it all using the floating method. I know if I were to use the ladder system or boards I would run into nothing but problems.

What is the advantage to using the boards as a base? You can get a pretty solid base using stone dust or something similar.

The way you have it with the expansion joints is the way the real RR did it when jointed rail was used. Walk down any track that is still that way, and you will find the expansion joints that allow the rail to move. The real railroad did experience heat related kinks, but those are rare. Now, that has changed a bit with the advent of welded rail.

I have also been visiting a RR for 8 years with concrete roadbed with the track screwed to it and expansion joints. Temperatures range from below zero to over one hundred and he hasn’t replaced a piece of track due to expansion yet.

I would give it a chance. Daniel Smith wasn’t waiting tables yesterday and laying track today. He is pretty experienced in what he does and had laid far more track than any of us.

Chris

I live 2 blocks away from Jim so I can give my experience with track expansion in our area. My layout is 10 years old, my track is brass Aristocraft screwed together. I used 8" plastic stakes at 36" intervals that are secured to the tie strip with SS screws (see illustration). We have no freeze thaw problems. I have only had one track expansion problem and that was on my trestle at 106 degrees during an open house that resulted in a derailment. Fortunately the cars fell to the dry side of the trestle. I have no dedicated expansion joints and have had no other problems but the trestle. Jim is going to have a full summer to see what happens. I don’t plan to run trains at over 100 degrees anymore unless it’s an open house.

Dan, I think one of the keys to your success is that you only secure the track every 3 feet and that is also somewhat flexible from your description.

The guy with the glued LGB track had virtually ALL the ties at both ends of each section glued, like 4-5 ties…

Also when I started about 10 years ago, the common thought was a screw every foot or LESS… all of those layouts did not last in that configuration.

Anyway, sounds like weather is Pleasant in Pleasanton …

Greg

Greg,

I agree that securing the track at 3 ft. intervals gives a little wiggle room for expansion. It’s worked well for the last ten years, and yes, it is pleasant here in Pleasanton.

Just came across this thread and sure a very interesting build and well done. The comments about how to restrain rail movement and the various statements made are interesting. Jim I hope this all works out over the long run and hope to hear of further updates and reports as the RR progresses including your experiences with expansion and contraction of the track structure. Later RJD

Thanks RJD!

Daniel is here today for day 8 of track laying so should have an update later tonight or tomorrow.

I’ve also been researching expansion physics (which is pretty interesting) so I may post a few links to information. Of course, theory does not match reality, particularly when you get wide variations in expansion coefficients, changes to water in the wood, and friction, so theory only goes so far (as Greg points out eloquently).

Day 8 of track laying with Daniel Smith: logging area with a Y and a curved turnout as well as progress on the Durango yard with a couple of remote activators for 2 hard to reach turnouts.

Here’s a birds eye view of the logging area:

Logging area

This is the Y:

The Y

The curved turnout from above:

And from ground level:

Here’s an overview of the Durango yard (not very large, but enough for this small layout):

The new stuff is on the left. Note the curious horizontal wood crossings with odd stuff on them. Those are remote activators for those turnouts that are hard to reach. They are made using stiff wire in copper tubing (painted), using a ground throw to move the points from afar. There is another one in the Jasper area near the sawmill.

Here’s a video showing one at work:

Cheers!

That is some smooth looking trackwork. Nice job you guys are doing.

Chris

I really like the remote turnout solution Jim, you’re making great progress!

Beautiful curved turnout!

Greg

No more track laid, but did spend some time rearranging rocks in an attempt to 1) isolate scenes, 2) get smaller clearances to make things seem more slapdash, and 3) create some vertical contrast to the horizontal trains. I also ordered another 1400 pounds of rocks so I can get more vertical and provide some spots to build some “cliffhangers” as in this topic.

Jim, the layout is looking good. The rock really makes a difference in the overall look.