Large Scale Central

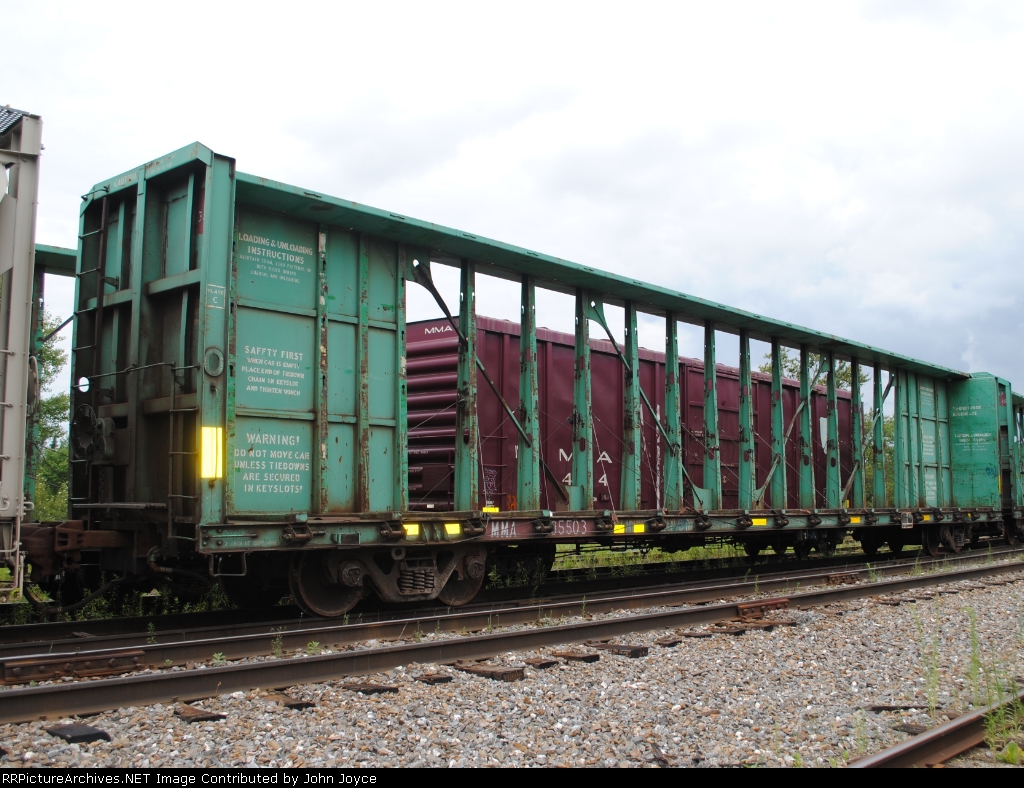
Centerbeam Flatcar Build

I don’t need to tell you what I think so far Mike because you already know!

I do want to ask you if you have ever had issues with cutting the big sheets like that because I sure have. The sheet walked/moved on me more than once in the past. I always use a clamp in the center of the metal ruler and I also now put masking tape doughnuts on the bottom of the sheet. If you haven’t had this happen then consider yourself lucky because it will eventually. Perhaps you have the plastic secured in another fashion though that we can’t see and this is why I ask.

I’m really enjoying this build !

Hehe…edit for page 3

Hi Dave , yea its a challenge . I use a aluminum 48" ruler clamped on each end to a work table . Its all about the first pass with the blade . Go slow and watch the angle of the blade. That being said sometimes there is a spot that messed up . Hopefully its wider than what I need so I can sand it . Otherwise its more stock for a future project. It would be neat if there was one of those Duplicutters for stock that’s 48 inches wide.

Mike, love how this is progressing.

Question, how do you get these consistent radii?

Steve , I made a small pattern and traced it to the plastic and use sizzers . It was very thin .015 .

Yer a better man than I, Gunga-Din. I kinna do that to save me soul. (http://largescalecentral.com/externals/tinymce/plugins/emoticons/img/smiley-surprised.gif)

mike dorsch said:

Hi Dave , yea its a challenge . I use a aluminum 48" ruler clamped on each end to a work table . Its all about the first pass with the blade . Go slow and watch the angle of the blade. That being said sometimes there is a spot that messed up . Hopefully its wider than what I need so I can sand it . Otherwise its more stock for a future project. It would be neat if there was one of those Duplicutters for stock that’s 48 inches wide.

Ohhh… I wonder if one of the smarter metal/woodworkers on the site could upscale a Duplicutter… Looks fairly simple in design. (http://www.largescalecentral.com/externals/tinymce/plugins/emoticons/img/smiley-undecided.gif)

I still have work to do on the car till she’s ready for paint etc but i’m catching up to "real time ". Here’s the next things I did. I glued to the deck the risers that the load sits on . There are 36 of them each tapered and bullnosed and made from Evergreen # 168 solid strips . After these were done it was time to make 36 little winches for the sides. I started with a piece of Evergreen #287 “H” column . After I took it to my sander it was now a “C” channel . I couldn’t find any suitable stock “C” channel that looked right. Then I cut it into one foot [1/29] pieces. I drilled a hole through them for a piece of brass rod . On one end of the brass rod I used a piece of Evergreen tube #224 sanded down to a little doughnut and epoxied to the brass rod. Back to the sander to clean up the ends of the rods and then the still square “C” is rounded off . I added a couple of rivets with JB Weld just to add a little more detail . I lined them up on the sides in line with the deck risers and vertical posts and glued the on with MEK. Sorry I didn’t mean to write a novel . Here are some pictures. .(http://freightsheds.largescalecentral.com/users/todus2/gondola%20load/IMGA0664.JPG)(http://freightsheds.largescalecentral.com/users/todus2/gondola%20load/IMGA0682.JPG)(http://freightsheds.largescalecentral.com/users/todus2/gondola%20load/IMGA0673.JPG)(http://freightsheds.largescalecentral.com/users/todus2/gondola%20load/IMGA0681.JPG)(http://freightsheds.largescalecentral.com/users/todus2/gondola%20load/IMGA0677.JPG)

That it Craig .

Damn that is cool. I love the ratchets.

Are you gong to load it with wrapped bundles of lumber?

I’m mulling over that possibility down the road Devon.

I can’t wait to see how he paints this!!!

Simply beautiful workmanship… (http://www.largescalecentral.com/externals/tinymce/plugins/emoticons/img/smiley-cool.gif)

I can’t wait to see him build 20 more so he has a string of them (http://www.largescalecentral.com/externals/tinymce/plugins/emoticons/img/smiley-surprised.gif)

20 more Devon , no way my better half would kill me . As to what paint i’ll use I haven’t decided on a road name yet. TTX yellow? Mc Cloud RR blue ? maybe MMA blue ? MMA 35503

Not just what color but how…

http://www.shortlinemodelers.com/paint-shop/weathering/create-chipping-paint-salt

Just one quick Idea I found for you.

Sean McGillicuddy said:

Not just what color but how…

http://www.shortlinemodelers.com/paint-shop/weathering/create-chipping-paint-salt

Just one quick Idea I found for you.

I am glad you posted that. I new about this technique but had forgotten it. This is one of the very best ways I have seen to accomplish the look. then you can dry brush the bare spots with rust color.

Thanks for that link Sean . I’ve seen that technique before . I think it was Burl Rice where he did a bulkhead flat . There’s also the hairspray weathering technique which looked interesting . I have never tried them and I don’t think I will experiment with this car. I do have my own way of weathering that I will use on this car. …Maybe.

Getting close to finishing this project. Getting into the small detail items . Next thing I did was build 4 jack pads for the sides. They are made from .030 sheet . There are 5 parts for each . Two pieces 15"x 6" and 3 pieces 6" wide and tapered into a small triangle . They were assembled with MEK . I cut a slot in the .060 material on the bottom side and glued them in place. Now I did the ends. I scavenged the necessary parts from a USA stack car . The walkway was cut into a 6’x1’ piece and framed on the inside edge with Evergreen #292 angle stock. After the epoxy cured I glued them on with MEK. The “B” end has a small slot cut into it for the break chain to pass through . The small chain roller has a bracket made from .030 stock and epoxied to the bottom below the hand brake. When this step was done I made 4 end steps made of some thin aluminum which I drilled holes in to accept some micro screws . The end steps are epoxied and screwed to the side corner . Last thing to do is rig up the brake system underneath . I’m not to concerned with what I see if I turn the car upside down , only what I see when its on the track so some stuff will be omitted . Here are some more pictures. .(http://freightsheds.largescalecentral.com/users/todus2/gondola%20load/IMGA0684.JPG)(http://freightsheds.largescalecentral.com/users/todus2/gondola%20load/IMGA0685.JPG)(http://freightsheds.largescalecentral.com/users/todus2/gondola%20load/IMGA0686.JPG)(http://freightsheds.largescalecentral.com/users/todus2/gondola%20load/IMGA0689.JPG)(http://freightsheds.largescalecentral.com/users/todus2/gondola%20load/IMGA0690.JPG)(http://freightsheds.largescalecentral.com/users/todus2/gondola%20load/IMGA0698.JPG)(http://freightsheds.largescalecentral.com/users/todus2/gondola%20load/IMGA0694.JPG)(http://freightsheds.largescalecentral.com/users/todus2/gondola%20load/IMGA0695.JPG)(http://freightsheds.largescalecentral.com/users/todus2/gondola%20load/IMGA0697.JPG)

Wow again!