Large Scale Central

C.V.S.Ry. Mik 2022 Build Log

Would he be on the chat line perhaps? Where is :rooster: when you need a rude comment.

So, I decided since this is a relatively simple structure with very basic elements that I would forgo drawing the plan on the computer and just do an old school sketch the way I plan builds at work. So the new name of my entry is the Pine Summit Telegraph Shack

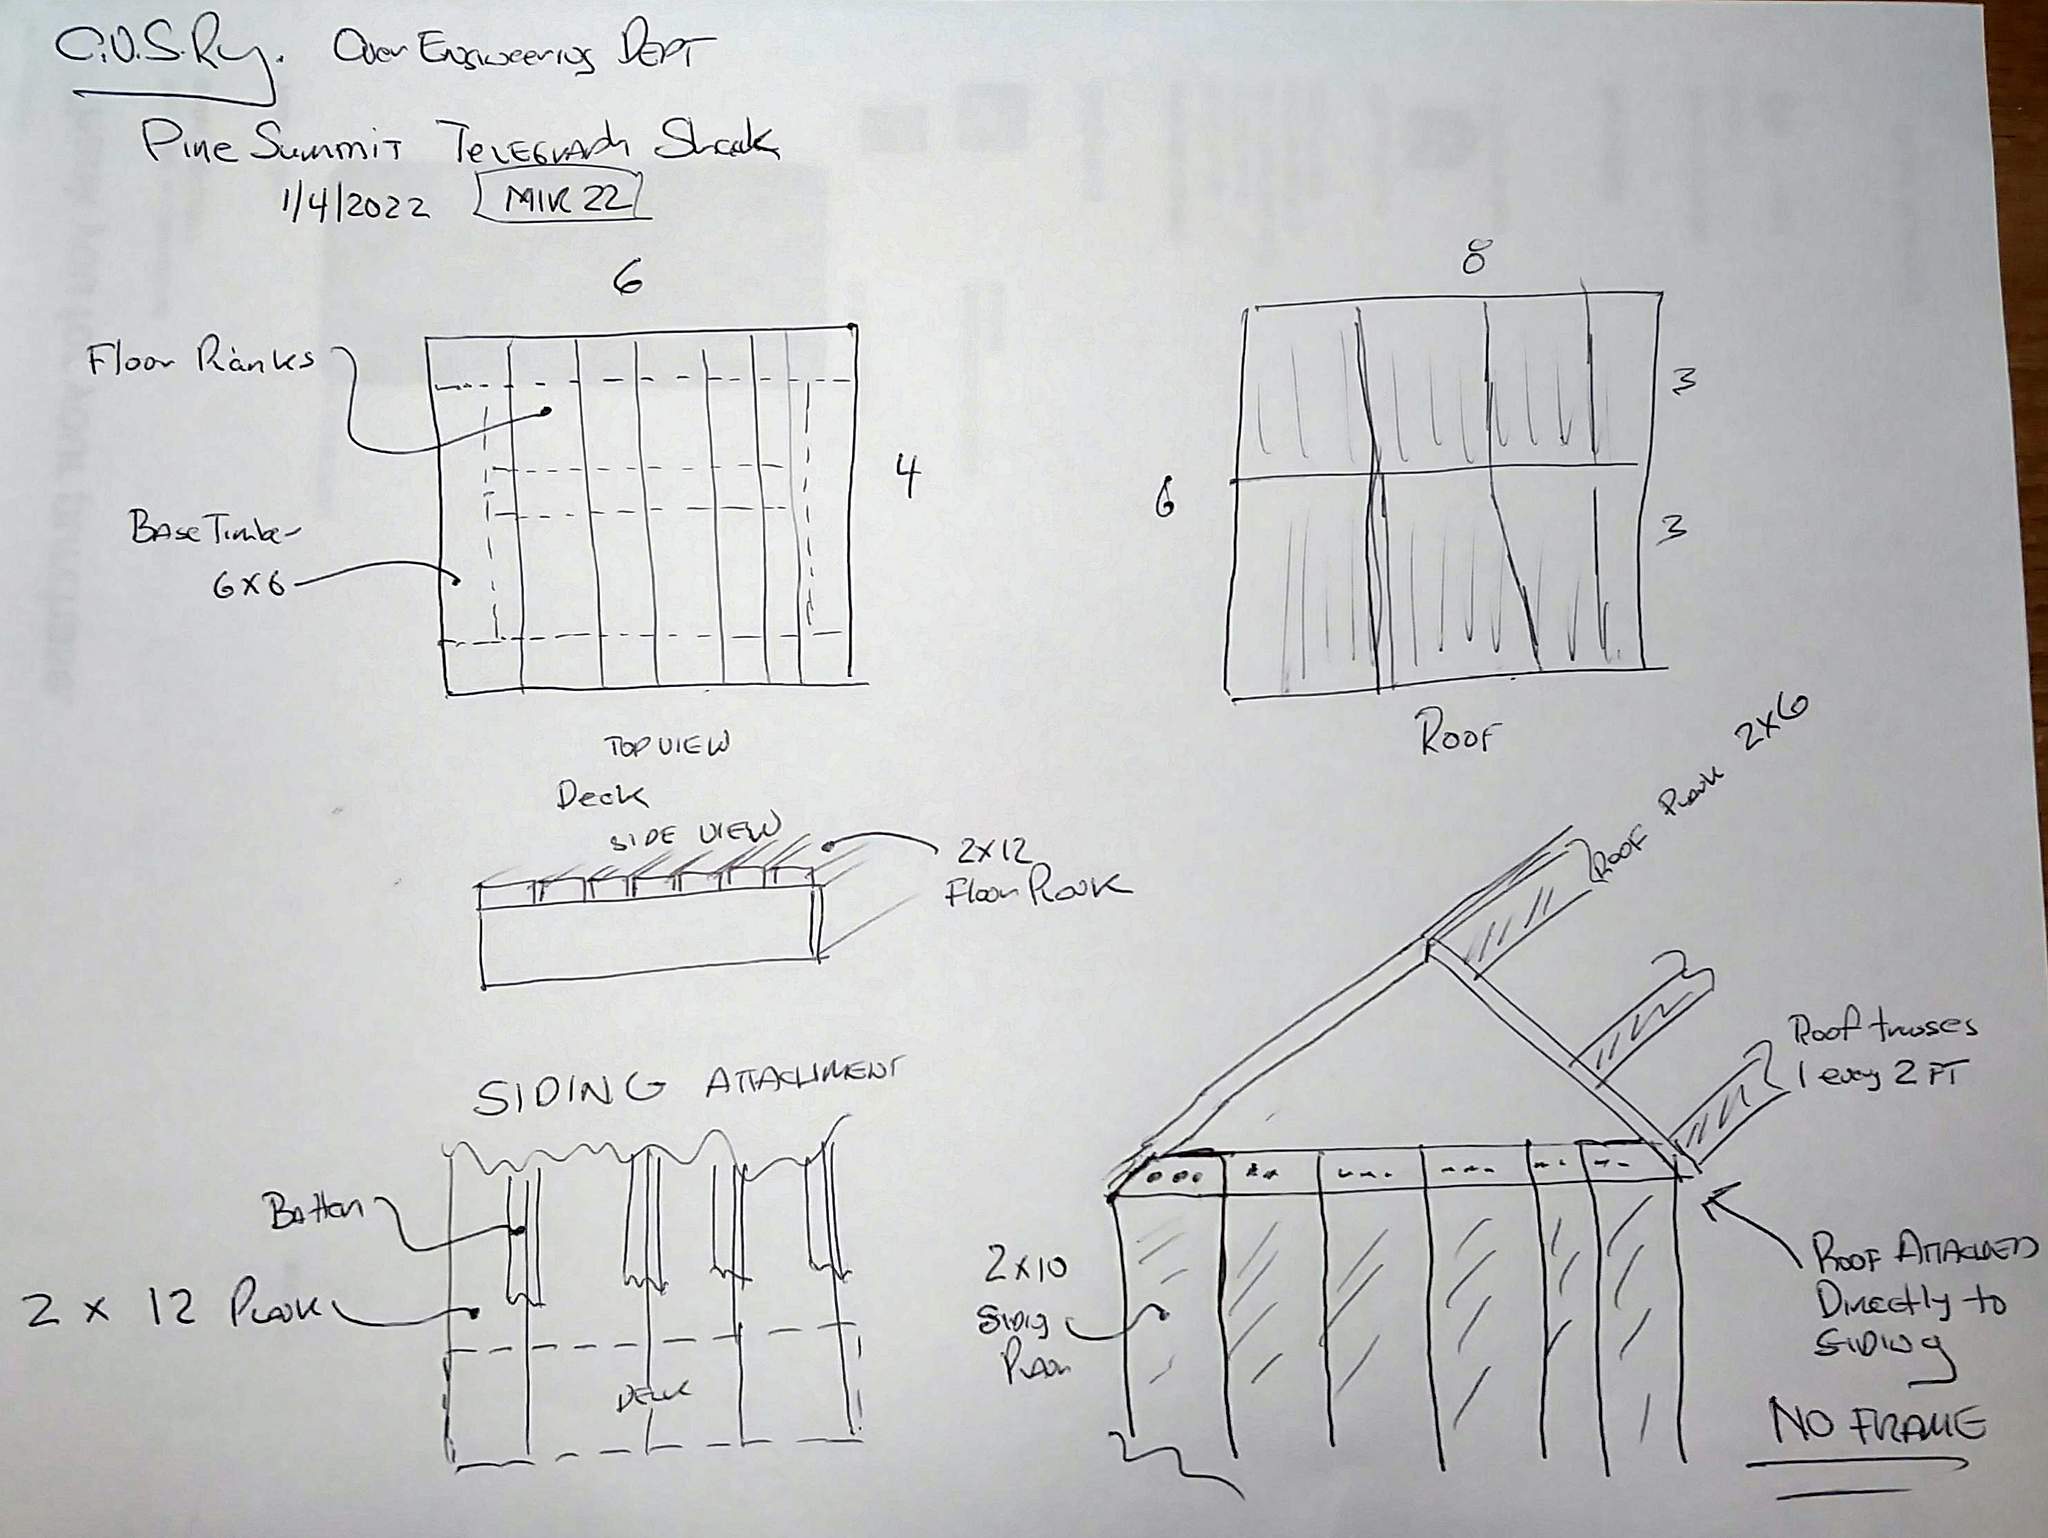
I still need to work out a few more details on the roof trusses, but I’m guessing they were pretty light and probably less than 6 of them.

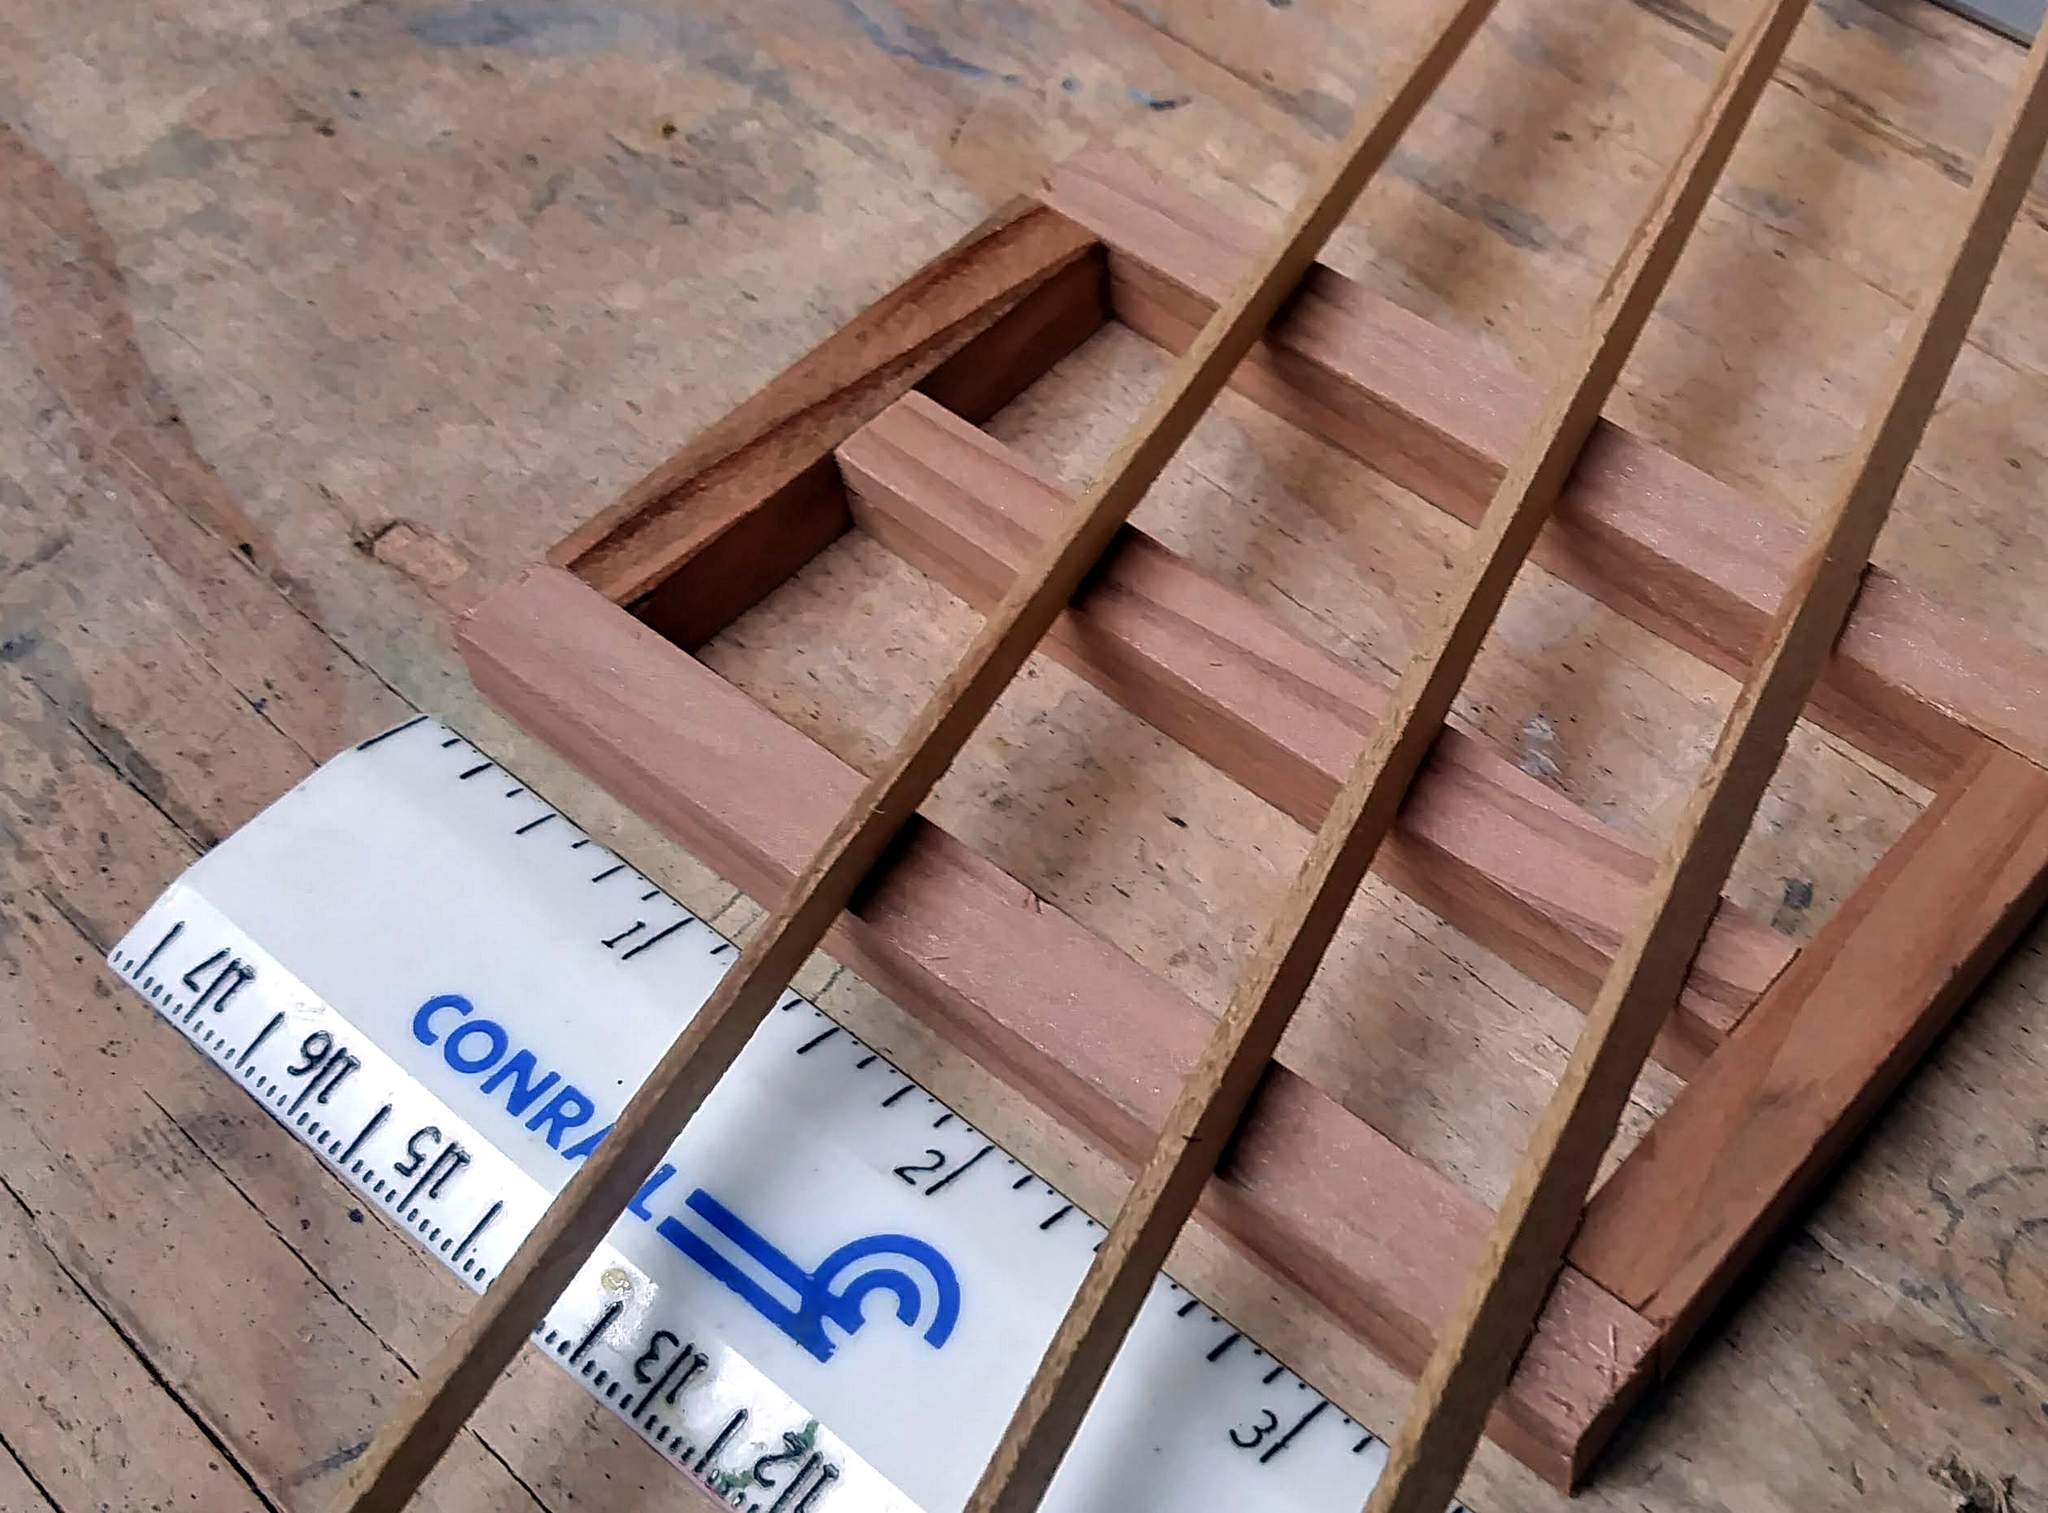
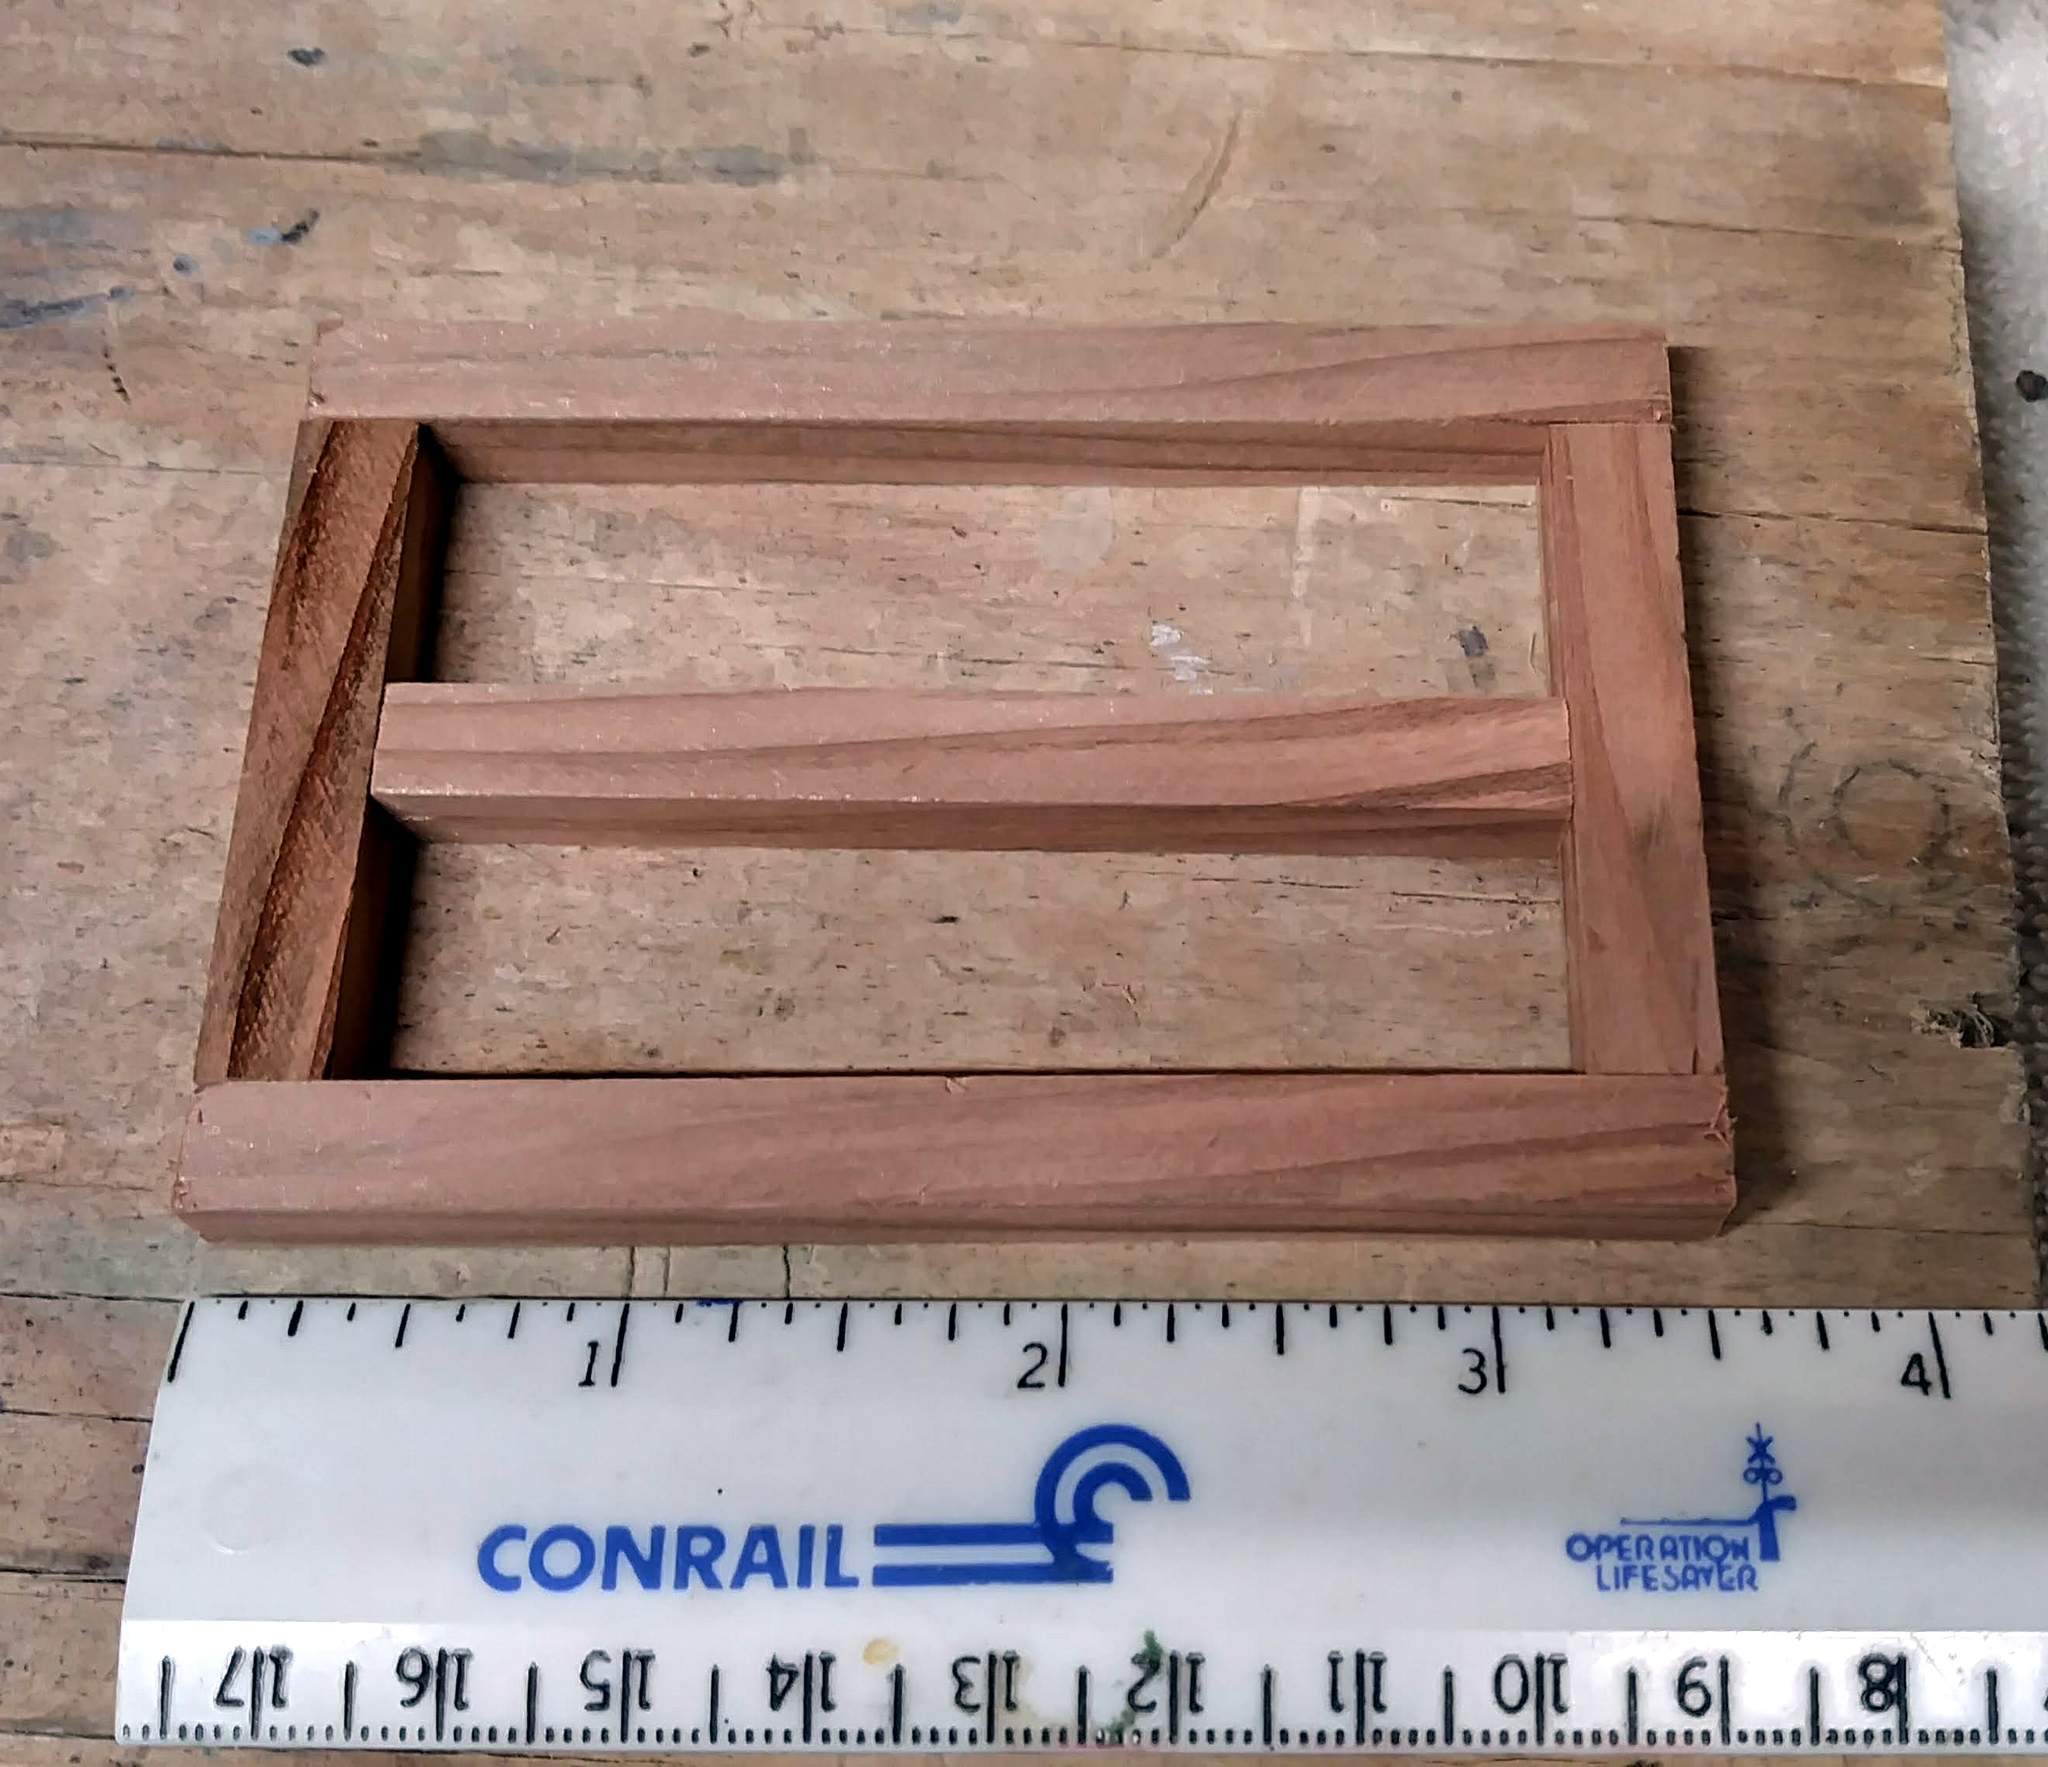
I had thought of not allowing the door to open and just build the exterior on a block of cedar, but the fun is in the structure, so the door will open, even if just enough to peek at the floor and let some light leak out. I’m not planning any interior detail like the stove or desk & chair. I have a great picture of a recently departed friend acting as a station master in the tiny Chester, CT station that might work inside.

Just did an inventory of the scale lumber I purchased from Stan a few years ago. I have all the sizes called out in my sketch except the 2x6 roof planks and some 1x2 for the battens.

I’m going to try and mill up the battens from some of the pre-cut 2x planks I have using the MicroMark saw. This will be my first time using it other than to check it out when purchased. I have brand new blades for it, but not expecting miracles. I’m thinking it will be most helpful in cutting the dimensional lumber to length.

Need to look at what I might rig up to possibly make ripping thin strips a little easier, kind of like that Rocklear jig for cutting strips on the left side of the blade.

Hopefully all of this will make the basic build very easy and allow me to concentrate on the details. Working door hinges and latch are something I’m shooting for, but have no idea yet how to do it. With some luck I’ll have some brass stock that can be used.

1 Like

A post was merged into an existing topic: Drawing trade

Jon,
That Micro Mark saw will work well for ripping but it likes a real slow feed even on soft woods I found that a push stick works best for me if I use it to sort of drag the end of the material through the cut. Another words, a 1/4 by 1/2 piece about 8-10 inches long held above and forward of the blade using the end to apply down pressure and hold to the fence and sacrafice the end of the push stick through the cut.
Hope that made sence, it’s a lot easier to do than explain.

Yes, made perfect sense. I’m very familiar with using a table saw to cut small pieces. All of my push sticks bear the scars :grin:

I will be sure to make one up for the mini saw.

I’m not sure what tooth blade saw you have but be sure to use the biggest size tooth (60?) for ripping thick stock. It will rip up to 3/4 but it doesn’t like it. 1/4-1/2" is just fine. Use the fine tooth blade for plastic.

John… which one of the micro mark saws do you have… For the small one, I machined a way better rip Fence… Helped a ton…

Thanks Craig. I bought two new blades, a 20 tooth carbide tipped one for heavy work, like ripping and a 100 tooth fine blade for really thin stuff.

I don’t know how you would rip anything thicker than about 3/8 unless there is a blade height adjustment I haven’t found :smirk:

I set up the fence last night using a small square to make sure it was straight. Initially I as planning to rip some 2x12 at 3mm, which in Fn3 is about 2.5", but after giving it some thought, that is way too heavy for battens. I think I want 1x2 or 1x3.

-OR-

I saved a bunch of super thin aluminum strips about 1/8" wide x less than 1/32" thick that come off my panel saw when cutting aluminum sheet. They might be a better stand-in for battens than anything I can cut on the saw. Also, somewhere in my junk collection I have some very thin aluminum flashing that was supposed to be used for corrugated roofing, but I never bought a crimper. That would cut easily with heavy scissors. Still may be a bit too thin to get the shadow line I’m after!

Dave - It’s and older model of the small one. Looks similar to this, but no vacuum outlet; the safety shield is missing (I would have removed it anyway) and the fence is a little lighter than this one…

WARNING: This product can expose you to chemicals, including Diethylhexyl Phthalates which is known to the State of California to cause cancer or birth defects or other reproductive harm.

I think a better warning would be “This saw can remove your fingertips in an instant. Use extreme caution when operating” :grimacing:

In my opinion, the weak points of the fence are it’s height - only about 1/4", it’s length - only extending just beyond the blade, and it’s single point attachment.

I doubt if I can get anything put together for this use, but I’d love to see what you did for future reference.

1 Like

I made up a new rip fence, from 1/2 x 3/4 alum. stock, big difference… Also made a sled type CrossCut, w/ zero clearance. and long tongue, the wood piece on the left, extends the table, and the slot allows to work from the left side of the blade.

Also made a 45 Deg miter sled for R and L cuts.

I limit ripping to 1/4 inch… and slow feed, the really thin blade, heats up and warps, the smaller Proxxon carbide blade, is much better but wider kerf…

Thanks Dave. What is the notch in the fence beyond the blade for?

I’d also be interested in a detail shot of there the fence attaches to the rail. I might be able to fabricate something similar in the shop at work. I might have a chunk of 1/2x1/2 1/8 wall square tubing in my scrap bin at work. Best I have here at home is 2x2 which is a bit large!

If Jon remembers, I told him one of the reasons I sold the saw to him was because I hated the fence set up. I think I ended up clamping a straight edge to the fence to make it stronger, but Dave’s solution looks much better.

I think it’s a perfect saw for styrene just a little underpowered for wood.

That said, I really, really, really used the heck out of it until I upgraded to the Byrnes saw a few years back.

1 Like

Mine is an older version, and the safety blade guard is small and pivots, when the fence is way close to the blade… it interferes with the blade guard, so added the clearance.

The big screw from fence to bracket, allows me to square the fence to the blade, and lock down tight.

I remember :smiley: I think it came with a few other caveats too, but I insisted you take my money.

It’s exactly the same as mine, except the safety was removed before I got it, so I won’t have that issue. Just need to keep my fingers out of the blade.

While others are moving quickly, I am in tortoise mode. I spent some of yesterday playing with the MicroMark saw and looking to see if I had any aluminum laying around that I could make a better fence from. I found a piece of 1/8" wall x 3/4" square tube that looks promising. I’ll take it to work Monday where I have a drill press and a good cut–off saw. Going to try and use the attachment screw from the original, so I need to come up with something small enough that the screw will work. Probably some 1/8" wall angle. I will mechanically fasten it to the fence, but also use some high-tech adhesive to prevent it from pivoting around a single attachment point.

The saw will work fine as-is for the cross cuts I need, so I might begin cutting some of that today, but need to take a break to watch the Bills/Jets game. Go Bills :football:

The reason to set up for good rip cutting is the battens for the siding. They are going to be a real challenge as 1" x 2" in Fn3 is just a sliver of wood. I could use styrene, but I want to leave the wood unpainted and weather it similar to the prototype photo. It would be tough to get a consistent look across both materials without paint. That also rules out those aluminum strips I salvaged at work even though at a real 1/8" x about 1/32" they would be almost ideal.

If decided not to get hung up on battens and start building the structure. While falling asleep last night I realized some errors in my drawings, so that needs working out too.

Always fun!

You think your battens are small, I’ve got even smaller battens at 1/29… I’m figuring I’ll be using precut styrene strips. .030 x .060. Hopefully I’ll have enough or I’ll be blowing my whole budget on strips. Unless I can figure out a way to safety cut them on my table saw ( I used a scrap piece of wood over some 1/8 stock yesterday to hold it all down. Seemed to work okay but not sure how .030 stock will do).

As it turns out, the battens will not be a problem thanks to my scrap bin. First I grabbed some pretty small sticks that I had in lumber storage and ripped them to scale 2" thick. They came out all right, but still a little big to my eye. I did not measure them but the thin side was cut to 2.5mm (2" in Fn3). They are shown sitting on top of the deck frame which is made from 6x6 (7.5mm)…

Then I spied, in a mess on my garage work bench, some redwood veneer. At the beginning of COVID lock down I milled up some old signs to build a coal trestle. Rather than try and remove the paint and gold leaf, I cut as thin a strip as I could off the painted edge. Glad I’m a hoarder because they are still laying around…

This looks like the perfect thickness for the battens - maybe scale 3/4". My luck continued as the stock fence on the MicroMark saw handled this thin material with ease ripping it at 3mm or about 2.5 scale inches wide. I set the fence using scrap of 3mm PVC board and a small square…

And the result…

I used only about a third of the strip, so if I need to mill more it’s no problem.

And while I was at the saw I also cut the 6x6 timber to length for the deck frame and some 2x10 to length for the deck floor. This thing is going to be TINY…

That’s probably it for today.

Jon,
What I have done in the past is make a thicker batten and place them between the boards instead of on top of them. A thicker more weather resistant small piece of wood. Unless you really look hard you can’t tell the difference. Also on heavier base stock like 7/16 house siding I have sawn groves in the wood and set the batten strip down in with glue, again works well and can’t tell the difference.

But, I am glad to see that you are getting that saw up and running :smiley:.

1 Like

Looks like you are getting the job done. I need a good mini hobby saw.