Large Scale Central

Building 1:20.3 Narrow Gauge CP Huntington Single

I drilled and added eighteen 0-80 x 1/2 screws to strengthen and hold the frame together. 5 screws hold one side of the frame on to allow disassembly in the future should it be necessary. My airbrush cleaning pad helped keep the screws, washers and nuts from rolling off the bench. The tweezers helped me manage the small washers and nuts.

(http://largescalecentral.com/FileSharing/user_6229/CP%20Huntington/Bolt1.jpg)

Tommy

Rio Gracie

Tommy Mejia said:

Greg, yes.

The cab shown above is the later version. I’m will be building it with the earlier version Gothic cab from the 1860’s.

(http://largescalecentral.com/FileSharing/user_6229/CP%20Huntington/GC1%20(2).jpg)

Tommy

Rio Gracie

Love the raised reliefs…is it possible to add in the the lambs tongues and chaphered edges on the raised panels of the cab and if not it’s all good as I prefer to model by eye myself…Looking good Tommy !

"is it possible to add in the the lambs tongues and chaphered edges on the raised panels of the cab"

I don’t even know what lambs tongue is except that it is fancy detailing. But I enjoy learning.

As I haven’t built the cab yet I guess anything is possible but that sounds a bit beyond my skill level.

Tommy

Rio Gracie

Tommy Mejia said:

"is it possible to add in the the lambs tongues and chaphered edges on the raised panels of the cab"

I don’t even know what lambs tongue is except that it is fancy detailing. But I enjoy learning.

As I haven’t built the cab yet I guess anything is possible but that sounds a bit beyond my skill level.

Tommy

Rio Gracie

Lambs Tongue

I guess anything is possible

That kind of trim is sold for dolls houses. You can buy a strip precut for the porch and re-purpose it!

Tommy Mejia said:

"is it possible to add in the the lambs tongues and chaphered edges on the raised panels of the cab"

I don’t even know what lambs tongue is except that it is fancy detailing. But I enjoy learning.

As I haven’t built the cab yet I guess anything is possible but that sounds a bit beyond my skill level.

Tommy

Rio Gracie

Tommy,

Yes, I too enjoy learning and it is possible to make lambs tongues and chamfered edges (even though my fat fingers misspelled it originally). When modeling it’s a bit tedious but no matter what skill level: YOU HAVE TO TRY as I was told by the folks on LSC back in the day! In my opinion simple overlooked details as such make a huge statement on the overall look of the model. I DO love history and have made a few models of Americas historic past but not really my cup of tea as I love my Amtrak!

Ultimately you build what is pleasing to YOU and throw the rest outta the window. I met a guy named Bob on LSC many years ago whom once said : The Devil is in the details! He was spot on ! The devil did create the details but remember Johnny did steal that golden fiddle or so Charlie Daniels says so!

Details is what made resin casting so helpful. Make one perfect part and make a mold of it for near perfect copies, shrinkage y’know. …

I took apart the frame and glued rivet detail to the firebox. So here I’m thinking some of these screws I don’t have to take apart again, so I’ll add some red threadlocker to them. Put the frame together and proceeded with the build.

(http://largescalecentral.com/FileSharing/user_6229/CP%20Huntington/Frame3.jpg)

Clamp pieces to the tender cab deck and let dry.

(http://largescalecentral.com/FileSharing/user_6229/CP%20Huntington/Frame4.jpg)

Added the lower vertical frame members.

(http://largescalecentral.com/FileSharing/user_6229/CP%20Huntington/Frame5.jpg)

Things are looking good, so I proceed to fit the deck onto the frame. Seems there are 2 screws in the way.

Remember that great idea of threadlocker? Luckily it had only been an hour or so and I was able to remove the screw without too much trouble. Redrilled 2 holes put in the screws and fit the deck. You can see the oops holes in the frame picture above. This is where she stands now.

(http://largescalecentral.com/FileSharing/user_6229/CP%20Huntington/Frame6.jpg)

Tommy

Rio Gracie

I love that mat! $25 is not cheap, but nice!

Found a store in Anaheim, $20 each, bought a couple, make nice Christmas gifts for those of us with more than 2 thumbs…

$19.27 at Amazon

Glad you like the mat. I’ve been using mine for about 3 years now. It is a soft mat, not meant for cutting on. I have a piece of black acrylic I lay inside to provide a cutting surface. I also place a white sheet of paper over the plastic to help see the parts better and cut down on glare from the overhead light. Besides using it to take apart my airbrushes, I’ve done a lot of very small 1/350 photo etch (PE) parts on it.

(http://largescalecentral.com/FileSharing/user_6229/CP%20Huntington/mat1.jpg)

Tommy

Rio Gracie

Added reinforcement to the rear deck and added rear and front frame extensions. Glued, bolted, clamped and left to dry overnight.

(http://largescalecentral.com/FileSharing/user_6229/CP%20Huntington/Deck1.jpg)

This morning I bolted (4 bolts) the rear deck to the deck supports.

(http://largescalecentral.com/FileSharing/user_6229/CP%20Huntington/Deck2.jpg)

(http://largescalecentral.com/FileSharing/user_6229/CP%20Huntington/Deck3.jpg)

Tommy

Rio Gracie

Today I worked on the front of the locomotive. The Hartland forward deck was modified, a pilot beam was fabricated from wood and the front deck was assembled and glued. The assembled front deck was then bolted to the chassis.

(http://largescalecentral.com/FileSharing/user_6229/CP%20Huntington/Chassis1.jpg)

(http://largescalecentral.com/FileSharing/user_6229/CP%20Huntington/chassis2.jpg)

Tommy

Rio Gracie

It’s all adding up. :slight_smile:

Tommy Mejia said:

Added reinforcement to the rear deck and added rear and front frame extensions. Glued, bolted, clamped and left to dry overnight.

(http://largescalecentral.com/FileSharing/user_6229/CP%20Huntington/Deck1.jpg)

This morning I bolted (4 bolts) the rear deck to the deck supports.

(http://largescalecentral.com/FileSharing/user_6229/CP%20Huntington/Deck2.jpg)

(http://largescalecentral.com/FileSharing/user_6229/CP%20Huntington/Deck3.jpg)

Tommy

Rio Gracie

I have clamp envy (http://www.largescalecentral.com/externals/tinymce/plugins/emoticons/img/smiley-tongue-out.gif)

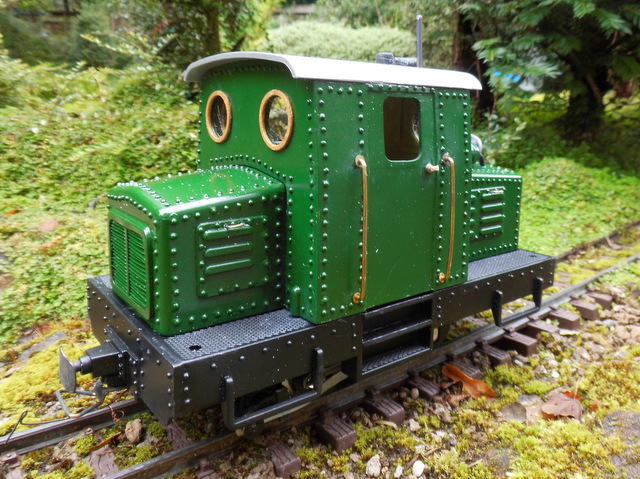
I needed some ideas on adding rivets to this build. The original instructions are to cut 0.5mm thick slices from 1.6mm plastic rod and glue them on. Searching LSC I found this thread “Boomer’s Snow Train Project” where he mentions “The rivets are Atlas HO round head track spikes #2540. Got the idea from Barry Bogs.” So I picked some up, shorten them abit. Applied a paper template, drilled some holes and inserted the spikes. Thanks Boomer and Barry.

(http://largescalecentral.com/FileSharing/user_6229/CP%20Huntington/Rivet1.jpg)

(http://largescalecentral.com/FileSharing/user_6229/CP%20Huntington/Rivet2.jpg)

Tommy

Rio Gracie

There are more comments on this just search rivets, they also make ones that have sticky on the flat side

Would like to take credit for this idea but I got it from a fellow on GSC,(ge_rik) they are 1/2 round flat backed acrylic beads 2mm in size and after gluing to a surface make nice look rivet heads. Bought 1000 for $1.00 free shipping off evilbay. You can also purchase rhinestone/gem picker pencils for a couple of $ which uses wax to stick the bead on for placement. Have been using Mirce model air plane rivets and they are great for placement, but they are flat and don’t show well after paint so I have been placing a drop of super glue on top of each one which is spasmodic at best and is hard to get the drops all the same so I’m going to try theses next time, Bill

133797_be16afef565ef7aecff7bd5bd95e71a9.jpg

Bill, Thanks, Love your rivet detail

I think I perused about 4 or 5 pages of rivets in Search. I saw the posts about the sticky ones and decided to try this spike nail option. There is always next time.

Tommy

Rio Gracie

Back in my early days I used nails but oh the holes I drilled and if the back side wasn’t visible I left them whole if not I cut them off, you wouldn’t believe what the inside of this little tender looks like, “the house of torture”. I also have used archer decal rivets shown on the sand tank just had a hard time getting them to stay in correct place till dry because the decal is a strip and very thin. I’ve had real good luck with the Mirce rivets but as I mentioned they are flat and don’t show up as well but real easy to use and keeping a straight line is very easy but probably wouldn’t be good in a curve or circle. Think next time I will use the Mirce rivets for placement and the 1/2 beads for the height detail. Your Huntington is coming along very nicely, spoke with Phil Jensen about them and he confirmed that they sold quite a few kits.

tendersand tower tank

To me rivets are only good as they are placed. I’m not a steam builder though…did that once …just make sure you have the rivets you need are properly placed before you put it together and find out later that you can’t put the rivets on it now so you have to tear it back apart. I prefer welded seams.