Several years ago I viewed a post of another modeler who rebuilt a New Ray, Union Pacific GP 35 toy locomotive into an actual operating Burlington Northern G scale model.


I had purchased one of these toys a few years earlier with similar intentions but never got to actually start the project due to lack of time, finances and admittedly, a little fear of possible inadequate modeling abilities.
Over the past few months I decided the time had come to to begin work by disassembly, sanding, paint removal, etc. and I didn’t even know what paint scheme to use on it.
I wanted something different than the norm and searched the internet for possible candidates when I happened across BNSF’s blue “Smurf” locomotives.

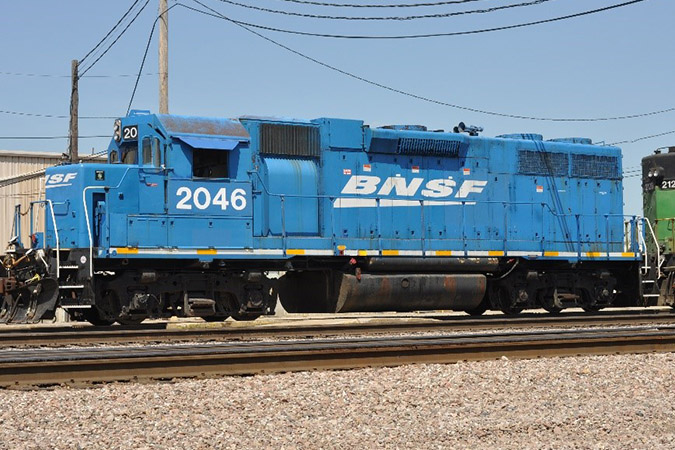
These locomotives were not GP 35’s but rather GP38-2’s so I called BNSF who told me that they actually had one blue repaint that was a GP 35 but they didn’t have photos.
I couldn’t find any myself, so I just took their info. and decided that was good enough for me. This then became the 2004, BNSF blue nose"Smurf" locomotive that I chose to model after. I had not seen any other models of this paint scheme anywhere in G scale.
Now, I am definitely not a professional at this by a long shot but I wanted to see if I could actually pull this off as close as I could get.
After sanding, I found a close color called Cobalt Blue and gave the locomotive body 1 coat of primer and 3 coats of Cobalt Blue with an absolutely beautiful end result.


After finding online designs and prototype photos, I began painting the chassis gloss black.
At the time I was unaware that trying to find motor blocks for this project was nearly impossible but eventually decided to use USA Trains NW 2 blocks. The way the original chassis was made requires most motor blocks to be recessed into the chassis and body area, which limits the turning radius of the trucks to a 10 foot diameter curvature.
To accomplish this required cutting most of the frame out at each end because without this step the locomotive sat entirely too high and looked ridiculous if the motor blocks were mounted directly to the bottom of the original chassis.
I also had to add a weight in the fuel tank which doubled as a mounting bracket for an actual piece of plywood for the motor block mounting holes at each end which was the only way I could find to support and mount the motor blocks due to the cut out and removel of the original chassis mounting.
It did however set the locomotive very close to accurate height. It looks strange but works like a charm.


I then assembled and painted the wood pieces and truck frames gloss black as well and installed the holes for the USA Trains wiring and wired the motor blocks together.
I then drilled out the headlight and classification light holes, added an L.E.D. circuit and L.E.D.'s at each end and in the cab, as well as number boards, ditch lights and a working strobe light.


After cleaning up the wiring mess I made, I began working on the interior of the cab by adding an engineer and painting the cab interior. I also added windows.

I then began work on the rear details but one problem I ran into is finding 1/32nd scale parts, so unfortunately, I had to use many 1/29th scale parts which didn’t totally match correctly.

I then began modification of handrails which was the hardest job I’ve ever done and I still had to use some USA Trains handrails. I just don’t have the experience to build handrails myself, so I made due.


I was now a month and a half into the project and I finally did a test fit of the body and chassis and it fit perfectly. Yea, that’ll never happen again!
Anyway, I moved on to mounting the Kadee couplers, which I used a larger coupler because all of our cars have Aristocraft couplers on them.
This project was very difficult because the toy never had appropriate coupler mounting areas, so I had to invent and build a larger area and space the couplers downward to line up properly. I also had to cut out the front and rear center frame to accommodate the coupler box and snowplow which was added next with the front brake hose and electrical cables.


I then put the horns, bell, antenna and windshield wipers on but didn’t remove the original molded horns because I was afraid I’d really mess up the cab trying to do that.
The good part is that the molded horns are in the perfect location to be covered with an air conditioner unit, as some of these locomotives had. I just need to find someone who can make the needed size for it.


Adding graphics from G Scale Graphics was fairly simple with the exception of some side details that they had to be applied over. That part didn’t come out as well as I had hoped but the white and yellow safety tape along the side came out flawlessly. It’s kinda hard to see in the photos but it’s really visible when actually viewing it first hand.
Cab shades came from a USA Trains GP 9 and mirrors from a USA Trains SD 70.
Cab shades are a bit large but don’t look terrible at least.


I added safety chains and a few extras and even though the locomotive isn’t exactly to scale as the Burlington Northern one was, I think it came out rather well considering.
I still need to add front and rear grab irons for the nose and rear hood but I’m just a little to leery of messing up what I currently have done but I’m sure eventually I’ll take on that project as well, maybe?


It’s not exact to the detail but it looks really nice, runs beautifully, has amazing power and has a lot of operating lighting. I think overall it’s turned out kinda nice for our program.
KM
ISKOT2026


