Large Scale Central

BN GP 30 Build

Here’s some more details to enjoy.
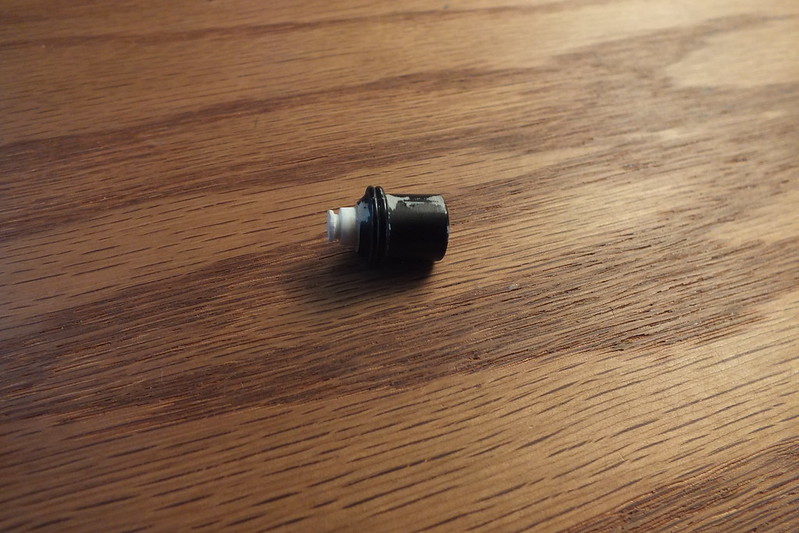
The original brake cylinder http://farm9.staticflickr.com/8396/8697863274_2fcf2af203_c.jpg
I chucked it up in my dremel, and turned down the piston a bit to represent a released piston.
http://farm9.staticflickr.com/8417/8697863152_0ab26ca26b_c.jpg
A little more work and its looking better
http://farm9.staticflickr.com/8269/8697862952_c82d78ee7b_c.jpg

Added a brake line. http://farm9.staticflickr.com/8394/8697862588_2314facdea_c.jpg
The sideframes are going to get new brake shoes as well, along with some other details.

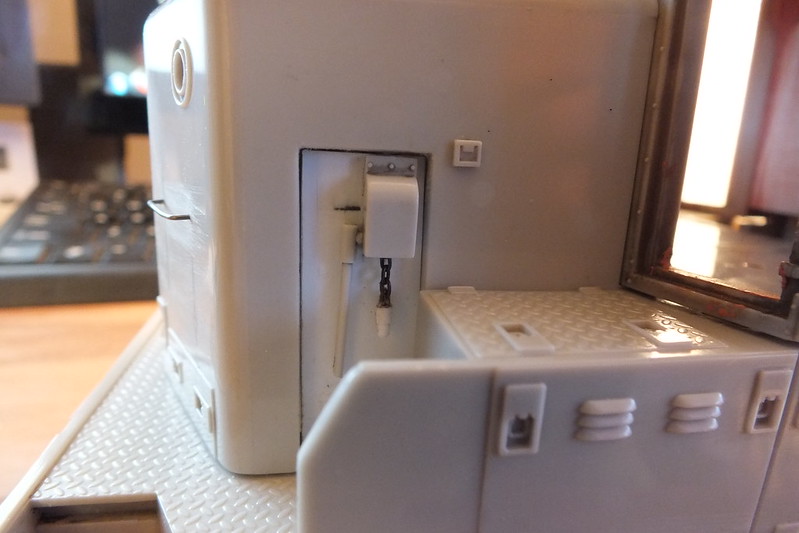
And speaking of brakes I cut out the old molded in handbrake chain and replaced it with and actual chain. While I was cutting it out I moved the whole handbrake assemble back into the recess so the handbrake would be flush with the side of the locomotive instead of sticking out as USAT makes it. I made a new weight on the end of the chain with a .080" square piece of styrene and turned it down.

Replaced the grabs with new music wire (.026")

Craig

Whoa. Very nice work.

I haven’t forgotten about this project…

Quiz time, what’s so important about these three pictures? They all say the same thing…

Craig

Oh! Ooo Ooo, I know…

Dave Marconi said:

Oh! Ooo Ooo, I know…

:wink:

This is similar to what the control stand should look like. A bit more modern and slightly different set up from what I’m modeling. From a SD40-2. There’s a major difference between this and the one I’m modeling.
http://fbcdn-sphotos-h-a.akamaihd.net/hphotos-ak-prn1/36626_10200371643153748_577257835_n.jpg

Very close, it looks like the new SD-40-E’s that Juniata is building for use as helpers on Horseshoe Curve.

And, that control stand is scary… that’s how the whole runaway happened to CSXT 8888, which lead to the movie Unstoppable. Thank god for the AAR Standard that we use now.

Wow, I knew it had been a while since I worked on this project but I didn’t realize I started before my oldest was born… Crap. I really need to finish this project. Good thing I worked on part of it today… Pictures later.

Edit: Here is proof I actually did something… I primed a few parts. (https://www.largescalecentral.com/externals/tinymce/plugins/emoticons/img/smiley-wink.gif)

Primed and preshaded…

Then I got a little carried away having fun with my airbrush and trying to practice drawing lines…

I realized why I stopped working on this… I need to order some HO scale NBW sets to finish up the grab iron relocation project. I also hastily tried to plumb the air tanks, but realized afterwords that the airtank lines are wrong. That’s why I need to print out pictures to follow.

On the list to do:

  1. CAD up new fan housings like I wanted to do when I started

  2. Order NBW details to finish grab irons

  3. CAD up new steps that are actually scale thickness

  4. CAD up new pilot.

  5. Order Archer decal diamond tread plate, remove over scaled diamond tread.

How the heck did I miss filling in those square holes? Dang it! Edit- Note to self. Those are for the lift rings… Double check location (https://www.largescalecentral.com/externals/tinymce/plugins/emoticons/img/smiley-undecided.gif)

im glad this project lives on!

Looking good Craig. Bring it down when it’s done and let us see it run! It will make some good photos. Don’t forget open house here on August 26th if you can make it.

Paul Burch said:

Looking good Craig. Bring it down when it’s done and let us see it run! It will make some good photos. Don’t forget open house here on August 26th if you can make it.

The eventual plan is to get it done by May 2020 for the Bridgetown RPM, along with the other half done projects on the work bench. I’m planning on using my Protothrottle to run it as well, so it should be quite fun. That said, if I don’t make my deadline, I’m sure it won’t matter. As my wife said to me, why are you in a rush if it took 6 years to get this far…

How do all you retired guys get things done so fast? I’m more productive during the school year with modeling than during the summer!

A few more details added;

Fireman’s blower heater, chair mounting rails (both sides), lower half of chairs (all three), and wiper motor airline on fireman side done.

What’s done?

Water cooler for crew, steps down to the head, framing for head door, fireman’s side emergency brake valve, new floor, back electrical panel, fusee storage box,

If you know what your looking at it is starting to come together…

Looking good Craig. Keep it up.

Craig-

The parts your going to draw in CAD, gonna 3D print them?

I remember seeing this project when I first joined LSC and searched for projects. Glad I get to join along as you finish it up.

Eric,

Some might get etched and others printed. For example, I’m thinking that steps, fans, grills and other “thin” parts would,be best etched. Bigger parts like, fuel tanks, brackets, etc would be scratch built or printed.

Here is the start of one of the steps. It should be fairly easy to copy this design for the other steps.

https://cad.onshape.com/documents/7bc7ebf27b4ee5f6f130d221/w/4f3633de79089d082de7c0dc/e/856c35eacf6736b79371e69d

Back in high school one of my industrial arts teachers and I were in the same model railroad club. We had fun making PCB’s for lighting effects on the club layout. We even got some of the chemistry teachers to make etching solution so we didn’t have to keep buying it at Radio Shack. I just watched a YouTube video not to long ago on making photo etched parts. May have to give it a try again. Been 20+ years, not sure if I can say it’ll be like riding a bike (http://largescalecentral.com/externals/tinymce/plugins/emoticons/img/smiley-laughing.gif)