Large Scale Central

Beating the heat with another RailPro conversion

I needed something to do inside since we are in some really nasty heat & humidity here the last few days.

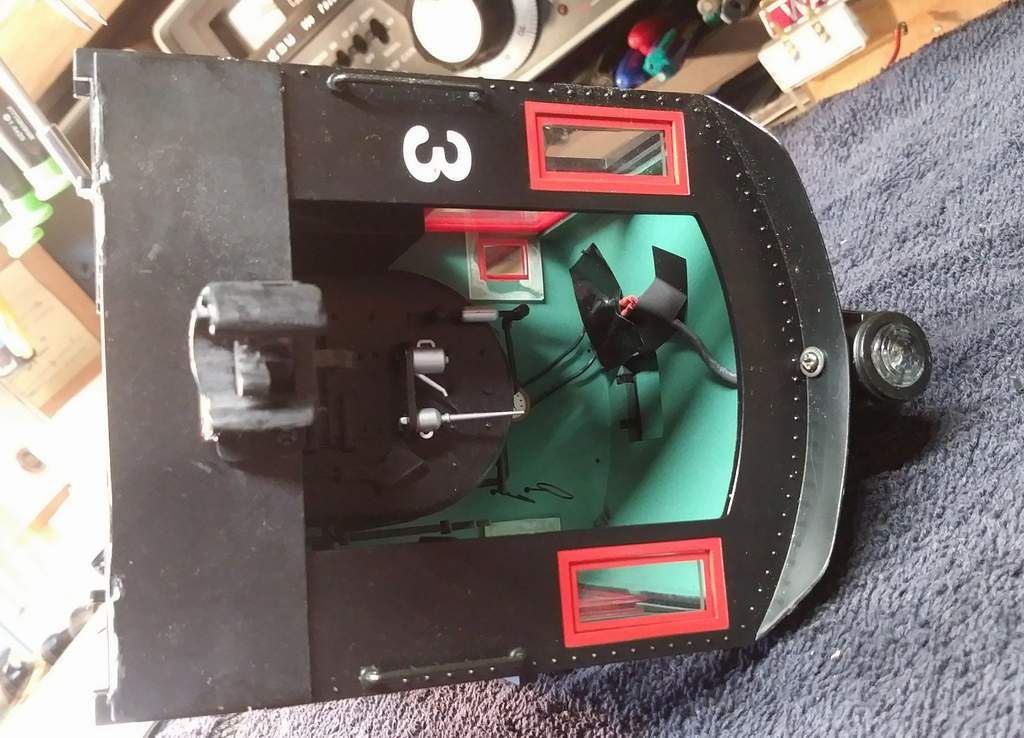
CVSRy Porter #3 has been out of service for several months. Somehow I screwed up the RX linking and my transmitter would no longer talk to it. I wasn’t smart enough to add an external bind switch when I first installed battery power many, many moons ago. This was my first autonomous battery powered loco. I it debuted at ECLSTS the year we gathered after at Dave Marconi’s. I have no idea what year that was.

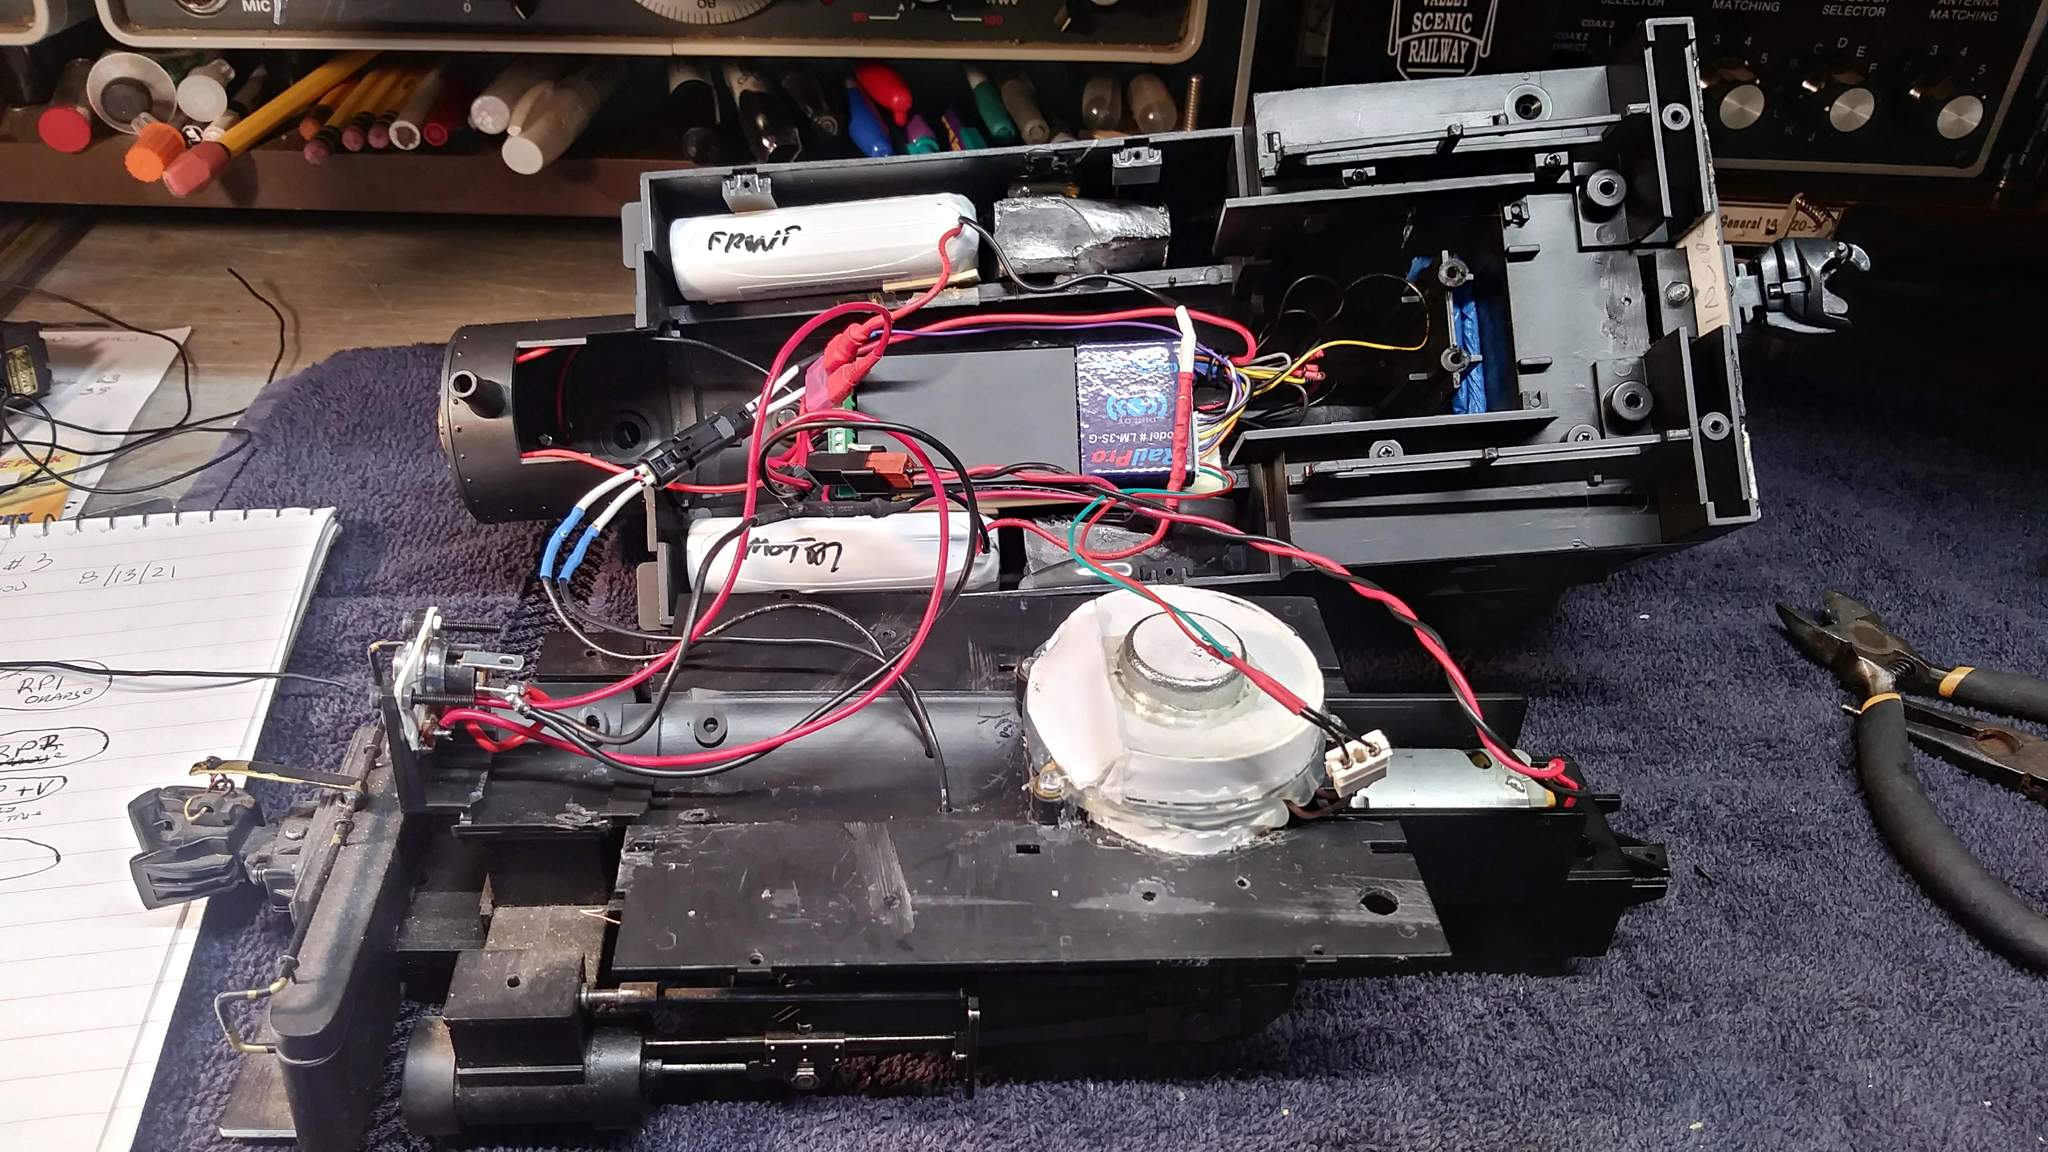
Since I would need to open the loco up entirely to bind the RX, I decided that it was time to install the RailPro board that was purchased for it months ago. Step one, remembering how to open the loco. Fortunately I left myself a little note underneath to alert me that I needed to open the gear case to access a screw that normally protrudes through the cover, but on mine does not. This shot was taken just after the sucessfull opening…

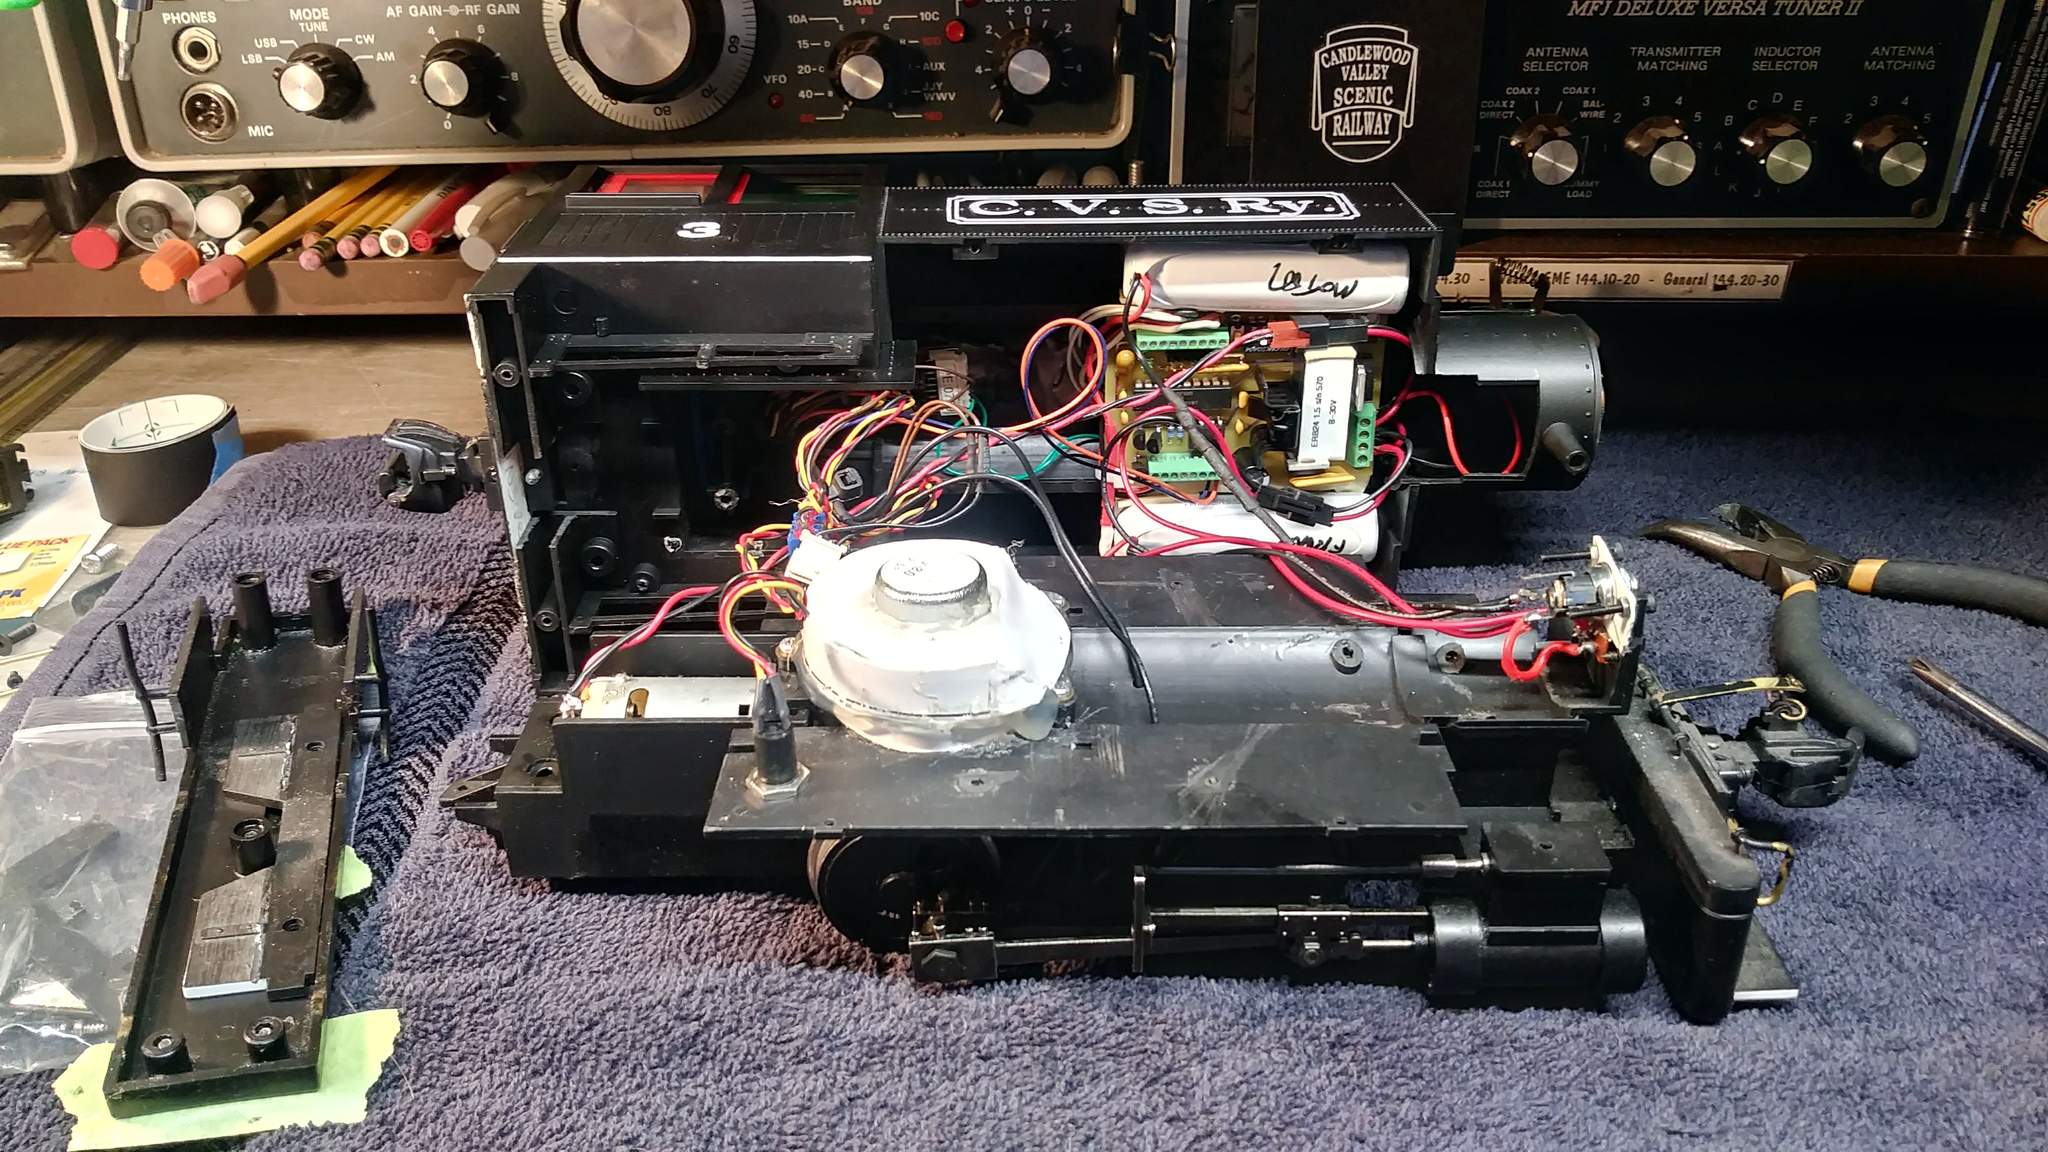
It’s hard to see in that shot, but everything except for the sound board controls are on plugs to allow the shell to be easily separated from the chassis. I made fast work of removing the old system…

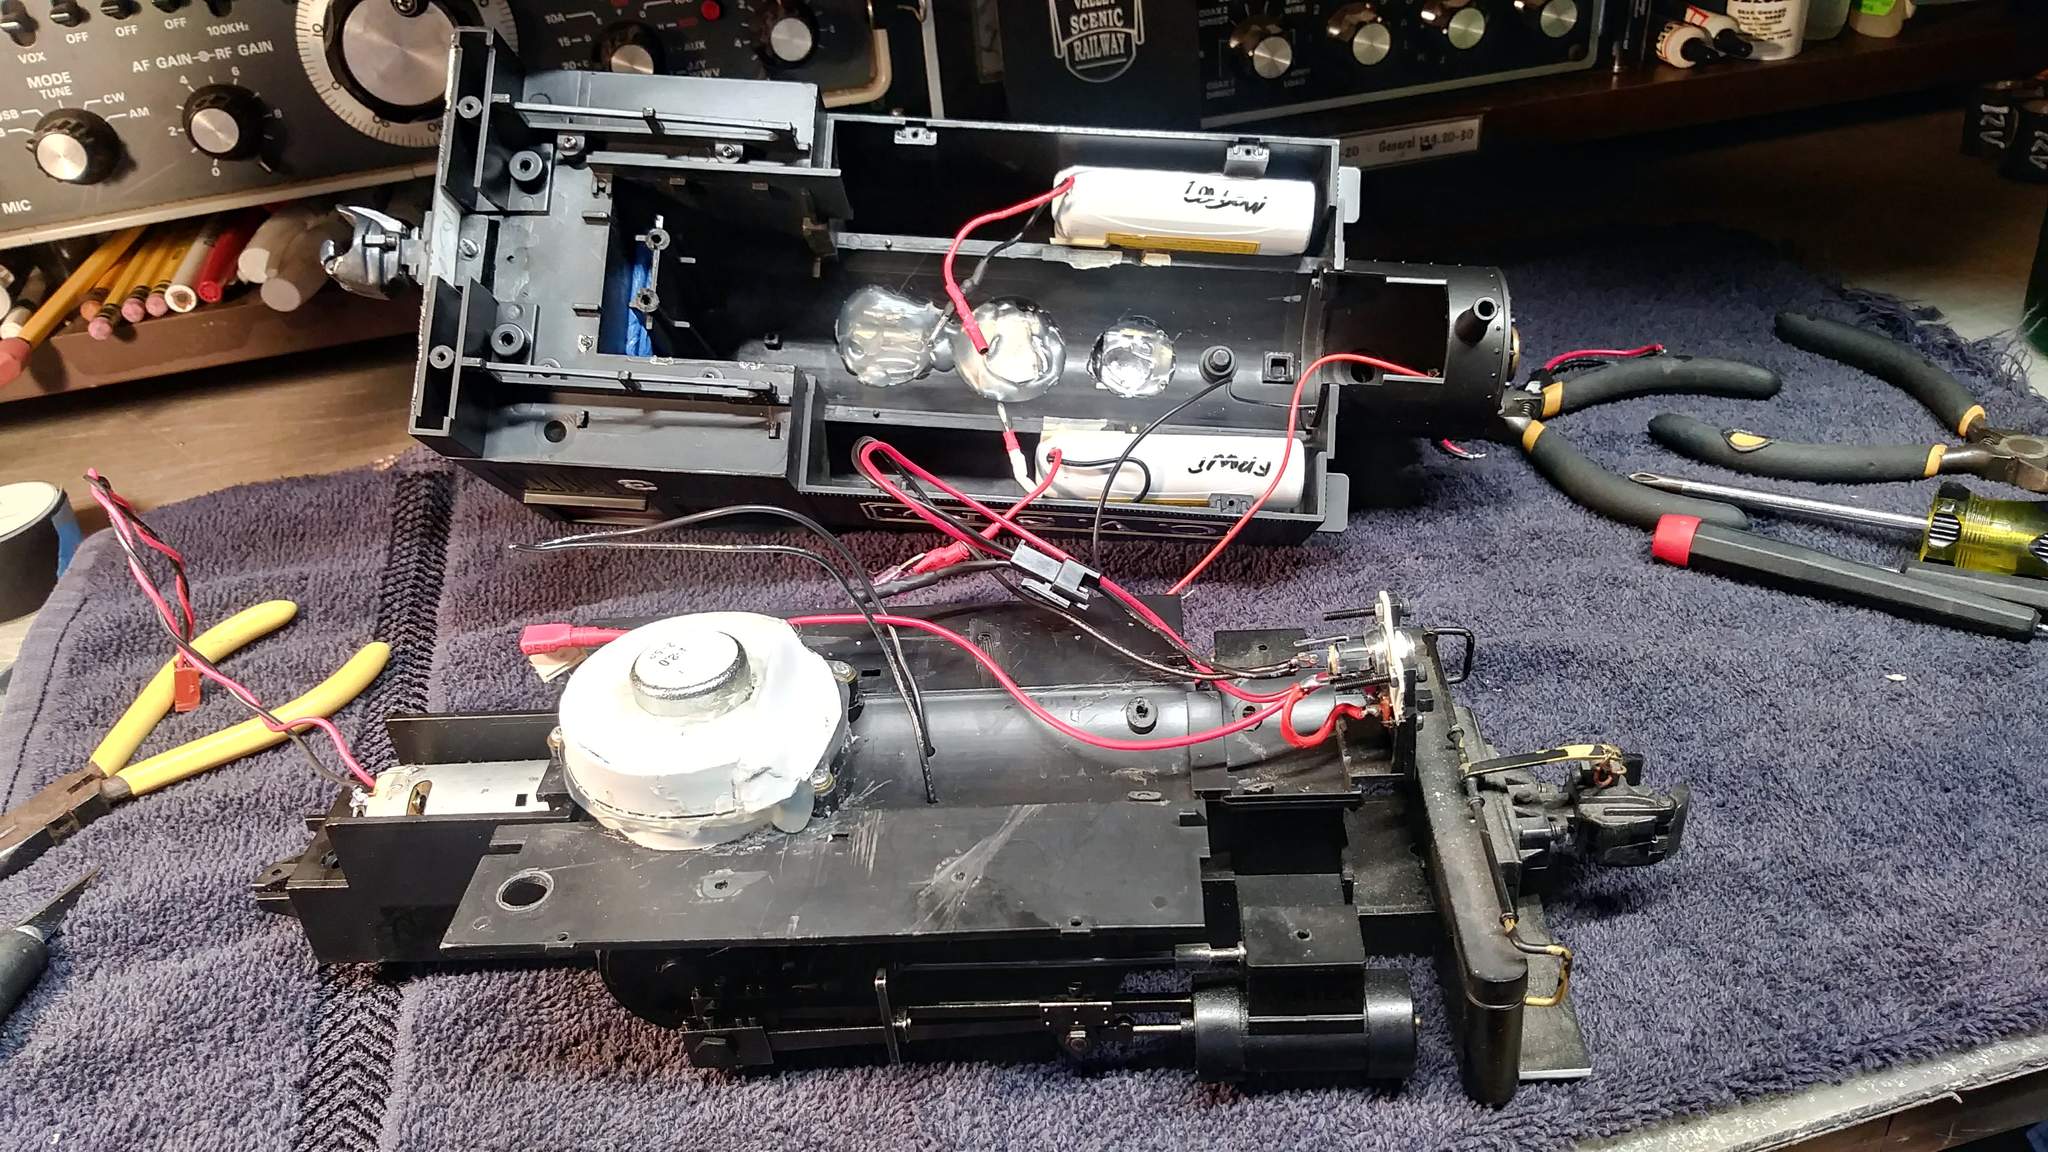
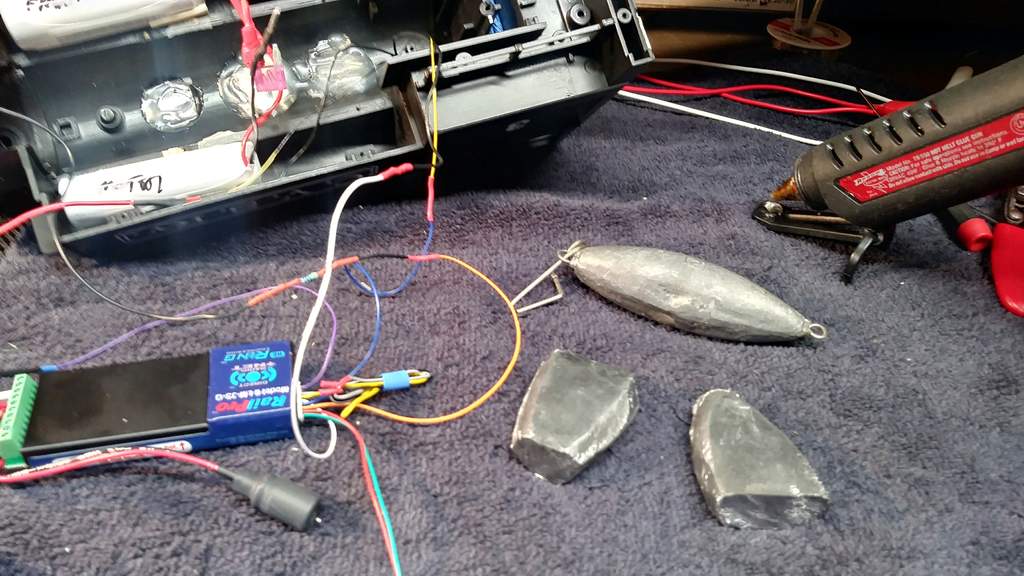
While the loco is apart, I’m adding a rear light above the cab and an interior light for the cab. Before I finalize the RailPro wiring and button things up, I also want to add some lead weight in the tanks behind the batteries. Not sure if I’ll work on that tonight, or leave something to keep me busy tomorrow as the heat wave continues.

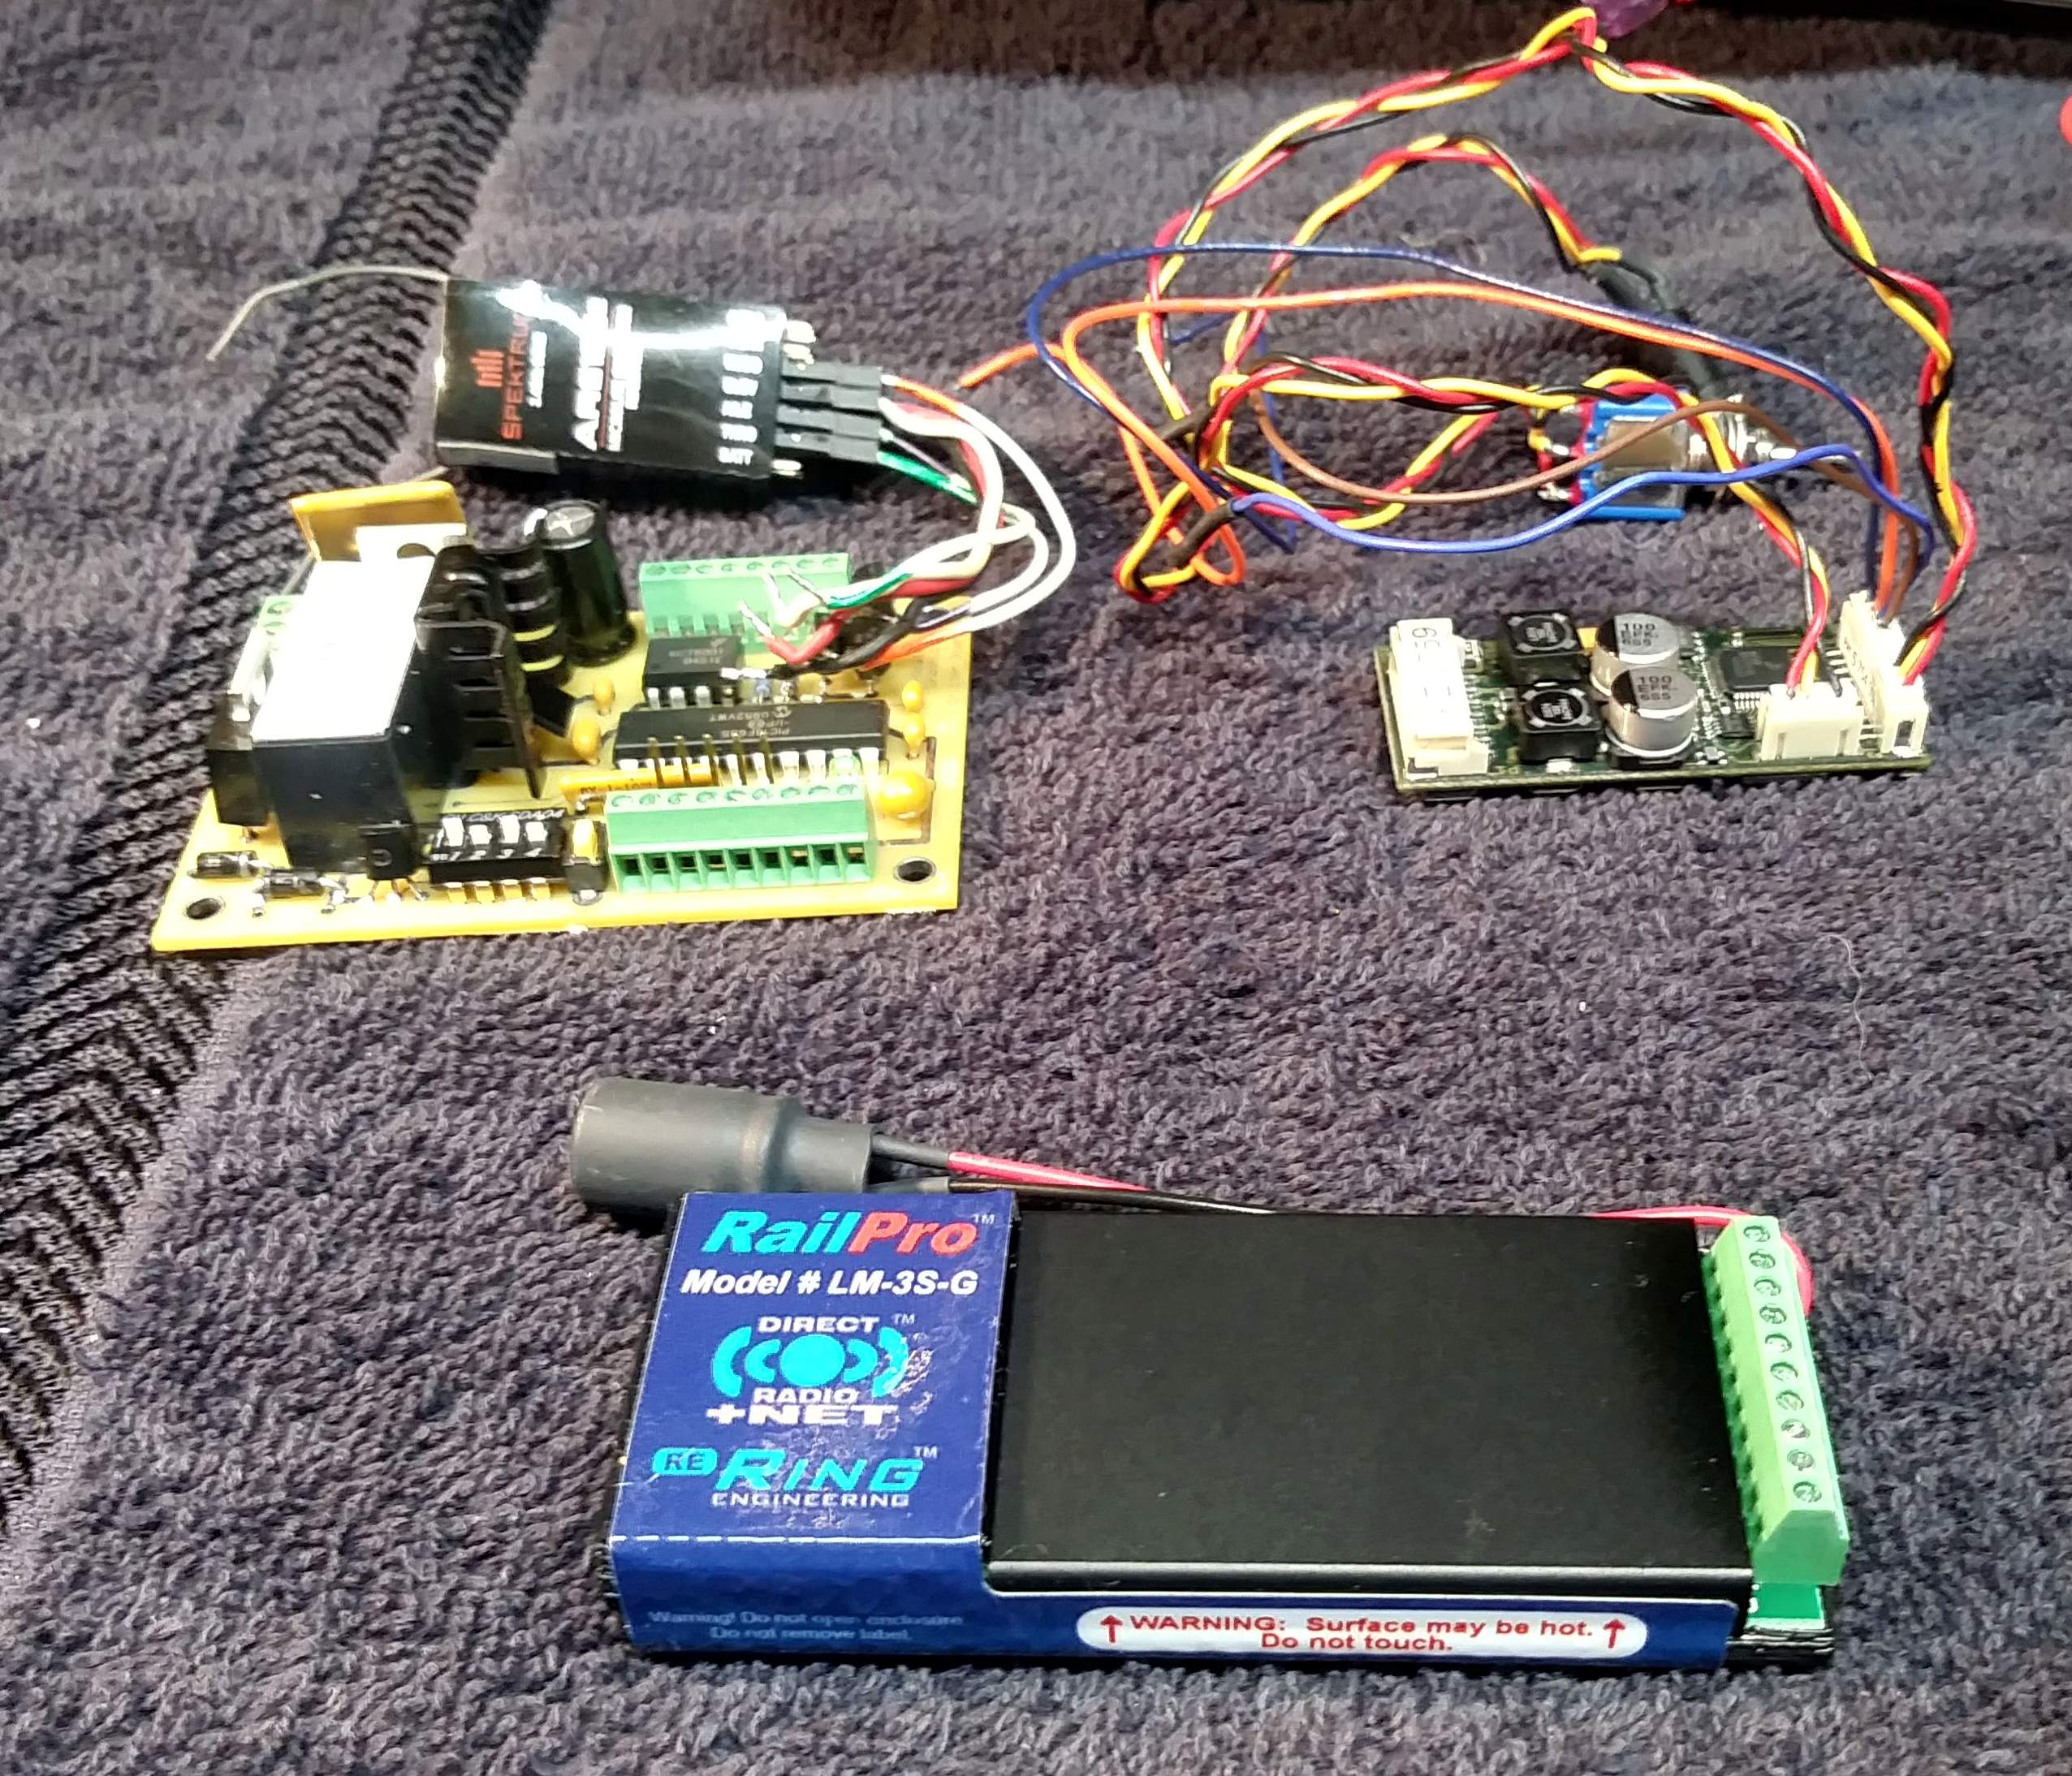
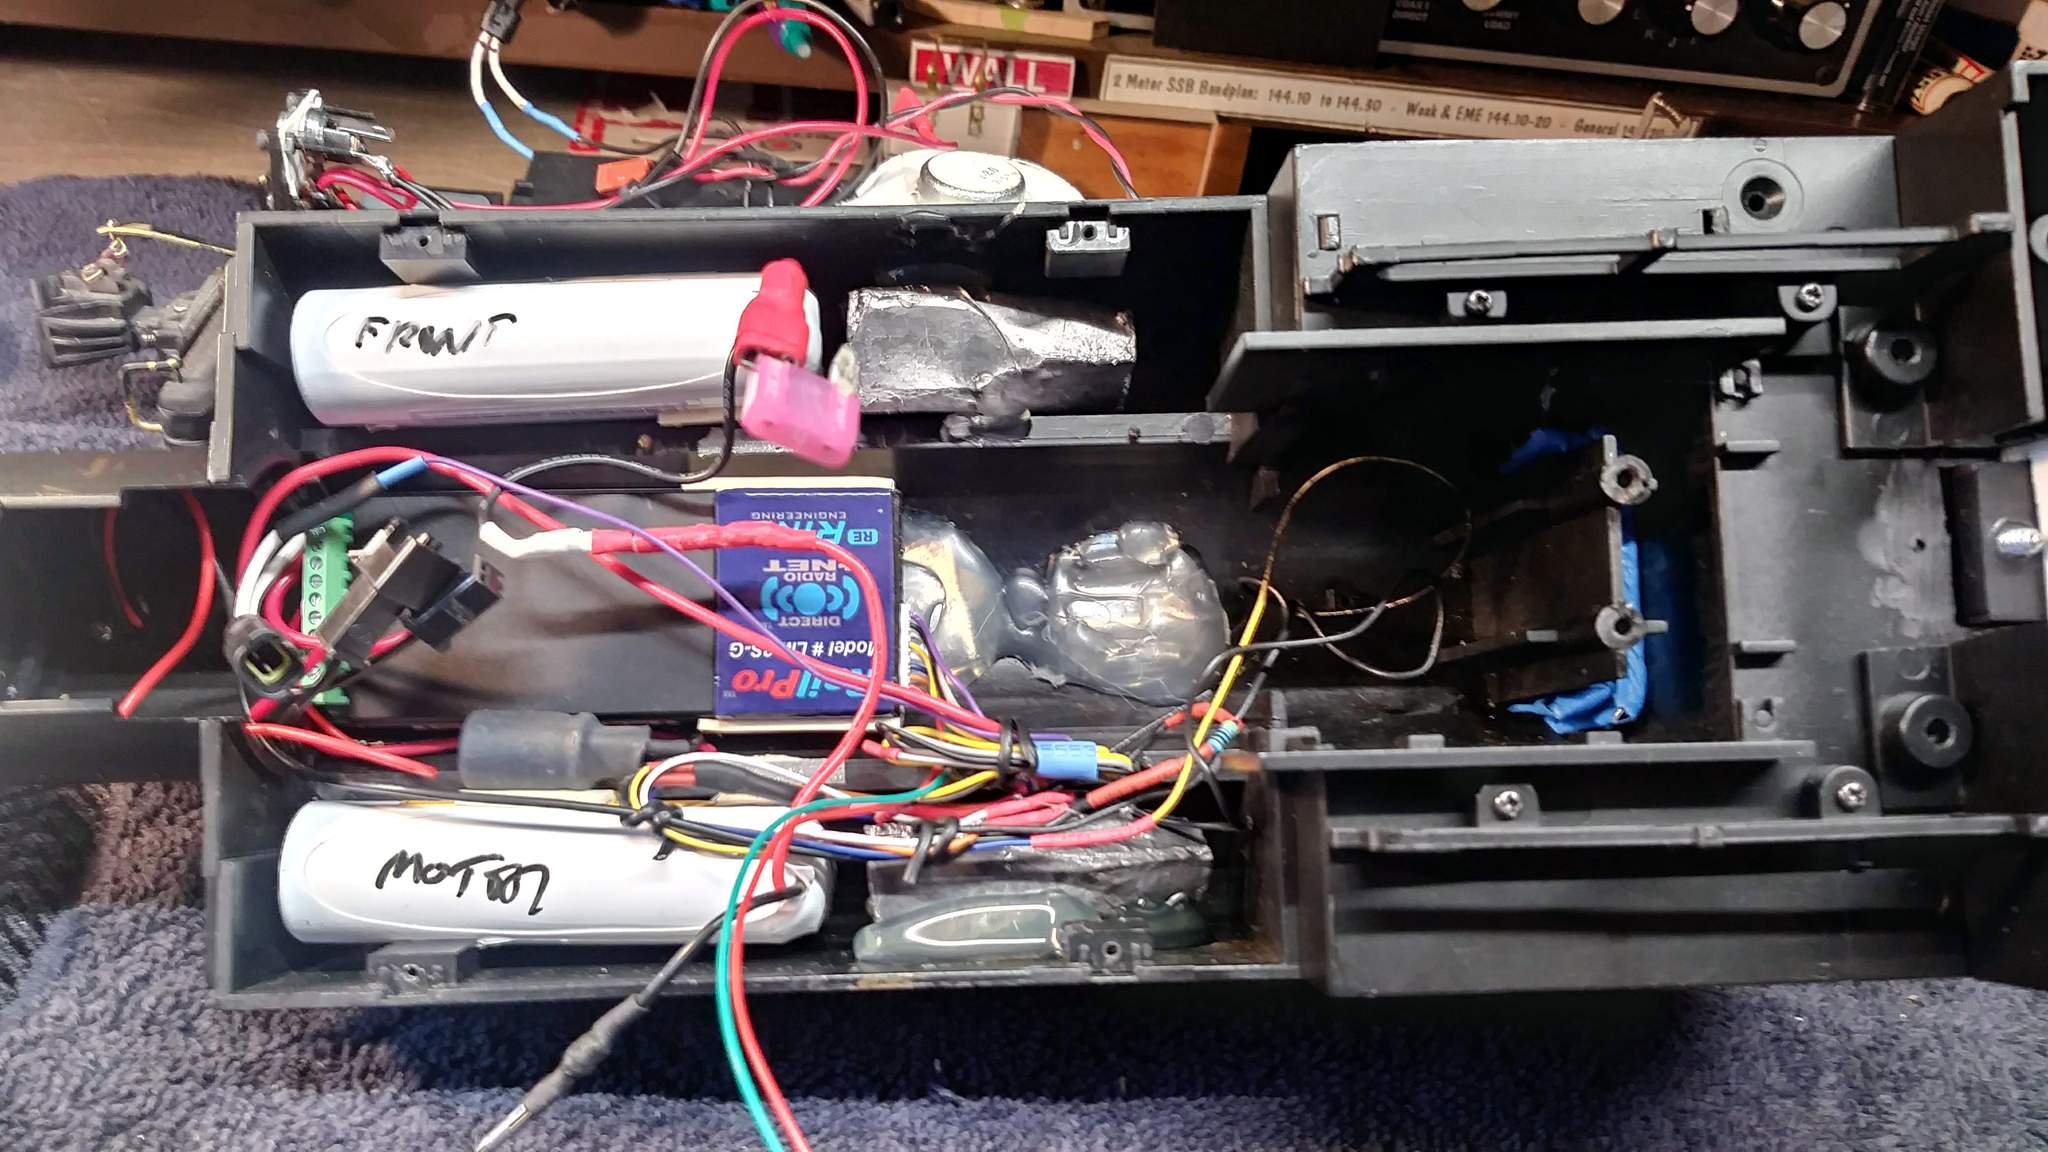
Below is a comparison of electronics. At the top of the picture is everything that was crammed in the boiler: Spektrum Receiver, RailBoss control system and a Phoenix sound card. All of that is replaced by the single RailPro LM-3S-G module. That is a lot less complicated EXCEPT, RailPro only has screw terminals for power and motor leads. Everything else like chuff input and light outputs, needs to be soldered to their wiring harness. This makes the install more complicated than it needs to be.

Railpro modules come pre-programmed with diesel sound and light settings. I spent almost as much time deleting the diesel files to make room for, then uploading steam files as I did wiring the module. My modules are six months old, so the firmware needed to be upgraded too for the chuff input. Deleting and copying files is gawd awful slow, but it only needs to be done once.

It’s a really good idea to do file loads and updates from the simulator on a PC using their USB radio module. This is to not kill batteries and insure the unit doesn’t run out of battery during a fie load or update. The simulator is not up to speed with the latest module version, so updates to the new module firmware (2.50) and external chuff settings need to be done from the hand held.

I want the chuff input, so I’m currently stuck with the Heavy Steam ULT sound which is great for my C-19s, but is a bit heavy for this little brute. Hopefully Ring will update the light steam sound to support triggered chuff so I can change to that in the future.

Still working on adding weight. Will snap some pics tomorrow once things look different!

This morning I dug out some huge lead fishing weights I bought at a flea market years ago just for this purpose. Problem is I misplaced them until just last week so I still have all of them! I spent what was left or the morning beating one with a 10 pound mallet until it would fit in the tank, then cut the ends off and split it in half. I must have guessed center pretty well as each piece weighs 7 ounces on my postal scale (https://www.largescalecentral.com/externals/tinymce/plugins/emoticons/img/smiley-cool.gif)

Just prior to being hot-glued in place shown with a 12 ounce illustrating what was done to it…

This is how I did the rear light. I found an Aristo plow headlight in my junk box and it looked like an easy solution. I spent no time trying to hide the wires. You really need to be a contortionist to get this view when the loco is on the track…

Unfortunately, I ended up breaking the tiny mount while I was closing up the loco. A longer screw fixed the mount, but must have pierced a wire because it quit working. I think I have a nice brass casting somewhere that can replace it someday.

With the weights glued in it was time for final wire management, mounting the LM and testing before buttoning up…

Ooops. Forgot that I needed clearance for the speaker, so the LM needed to be moved forward. In the position shown below, everything buttoned up nicely…

It ran around the indoor for some testing. This thing is pretty powerful, but the side-to-side motion allows it to crab a bit when pulling a lot of weight. When it’s doing that it picks switches. Not really a problem as #3’s primary purpose it to shunt cars in R1 territory on the indoor. Cars that fit through R1’s are generally short and light.

I need to make some changes to the loaded sounds to get a whistle and bell that I like, but is still different from the C-19s. I modified this unit years ago to use a reed switch and magnets on the chuff drum. This is the first analog switched chuff that I have tried with the new RailPro trigger input. It seems much better at slow speeds and when starting than the optical trigger, but still doesn’t handle deceleration well. It seems Ring’s software pretty much ignores the trigger on deceleration and will chuff one or two times after the loco stops. Better than the voltage based chuff; but still not where it needs to be to compete. I recall someone saying that the sync can be improved with load and deceleration settings. Perhaps that’s true, but for switching I don’t want load (momentum) nor any delays in acceleration or deceleration. I prefer immediate response to throttle input. I can start and stop more prototypically than software can!

I love a story that has these words: misplaced, contortionist, unfortunately, breaking, quit working, oops.

Nice work!

Nice documentation, Jon. Well done. What color wire is used for the chuff trigger? (I’m still in the middle of my conversion, but I’m also in the middle of having the kitchen redone, so not much work is being done by me.)

Bruce Chandler said:

Nice documentation, Jon. Well done. What color wire is used for the chuff trigger? (I’m still in the middle of my conversion, but I’m also in the middle of having the kitchen redone, so not much work is being done by me.)

The Purple “Input” wire connects to one side if the chuff switch, the other side of the switch to the +5 screw terminal. This is for analog switches only. For Bachman optical chuff, you need to boost the voltage. Don uses a resistor between the chuff output and +5v. Personally I still think the optical is less accurate than the reed switch. I still have my C-19 open with intentions to try a transistor circuit to make the signal a more defined (or hard) on/off.

To take advantage of the cuff trigger, the LM-3S-G must be upgraded to version 2.50 and the HC probably will need a firmware update too. Also, only the new Heavy Steam ULT sound supports the input. You can’t use the PC simulator to upgrade the loco module or enable the trigger input. That must be done on the HC. Once it is working, loco can be controlled and other parameters adjusted using the HC simulator.

Today I’m pulling my hair out trying to get a good loco picture of #3 in the controller. I got it the way I want it in the simulator, but can’t seem to change it on the HC. Walking away for a few hours and perhaps it will fix itself!

JRad, is that your final answer for the location of the LM-3S-G module? You know it likes to breath, right? There’s even a guy on Facebook making a printed mounting bracket with a fan on it. Some think a fan is necessary, especially on hot days, but I don’t. Of course I have diesels with an adequate amount of air around the modules, but you don’t have the luxury. So other than putting the module in a trailing car, I don’t know what else you can do in that small compartment.

Michael Kirrene said:

JRad, is that your final answer for the location of the LM-3S-G module? You know it likes to breath, right? There’s even a guy on Facebook making a printed mounting bracket with a fan on it. Some think a fan is necessary, especially on hot days, but I don’t. Of course I have diesels with an adequate amount of air around the modules, but you don’t have the luxury. So other than putting the module in a trailing car, I don’t know what else you can do in that small compartment.

For now, yes.

I have not had any heat issues and in talking with Tim Ring, heat is only an issue when drawing close to the maximum current from the LM. This little loki draws under a half amp at stall. I could have flipped it over giving it a little space above for heat dissipation. If I get any indication of overheating I will open it up and flip the board.

I removed the fans from my C-19 tenders and even pulling full load up my grades I haven’t seen a heat issue. In my C-19’s the LM is mounted vertically which is also OK in less than full draw situations. I’ve not had any heat issues even running all day on a warm summer op session.

YMMV (https://www.largescalecentral.com/externals/tinymce/plugins/emoticons/img/smiley-tongue-out.gif)

Thanks, Jon.

It seems that NO system is ever as intuitive as they would LIKE you to believe.

Bruce Chandler said:

Thanks, Jon.

It seems that NO system is ever as intuitive as they would LIKE you to believe.

Ring has quietly introduced the chuff trigger feature. It really isn’t documented anywhere yet. Don worked with Tim Ring to get it working. I think you’ll see improvements and more support as more people start using it and give feedback.

One of the features I like most about RailPro is the ease of setting up and breaking consist. I wanted to see how #3 would perform in a multi-loco setting. It did OK as you can see in this short video, but being so light the C-19 kept pushing it sideways! I think it would do much better as the end-of-train helper.

Jon Radder said:

Michael Kirrene said:

JRad, is that your final answer for the location of the LM-3S-G module? You know it likes to breath, right? There’s even a guy on Facebook making a printed mounting bracket with a fan on it. Some think a fan is necessary, especially on hot days, but I don’t. Of course I have diesels with an adequate amount of air around the modules, but you don’t have the luxury. So other than putting the module in a trailing car, I don’t know what else you can do in that small compartment.

For now, yes.

I have not had any heat issues and in talking with Tim Ring, heat is only an issue when drawing close to the maximum current from the LM. This little loki draws under a half amp at stall. I could have flipped it over giving it a little space above for heat dissipation. If I get any indication of overheating I will open it up and flip the board.

I removed the fans from my C-19 tenders and even pulling full load up my grades I haven’t seen a heat issue. In my C-19’s the LM is mounted vertically which is also OK in less than full draw situations. I’ve not had any heat issues even running all day on a warm summer op session.

YMMV (https://www.largescalecentral.com/externals/tinymce/plugins/emoticons/img/smiley-tongue-out.gif)

I’d heard about module heat issues and asked Tim Ring about it. He said the only overheating issues were with their first run boards and they were very few and far between. He said their new Rev 3.00+ boards are extremely capable of handling heat and he hasn’t heard of any problems and the huge vast majority will not need any fans with Rev 3.00+ boards. He said he doesn’t advise enclosing most of the module with a holding bracket.

Been reading the Interesting improvement wish lists from guys on the Rail Pro forum. Good stuff. Mr. Ring will be a busy man if he executes any of those “wants”!

Well when I get mine installed, first time opening Up a locomotive, let alone installing a r/c system, and with the AZ weather I will let y’all know of any heat issues, by November I should be down to what all y’all consider hot!!!

Got a nice note from Don Sweet reminding me that deleting the diesel files isn’t necessary as there is room for both on the module. I will still delete them to maximize room for other sound effects. I’ve been playing around with creating my own sounds with mixed results as I learn the ins-and outs. BTW, you can record your own sounds and load them to the boards, but they are simple play only effects. Prime Mover/Steam sounds need to be in a proprietary format in order to be controlled.

If you listen to the two steam locos go by in the video, the size of the speakers dramatically changes the sound, making a light steam sound no longer a need for me.

I didn’t take any pictures as I was having too much fun to stop and get a camera. I’m thinking I’ll get my BIL to help me put together a professional video of this scenario and what needs to be done on the controller to make it work. Here’s the set-up:

RG C-19 #345 led a train of one 3-bay hopper, 4 2-bay hoppers, 2 wood hoppers and a caboose. GE 45T M-10 lead a train of 3 boxcars with M-11 pushing and trailing a caboose. For the run at Coal Dump Curve, which is 4% or more, M-10’s train coupled to the rear of 345’s train. All three locomotives were set up in MU mode on RailPro which is a simple as pressing one button (Link) then choosing the picture of Loco #1, Loco #2 and Loco #3 then hitting Done. Railpro then puts you in the lead locomotive’s control screen. You press MU to be certain each locomotive in the consist is set to the proper direction to move together, then return to the main screen to control the consist. The locomotives all talk to each other and after a few feet of negotiations they run together very smoothly.

With all this power, the long train had no issues at all with my long curving grade. Once reaching Pine Summit, the train was split in two. Breaking up the train was 1 button: Unlink. While M-10’s train idled on the main, #345 took it’s train into Deep Cut, then backed through the East leg of the wye to the North tail. Moving forward again the train stopped on the West leg to await M-10’s train.

I switch the control screen to M-10 (two picture presses) then press the Link button to add M-11 as a pusher and check the direction with the MU button. M-10’s train then proceeds into Deep Cut, then backs to the North tail. Moving forward again M-10 couples with the rear of 345’s train. I press Un-link to break up the M-10/M-11 consist then press Link to set up 345/M-10/M-11 as a consist. It takes 5 button pushes, three of them pictures, to set up the consist then two more presses to check it. The re-united train proceeded down-grade back to the main and around the balloon loop indoors.

M-10 and M-11 running alone buck pretty bad down-grade with a load. However, when running in a consist, the constant communication and load adjustment between units reduces that from enough to slap couplers to just barely noticeable.

Once turned around I once again broke into two trains for parking on indoor track where it waits another chance to do this again. If I still have a railroad after Henri passes directly overhead late Sunday into Monday then I’ll run this again and take a few stills.