Your door is a bit too small. Doors are 6’ 8" tall in the opening. That is a US standard. As for width, generally exterior doors are 36" or larger and the minimum interior door is 30". Granted there are narrower doors to be found. 24" is generally used for closet doors such as a utility closet or linen closet. I would say you can justify a 30" door on the shanty but not any narrower. 6’ 8" is a must for height. Also in designing windows…especially on older homes, the top of the window should be the same height as the top of doors. Again there are specialty exceptions but this is a general rule for a standard window.
Warren Mumpower said:Warren has spoken, so let it be written,
Your door is a bit too small. Doors are 6' 8" tall in the opening. That is a US standard. As for width, generally exterior doors are 36" or larger and the minimum interior door is 30". Granted there are narrower doors to be found. 24" is generally used for closet doors such as a utility closet or linen closet. I would say you can justify a 30" door on the shanty but not any narrower. 6' 8" is a must for height. Also in designing windows..especially on older homes, the top of the window should be the same height as the top of doors. Again there are specialty exceptions but this is a general rule for a standard window.

Steve Featherkile said:Warren Mumpower said:Warren has spoken, so let it be written,
Your door is a bit too small. Doors are 6' 8" tall in the opening. That is a US standard. As for width, generally exterior doors are 36" or larger and the minimum interior door is 30". Granted there are narrower doors to be found. 24" is generally used for closet doors such as a utility closet or linen closet. I would say you can justify a 30" door on the shanty but not any narrower. 6' 8" is a must for height. Also in designing windows..especially on older homes, the top of the window should be the same height as the top of doors. Again there are specialty exceptions but this is a general rule for a standard window.
So he has
I work for a contractor and have done some cad design work for them, so I’m familiar with these rules, but if you refer back to the picture, this little shanty doesn’t follow them.
Notice how low the door knob is. That indicates an odd size door to me/ I agree that 24" is too narrow, but I doesn’t look like 36" to me.
As for windows and doors at the same top height, look at the photo again. The top of the door trim is above the eves. The widow is lower than the door so it remains visible behind the roof line…
Again, I’m not looking to do an exact replica of the prototype, but I like it’s odd dimensions. Gives it character.
Jon
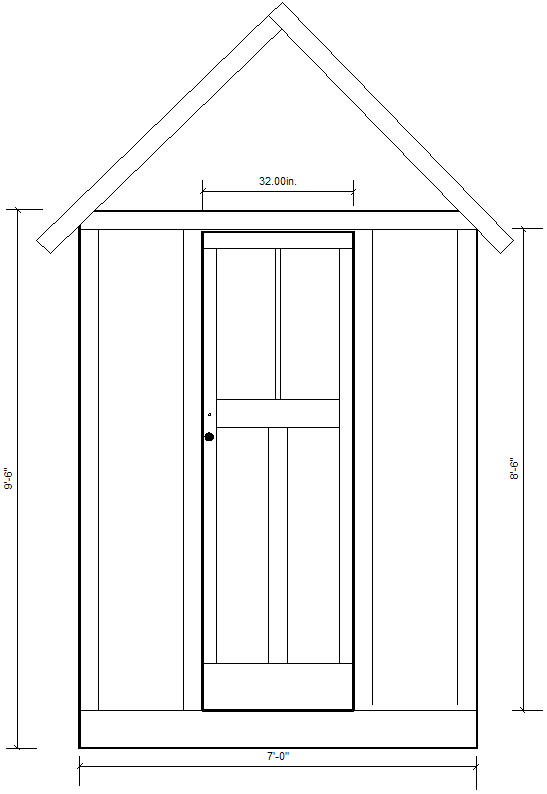
OK - I’ve tossed the graph paper and imported the image into Viso. Then based on the assumption that the trim is 4 inches wide, I stretched the image until the trim on the left (furthest from camera) was at 4 scale inches. I then began measuring other elements and came up with the following… [url=lsc.cvsry.com/ShantyVis.jpg]

[/url][color=blue]Visio Drawing - Right Click Photo and select Open Link in New Window to Enlarge[/color] The siding looks like 6" boards and the door panels 10 inches wide. The entire face of the building scales out to 7 foot wide. Thus the door is 32" wide but 8Ft 6In tall. That’s one tall door :o I think I’m getting close to be able to build a cardboard mock-up…
Jon
The camera is fooling you. Because it is at an angle to the plane of the front of the building, it appears taller than wide, but isn’t. You are correct with the 7’ wide. But…the height to the top of the trim above the door is also 7’. That’s the 6’ 8" plus the 4" trim. That door height should be taken as a standard height door.
And as for the window, note what I also said above:
“Again there are specialty exceptions but this is a general rule for a standard window.” This would be a specialty exception because the eves are too low.
Thanks Warren, I agree.
I printed the drawing and made a paper mock-up, and it does look way too tall.
What was fooling me was the door knob location. I realized this morning that the knob was moved lower because there is no landing at floor level. One has to reach the knob while standing at least 4 inches below the floor level.
This is turning into a great exercise in scaling a photo, something I’ll likely need to do again someday as measured drawings for as lot of what interests me aren’t available.
Revised print to follow.
Jon
If you look closely at the photo, you can see where the door knob used to be on the door. I wondered about what that hole was for, but figured it used to contain a dead bolt.
Go figure.
REV C with everyone’s input. Thanks!

Lots of standard dimensions now will make it easier to build. The only change still needed is to remove the trim boards from the edge of the roof to pattern the front and rear. Jon
Ah, yes! That’s the way it should look. That’s going to be a fine little building. 
One other change–the side stiles on the door run the entire length of the door–the header and footer blocks go between them. I forget if it was here or over on MLS we were having that very discussion just recently.
Later,
K
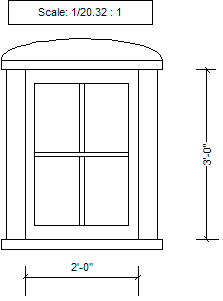
Thanks Kevin. I should have known that as I have panel doors in my house. I’m thinking of using a slightly different window style then on the prototype. I really like the arched top windows on a barn near me. I need to take a ride and photograph it to get it right, but I think this window is close.
The paper mock-up is finished. I printed it before fixing the door and the window frame, but it gives a good feel for what the finished building will look like. [url=lsc.cvsry.com/PaperMockUp1-1024.JPG]
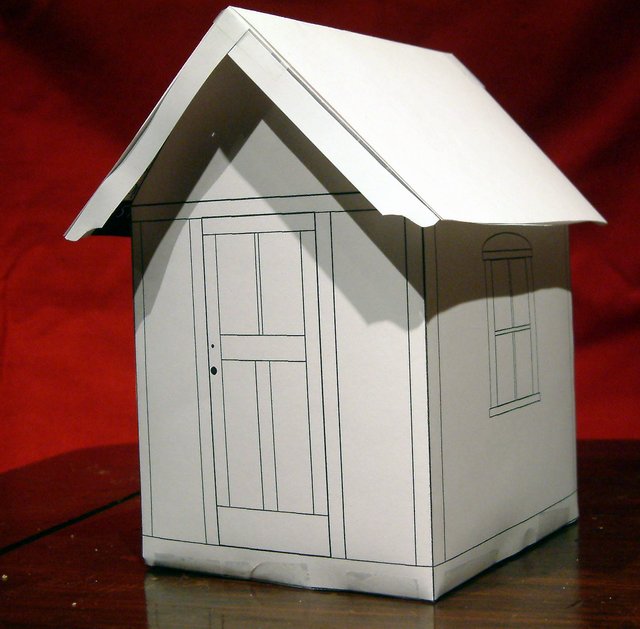
[/url][color=blue]Right Click Photo and select Open Link in New Window to Enlarge[/color] Jon
OK, The acrylic has all been cut and the last glue joint is drying now. The bottom the box (floor) is closed in for stability so I’ve decided not to glue to roof on. I’ll drill some holes and insert pins in the gables to keep the roof in place.
Now I need to think about finishing. None of the windows or the door will open. I plan on leaving the clear acrylic visible as the glazing and build up the frames from styrene strips glued to the acrylic. I’ll probably try the razor saw technique to simulate wood grain on the sides and add styrene battens to give the appearance of board-and-batten siding.
I’m undecided as to how I will treat the roof. My prototype photo shows 3 tab shingles, but I’m sure that’s a late 20th century upgrade. I’m thinking of either corrugated tin, tar paper with battens or wood shakes. The tar paper would be the easiest to build, but probably the poorest performer for outdoors. Opinions welcome.
Jon
Jon, If you make the roof of acrylic it is quite easy to replicate tarpaper right on it. A coat of flat black primer then some granite texture paint oversprayed with a second light coat of flat black to even the colors a bit. If the battens are to be “tarred” they can be applied before painting. Acrylic roofs hold up very well outdoors especially when painted. No problems at all with this roof yet.

I like the self stick stuff Bruce used on his warehouse.
Thanks Richard. The roof is acrylic - I like the idea of just texture and paint and perhaps some battens. Easy and durable.
Warren - I like the material Bruce used too, but on a building this small you wouldn’t get the multiple sheet effect. two sheets would probably cover the whole roof with the only seam at the peak.
I went back and looked at the photo on page one - there are no battens on the siding and I like the look of the prototype. I think I’ll thy and use the razor saw to cut the board seams and then rough up the acrylic. I thought of using a wood veneer planks as siding but that will give me a bit of trouble with depth if my door and window trim is glued to teh acrylic.
This is a fun learning process. I’ll experiment on some scraps to try and come up with my decisions on siding and roofing.
The box is done except for pinning the roof. Now I need to order up some styrene strips. [url=lsc.cvsry.com/Shanty-Clear-1024.jpg]
![]()
[/url][color=blue]FF: Click to Enlarge - IE: Right Click Photo and select Open Link in New Window to Enlarge[/color]