Garden Railways magazine publishes some scale drawings every month now; and if you’re a subscriber, you can access the library of plans and download any that have ever been published.
These are a great source for ideas and if you build one you’ll probably end up with something unique on your railroad. But, many people are reluctant to start such a project; if you have never built anything that wasn’t a kit it can be quite intimidating as there are no instructions at all.
How does one even get started? Let’s take a look at an issue and see how one can take a drawing and turn it into a structure you will be proud of.
The April 2012 issue of Garden Railways had drawings for a bucket coaling station. It turns out that these were based on an article from a June 1955 Model Railroader. In turn, this was based on an actual structure.

(Picture from June 1955 Model Railroader magazine)
I had built a similar model in the 1970’s when I was into HO scale. It was from a kit by Fine Scale Miniatures.

They had added a sanding shed, but I was really attracted to the bucket coaling station. At that time, I had not known that it was based on an actual prototype.
I decided to make this my model.
When looking at the drawings, I first try to get an idea about the size of the building. I don’t print the drawings to scale; instead I look at the prototype dimensions. The drawings indicate that it was 28 feet wide, 22 feet deep, and 26 feet high. I model in 1:20.32 scale, so I divide the prototype dimensions by 20.32 to find out the model size in feet. Then I usually multiply by 12 to give me the actual dimension in inches. Thus, this building would scale out to 16.5” wide, by 13” deep, by 15.4” high.
Materials
That seems pretty reasonable and will fit the location I have in mind. However, I now have to start thinking about the materials I will need.
It’s pretty clear that there are some hefty frame pieces; the drawings show that they are 8” timbers – about .4” in my scale.
But what should I do about the boards covering the frame? There are no dimensions for them, but if you look at the “Accessories Elevation (AE-1)” drawing, you will note that the boards keeping the coal in place are 1 foot wide. 1 foot scales to about 0.6 inches. So, the first decision is to check and see what is available that is already cut. This building, as all my buildings, will stay outside all year long. I want to use something that will hold up outside. Cedar is nice, and I found a vendor on eBay that sells precut cedar.
Yes, you can cut lumber yourself and make it exactly to scale, or you can compromise and buy lumber already cut. While the latter is more expensive, it involves a lot less sawdust and potential injury.
I chose to compromise and use cedar in readily available sizes. .5” square cedar scales to 10”; quite a bit larger than an 8” timber, but I think it will look all right; I will use this for the corner posts and top framing. ½” x 1/16” scales to a board that would be 10” x 1 ¼” – not a bad size for the siding. For the horizontal framing I choose something a bit smaller: ¼ x ½. This scales out to about 5” x 10”. I use 3/32” lumber for the floor, just to look a bit thicker.
The building is mostly wood siding, but I also have to make a number of buckets and do the roof as well as complete the crane.
The roof could be done in wood and tarpaper, but I have some corrugated metal that I bought a few years ago at the ECLSTS, so I’ll use that instead.
The drawings and MR article mention making the buckets out of brass, but that looks like a lot of work. I’ve worked with brass, but only for making grab irons and small parts. One of my trusty sources for parts is Plastruct. I look through their catalog and find some gears that are appropriate for the crane. I also find some clear tubing that looks like it could be cut to size for the buckets.
Creating Instructions
I have an idea of what to use, but how do I go ahead and build it? I mentioned that I prefer not to print the scale drawings, it’s a lot of paper, and I really have enough information to make this building. I just need to prepare a plan, or the set of steps that I will use to start construction.
In studying the diagram, I can break this down into multiple sub-assemblies:
- 2 sides that are identical
- 1 back piece that fits between the sides
- 1 floor assembly that fits in between the sides and the back
- 2 roof formers that will cap each side
- Roof framing that will go between each roof former
- Roof
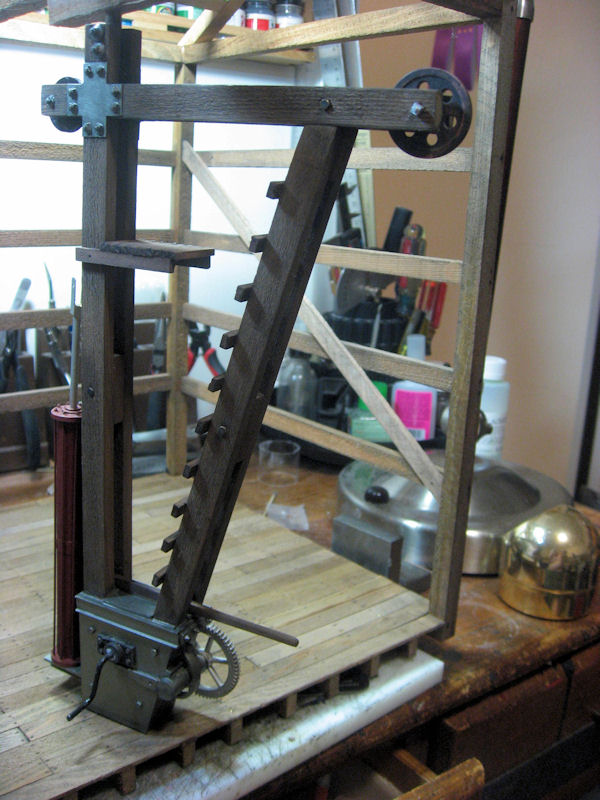
- Crane. This looks like it will require some styrene to simulate metal bracing, some gears, pulleys, and a chain.
- Interior coal bin
- Coal buckets
I cut corner posts and vertical bracing and build the sides to the dimensions listed. This is where it really helps to have a nice scale ruler; that way I can just use the dimensions from the drawing.
Next I cut the back pieces to length. To calculate this length, you have to remember that each plank is .5” wide, so if I want the total width of the back to be 16.5” wide, it seems I should cut the back piece to 15.5”. But, this is where you really want to think ahead. Since my planks are 1/16" thick, I need to make sure that I cover that 1/8" total of the the planks that will be glued on the sides. Thus, I subtract the width of the 2 planks (a total of 1/8"). This means that the length of the beams between the two sides should be 15 1/8". This will allow me to place my 1/2" wide planks evenly across the back with no large gaps between the planks.
It’s pretty easy to glue everything together, making sure the corners are truly square.

Clamps and weights help a lot.
I used the ¼" x ½" for the floor joists as well.

I’ve used some of my flooring pieces across the front to hold the floor joists in place. These pieces are cut to various lengths, always making sure that the end of a piece will end up in the middle of a floor joist.
I glue everything with Titebond III, a water proof glue. For the main frame pieces, I drill guide holes and then pound in a finishing nail. The guide hole makes sure the nail goes into the wood, not out the size.
For the floor and siding, I also use small blackened tiny brass nails.

The floor is stained with a mixture of India Ink and alcohol..
The siding is applied in the same manner, with joints ending on the horizontal supports.
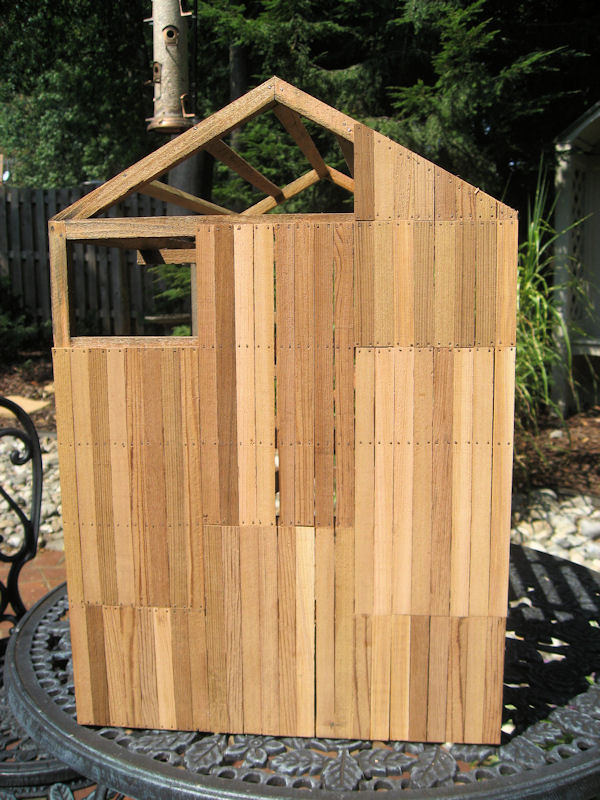
I followed the board pattern from the drawing; this shot shows the work in progress.
The original plan suggested wrapping sheet brass around a dowel and soldering the ends together to form a cylinder, but the tubing from Plastruct will make this a lot easier. It is 1.75” in diameter, which scales out to 30”. The GR plans want the buckets to be 3' in diameter AND 3' in height. That sounds too square for me; I will make them 3’ scale height and 2.5' scale diameter.
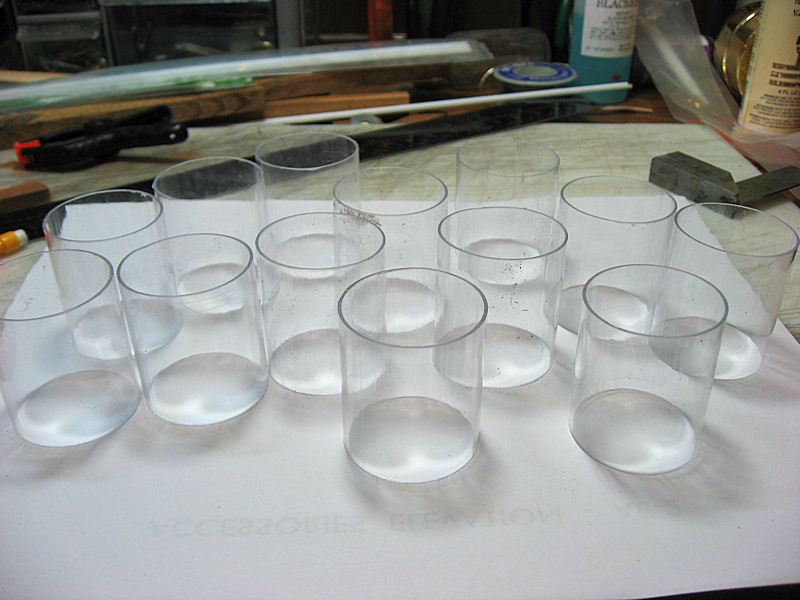
I bought some ends from Plastruct and will use them as the base.

I wrap some thin styrene strips around each end, add some tabs, and I’ve got a pretty good looking bucket.
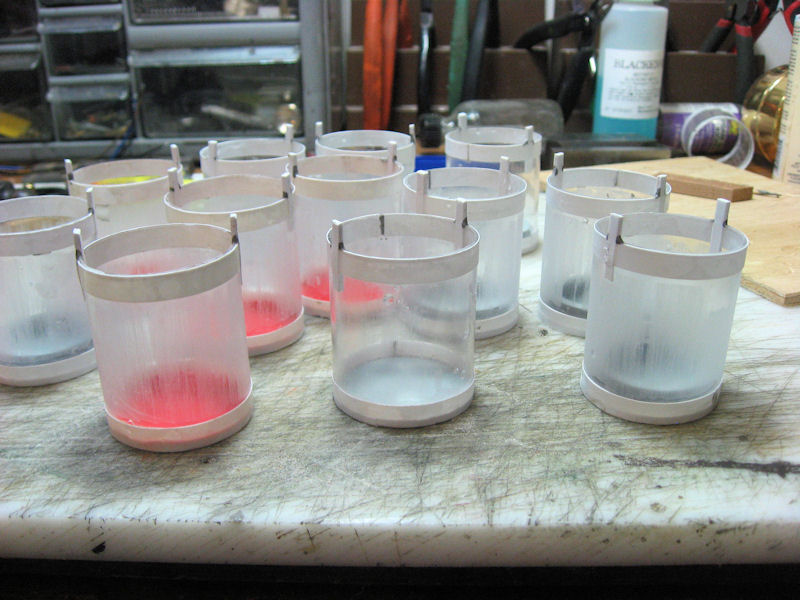
The ones with the red base will be left empty as they have a thinner bottom; the others will be filled with coal. The red pieces were cut from thin foamed PVC.
I added some "latch-like" mechanism with some styrene. Not very detailed, but it'll look fine from normal viewing.
Next, I formed the handles out of 1mm brass rod. I finished with a Rustoleum metallic paint.

The crane is fabricated from cedar pieces, with styrene plates added. I’ll use some NB casting to add detail. The gears from Plastruct add just the right touch.
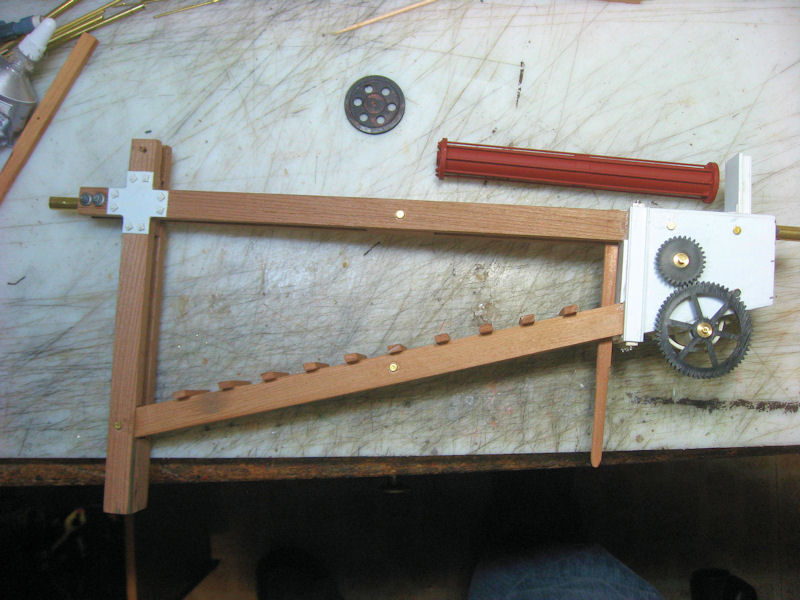
I stain it with my India Ink/ acrylic wash, and paint the styrene and gears.
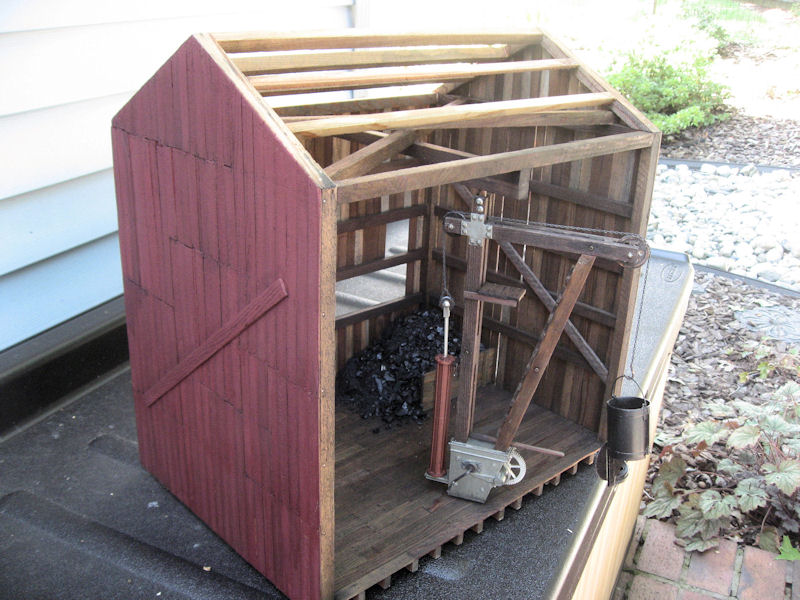
The wall for the coal is made from cedar. I have a huge block of Anthracite coal that I chop up for my projects. It is glued in place with Woodland Scenics scenery cement.

The large chunks of coal are then covered with some pulverized coal to simulate the type needed for a locomotive.
I make one bucket that is open so I can show how the coal is dumped into the tender.

Home Depot offers paint samples – custom mixed paint to any color you want; you get 8 ounces for under $4. The best part is that it is exterior grade paint. I order some and paint the outside.

The corrugated metal sections are glued in place, starting at the bottom of the roof. I use clamps and weights to hold it in place until it dries.
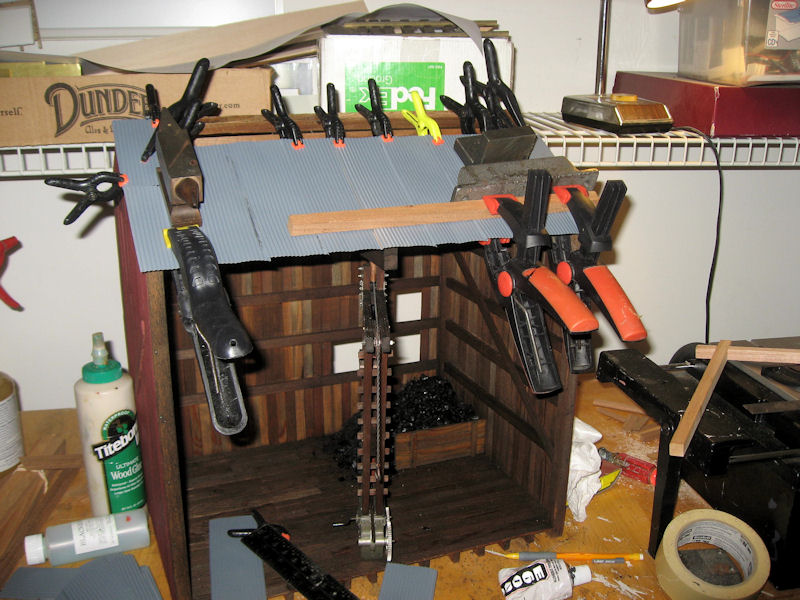

The roof is painted with Sophisticated Finishes Iron, followed by an application of some rusting solution.
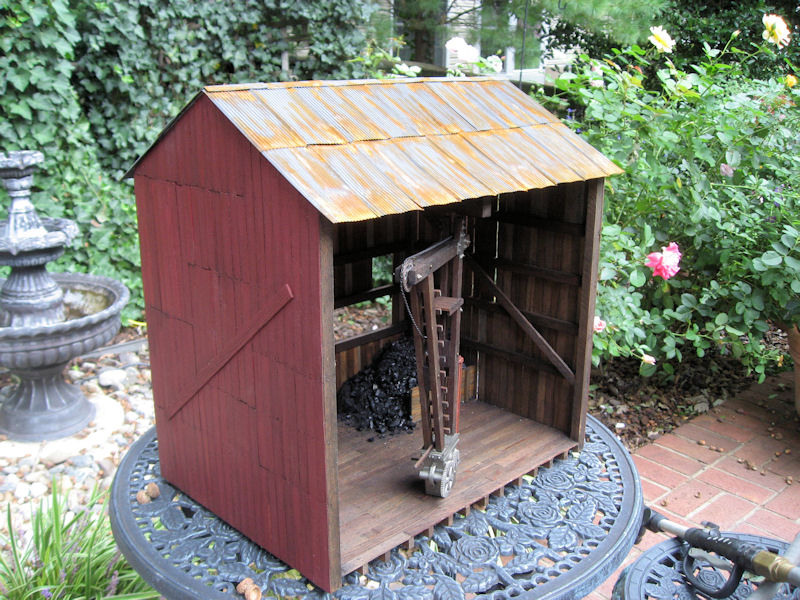
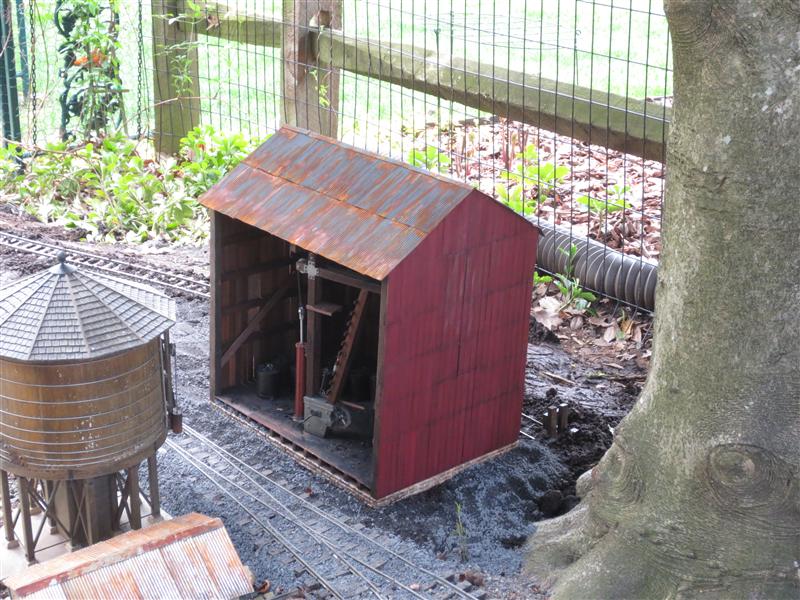
Finally, I chop up some more coal for the buckets, add some men and shovels, and my building is complete.

From drawings to complete building; I end up a nice model ready to place outside.
Before I put the structure in place, I first made a stone foundation from some 6mm foamed PVC, covered with some Precision Products sheet. This will keep the wood frame from sitting in water.