It seems to me that “How Do I post A Picture” is one of the most popular question on forums. Of course the short answer is to first resize your picture to the appropriate dimensions and than store it on a place accessible to the web. This answer generally confuses a lot of us!
So, here is a step-by-step illustrated example of how you can easily post pictures on Large Scale Central.
Note that this is done via Windows XP and using Firefox as a browser. (It can be done with Internet Explorer, but it’s just not as easy.)
First step is to go over to Microsoft PowerToys for Windows XP and download Image Resizer. Save the file and then execute it when the download is complete. This PowerToy enables you to resize one or many image files with a right-click. If you’re running Vista or Windows 7, you can get it here: http://imageresizer.codeplex.com/releases/view/30247
Now, head over to one of the fine forums in Large Scale Central and reply to a post. You next see this screen.

Notice the “My Files” selection at the bottom. This is a powerful feature of Large Scale Central which gives every member a 5 MB storage area that is web accessible. (If you get a freight shed, the total goes to 125 MB!) Click on it and it reveals your storage area.
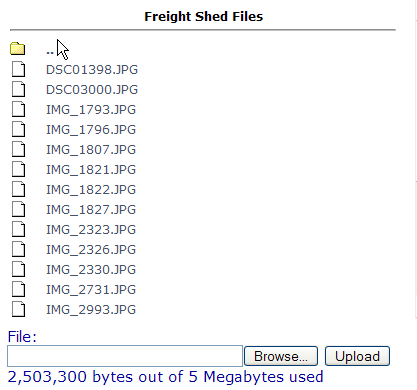
In this case, let’s assume that you haven’t uploaded that neat new picture you just took, so go ahead and select the “Browse…” button. This allows you to get to the directory where your pictures are stored. Hopefully, you know where your camera stores the files, so navigate to there and you get a screen that looks something like this:

Now, which picture was it? If you’re like me, you don’t keep track of the names, so if you click on the last icon in the right top, you can choose to display thumbnails instead of just the file name.
That makes it a LOT easier to pick out the file you want.

Now, select the picture you want to upload and “Right-Click” with the mouse. I haven’t found a way to capture this image, so you’ll have to look at the menu that comes up. One of the options will be “Resize Pictures”. Select that option and a window will pop up.

The default is for small and I leave it there. This seems to be the accepted size for pictures on the web, and it’s also handy for folks no slow links. Press the “OK” button.
This makes a copy of your picture and renames it to something like orgname (SMALL).jpg.
The problem is, that this name has spaces in it - which is a BAD idea for posting or storing pictures.
So, click on the name and either right click and select the “Rename” option, or click again to where you can type in the filename area.
Rename the picture, BUT DON’T FORGET to include the file type extension - in this case, it’s .JPG.

Now it’s renamed, and it also appears as the file name in the field at the bottom of the screen. Select the “Open” button.

Press the “Upload” button, and your picture is automatically inserted into your reply. (Note that there is no need for any [IMG] tags.
(Note: If you’re using Internet Explorer, a small window will pop up stating that the url has been copied to your clipboard. Now, place your cursor where you want your picture and right-click, then select Paste.)

So, it may seem a bit complicated, but it’s very easy once you do it a time or two.
Plus think of what you have done! Without leaving LSC, you have:
Selected a picture for uploadingResized that pictureRenamed that pictureUploaded that picturePut that picture into a post (or the chat room)
Pretty amazing!
If you’re using Internet Explorer, Firefox is a free download. You will be amazed at the difference!
[empty]