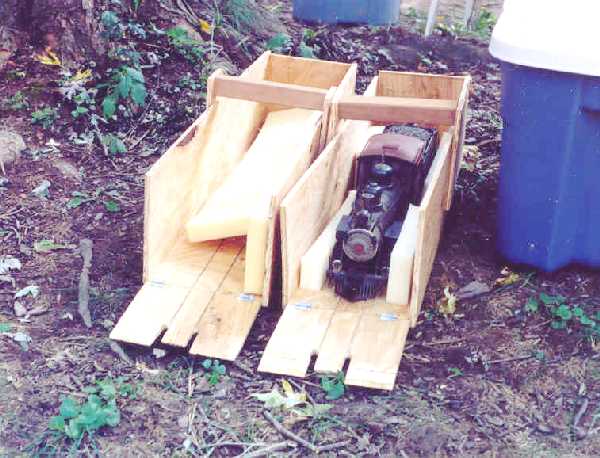
by Ken Brunt
I posted this picture in the chatroom one night and Bob asked me to
write an article on how I built it. But I have to give credit where credit
is due. I got the idea from Bart Salmons last summer at the Garen Railway
convention. He had built one similar to this for his 7/8 scale shay. Since
I’ve been converting my loco’s to Radio Control & Batteries, all the
electronics are located in the tender. This means there are usually 2-3
pairs of wires that have to be hooked up between the tender and the engine
for lights, sound and power. Which can be a hassle when your transporting
your engines to run on someone else’s layout. So one Saturday afternoon
I took Bart’s idea and ran it through my head and came up with this quick,
dirty and cheap method of transporting my loco’s without disconnecting
all the little wires.
What it basically consists of is 3 pieces of 1/2" (or 3/4") plywood,
(whichever you decide to use) cut 9" wide. I think I used a half sheet
of plywood to make 2 carriers. 1 of these pieces are then measured width
wise to find the center. From the center mark measure over 3/4 of in inch
on both sides for the grooves Or measure in from the sides 3 11/16 of an
inch. You can use a piece of track section to make sure the marks for the
grooves are 1 3/4" apart. If you have a table saw lower the blade till
it’s an eighth inch high. Do the same with a circular saw if that’s what
you decide to use. Just remember to make the kerf on the inside of your
marks. After I made my first kerf cut, I moved the fence in an eighth of
an inch and made another pass just to make the grooves wide enough.
These 9" wide pieces are then ripped down to 34 inches in length,
or longer or shorter to suit your loco length. One of the left over pieces
with the grooves in it will be used for the front ramp. Leave it as long
as you can as this will make a less steep plane for you engine to negotiate.
Mines about 10 -12 inches long. On your table saw run up the blade as high
as it will go and then angle it 5 degrees. (This is for the ramp. It’ll
help with running your loco’s in and out of the carrier.) Run the piece
through the saw so one end of the ramp is beveled. If you have a band saw
, cut the slots in the ramp following the inside of the groove and about
1/4 inch wide. This will help the ramp fit over the track your running
your loco on to. Cut about 1" off the inside of the ramp between the slots.
(If you’d like, you can do this twice and have a ramp at the front and
back of the carrier, but that’s optional. The back wall of mine has a B’mann
coupler attached to it to keep the loco in place when transporting it.)
The rear piece is then cut down to 9x8 1/2".
The handle consists of 2 pieces of 10" x 2" and either a 3/4" dowel
or 3/4" square piece of wood. ( I used some old cedar stakes I had laying
around)
Now comes the fun part. Assembling the thing. The sides are glued and
screwed to the side of the bottom piece. Then the back is glued and screwed
on. For the ramp you’ll need two 1" hinges from the local hardware store
($2.50) and a small hook and eye. ($2.50) I placed the hinges as far to
the side of the ramp as I could get so the loco would clear them.
The handle pieces are then screwed to the outside of the box approximately
centererd. And there ya have it. A quick, dirty and cheap loco carrier.
One other thing. I also screwed some 1/2" square stock on the bottom of
the carrier to assist the ramp in getting below the level of the track.
You may have to fiddle a bit with the slots and groove ends to help get
the loco aligned into the carrier. Sorry I don’t have more pix to help
in the construction process, but I never thought anyone would want to know
how I built this thing. One disclaimer though. This thing doesn’t work
too well with track-powered loco’s. Unless you use the “armstrong method.”