Vic Smith’s 2025 MIK Challenge Entry, a Casey Jones style railbus based on the Silverton Northern prototype. Napkin sketch:

It is a scratchbuilt model built with a basswood chassis and sheet styrene body. Its uses an HLW Waddling Goose drive mounted in a modified Scientific wheel mount, and an Ozark front truck. All three axles have power pickups. Existing parts consisted of an HLW radiator from a Mack, a no name headlight and front pilot, basswood and resin engine/transmission, various basswood, brass and styrene bits. As I said it’s based on the Casey Jones, but its a shorter smaller version as befits my shorter smaller layout. Total costs: $0. This was a really fun build this year.


Processing: IMG_20250209_110636051.jpg…


Cars to go with my ACL Eggliner; they are called Egg-Goes. The resulting train is the Easter Bunny Limited.

Regards, David Meashey
P.S. Oops, forgot to mention I spent about $4.90 on paint.
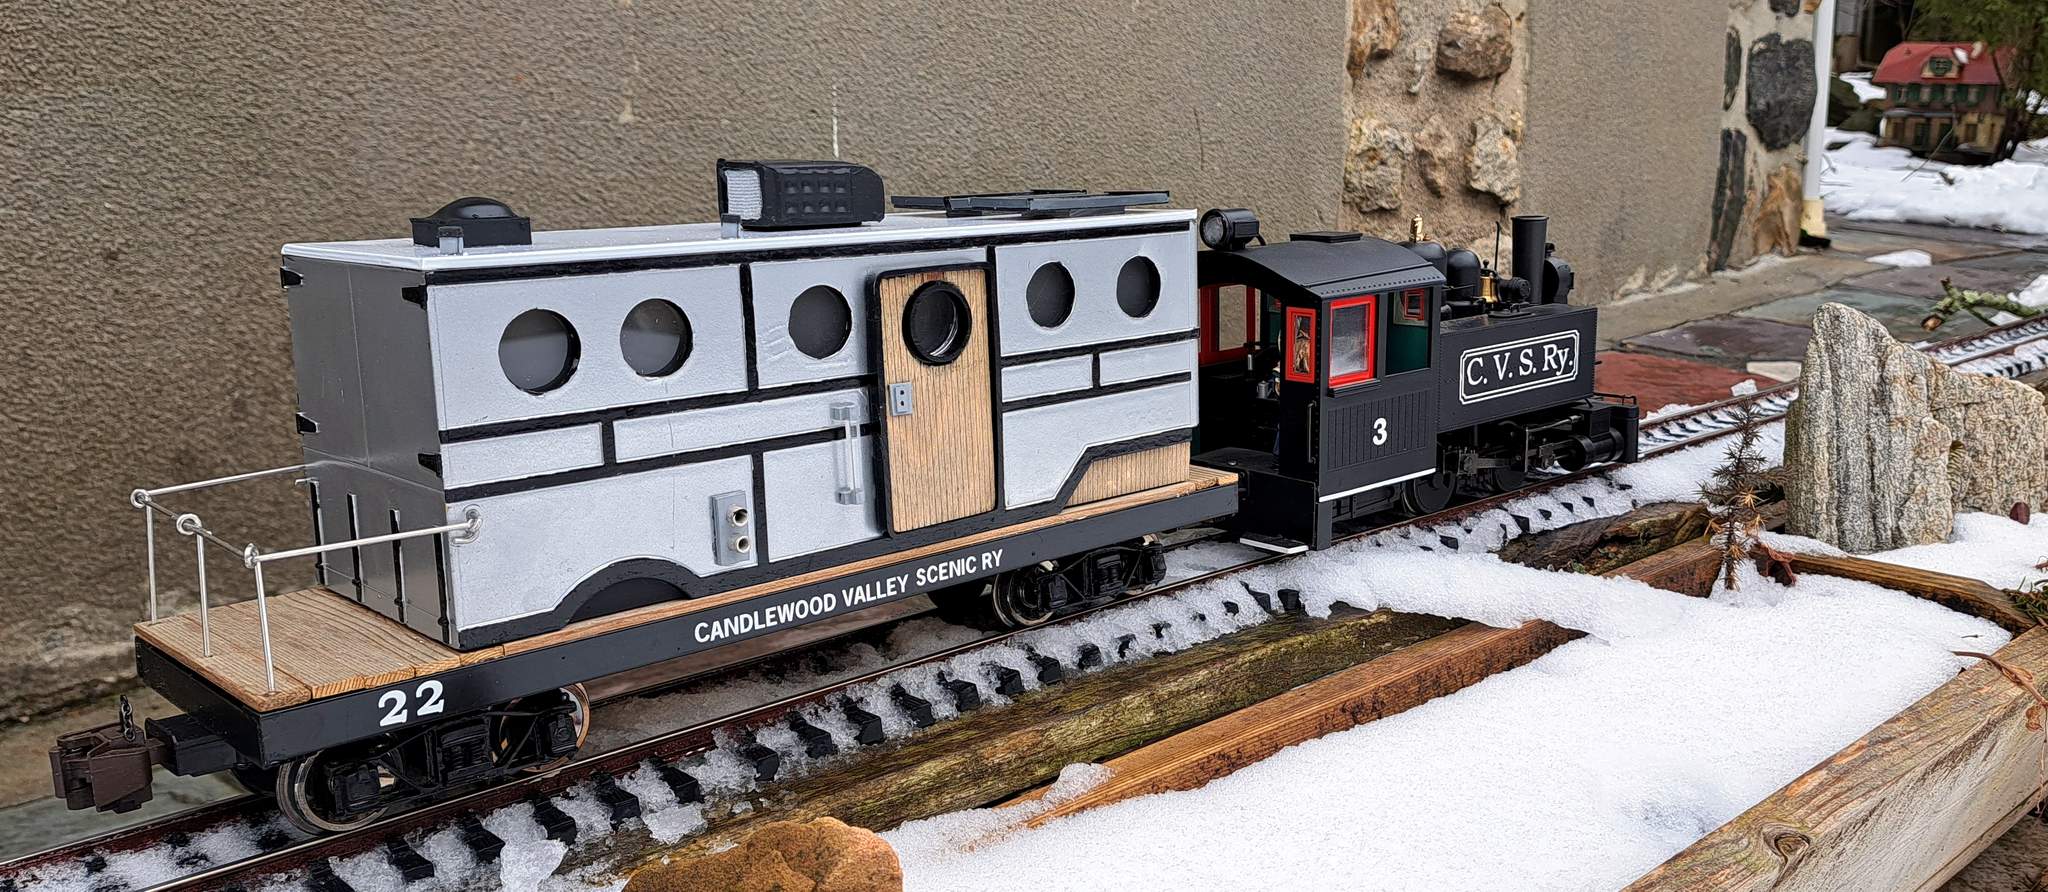
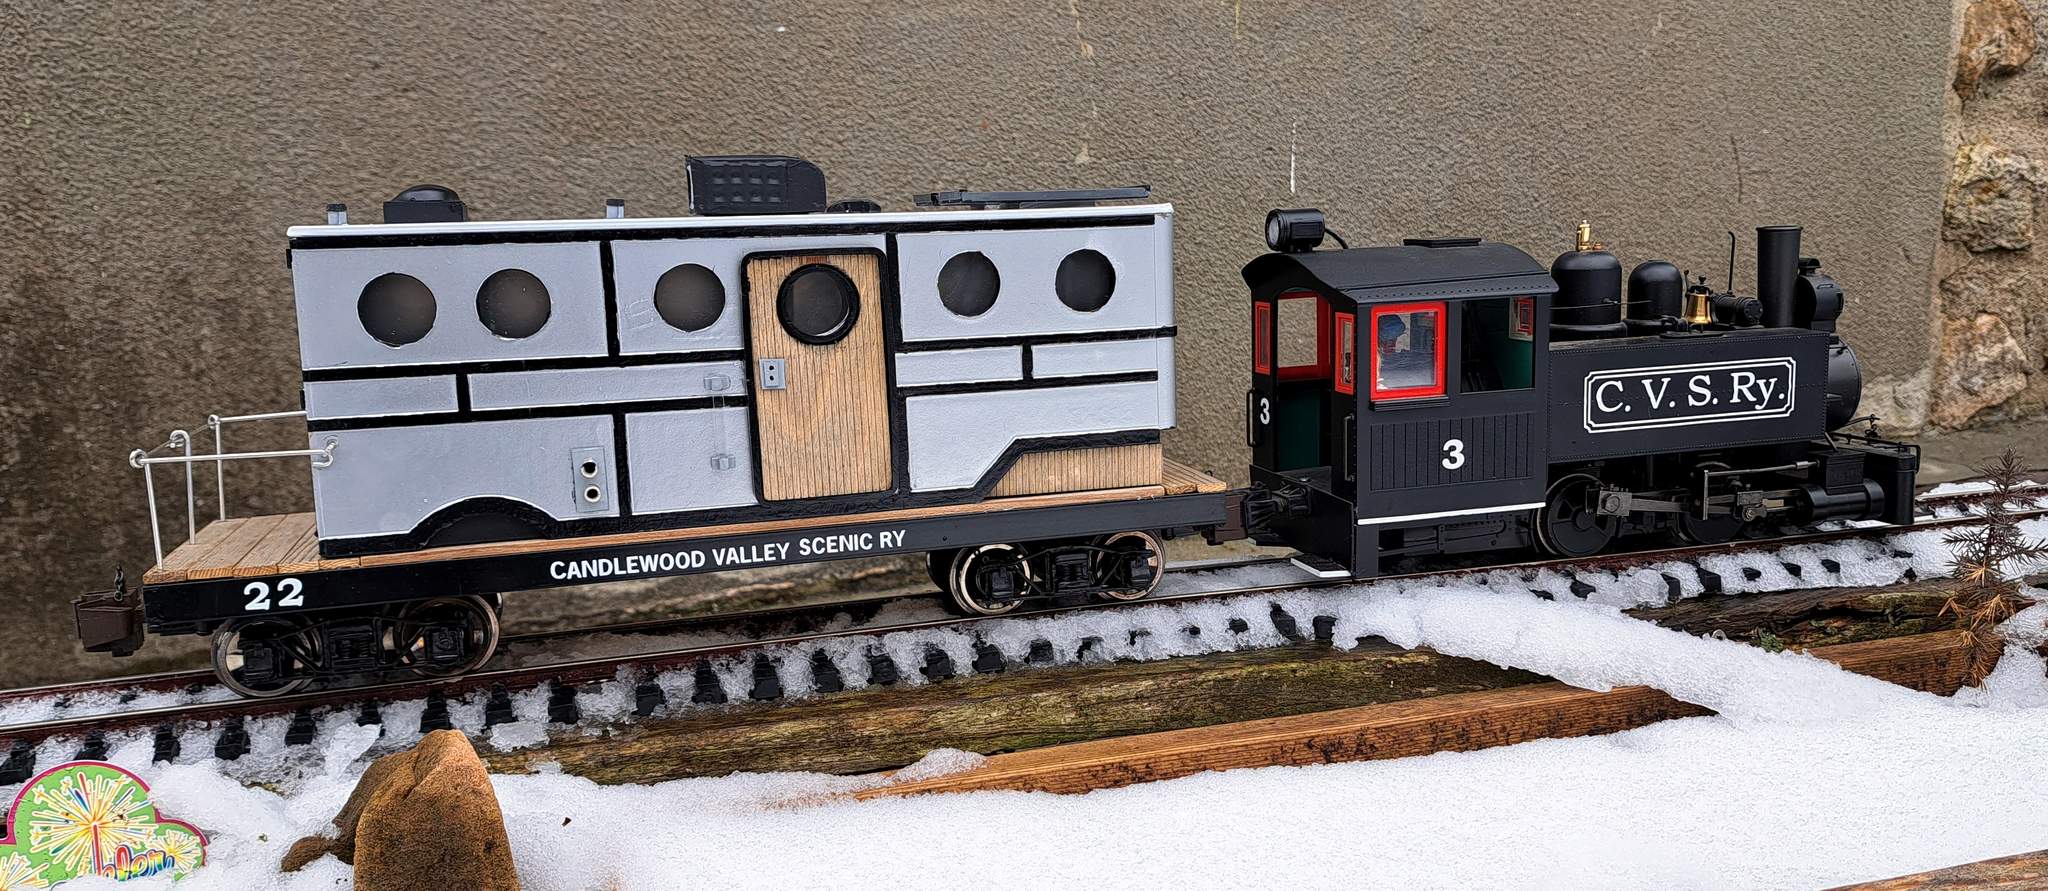
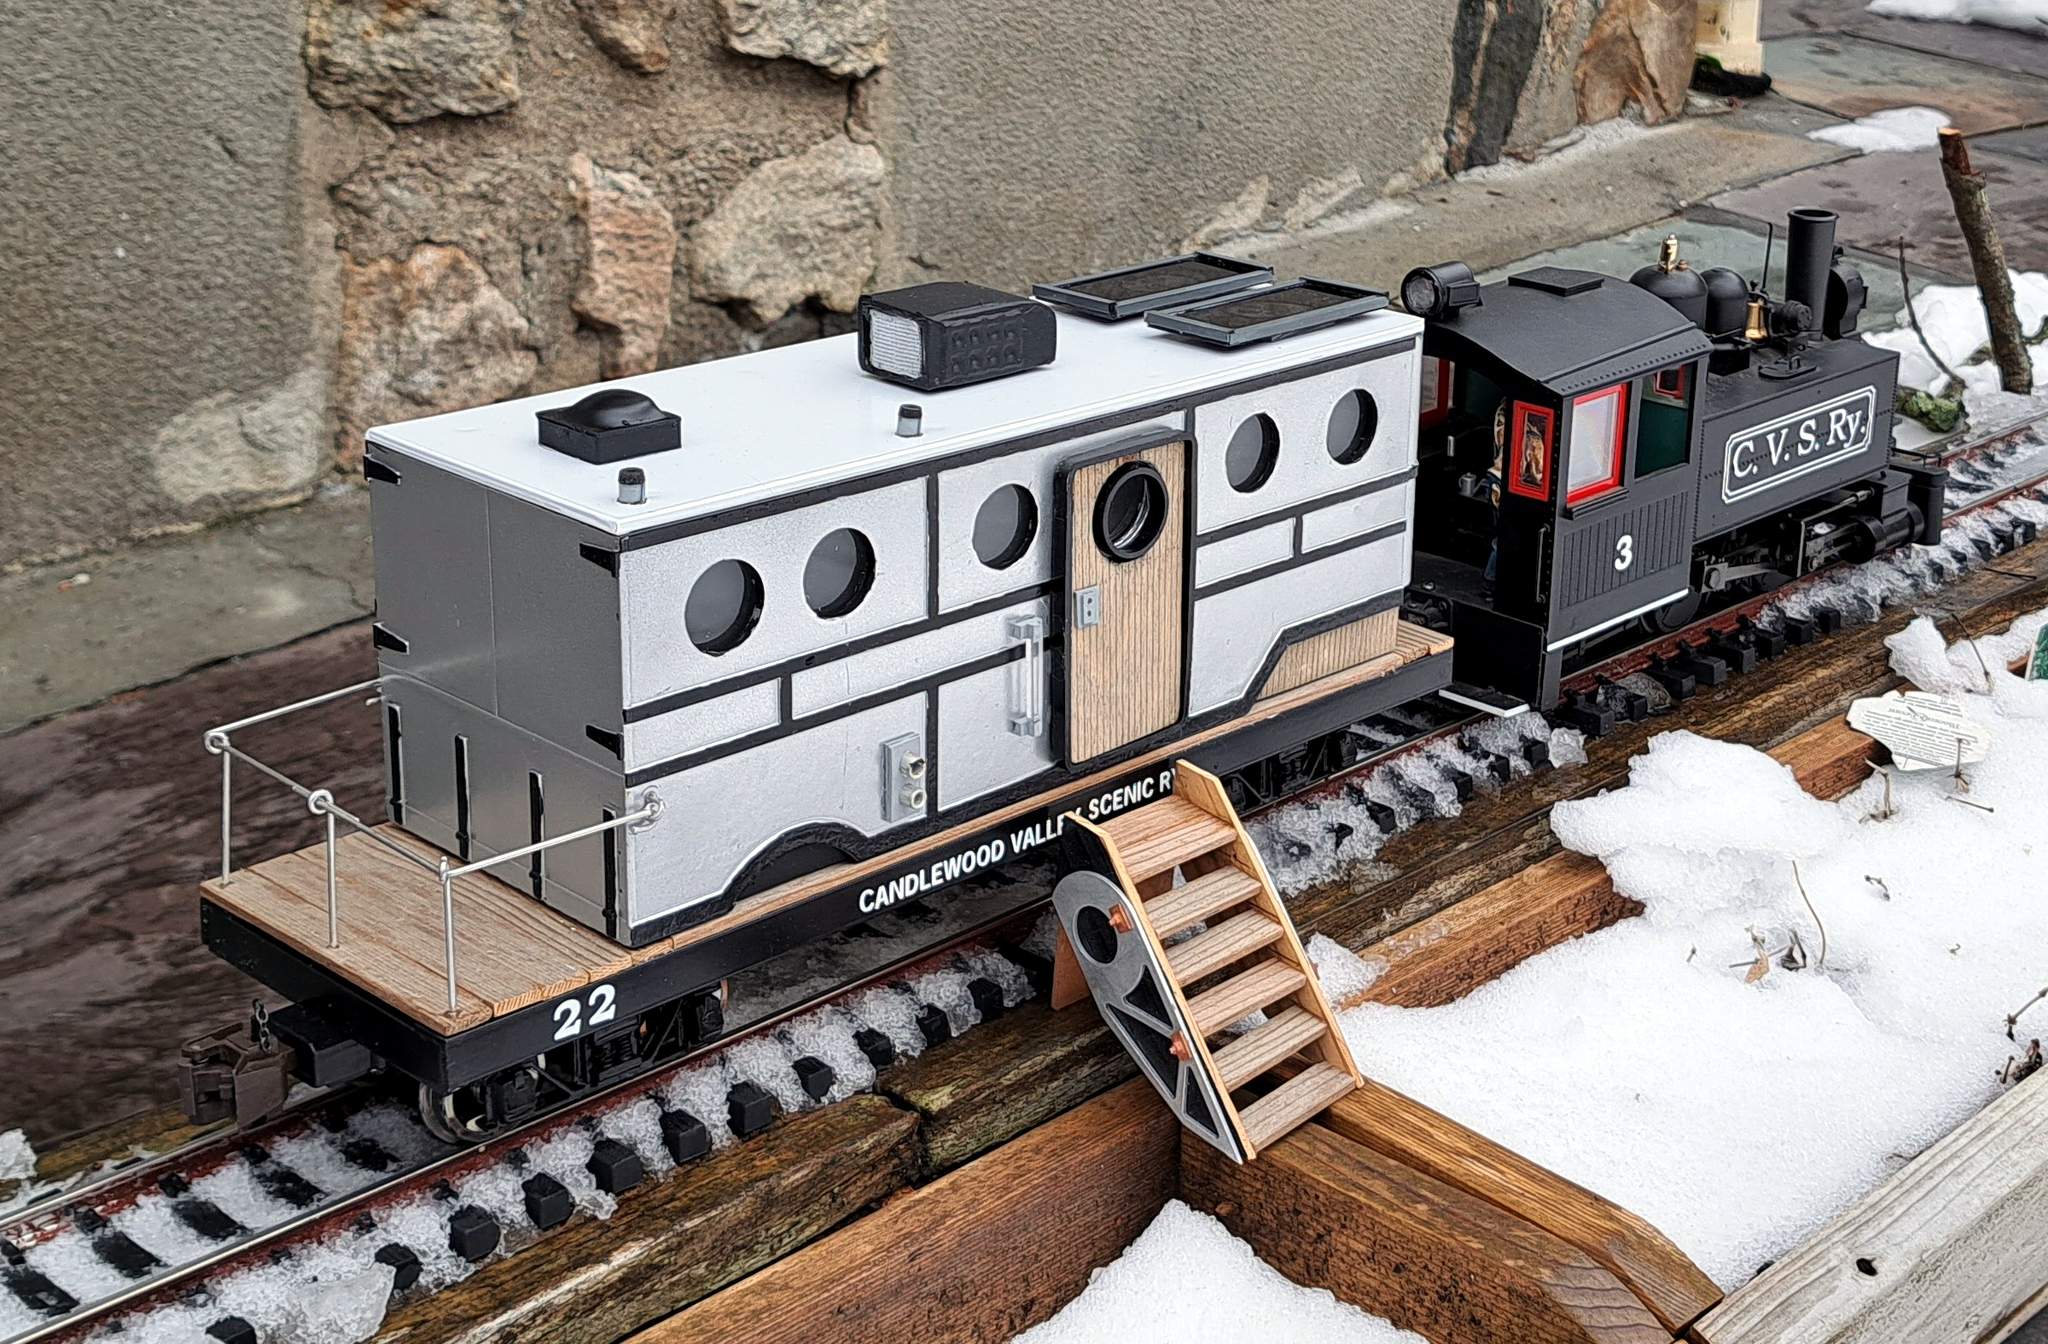
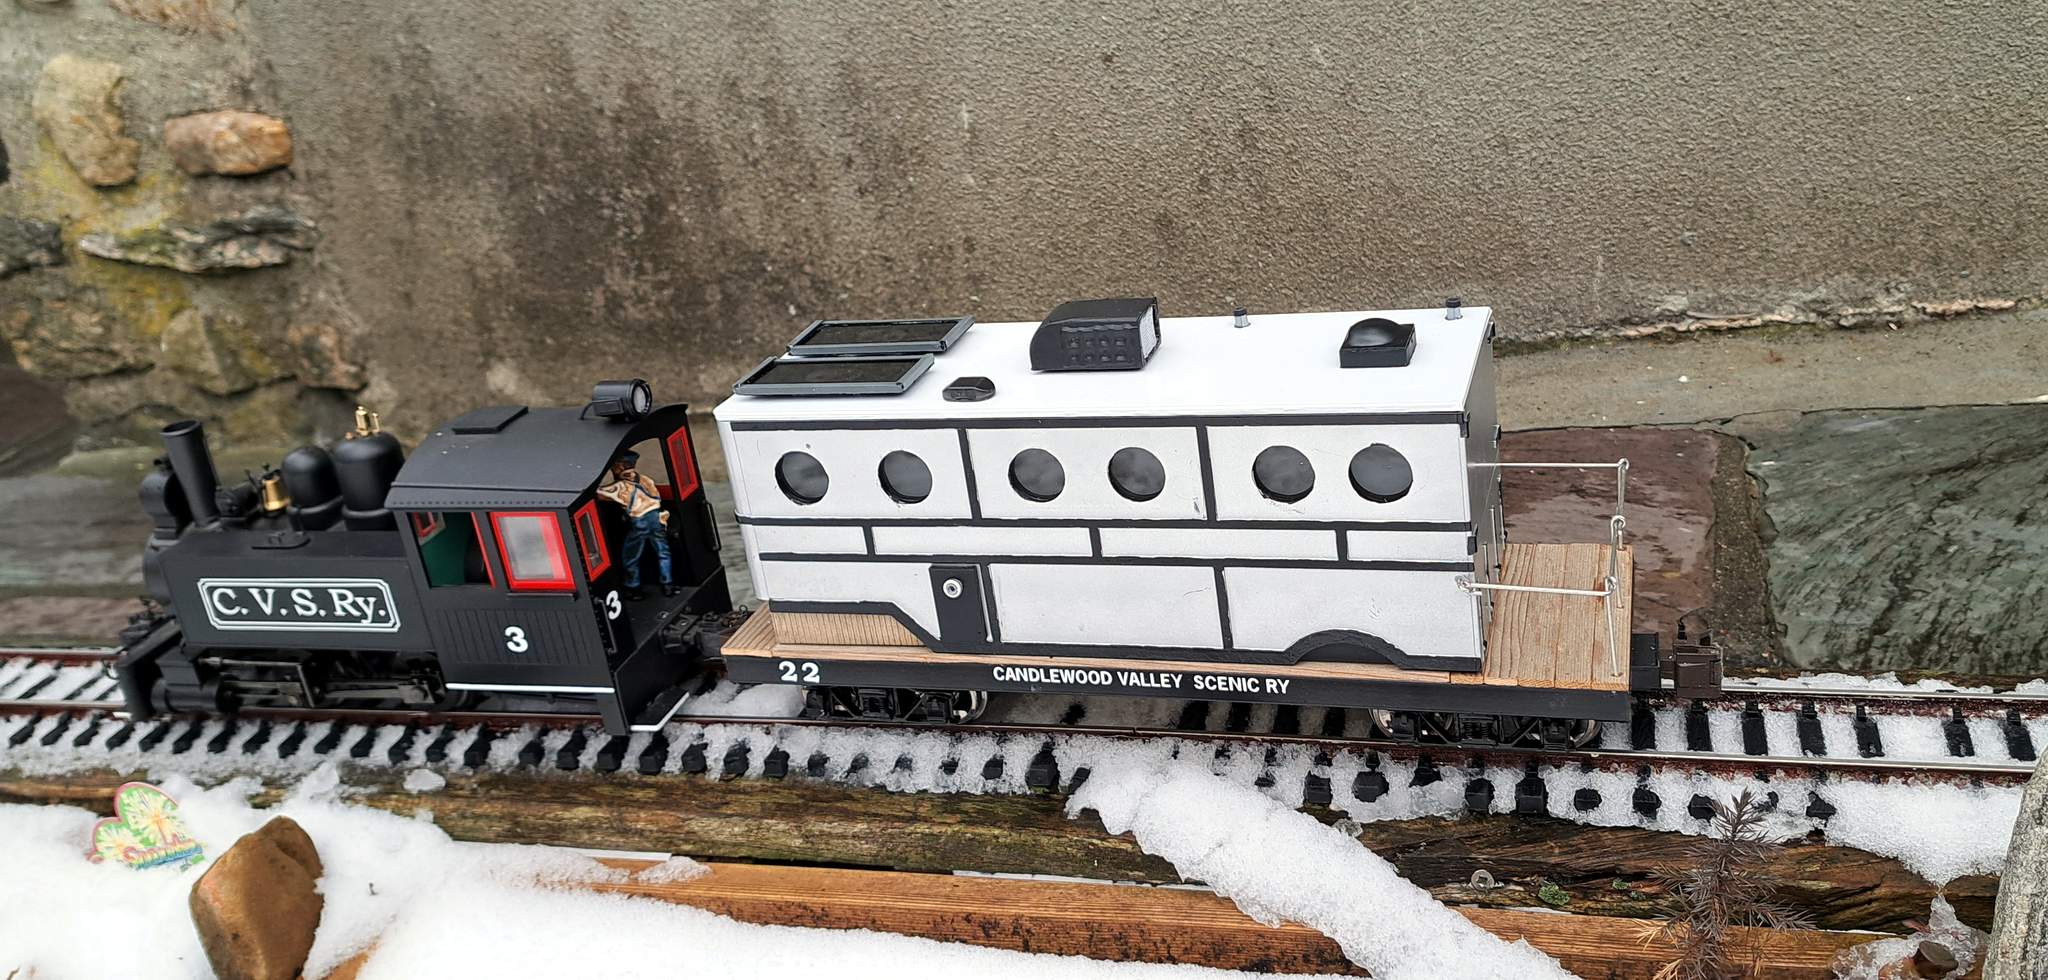
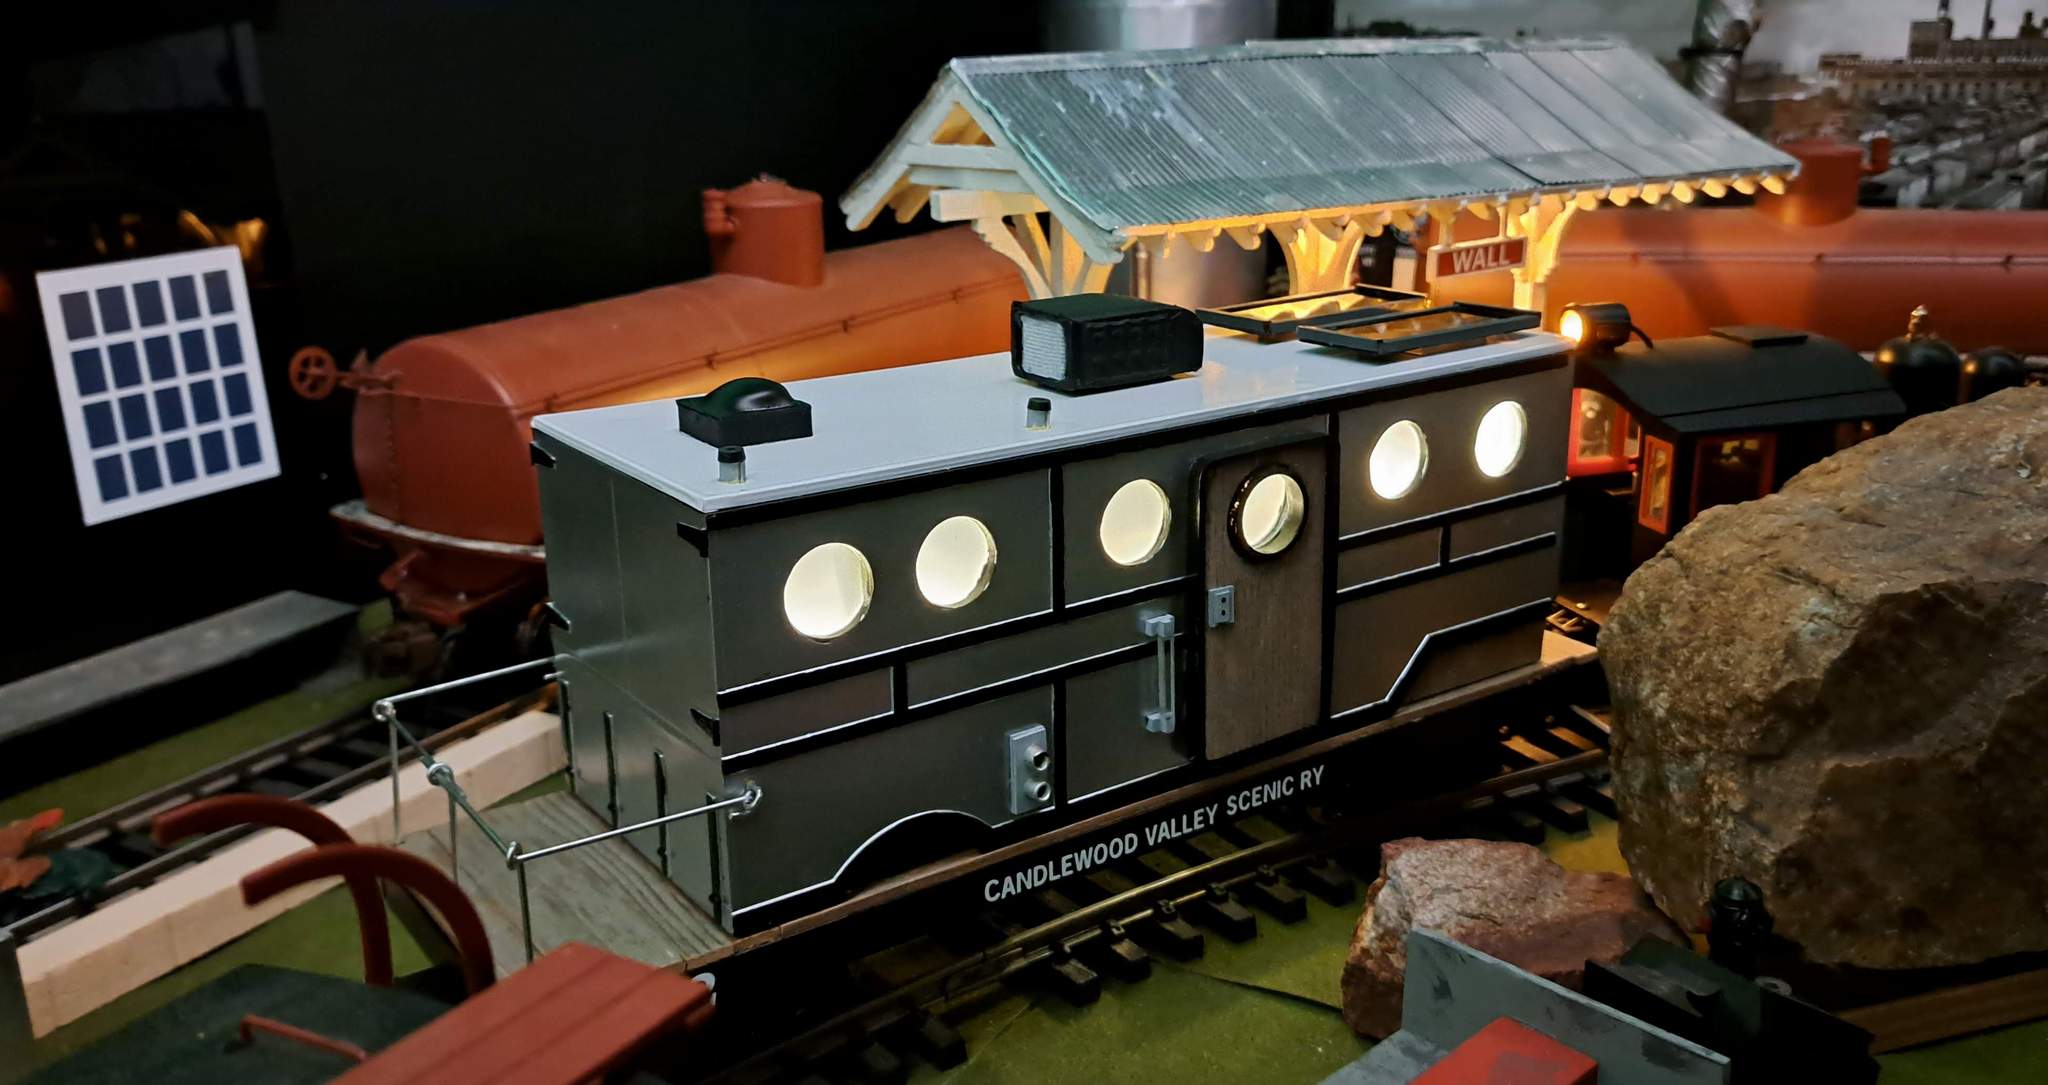
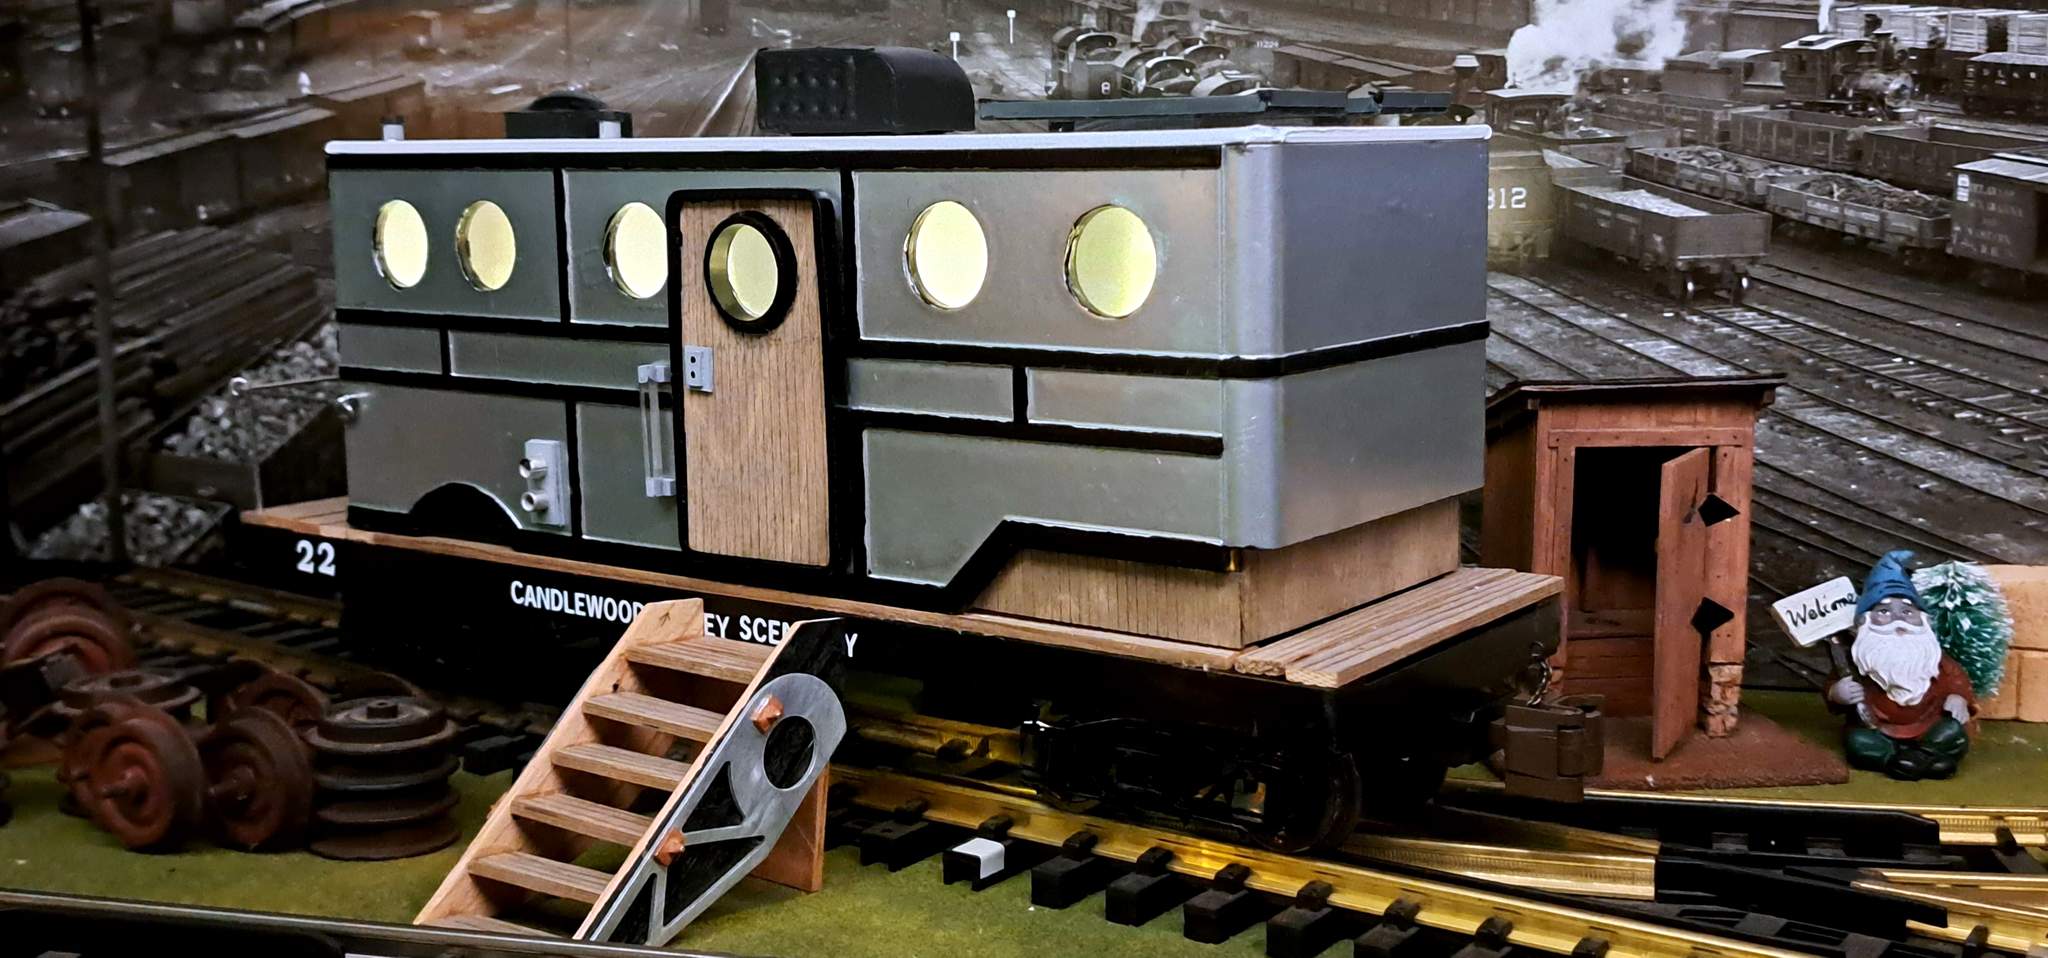
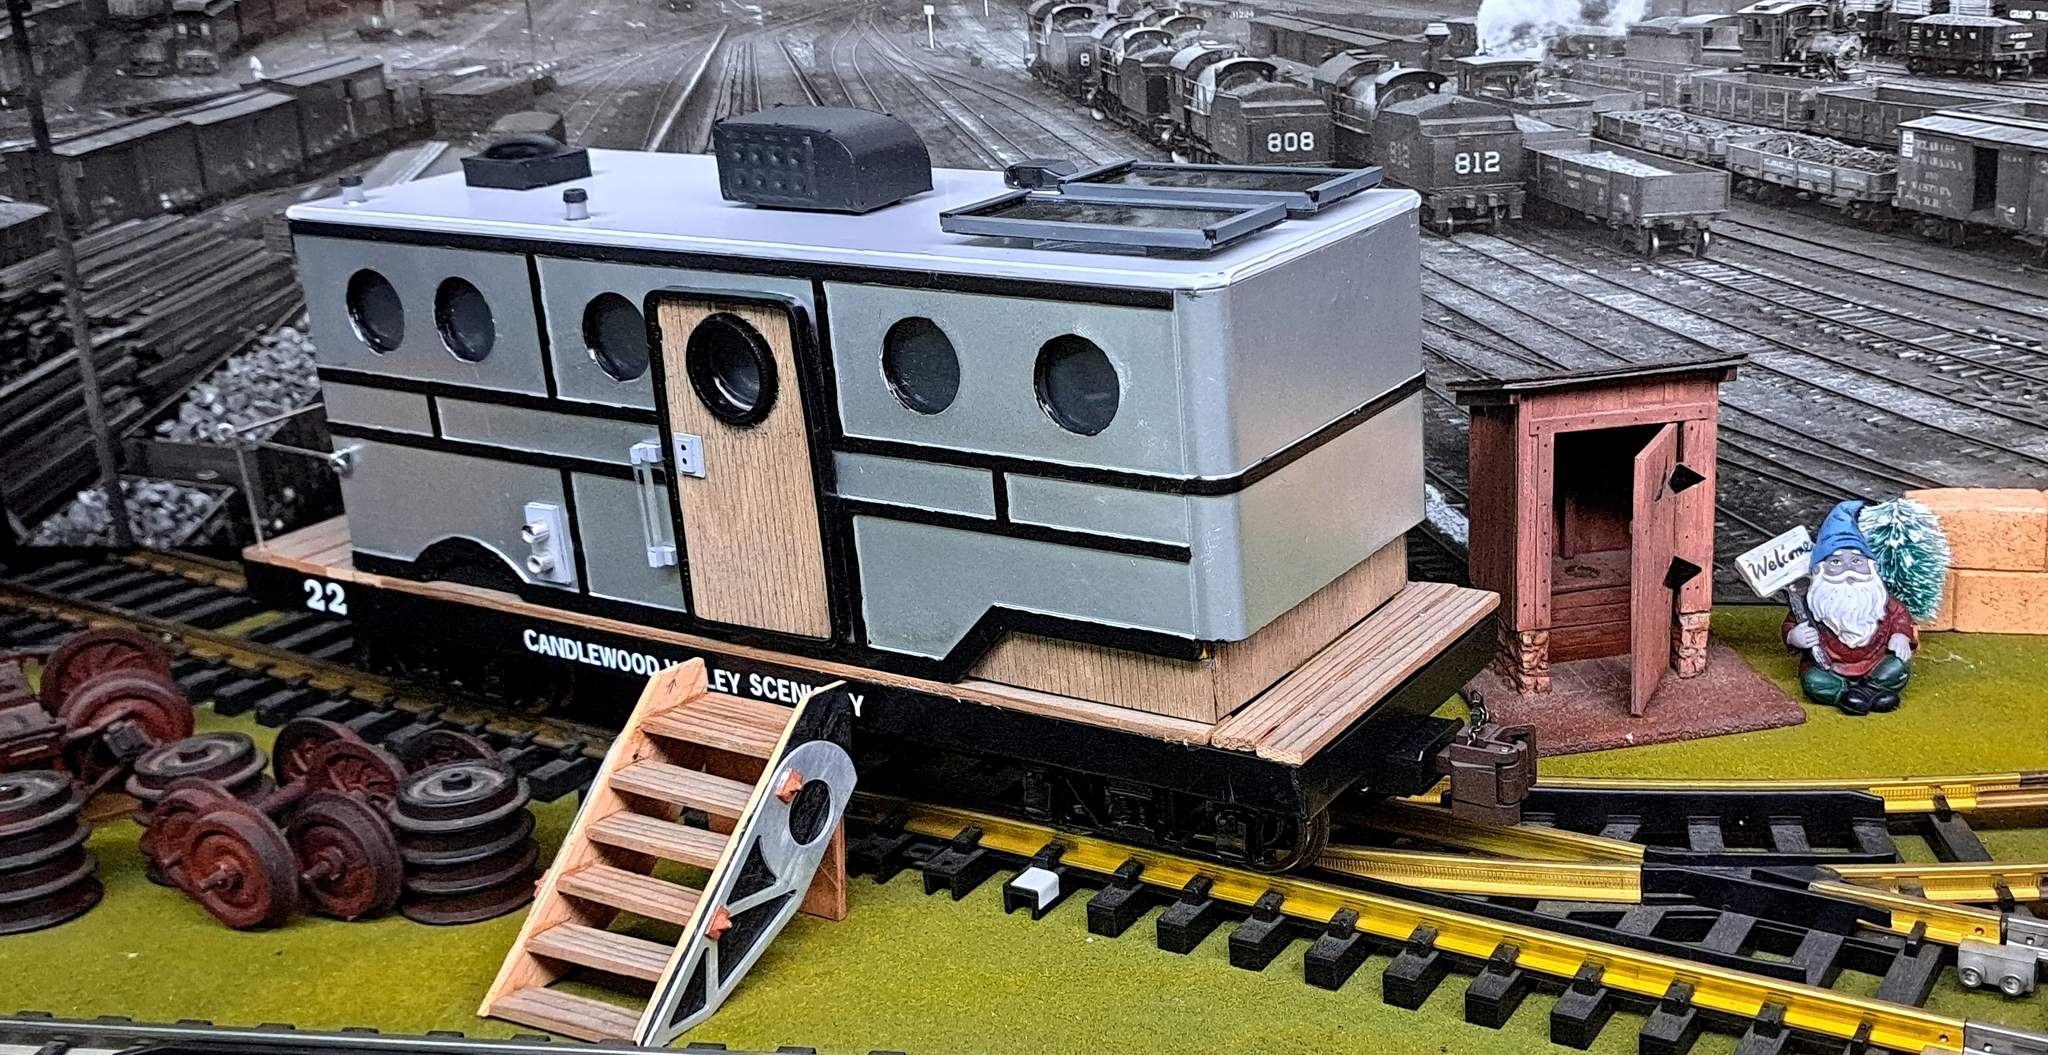
C.V.S.Ry. Overnight Car #22
The shop crew of the Candlewood Valley Scenic Railway got busy this year and actually finished early. The premise is that the railroad has had requests for overnight lodging. They considered building some logging skid shacks but then ran across an old road freight trailer. Rising to the challenge, the crew built a wood decked steel flat, outfitted the old trailer as a retro RV with modern appliances and mounted it on the flat. During the high season it will be spotted in a scenic location and guests delivered by rail.
The shop foreman’s early sketch…

And how it turned out. a few quick shots out in the snow followed by some indoor shots…
The build thread is here: https://largescalecentral.com/t/jons-mik-2025-an-overnight-car-for-the-c-v-s-ry
Total expenditure was under $15 or a hole saw and some #4 wood screws. All other materials from my stash. I really enjoyed building this and following everyone else.
Another MIK Challenge almost in the record books and what a great turnout this year. This is my 7th year of participation and it’s still just as much fun as it was the first time.
Voting for favorites this year will be just as difficult as it has been in the past for me and probably everyone else. Such a wide variety of rolling stock and no common ground, well, OK, maybe the
wheels. 
My build choice for this year was a complete surprise to me, if Peter hadn’t posted this picture in the Strange Locomotives thread I would never have ventured down this path, probably just built a caboose or freight car, but no, he had to post this picture.

Trying to decipher what was going on mechanically from that one picture was a challenge, no pun intended, so a lot of the build was just winging it based on best guess and a little mechanical knowledge.
So we present our finish photos of the build, although the build will be modified some in the near future. Our original thought was using it to pull the Crummies, logger filled cars, to and from the woods. But as the build progressed we have decided that it will pull the fire fighting train, most large logging outfits had a dedicated train of cars to fight fire along the tracks.
Already having one fire pump car and a bobber caboose that will work perfectly and needing a new appropriate shell anyway for the power/control trail car that just leaves a tank car to build and the train is ready to go.
OK pictures.

Here Sherm is posing with his creation in front of the shops, he is the Foreman of the crew that put this beast together.

It’s hard to believe from the limited space but I was able to stuff enough lead sheet into and on this chassis to bring it up to weight for pulling power. A stock Bachmann Annie weighs in at 5 pounds 13 ounces, this beast weighs in at 5 pounds 14 ounces.


Some closeup shots to show the detail and all the mistakes and errors. The detail is pretty limited because of the time constraint, just enough to give the impression of the real thing.
And just to prove that it can actually move under it’s own power.

No money was spent this year as everything came from junk boxes and supplies on hand.
The build thread can be seen here. Rick's MIK 25 - #86 by Rick_Marty
A big thank you to Dave for continuing to lead this event and to all of you that participate each year with your builds that benefit all of us.
Thank you.
He is my 1:29 scale rendition of an NSC 42’ coil car with open load. This was my first MIK. My decision to participate this year was due to the fact I was committed to build a car to give away at this years NELSTS. I expected to have it done much sooner but other distractions caused me to go til the last day. Nonetheless, I enjoyed every minute spent.
The car is mostly built from 2mm and 3mm sheet styrene with bit’s of brass, aluminum, nylon, wood and both resin and filament printed parts.
I did purchase some 1.2mm brass rod for $8.59 but didn’t end up needing it so Total cost $0.


Build log here Dan's 2025 MIK - NSC 42' Coil Car - #48 by manimal


Mark Lockburner MIK 2025 build, flat car. Built with styrene, wood and some odds and ends spent $3.16 on T nuts and bolts to hold the trucks on. Its my first MIK and first car but not my last. Built a flat car because M&M RR is adding a siding for a Blue stone quarry in the spring. Made a steam donkey for a load and will need it for the quarry.
Another Amazing Mik is wrapping up and the imagination and talent of this group never fails.
I have always wanted to build a schnabel and over the years I have collected trucks for this someday build. When the theme of “Rolls on Rails” came up I knew I had to go to the Extreme and here we are with a monster. I didn’t finish the detail parts such as the railings and 2 large pistons for the top but I’d say it’s 95% completed. The list of extra materials included a rattle can of grey, another tube of E6000, a box of washers and screws, some other odds and ends and a few dowels that I only used several inches of. The total cost of this beast is approx. $25.
I took it out for the glamor snaps and hooked an engine to it and I found 3 spots on the RR that will need attention due to the overhang going round curves and will no doubt find more since we only made it 1/3 around.
The overall length is 70" and that is with out a load just the piece that connects the 2 units. The height is 7" the width is 4.75"


Track Test video

Devon’s 2025 MIK entry. Everett and Son’s Circus Boxcar. I won a Stienz at my clubs Christmas party and decided it would be a good loco for my grandson’s first train. When Dave came up with this year’s challenge the circus train was born. This is the first car of a few I hope to build to be pulled behind the Steinz.
I chose to use LGB hook and loop couplers to keep it easy for a 3 year old to manipulate. This box car will serve as the battery and electronics car for the Steinz. For now it’s just a box car. Since this project was more about building something to share with my grandson, there is only one glamor shot I care about. His eyes lit up and the smile was worth it.

The inspiration for ke Ka’ahai o Luna Nana / the inspection locomotive, originated with a suggestion and a box of bits from Pete T. (@PeterT ). The idea and bits sat on the Track of Perpetual Puttering until this year, when the MIK forced my hand and it all came together as my build log describes ( Eric’s 2025 Mik - Ke Ka’aahi o Luna Nana / Inspection Locomotive ). Expenditures went towards styrene, glue, and such, and, split between the three Mueller projects, came in well under $35. The main bits came from a very creative soul, and I chose as a goal to preserve some of that unknown modeler’s creativity in the end result. That end had to fit into the 1:24-ish PLAYMOBIL scale interpretation of Hawaii sugar cane railroads. The end result, Loke Ihi / Climbing Rose, captures all of this, as she bears the rose of her originator and grew upward from diverse parts bins and creative stimuli to become the inspection locomotive of the Oberammergau, Ogden & Olomana Railroad. Let’s hop aboard and see her in action!
Heavy rains have washed out the Triple O’s mainline. The plantations have put all hands to work restoring the tracks, bringing the harvest to a halt. Box cars of bagged sugar have built up at the mills. The brass have decided to put the most elite engineers to work to ensure repairs done in haste will bear the load to come!
*

*
The signboard is a tongue depressor painted yellow, masked and repainted green. The safety rails are some sort of wire mesh. The tender actually provides the power to the loco, which fuses a busted LGB m2075 (battery) chassis to a planter or candy box (no idea which) boiler and cab.
The fireman will soon get her up to full steam…

The original firebox was from some sort of toy. Scrap styrene and the guts of bike bell simulate the backhead.
The fire up, our engineer is ready!

You can see the rose (loke) on the loco’s steam dome. The steam dome was from her original incarnation and is presumably from a cosmetics bottle. A busted LGB part serves as whistle. The bell is a shaped and painted twist connector from a ceiling fan.
The track gang clambers aboard…

…and Loke Ihi steams out of Pu’uoma’o…

…passing a crack 4-6-0 Starliner waiting for the clearance to hook up to those box cars and earn her - and the railroad’s - keep!

The Starliner will have to wait, though, until the track crew deems the main safe.
The engineers can focus on their jobs as they travel the island of No’u’ea, safe behind railings and chains…

…as the company brass rides in comfort in their club car ( Ke Ka’a Piki (the Shortened Coach) – Passing the Baton )!
A friendly local waves from a small station, where a cane car sits idle until the Triple O can again move product to the port.

Finally, satisfied, the brass disembarks at Haluku’ilio…

…and Loke Ihi proceeds toward the trestle leading back to Pu’uom’ao for her official acceptance photo for the company catalog.

Fun build, fun contest, lots of learning…I call that a successful competition! Mahalo nui / thanks a bunch to @Dave_Taylor for again riding herd on this horde and bringing us all through another fabulous MIK!
On Behalf of Clan Mueller,
Eric
OD here!
While I was visiting Japan, OS drew up this napkin sketch of his idea for a steampunk locomotive.

As soon as I heard about his ideas we teamed up - he did most of the building as it was his original vision, while I did most of the painting and details.
If you’re wondering what steampunk is, it’s a fantastical alternate history theme where a past era decides to invest heavily into steam powered machines.
(O.S. taking over…) This is represented by the funky design and how there are people from multiple eras in the glamour shot, as shown below.

The main engine was made during the competition, as well as the transitional flatbed that is needed to link with other cars thanks to the long stack in the back. The build log is here: The build log is here: O.D. & O.S. Mueller 2025 Mik - Steampunk Loco

Everything else was made over the course of years.
Some of the unique features of this train is that to enter the cab, you have to use a ladder and walk across the boiler, another feature is how coal is sent from the roof of the cab.

OD again: We tried to make the boiler translucent, but as you can see it doesn’t do the details inside any justice.

You can see the faint outline of a brass pipe. All these details like the brass smokestacks were made from random scraps taken from bit-boxes and other projects. I would’ve hoped to do some more detailed brass parts like the smokestacks somewhere else on the engine, but I guess we’ll have to wait and see what other pieces of junk we can stick on it in the future! For the current details, I bought some metallic paint and either coated or dry-brushed the piece over black.
I think it adds a nice change of pace with all the wood.

Thanks for running this again! @Dave_Taylor We had lots of fun with this one.
I (Y.D.) helped Kid-zilla make a missile transport (MT-00001):


He used the trucks and the platform leftover from his submarine carrier project ( Submarine Transport for the Triple O ). He then made a toolbox from wood, oiling can from a desiccant container, and a rocket fuel barrel from an old candy container.


He built forks to hold the rocket from burnt rocket motors and wood pieces. Our build log is here: Y.D. & Kid-zilla 2025 Mik - Rocket Carrier.
Here are some more pictures.


I (Y.D.) helped paint, detail, take/edit the pictures, and write this post.
Thanks for looking, and thanks to @Dave_Taylor for doing this contest.
Kid-zilla & Y.D.

When Dave announced that this year’s MIK Challenge theme was “Anything on Wheels,” my first thought was to sit it out and watch. I had several reasons to not take the challenge —my modeling experience is limited, and rolling stock wasn’t on my list of projects. Additionally, acquiring wheels, trucks, bolsters, and couplers would take at least a month. Like others, I wasn’t sure what to build.
However, I recalled Fred Mills saying, “The MIK is an amazing learning experience.” …and I realised I’m 20 years behind in modelling skills.

Here’s what I learned:
- Some history of gandy dancers and handcars.
- The mechanics of a handcar.
- How to work with and deal with WOOD PLA issues.
- How to troubleshoot a hot end on a 3D printer.
- How to use the Arcane setting (an experimental setting that improves filament extrusion for better gap filling on thin walls).
- How to add lettering post STL production using slicer settings and being able to use any font.
- That I still have no ability to weather my models.

Materials and Costs:
- $3.60 spent on unsuccessful vertical steam engine variants.
- $3.00 spent on brass rod.
- WOOD PLA was already on hand, preventing additional costs.

In the end, this challenge turned out to be another fun valuable learning experience, and I gained more skills than I expected. I certainly learnt more lessons from reading you guys build logs.


I also found we had a kit-zilla around the house who, early on, became quite involved in this project. She was quite active during the model build and was instrumental in developing a comprehensive crash testing program for the hand cars. (A table based drop test) However, her being of any actual help during the build was severely limited by her lack of opposable thumbs.
In trying to get the glamour shots, it also became quite evident that the most dangerous place in the house was between her and a camera lens.

I am quite happy how this build came out and now have plans to build a trackside building for the handcars. Thanks again for all the comments and advice.
You don’t have to hold your breath anymore, here are the Glamor Shots of what Bill Hines labelled Lou’s Loo. OK, you might need to hold your breath again.

Get out! We gotta move that car!

Stopping by to load up on TP.

Off we go…

Movin’ right along. (Cue Muppets song)

Hope we have enough paper.

This is the end of The 2025 MIK Build.

Hard to believe another Mik Challenge has come and gone. I didn’t get to honor Rule #1 as much as in years past due to being away from home during the week and too many chores on the weekends. However, me and the boys in the Waverly Southern shops managed to build a small, backwoods diesel switching engine. Build log can be found here: WSSR Backwoods Engine Build Log This is my first foray into building an engine and I did enjoy the journey and will build more. All materials used in this build were on hand prior to Jan.1 so the cost to build is $0.00.
We started with our typical back of the napkin concept drawing.

After a few more iterations we came up with this little gem.

It gets its power from a USA Trains truck. The side frames are 3D printed and are a variation of the Fox pressed steel side frames. I can’t remember who provided the original photos of the Fox side frames several years ago, but I like them.

The cowling is also 3D printed as are many of the details. The frame is built from western red cedar and the front and rear beams are mahogany.

The front and rear couplers are Kadee 1906 (I think) surface mounts. I designed and 3D printed the coupler mount shown above.
The rear fuel tank is 3D printed and will hold the RailPro card one day. The battery will be housed in the cowling and the speaker will be mounted in a trailing tank car.


Although the tank car is not part of the Mik Challenge, I built it and a few other cars for this little engine. You can see the tank car and a short flat car below. The rolling stock for this engine all have my version of the Fox pressed steel side frames.

I’m waiting on a few other 3D prints to finish for the caboose that will go with this set.
Thanks to everyone who provided inspiration and ideas during this build and especially to @Dave_Taylor for continuing to organize this event each year. I always look forward to participating.
We’re outta here!!

Dave’s Mik 2025 Lime Car
Last day to post… and I thought that everyone that was gonna has so I’ll finish off this years Glamor shots.
Just a couple days after the start of Mik 25 I ran across a photo of a unique 1880s Lime car. Wow… never saw or heard of one so thats perfect of Mik…!


And here is my version Fresh out of the Factory.


I like it, and I just might have to build me another one, since I already have the flatcar frame built…!!
Daves Old Gon Car…
While waiting for the paint to dry on my Lime car… I already had another flat car base built and decided to build yet another low side gon… But I have several already… and decided to go back and modify it.
Local old lumber company bought up an old well used gon to use as a sawdust and chips hauler. Got the gon cheep and added high sides to it, and used the hell out of it… but it still kept rolling along…


I whipped this built out start to Finnish in two days…
It is the very first time that I attempted to age weather a car… In the end I like it more than the Lime car… Old and used Just like me…!!
Fantastic model. Very fun and creative! Question: How did you make the funnel?
Carl,
It was part of the core bits. I suspect it was from whatever train-shaped container inspired the original modeler to try and craft a working loco.
Eric