Large Scale Central

1920's sawmill help.

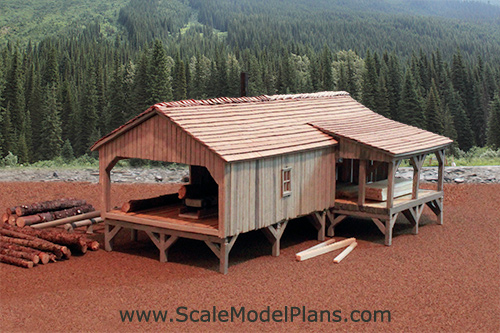
So one of the first structures to be built for my new On30 empire will be a turn of the century small backwoods sawmill. I already purchased this set of plans when i was going to build it in 1:24. Its from Scale Model Plans and their plans come with both templates to use to make it out of card stock/styrene/wood (whatever) and printable paper to make a paper model.

What I need help with is a basic understanding/ideas on what equipment I need to make a decent model of a small steam powered saw mill.

Here is what I know I need:

carriage for the log to ride on

head rig saw

steam boiler/engine

Some sort of table or rollers for the cut lumber. I am adding a drying shed as well so I am thinking rollers to catch planks and roll to the shed for stacking and drying

What else is an absolute must have. I am not looking to have everything a saw mill needs. I am looking for enough equipment to give it the proper flow and look.

Also what was the purpose of a Tee Pee burner. I feel like I need a Tee Pee burner.

Been slowly building up my knowledge in this area so this is woefully incomplete and possibly just plain wrong but, you might consider:

  • how are you loading logs? from a pond? or rolled directly off the log buggies?

  • how about another saw to cut the boards to length and/or trim off the rough end?

  • afaik the teepee burner disposes of sawdust, so it needs a conveyor to get the sawdust over. also afaik they were taller than you think. Wikipedia [link] calls them wigwam burners and say they were 30 to 60 feet tall.

I am definitely interested in all this. Thanks for starting the topic to cull all the knowledge in this community…

I’ve also been wanting to have the roof be rough/incomplete, partly so you can see inside and partly because interesting roofs make a railroad:

Jim,

looking more into it I need an edger which trims boards to width, and a swing saw which trims to length. So that all makes sense run it through the head rig to slab it. The edger to cut them to width, then a swing saw to trim to length. Then onto a sorting table to be stacked and put in a drying shed. I see that there were sawdust blowers that blew the sawdust to the burner.

Here’s a great model website: http://www.lauriegreensweb.com/Driwrott%203/Driwrott%203.html

More home work:

Since saw dust is dangerous, it is usually ducted to the slash burner for burning along with waste cuts. Flash fires and explosions are possible.

I watched the above video several days ago, because of the log tugs in the opening, little did I know we have a budding lumber man!

This being the last steam operation, moves slower and you can see how they done it.

thats a good vid John

Chris thats a pretty good view. I even am thinking a log pond.

Devon,

Flow chart is pretty similar and basic to most saw mills no matter the size of operation. Unfortunatly in modeling, especially garden scale, the mills are always way undersize for a railroad operation, it would take mills that size a week to cut enough lumber to fill a boxcar. That last is just a personel gripe never mind it.

Looks like the flow has been discussed some already but my 2 cents.

Logs into the mill.

From a pond there has to be some kind of Jack slide or chute to pull the logs to the cutting deck. This is done with a ladder chain running like a conveyor belt or a tongs and cable from a powered spool to pull them up. In larger mills there will be a water wash to spray loose bark, rocks, mud, etc from the logs on their way up the slide. And don’t forget the “Pond Monkey”

A lot of smaller mills used a rollway arrangement to bring the logs to the cutting deck. Either by cross-hauling the logs from the ground to the cutting deck up a ramp or using an elevated cold-deck and rolling the logs down onto the cutting deck.

From the cutting deck the logs are rolled onto the carriage and oriented in the most suitable cutting position and “dogged” down. The carriage is where the “Setter” works, riding the carraige back and forth and taking dimensional info from the “Sawyer” and adjusting “setting” the width of the cuts for 4 quarter, 8 quarter, etc.

The sawyer puts the saws and carriage in motion when he is satisfied that everything is ready. He is also the one responsable for “reading” the log and getting the most available lumber with the least waste from each log.

From the head rig the offcuts or slabs, or blanks are rolled either by hand or power rolls to the Edger table where a series of circular saws are set to cut dimensional lumber such as 6 inch or 8 inch etc. Usually there will be a couple of blade set ups on the edger so the edgerman can get the most out of the slab depending on it’s width.

From here it can go either to the Green Chain or the Cut Off tables depending on several factors such as; At smaller mills the logs are usually already in lengths that the want to deal with such as 16 or 24 foot so the lumber goes from Edger to the green chain. In larger operations they usually Cut 32 ft logs so the lumber is sent from the Edger to the Cut Off saw to be knocked down to the lengths they are wanting such as a couple of 16’s or maybe four 8’s etc. And remember a log is always cut long so that full 8 foot lumber can be cut from it no matter the breakdown. A 32 ft log will usually be cut 32’ 6 or 8 inches. After cut off ted boards are sent to the Green Chain.

As the boards make their way down the Green Chain they are (at least in the old days) graded for quality and marked with a crayon then the pullers grab the boards and stack them on racks according to size, 2x4 or 2x6 etc., and grade From there they are moved to the drying yard by any of several methods (again depending on several variables) and are stacked and stickered for drying before moving on to whatever they are going to be used for.

Lots of variables in all of the above depending on mill, size, location, budget, timber size, era, etc.

Here is a video we made a few years ago of a small steam operated sawmill, no railroad involved but it shows quite well the operations discussed above. In the vid I think you will see that all the waste from the edger is sent to a cut off saw and cut into piecesand these pieces along with the sawdust are all sent to the boiler as fuel, nothing is wasted.

Look here.

https://www.youtube.com/watch?v=CGuR3WN8PCs&feature=youtu.be

Looking forward to seeing your build.

Rick
Thanks Rick for that excellent description.

Yes the mill is too small. But as you said the real estate available in modeling is always a problem isnt it. That’s why I dont need every detail. A decent representation is all I am after. And with the information provided this far I know I can set up a reasonable rural mill that will at least convey the idea. One nice thing about dropping from 1:24 to 1:48 is I have effectively doubled the real estate. And a pretty decent portion of this layout will be the mill operations.

Now this brings up another question. So we have discussed how to get logs from the pond to the drying sheds. But how do we get the logs off the cars and into the ponds. Unfortunately John’s video shows a very nice log loader but I dont think they had them in the 20s. So keeping in mind that I can’t have it all what’s a good 1920 way to get logs off my skeleton cars and I to the pond.

Answered my own question. A log dump. Far more simplistic than I thought. Looks like the car is pulled up to the dump which is nothing more than an embankment, side, or ramp next to the tracks and then a cable is run under the log load opposite the mill pond and is attached to a simple log hub crane. The cable tightens and lifts the logs up and toward the pond where the fell into the water.

Is that really how they work.

Devon

You will find a wealth of information about sawmills on this site;

Vilas County Lumber Co.

They can provide plans sized to virtually scale.

Tom

“Is that really how they work.”

Yup pretty much. The cars are pulled into place, one at a time, next to the “Brow log”. The brow log is solidly anchored down and sometimes vertical logs at an angle are installed for the log load to slide down into the pond. Cables anchored on the Brow Log are, as you said, ran under the log load and attached to some type of hoisting device. and thed load is hoisted over the Brow log and into the pond.

Another system for unloading was called the “Jill Poke”. I’ll let you all figure out why it was named that way. The unloading track was at a slight angle side to side with the low side toward the brow log, made them slide/roll off the cars easier.

Check out Tom’s ON30 thread again he did some nice work depicting the unloading into the pond.

Also look here

https://www.mendorailhistory.org/1_logging/gillpokes-ginpoles.htm

And here

http://www.railroad-line.com/forum/topic.asp?TOPIC_ID=49986

And here

https://www.google.com/search?sxsrf=ACYBGNRoK4wNXFmDtT2K1DBGUQjEg7PoFA:1577241603407&q=log+unloading+with+a+Jill+Poke&tbm=isch&source=univ&sa=X&ved=2ahUKEwi7x_vr4s_mAhUOv54KHYp-DCIQsAR6BAgIEAE

More Input #5

Wow Rick,

Great resources and a couple different ideas here. For its simplicity I am liking the gill poke. A little adjustment to my track plan at the mill and I can make that work nicely.

Devon Sinsley said:

So one of the first structures to be built for my new On30 empire will be a turn of the century small backwoods sawmill.

Most start with building there layout … But knowing you … you want to know what is needed (footprint) forn this item and all the other wish things …

Devon lets not let this get to the Devoning stage … (https://www.largescalecentral.com/externals/tinymce/plugins/emoticons/img/smiley-wink.gif)

What else is on this list …

Sean McGillicuddy said:

Devon Sinsley said:

So one of the first structures to be built for my new On30 empire will be a turn of the century small backwoods sawmill.

Most start with building there layout … But knowing you … you want to know what is needed (footprint) forn this item and all the other wish things …

Devon lets not let this get to the Devoning stage … (https://www.largescalecentral.com/externals/tinymce/plugins/emoticons/img/smiley-wink.gif)

What else is on this list …

I would love to start building the layout. I would love to have a room to work in. But I am relegated to a table. Its frustrating because I am not in control of this process and so the Devoning that is taking place is not of my doing. The dance that is going on at my house resembles musical chairs and I am the one left without a chair. My son moved down stairs to my old hobby room. The wife took his room but is remodeling it and everything has been dumped in my new hobby room. So admittedly I am kinda putzing around with the mill and the cars to just cure my fix. I can’t even work on other unfinished stuff because its all buried.

OK under stood.

Good excuse … (https://www.largescalecentral.com/externals/tinymce/plugins/emoticons/img/smiley-wink.gif)We all can relate …my schedule … is not mine either … (https://www.largescalecentral.com/externals/tinymce/plugins/emoticons/img/smiley-laughing.gif)

OMGram …put the crack pipe down Rick …your worse than Cliff anymore !

Devon, don’t know how I missed this but I have an article that was published in Garden Railways magazine several years ago that explains a lot of details, when I built mine I sort of winged it using old playmobil wall, and roof parts + a lot of styrene and was able to over come the mistakes that I made, and would be glade to send it to you if you want. Here is a web site that has O scale stuff and not too expensive, saw 1 the other day that was talking about 3D stuff but can’t remember where, I’ll keep looking ( http://www.jvmodels.biz/o_scale_models.htm), and check mine out at https://www.pinterest.com/billbarnwell09/, Billsawmillinside the sawmill

X