Large Scale Central

Beating the COVID Boredom -- Island Mixed Plate

OK,

I am just going to list a string of projects. As I mentioned elsewhere, I am out of space and out of bits, so I am going to let circumstances and weather dictate what we tackle here’s the list:

  1. Coach Lighting. Bill Barnwell finally got me convinced I could make my own using some LEDs (on hand), scrap wire (on hand), styrene (on hand), and battery clips (have to wait). I can at least get a proof of concept!
  2. Fix Christmas Thomas. This is a battery powered LGB m2075. “He” absorbed lessons learned, a DPDT switch, and a rechargeable battery over the course of his “older brother’s” restoration. Now this one won’t engage its gears. The goal is to get this one working to validate a stab at repairing my LGB m2071 *Gltichy Gustav…*and to restore another “missile sponge” to service while we still need a cheap, light “toy.”
  3. Fiddle with the track. Over the years, our track plan changed and a run over a trestle no longer really runs over the trestle. A board makes it serviceable, but it bothers me…Cut out the trestle and position under the track, or fiddle with the track? Lots of interesting issues with space availability…
  4. Fiddle with the landscaping. The inner loop sits on a slight rise. Elements could benefit from a bit of shorting. I still have some lava rocks, and I have some pre-scribe “retaining” walls on hand.
  5. Fix Glitchy Gustav. Yeah, right…

Happy Easter to all who celebrate!

Eric

what sort o battery clip do yo need for item #1? I have a couple for 9 volt batteries laying around…somewhere…

Tim,

Forum member Bill Barnwell uses a pair of triple A batteries, I think. I am going to see if can fashion something from bits and parts.

Eric

A couple pictures of the landscaping issues…

Fiddle with Track. These photos show how the track and trestle have come misaligned. When I installed the trestle years ago, I cleverly and accidentally cemented it in place (oops). I could dig / cut it out, expand / replace the abutments, etc., but the gorge narrows to the point this may not be possible. Alternatively, I could dicker with the tracks, but it comes from a very narrow cut with limited wiggle-room and it runs into the town of Pu’u’oma’o where it already abuts the garden retaining wall. I have to leave some flexibility, because the cut, known as Deadman’s Curve, is a pinch point, and before we added some larger radius curves back there, even a STAINZ could bind up in the curve on a hot day! It still slows things down, so further curve widening is possible. A wider curve is also a likely improvement to the mainline as it passes through Pu’u’oma’o. Oh, I am adverse to cutting rails. We are still in “sandbox” mode, and I’d rather have standard sized partial solutions than a broad array of non-standard non-solutions as we continue to improve this part of the railroad.

Fiddle with the Landscaping. We raised this area a year or so ago to add some visual and vertical separation. I don’t know why, but the fact it keeps collapsing bothers me, even though it takes literally seconds to fix. The issue got worse in my opinion when we upgraded the pond. The flat concrete chunks are holding things in place (nominally), but I don’t like the “flying rock” look that bothers no one but me. I also don’t like untreated concrete where I could potentially leach into our little pond. Past fiddling sessions had seen tracks too close to the retaining rocks, with predictable results…We have the rocks…we have the shovels…

In other small project news, Kid-zilla and I fixed Christmas Thomas this morning. There was a loose wire, and the little guy noted a possible short where some insulation had melted away some time ago. Excellent… Unfortunately, we couldn’t recreate the gear slip, so no joy using this as a bridge to fixing Glitchy Gustav

Now to find stuff for lights and contemplate the concept of “solder.”

Eric

Forum member Bill Barnwell uses a pair of triple A batteries, I think. I am going to see if can fashion something from bits and parts.


Used to make those out of cut up tin cans, screws, and bits of wood forty some years ago

Update:

Progress across the board! Naturally, I deleted all the photos, so you’ll have to take my word for it…

First, Christmas Thomas stopped working, and I could hear the wine of a motor not engaging the drive gear. I opened the thing up, cleared up some grime (it is not intended to run in the garden…poor thing!), and gave it a good, hard look. Sure enough, the motor wiggles, and I could actually see some wear marks in the plastic housing that is supposed to hold it in place. I glued a small piece of strip styrene to the top of the motor, screwed it back together, and all is well… For now… We’ll run him some more tomorrow and see if this holds. As I tinkered, I promised Kid-zilla today when he turns 5 we will start converting his missile sponges (this beast, an unidentified save from a swap meet, and Diesel Dan) to “real trains.” Hang in there for one more year, Christmas Thomas! A real power train is coming!

I then turned to on the trestle. I had just enough of those stock, short lengths of track to lengthen the tracks in Pu’u’oma’o about 3", lining up the end of the curve with the trestle. Then I had to grab hammer, chisel, and safety goggles so I could cut out the one rock in that cut that was concreted in place. I regret the electrical weak points the short tracks will create, but this looks somewhat better and is a lot less iffy in terms of train safety. It rained, so no OPTEST. Longer term, there are some other cosmetic fixes that are better demonstrated with the photo I deleted.(http://largescalecentral.com/externals/tinymce/plugins/emoticons/img/smiley-frown.gif)…

The landscaping was where I thought I’d really have to do some digging and fiddling. OD ambled over, showed me better rocks, showed where I should put the stone I had just chiseled out of Deadman’s curve, and the whole blasted job was done in about 30 minutes. That’s what I get for asking for help! I did OPTEST this before the rains set in. Clearances are good, looks are improved, and Lake Inferior is safe from leaching concrete.

I had a few minute to think about the coach lighting. This is for OD’s shorty. I found the styrene, found the scrap wire, and used contact cement to glue one to the other. Tomorrow, I’ll solder on the LEDs. She wants to tinker with the roof of the coach a bit more, so installation will have to wait. If I validate the concept, I’ll proceed and make more.

At this rate, I am going to have to reopen Glitchy Gustav.

Eric

Update with Photographic Evidence:

First, while not evidence of victory, the Thomases:

The one on the far left my brother bought ~1982 after saving his pocket change for a while; next is Christmas Thomas who arrived in 2014 sporting the manual controls that replaced that horrid IR system; and lastly Little Thomas from 1976 sporting his new STAINZ engine block and paint job.

The trestle issue came out as seen below:

Trains ride more securely, and I seem to get better electrical conductivity, implying I accidentally fixed gyrations in that portion of the track from trying to align cut, bridge, and curves. It is still unsightly, however, but I am not sure if there is a good way to raise the trestle deck and fix that approach that doesn’t cause more problems.

I’ll let the photos below attest to OD’s eye for fixing the other landscaping issue.

The rock in the close-up came from the cut when I removed it to accommodate the new track alignment.

I moved onto the coach lighting. I used contact cement to glue scrap wires to styrene strip and exposed the wires in a couple points for me to solder the LEDs in place. I thought I remembered that LEDs only pass electricity in one direction, so I figured I’d better test my memory by testing the LED. Did you know that a 9 Volt battery will blow these things? I do now…YouTube research indicated 1k-ohm resistors may be required, but the LEDs are cheap, I have time on my hands, and, a noted elsewhere, some soldering practice on my part is in order! Otherwise, I have to turn to on Glitchy Gustav

Aloha,

Eric

Eric Mueller said:

I thought I remembered that LEDs only pass electricity in one direction, so I figured I’d better test my memory by testing the LED. Did you know that a 9 Volt battery will blow these things? I do now…YouTube research indicated 1k-ohm resistors may be required, but the LEDs are cheap, I have time on my hands, and, …

Even though it comes via the model rocket hobby, someone has created the perfect shirt for you to wear while engaged in that endeavor …

https://www.cafepress.com/wnotberesearch

Forrest,

You have no idea… Today, I undertook a long fallow project to get Oldest Son’s B’mann railtruck Charlie running using the same incredible technique…I have a selfish interest in getting it going, because I attribute this piece-of-(http://largescalecentral.com/externals/tinymce/plugins/emoticons/img/smiley-yell.gif)'s failure to his loss of interest in the hobby. He and I had previously ascertained power was getting to the circuit board but not to the motor, so we resolved today’s “homeschool” class would be Observing a Moron (me) Troubleshoot a Beautiful Model with Crappy Engineering 101. Oldest Son learned the following:

  1. Endeavor to find the manual.
  2. Find something to hold the 1,247 screws in separate bins that you can label.
  3. Photograph as you go.

Learning was achieved by observing the impact on the project by following subject moron’s (my) failure to follow steps 1-3.

We did manage to get to the motor at long last and confirm the bloody thing doesn’t work. We have had this model for 4 years, and it has been a shelf queen for most of those 4 years, sputtering to a stop for good last summer. I have an LGB locomotive from 1981 that work like champion, in contrast.

On the upshot, Oldest Son is jazzed that we have a way forward for Charlie now. His preference is to wait for B’mann to carry these motors again. I explained this might not happen, and he is open to trying a powered trailer. I have a functioning B’mann 10-wheeler motor we could try to shoehorn under the hood, too, but that is probably beyond my skills at this time. As it is Oldest Son’s preference to wait to see if we can get a stock motor, though, Charlie goes back on the shelf for the time being.

Oh, I am working on another light strip. Might as well as do something that leads to near term success. Glitchy Gustav continues to stare at me from the container where he lays in parts…

Aloha,

Eric

Eric you can get drives from H-L-W call Phil Jensen on Tuesday or Thursday and is only there part day so check web site for times or email him, motor is in the crate and only the rear wheel is driven

HLW Woody Rail Car, G scale. – West …
westrailway

X

His preference is to wait for B’mann to carry these motors again. I explained this might not happen, and he is open to trying a powered trailer.

Bachmann uses fairly standard parts throught their ranges. When I fixed a trolley, I bought an HO motor which looked the same and turned out to be the same size. It probably has different wire as it is a 12V motor, so I would be careful and make sure you don’t overload it.

Oh, and my motor turned out to have a bad commutator brush - that’s often the problem. Not much you can do except swap them out.

Bill & Pete,

Thanks. The irony, when the family all chipped in to get the railtruck, we thought about the HLW version, but it was more expensive. Should’ve gotten it, instead.

I’ll look through the B’mann catalog. The motor had a resistor of unknown size wired in parallel with it, which seemed odd to me. If it was from an O or HO model, it makes sense now.

Eric

I’ll look through the B’mann catalog.

Give yourself plenty of time. It took me a while to find a motor!

The motor had a resistor of unknown size wired in parallel with it,

That is probably a choke, intended to reduce RF interference. I’ve read they can burn out on some locos? You can certainly try removing it as they don’t have any other use. Wire the motor directly from the power source and see if it spins.

P.S. I never took the motor out of mine. How about a photo for posterity?

Pete,

Will do. I neglected to photo-journal this project, but I can certainly photograph Charlie in his component parts. For now, we will wait to see if B’mann has these in stock at some point in the future. The website says they are taking no orders for the time being due to COVID-19.

Eric

Pete,

As promised, here is what we did. Note there is probably a correct way to do this; Oldest Son and I used the “look at it and guess method.” There are a number of screws on the bottom that look like they hold the cab on but do not. Here, Oldest Son removes what turned out to be screws holding in a cable channel (there is a channel on each side):

We were looking for broken or damaged wires, so removing those cable channels was necessary, anyway, in our case. Boy, was it a pain to get those wires packed back inside, though!

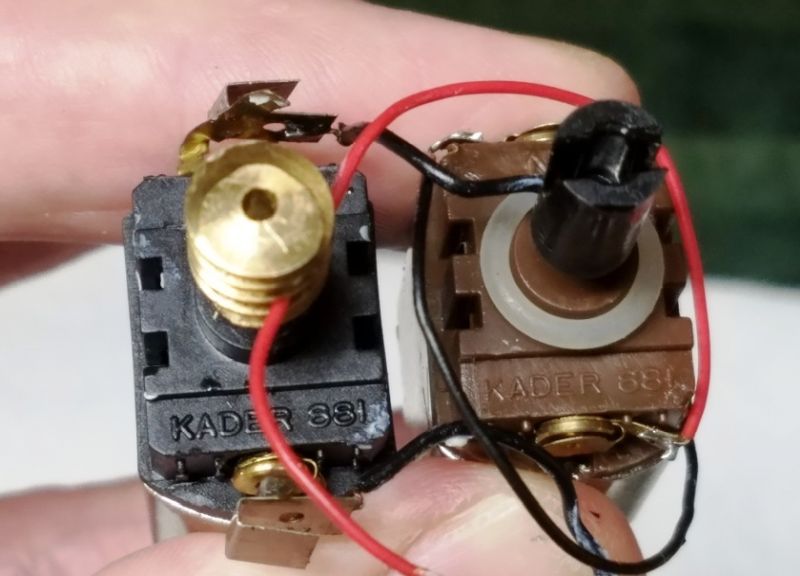
The screws actually relevant to the problem are all forward of the silver painted exhaust piping. From fore to aft, you need to take out screws that hold in the radiator grill (2), screws that hold the glide plate for those spring-loaded electrical buttons (4, I think) (We have a jumper wired from the wheel area to the plate. Those spring things were crap almost out of the box.), and a screw that holds the transmission cover in place. Most of these screws are visible in today’s picture below:

Once you have the “transmission” open, you can see the tabs that let you push off the plastic motor (Actually, a very nice touch in the detail department. Too bad it is wed to such rotten machinery…) , which, in turn, allows you to access the motor. I did not think it necessary to the do that tonigth, but the photo below gives you a sense of the size:

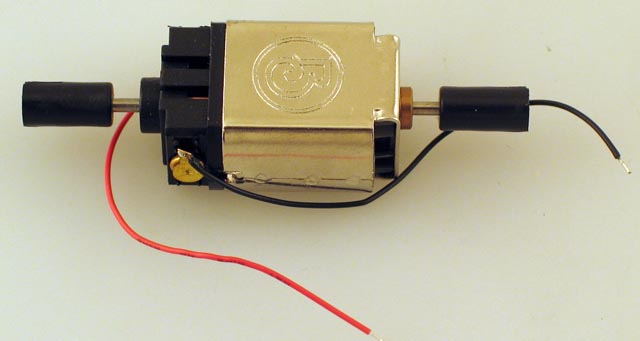
That resistor is the orang “booger looking thing” just forward of the grill. We did cut the wire as you suggested. Nope. This is a dead, dead motor. For comparison, here is the motor next to a salvaged B’mann 4-6-0 that ate its own gears (Beautiful model; bad engineering…I am seeing a trend. That loco got one of the new chassis and since runs great.).

The worm gear would engage the drive train, and we did kick around force fitting to the model. Oldest Son advised patience, which is unusual for him, so we will wait and see if B’mann carries the right motor again.

Oldest Son was pretty pleased with his efforts. Here you can see Charlie pretty much completely broken down last Saturday:

Again, there is no need to take off the box that holds the circuit board if you need to get at the motor. We took it all apart to inspect for broken, loose, or damaged wiring. There is not much slack, so getting the box screwed back on was painful, and now we do have an opportunity to re-solder a disconnected wire.

I have been very, very critical of B’mann in this post. To be fair, they handled this reasonably well when this model first showed problems shortly after purchase, sending Charlie back to us free of charge along with a new 2-4-2, since dubbed Smokey (As it turned out, the problem at that time was those stupid spring loaded contacts in the forward truck. An easy fix, had I known about it at the time. I found out about that after paying for it via an independent repair shop on the Mainland.). We did have to pay to ship Charlie to their repair site, in contrast with Piko which offered to reimburse us for a product if we failed to find a way to fix it locally via e-mail. I am just astounded that they would take the time to make such a detailed, fun model and then trust it to such a horrendous power train and electrical pick-up system. After this experience, I would rather pretend my STAINZ are Porters than take a chance on another B’mann model. Worse, it broke my boy’s heart when his train wouldn’t work, and I lost him to the hobby.

OK. I am venting. Excuse me. More plastic strips, scrap wire, and LEDs to convert to coach lamps as the Aloha State prepares to remain in lock-down through May. Glitchy Gustav still waits in the shadows, too… At least he worked for 2 decades before giving me fits.

Aloha,

Eric

Eric,

I’m sorry I didn’t think of this earlier. Instructions for tearing down the rail truck to get at the motor were circulated a few years ago, as the early ones needed a different screw, I think the factory put one in that was too long? George Schreyer’s Tips page has Dave G [TOC]'s instructions:
http://www.girr.org/girr/tips/tips8/bachmann_railtruck_tips.html

That motor of yours is the standard Kader unit used in everything from HO to Large scale. I fixed a trolley a couple of years ago and it had the same motor. The gold disks on the black end are the brush mounts - I found my brushes were useless which stopped the motor from working.

Does it say “KADER 881” on the front, like this:

The motor on the right is for the HO GP50, part #H61206, as below:

I had to swap worm gears, etc., when I fixed my trolley. This thread might be helpful.

https://www.largescalecentral.com/forums/topic/28736/re-motoring-a-bachmann-4-wheel-trolley/view/post_id/373286

Pete,

Thanks for the links and the tip. It is indeed a Kader 881. This gives me options if B’mann doesn’t carry this specifically for the Railtruck. I wonder if there is a Buehler equivalent? That bears some investigating, too…

Eric

Four year old, falling lava rocks, and construction cement…What could go wrong? Actually, Kid-zilla and I fixed some landscaping issues and repaired some buildings before I glued the glue gun to myself.

Battery clips and switches are on order for the coaches. The cane cars await the full opening of the hardware and craft stores. M&K Sugar Mill is in the research and planning stages. Glitchy Gustav calls from his box… There is no escaping… Like a moth unto the flame go I (and my VISA)…

Eric

Coming up on my off week, it is time to lay out the goals:

  1. Help Oldest Son restore Charlie the Railtruck to service. Many thanks to Pete Thornton for the assist!
  2. Finish some coach lighting using the bits that arrived in the mail, to include flux. This time, I shall try “flux” as part of my learn-to-solder-correctly challenge-within-this-challenge.
  3. Make cardboard mock-ups for the M&K Sugar Mill
  4. Assist, as required, OD on her shorty restoration.
  5. Finish the cane cars. Stores open Friday, and the craft shop is on the agenda!

Glitchy Gustav’s chassis is at TrainLi. I had to finally give up on that project after three years and multiple efforts to restore the old boy to service. Throwing money at the problem may not count as “success,” but I had to cut this mental anchor loose

I’ve been glad for the “Beating the Boredom Challenge.” Work on the Triple O was a given; putting myself on report has helped guarantee progress!

Eric

So far, so good!

After Pete Thornton’s assistance with the motor, the boys and I wired up an old power pack, rebuilt Charlie, and fired him up over the weekend:

The initial check began with great excitement as Charlie’s drive wheels spun for the first time in at least 18 months:

Video

We found by pushing down on the cap that holds one of the brushes in place, Charlie worked just fine. We experimented by placing a shim under motor cover (the white block to the left in the picture below):

This proved unreliable. We then rummaged about for zip ties:

This almost snugged it down enough. Then, as I fiddled with it, Oldest Son noticed I cut the wire to the motor. Good thing soldering is on my “skills to improve during lockdown list!” We seem to be on the right track, and I suspect a smaller zip tie might be able to better snug down over the cap. I can get those at the auto parts store, which is open. In the meantime, Oldest Son was thrilled to see his train running, albeit poorly for the moment, so I’ll count that as a victory. Thanks, Pete!

Since we were on a roll, we soldered together some LEDs, scrap wire, and a battery-switch box in a poor imitation of Bill Barnwell’s DIY interior light strips. Oldest Son event tried his hand at soldering. He has my natural “talent.” Light, however, came to the night time riders of the Triple O!

Video.

It’s a lot, lot cooler in person.

The girls donated a chain to the cane car project, so that is still stalled, but in the archaeological dig they call their room they unearthed sufficient carboard to begin worrying over the sugar mill.

Lots of little projects, none very epic, but all are fun.

Aloha,

Eric