Welcome!! As a fellow returnee to the hobby, I can let you know that the guys here are great and know their stuff!
About the “decreasing radius”.
- Pick the largest curve you can fit.
- Now find a way to go “gentler” one more “step” (work harder to squeeze in a larger curve)
- if you can add transitions to the beginning of the curve, that is great
I would not do it the way I read your question, i.e. pick a curve, and then put a tighter piece in the center. You really want to maintain a smooth constant curve as much as possible, and definitely not let it get tighter.
Remember that normally we do not have room for transition curves as in the prototype, and the best we can do is maintain the largest curve that will fit.
Keeping it consistent reduces the “jerks” to the equipment as traverses the curve, i.e. a constant curve only has 2 “jerks”, from straight to curve, then hold constant, then from curve to straight.
If you put a tighter curve in the middle, you get 4 “jerks”.
The fewer jerks we have in our hobby, the less there is to fowl things up. (http://largescalecentral.com/externals/tinymce/plugins/emoticons/img/smiley-wink.gif)
Greg
The fewer jerks we have in our hobby, the less there is to fowl things up. (http://largescalecentral.com/externals/tinymce/plugins/emoticons/img/smiley-wink.gif)
And why were you looking at me when you said that? (https://largescalecentral.com/externals/tinymce/plugins/emoticons/img/smiley-wink.gif)
Welcome to the hobby. I have seen what you describe with the curves done in O scale, I haven’t seen it done in large scale. Trust us when we say go with the largest curves. Right now it may not seam necessary, but someday you may just buy a something that just isn’t happy on small curves. A something you haven’t even considered now, because you haven’t seen it yet.
Fowl?
Thanks for the interesting input - it makes sense. It is details like this that I appreciate and will add to the realism of my new little world! (http://www.largescalecentral.com/externals/tinymce/plugins/emoticons/img/smiley-smile.gif)
Thanks for the interesting input - it makes sense. It is details like this that I appreciate and will add to the realism of my new little world! (http://www.largescalecentral.com/externals/tinymce/plugins/emoticons/img/smiley-smile.gif)
Sam… Just my opinion, might be shared by others… If at all possible , Use the longest possible length of rail you can get. 8 ft sections if you can get them…
Get a rail bender ( beg, borrow or steal one ) and curve your own sections. The key is you can put in a bit of transitions into the curves… BIG PLUS… you end up with the fewest possible number of joints in your rails.
Most all problems occur at joints. and switches. long rails = fewer joints = happier trains…
You can also fit a curve to the space available, just like the real RR did. It allows you the freedom to put track to fit the space better.
I have tight curves to fit tight spaces, so I have to run Talgo couplers, Body mount are instant derail… Go as large as you can fit…
$.02
Greg Elmassian said:
The fewer jerks we have in our hobby, the less there is to fowl things up. (http://largescalecentral.com/externals/tinymce/plugins/emoticons/img/smiley-wink.gif)
Greg, what an open door …
Dave Taylor said:
Sam… Just my opinion, might be shared by others… If at all possible , Use the longest possible length of rail you can get. 8 ft sections if you can get them…
Get a rail bender ( beg, borrow or steal one ) and curve your own sections. The key is you can put in a bit of transitions into the curves… BIG PLUS… you end up with the fewest possible number of joints in your rails.
Most all problems occur at joints. and switches. long rails = fewer joints = happier trains…
You can also fit a curve to the space available, just like the real RR did. It allows you the freedom to put track to fit the space better.
I have tight curves to fit tight spaces, so I have to run Talgo couplers, Body mount are instant derail… Go as large as you can fit…
$.02
Sam, I totally agree with David… It’s a different way of thinking, flex vs. sectional track. But it really works. And when you use a rail bender, going from curve to straight, the transition curves are practically automatic. And you don’t have to put joints at any exact point where curve meets straight. Also, you can stagger joints on curves, so that the jerks are evened out somewhat.
I was concerned with $$ when I put my track in, but after I did all my research I decided to save up and get the track that I felt would work best for me. That meant flex track, non-oxidizing nickle-plated brass rail, from Train-Li.
Another 2 cents
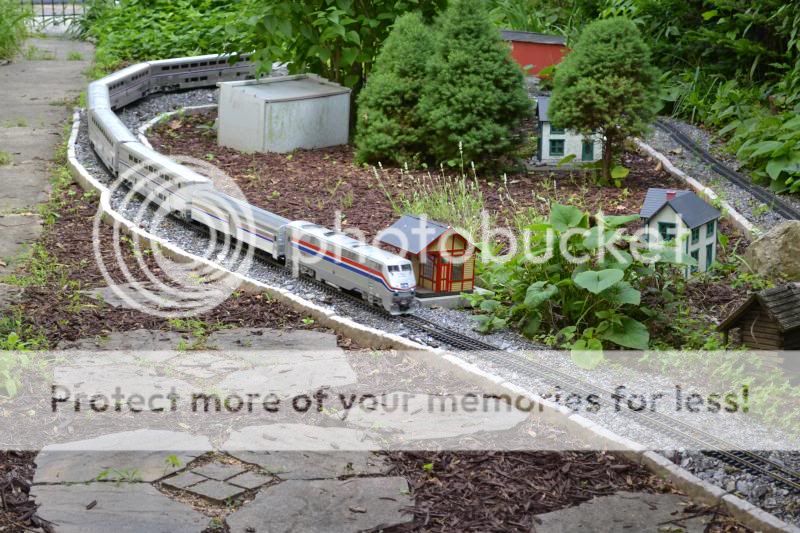
I have the advantage of almost unlimited room for my railroad. In several places, I lead into a curve with a 20 ft diameter (10 ft radius) section, followed by a 10 ft dia, then another 20 ft curve, each transiting 30°. No jerks allowed.
I also used mostly flex track, as you can see in the free flowing curves of the wye.

Lovin’ the nuance of all of this track design/setup and appreciate all your inputs. I knew I was gonna dig this hobby! Many thanks fellas - standby for more silly questions!!!
Agree with larger is better but there are times and situations were that is not possible, if you were to keep to 1 radius say like a 2 1/2’ (1500) would it be better than using 1600, 1500 and a couple of 1100 to fit the same place I believe from past experience the latter is better, + if the smaller curve is put first it wouldn’t be decreasing radius it would become increasing radius and definitely use flex track.
But Bill, you put the smaller curve first and come from the other direction and it is decreasing radius. (https://www.largescalecentral.com/externals/tinymce/plugins/emoticons/img/smiley-wink.gif)
One thing that would be helpful to the OP is how much room do you have and get a calibration on the situation. Clearly if you were in Steve’s situation, by all means use BIG curves AND transition curves like the real railroads.
But, I suspect by the question you asked in your first post, you have the situation that the vast majority have, too little space to have nice sweeping 20’ diameter curves.
So if you have a rough sketch of the space available, maybe we can be of further assistance.
Greg
Greg, so true
So my “limited space” is a bit of a self-limiting scenario in that I want to nestle my set up in an area with existing garden plots that makes sense for my back yard layout/flow (not that I am leaving any time soon but, always got to look toward resale of the property - learned that in the Navy). But, I have been bouncing all of your good input off of my sanity board (aka wife) and she and i discussed orienting the pond (this is a non-negotiated feature of the raised bed btw) 180 deg opposite of my initial design. This should give me some relief on “sharp” track turns. I’ll post a photo shortly to help you all visualize this.
So can you tell us a bit more about your “vision”?
For example mainline standard gauge trains? Narrow gauge trains? Modern cars, old cars?
In my case I model the transition era (ending of steam, early diesels) mainline Santa Fe. So most of my rolling stock is 40’ cars with a fes 50’, no super long freight. Old heavyweight pullman passenger as well as early streamliner 80’ cars.
This helped me set my minimum curve diameter and minimum mainline switches. It also helped set clearances as my layout is shoehorned into a somewhat small lot.
Greg
Greg. Good question. My vision is to run European narrow gauge freight and passenger cars (mostly shorter in length with a few exceptions) pulled by mid-century and later steam and electric engines using power from track and extensive catenary system. I have a ”Jumbo” analog (10amps ?) LGB power supply. I plan to use extensive blocking to maximize flexibility of engine/car movements (given I won‘t be using digital capabilities for now). I plan to have the capability for automated traffic with appropriate track electronics and sensors on engines and integrating epl signal technology. My setup as mentioned before will be elevated (12-20”) and will have a pond with waterfall. The ”mountain” which will house the filtration system and provide the waterfall will have a tunnel going thru it. My train yard area will have 4-5 tracks and will accommodate a small rural passenger station with a repair/servicing facility and a coal loading capability for steam engines (my electric, catenary, engines are on their own!!) and a cargo handling facility (please excuse my hacking of the railroad lingo - I’ll get there!!!). The rough (very rough) area of my layout will be about 500-600 sq ft.
Have you heard of the concept of “givens and 'druthers?” Givens are the must haves, like EUROPEAN style NG freight and passenger, track power, analog control, pond, waterfall, tunnel, yard. " 'Druthers are the things that you want, but can live without, like future digital control (DCC?), operating transportation system, moving freight and passengers from A to B to C and back. Bridges, trestles. Buildings. That sort of thing.
What sort of plant life will inhabit your miniature world?
Think about them now, remember the 5 P’s.
Sam Griffith said:
BTW, is it taboo or mechanically challenging to reduce the curve radius in mid curve, i.e. mix large radius followed by medium radius curve track within the same curve.
As Mr. Barnwell stated absolutely not as you fit the RR to the space that you have and further more it’s YOUR RR YOUR RULES (spelling and punctuation police please report to the moderator).
Despite what the experts recommend it does not create any more “jerks that can FOWL things up”. However my RR has only been on the ground for over 10years so I’m not really sure if it works or not. What I do know is you can certainly run 36" long custom built cars with body mounted couplers on a 9’ diameter with 10’ diameter sections inserted without extra jerks .
Welcome Sam!
Yes Joe I know how to embed …https://www.youtube.com/watch?v=P13qxoeETxs