Indirectly answering, I’ll say this; the HLW 4-wheel Mack switchers, and the “Sparky” trolley locos on same mechanism, come with loop only on each end, no hooks. They got replaced with hook+loop couplers except for the one which got knuckle couplers.
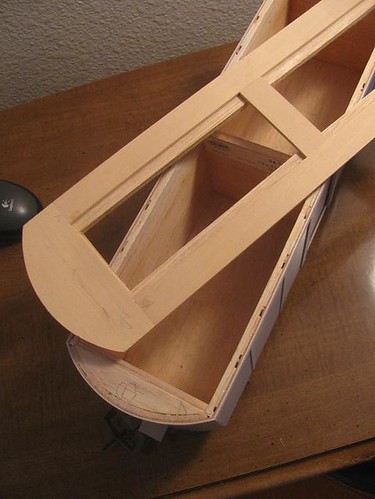
First body built, roof to be made yet.
The door is made from paddle pop/icy pole sticks and bought from a $2 shop.
To get the sides and ends square I used balsa blocks glued inside which were held in place by dressmaking pins.
The ends are a bit rough so I think I’ll trim and sand them square I might even use some styrene angle over the joints to simulate steel reinforcement and hide the rough job.
I have some 0.5mm which I should be able to bend and put simulated coach bold heads down it using my pattern tracing wheel.
The meranti wood strips were a bit wide, so I had to attempt scribing them down the middle to give the impression of thinner planks, I am going to give them a dark wash to try and highlight the scribe marks similar to what the plastic modeler do with aircraft panel lines.
A friend has cut some of the strips to be used for the rest in half so that scribing will not be necessary.
This will be an outside frame boxcar so thin strips will be glued over this to simulate the frame.
The other bodies will be my therapy as I recover from a hip replacement.
Hey Cool! there are photos of European narrow gauge boxcars, wagons, which have planking about that wide proportionally. And metal corner reinforcements like you mention - with bolts securing them to the corner. Also with metal diagonal and vertical framing on exterior.
And the truck placement to me looks like car is intended for trolley and interurban style curves.
On scribing the planks in the middle, some US standard gauge boxcar siding was actually done that way.
Wash might soak in to plank wood as a whole - another idea Ive used sometimes - use fine mechanical pencil, 0.5mm, and soft lead, 2B or softer, to shade the scribing.
And here’s wishing for that hip to heal well and on schedule.
Forrest Scott Wood said:
Hey Cool! there are photos of European narrow gauge boxcars, wagons, which have planking about that wide proportionally. And metal corner reinforcements like you mention - with bolts securing them to the corner. Also with metal diagonal and vertical framing on exterior.
And the truck placement to me looks like car is intended for trolley and interurban style curves.
On scribing the planks in the middle, some US standard gauge boxcar siding was actually done that way.
Wash might soak in to plank wood as a whole - another idea Ive used sometimes - use fine mechanical pencil, 0.5mm, and soft lead, 2B or softer, to shade the scribing.
And here’s wishing for that hip to heal well and on schedule.
I have seen the boxcars with the steel reinforcing which is were I got the idea.
The wash is going to be over a sealing undercoat and then the top coat will be sprayed, if that doesn’t work I’ll paint the wash on and then wipe it off with a cloth hopefully leaving a dirty weathered boxcar.
After saying that I might just do that with all of them.
The hip is my second one when I am finished I will have afull titanium undercarriage/suspension just like the$6 million dollar man (http://www.largescalecentral.com/externals/tinymce/plugins/emoticons/img/smiley-laughing.gif)(http://www.largescalecentral.com/externals/tinymce/plugins/emoticons/img/smiley-laughing.gif)
Okay, yeah, the sealer and paint will make a difference! I was thinking bare wood or just stained wood, like I’ve done a couple times.
These 2 cars which occasionally see progress have round ends and will have round roofs inspired by interurban boxcars cars. Am saying that my island based Willow Creek Traction short line used plywood for exterior siding.
Cars will, eventually, probably, see copper sheet used for shaping corner trim. Am pondering whether to emboss bolt head or drill and use pins to represent bolt heads.
Door style remains undecided.
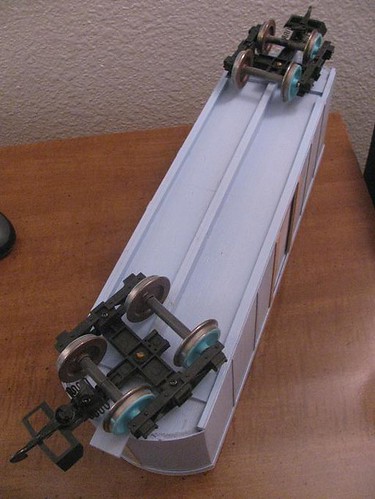
Trucks on these are in more normal RR boxcar locations with carbody a bit shorter to allow a small platform at each end.
And that’s not the final coat of paint, there will be more. Roof color is undecided, maybe grey.
A couple shots showing construction, which is balsa wood and basswood with exterior skin of really thin RC plane plywood.
Looking good. Fun project
I’m still unsuccessful in coming up with how to put my words to “two loops of raisins in every package of …” so expressing same sentiment as David and Devon is what I’ll do.
Now, granted, it is easier to uncouple with just one hook involved, but to me the operational flexibility and the simply place the cars on the track and couple up the train factor are the deciding factors.
I have an OO scale train-set that I gave myself for father’s day. It has OO scale hook and loop couplers and one of the hooks fell off one of the cars. I tried running it with just the one hook, hooked, and after it uncoupled on some uneven track, the second time, I moved that car to the rear of the train. So on less then perfect track, 2 hooks are better then one. Although they can be a bit more bothersome to uncouple.
Forrest Scott Wood said:
I’m still unsuccessful in coming up with how to put my words to “two loops of raisins in every package of …” so expressing same sentiment as David and Devon is what I’ll do.
Now, granted, it is easier to uncouple with just one hook involved, but to me the operational flexibility and the simply place the cars on the track and couple up the train factor are the deciding factors.
I have an uncoupling device made from half a credit card mounted onto a stick, just push down on both the hooks between the coupler and drive the train away.
Those boxcars with the rounded ends are really neat! I can see where that would be helpful going around the very tight curves found on an interurban.
Graeme Price said:
I have an uncoupling device made from half a credit card mounted onto a stick, just push down on both the hooks between the coupler and drive the train away.
Ahh, that’s an idea, will have to try that!
Forrest Scott Wood said:
Graeme Price said:
I have an uncoupling device made from half a credit card mounted onto a stick, just push down on both the hooks between the coupler and drive the train away.
Ahh, that’s an idea, will have to try that!
Some pictures because they say a thousand words
Graeme Price said:
Necessity being the mother of invention I have had to resort to building my own rolling stock due to the cost of RTR being out of my reach.
This is the prototype of flat car that will have a boxcar body mounted onto it, I intend to make 6 Boxcars which are roughly modelled on plans from Garden Railways and are intended for use behind my 1:20.3 Consolidation…
The base is made from MDF (type of particle board) with strips of wood to add some underframe detail and a piece of mild steel flat bar which serves to stop the MDF from curling and to add weight.
The bogie (trucks) side frames are made from 2mm styrene, the bolster from some plastic molding, the axle bushes are belt making eyelets from a craft shop and the springs are from clothes pegs.
The only commercial products on the bogies are the wheels and the coupler.
Update 11 Nov 2016
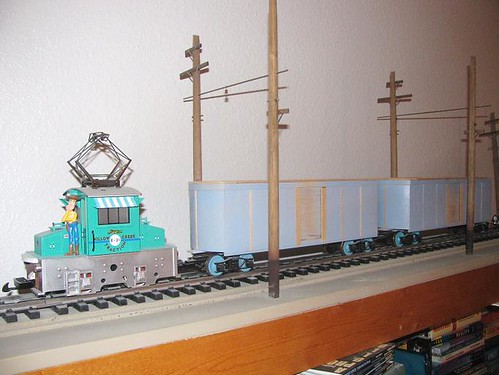
The boxcar is now assembled and is ready for a visit to the paint shop.
Being made of wood I am going to paint it with a sealer/undercoat prior to spray painting with another primer them the top coats.
This boxcar was produced by loosely following a plan that was in “Garden Railways” (when they came as a centerfold) that I was given a collection of.
I have Australianised it by not making the roof out of “planks” and not putting roof walk details on.
From looking at rolling stock in museums here in Oz I noticed that roofs of wagons and carriages were made of wood which the had canvas or some other cloth glued/attached which was then painted so this is what I am emulating.
This project was therapy while I recover from a hip replacement I have 5 other chassis ready for some bodywork to be attached
The original plan was 6 boxcars but while in hospital I started thinking open wagons, maybe a reefer and a tank car might make the train that these are destined for more interesting.
Update 13 Nov 2016
Boxcar is now out of the paint shop and ready for service.
I added a couple of pieces of styrene to the door to give it a bit of detail (runner brackets and a lock)
I painted the wheels and springs a rust colour, the axle box ends are painted a dark grey.
I did this because when they were painted flat black they looked plain boring and I feel that the bogies now have a bit of character.
The future
The next project is a tanker I am using one of my 6 premade chassis and making the Tank from 100mm (4") PVC pipe with end caps and a couple of 32mm PVC end caps for the domes plus some detail ladders, walkways, piping etc.
That outside bracing seals the deal on that being a cool car.
your first try is way better, than my first tries were. go on!
That’s a helluva nice job, Graeme. Keep us posted on the consist. And good luck with the recovery.
I could not figure out how to add pictures to a reply so I have added an update with pictures to thread dated 10 November 2016.
Now I have found that after I post a quick reply I can add pictures (still haven’t figured out how to attach pictures to Quick Reply).
So here is the update.
Update 13 Nov 2016
Boxcar is now out of the paint shop and ready for service.
I added a couple of pieces of styrene to the door to give it a bit of detail (runner brackets and a lock)
I painted the wheels and springs a rust colour, the axle box ends are painted a dark grey.
I did this because when they were painted flat black they looked plain boring and I feel that the bogies now have a bit of character.
The future
The next project is a tanker I am using one of my 6 premade chassis and making the Tank from 100mm (4") PVC pipe with end caps and a couple of 32mm PVC end caps for the domes plus some detail ladders, walkways, piping etc.
Graeme, you cannot insert pictures from your computer on the quick reply. If you want to put pictures from your computer in the reply, you need to scroll up to the top of the page and click the reply button. I dunno why, it just is.
Congrats on your build. (http://largescalecentral.com/externals/tinymce/plugins/emoticons/img/smiley-smile.gif)
Call 'em brand new bearings in primer if someone needs a technical reason why. Artistic reasons are fine by me.
Guess if you took the time to add photos the reply wouldn’t be quick?
David Maynard said:
Graeme, you cannot insert pictures from your computer on the quick reply. If you want to put pictures from your computer in the reply, you need to scroll up to the top of the page and click the reply button. I dunno why, it just is.
Congrats on your build. (http://largescalecentral.com/externals/tinymce/plugins/emoticons/img/smiley-smile.gif)
Thanks David,
Found the “Reply” button its that big thing that if it was a snake it would have bitten me. (http://www.largescalecentral.com/externals/tinymce/plugins/emoticons/img/smiley-smile.gif)(http://www.largescalecentral.com/externals/tinymce/plugins/emoticons/img/smiley-wink.gif)