Large Scale Central

Modern Woodchip Hopper Car Build

Mike said:

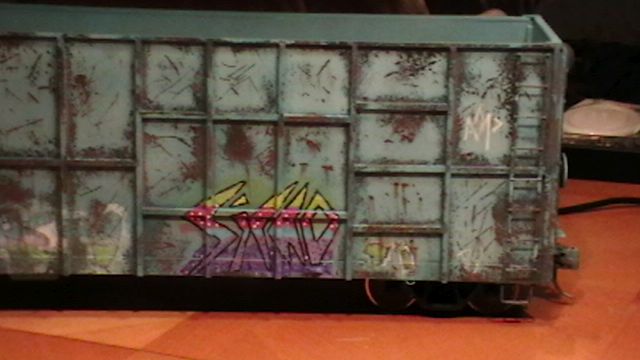
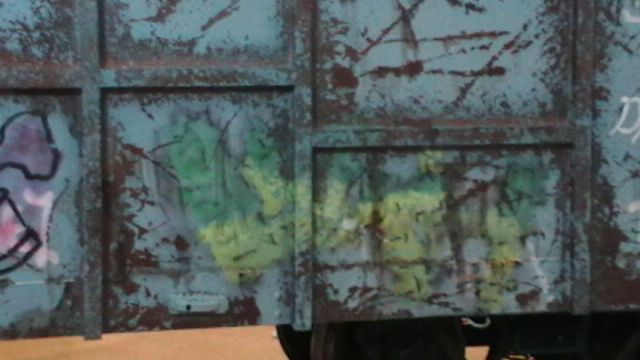
“The method that seems to be working pretty good on removing the paint and exposing the rust color goes something like this. First using a soft 1/2” inch brush dip it in the alcohol and put it on the area you want to weather. You have only one shot at getting it wet because if you go over it again you could remove too much top color where you really didn’t want to. Next I randomly make scratches with a toothpick . You have to apply feather light movements or again you might make the scratches too big. Then I take a 1" brush and stipple the whetted area using a strait up and down motion. I like to use a hairdrier when i’m doing this as the paint gets a rough , grainy feel and isn’t smooth anymore. "

I do like the results of the technique Mike.(https://www.largescalecentral.com/externals/tinymce/plugins/emoticons/img/smiley-cool.gif)

Today I finished the construction of my woodchip car. The load is made of blue foam board carved to a mound shape and covered with real sawdust . The load is removable so I can access the truck and coupler screws . This car was pretty easy to build compared to others I have done in the past and I am heading back to Loews to get a couple more metal strips to build two more cars just like this. Anyhow here are some photo’s of the finished car. Thank for following !

Very well done, Mike. Thanks for sharing your work. I especially like your method of weathering.

Congratulations, that is a fine model.

Gonna make a tarp for it?

Thanks Dan and John . The load was relatively easy to make so others could be made with a tarp on it and others with construction debris instead of wood chips. This car and the other two others I am gonna build will be wood chips.

Seriously blown away by your skills!

I like it.

John Caughey said:

Congratulations, that is a fine model.

Gonna make a tarp for it?

These don’t normally have tarps, but rather light weight mesh netting. A piece of bridal veil would probably work.

love this!!!

Get several more pieces of metal, and start selling them, I would buy one!! As always awesome work Mike!

This era of cars are not my style but man, incredible work Mike! I was impressed with how quick you built it but the weathering just makes the total package.

Steve

mike dorsch said:

Mike

Fantastic work, I started a similar car many years ago - got as far as the sides. After reading this thread I must dig them out and finish the car some day

Colin Stewart

Inverness

Scotland

Thanks Colin , you should finish it. I just started on two more of them yesterday . I had just enough .080 to make two more floors for them. I hope I have enough .060 sitting around for the side and ends. The one in the foreground is setting up after applying epoxy and the one on the back needs to be glued together still.

Great work Mike.

I always liked the smell of those cars as they went by.

Shane

Fantastic Job… (http://www.largescalecentral.com/externals/tinymce/plugins/emoticons/img/smiley-cool.gif)

mike,

how do you get the JB weld rivets to look so good? I tried some on scrap but mone were too runny. I like the technique but can’t seem to get it right. please help.

JKS

Smoke some crack or something then try again John ?

Mike is outta control !

John K. Saunders said:

mike,

how do you get the JB weld rivets to look so good? I tried some on scrap but mone were too runny. I like the technique but can’t seem to get it right. please help.

JKS

Try mixing some baking soda into it. I’ve read about baking soda being used in CA glues to thicken …

My wife would agree with you Rooster . (http://www.largescalecentral.com/externals/tinymce/plugins/emoticons/img/smiley-smile.gif)John , I use regular old JB Weld for the rivets . I think they make a couple of different types. Mine is the two part grey / black variety .