Large Scale Central

MIK 2019 Craig Townsend Build

Paul Burch said:

Craig,

I took a look at one of my N.P. boxcars with the idea of cutting off the sills. Big problem, the lower door guides are on the sill.

The lower guides pop off with a little help. But then if you fix the side sills, you really need to replace the ends and the roof as well. Major foob car. I was looking at the 50’ mechanical refers and they use the exact same mold for the ends and roof. Humm, what a shock.

The LGB 50’ box has the same style end as well. And so does the AML boxcars.

Humm, I wonder who copied who?

I guess in the future I need to start drawing up a correct end and 3D print it, and then cast molds. Oh great more projects.

John,

When I do the other side, I will try to take more in progress photos. The biggest step with weathering is getting over the idea that you’re ruining a factory paint scheme.

Here’s what I did today. Removed the roofwalk, plugged the holes with stryene rod. Filled the gaps in the ribs with stryene strips to represent the roofwalk supports.

Repainted the green roof to silver to represent the galvanized roof.

Quick dry with hairdryer (a must for weathering and don’t steal the one from your wife)

Clean airbrush, and spray the roof with tap water. Sprinkle salt on top of the roof, rewetting with airbrush. Dry with hairdryer.

Then when everything is nice and dry proceed with rust base coat. This was craft acrylic paint (burnt umber) thinned with my normal acrylic thinner. Then I sprayed a layer of a dark rust wash over the burnt umber.

Clean airbrush. Quick dry with hairdryer again. Then brush off the salt with an old toothbrush/stiff paint brush

This is the prototype photo I’m using as an example.

Looks good. I love the salt method.

Devon Sinsley said:

Looks good. I love the salt method.

This is only part 1 of the base coat.

Next I’m going to spray chipping fluid aka hairspray, over the whole roof and repeat the process. Then chip away. That should give a good 3D layer effect of layers of rusting, and the un-rusted galvanized roof.

I use that technique as well but never tried it together. Will be very curious how the combined effects turn out.

Devon Sinsley said:

I use that technique as well but never tried it together. Will be very curious how the combined effects turn out.

How’s this? Calling the roof done. Sprayed a clear coat on. Nothing would be worse than having this weathering wash off the first time it rains and I run trains!

Very Nice!..

Very very nicely done.

You done good.

For those interested this is the steps of what I did.

  1. Airbrush base coat of silver

  2. Salt

  3. Airbrushed burnt umber

  4. Airbrushed a dark rust wash to blend burnt umber

  5. Removed 90% of salt

  6. Sprayed chipping fluid

  7. Airbrushed silver, feathering the edges so they aren’t hard

  8. Airbrushed a light rust wash

  9. Dried everything good with a hairdryer

  10. Chipped the entire roof, removed the last 10% of salt

  11. Added rust powders to the roof

  12. Clear coat seal

I think I might go back and add just a touch more weathering to the brackets, and blend a couple of problem areas. But I will probably wait on that until I’m closer to the end.

Wow Craig!!!

Looking great. Making me jealous to get going on some new projects.

Image result for we're not worthy meme

I got distracted with work so the progress has been slow (not fair the retired people get 30 full days, but us working stiffs only get partial days), but that said I did complete a layer of oil filter wash on the one side a couple of nights ago. Film at 11. This wash was a bit darker, with more rust/dirt tones than the first wash which was a whiter wash. Touched up the roof with a little bit of weathering powders as well.

I will try and post a step by step of the oil filter wash when I do the other side. Trying to figure out what’s next after the washes/filters.

What you have so far looks great. I’d love to compare (in person) your paint/rust/hairspray methods to the iron paint / rust activator that I use commercially for a rusted finish.

Jon Radder said:

What you have so far looks great. I’d love to compare (in person) your paint/rust/hairspray methods to the iron paint / rust activator that I use commercially for a rusted finish.

Send me the airfare both ways and I will come to York and the drag and brag. :wink:

More in progress photos. This has an additional layer of oil filter wash. This time it was more a dirty brown wash than a white fade wash. The lettering, logo was all chipped with a dull #11 blade. Worked better than sandpaper, and much more controllable.

Updated picture of the roof.

Step one of oil filter wash.

Squeeze some oil on some scrap paper/cardboard. Walk away for a few hours to let the oil soak out. I did this when I got home at 15:00 local, and probably won’t get back out into the shop until 18:30-19:00 local. A little oil goes a long way, so these will probably be enough for the entire car (3 sides remaining)

Devon and Steve F. have been back channeling me on Facebook accusing me of rivet counting. Well, I admit that I was rivet counting…

Where is the rivet counter anonymous meeting this month? Or did we cancel on account of MIK?

Step 1 Grab oils after they have sat around for a while. Compare with other photo.

Step 2 of oil filter (after doing letter scraping,etc)

Place random dots all around the car body. I probably did more than I need, but I’m still learning. The more lighter colors the lighter of a fade, more darker colors the darker fade. I was trying for a dirty/light fade.

Step 3

Break out the biggest brush you have, and get it damp with mineral spirits (I use odorless, a bit pricer, but I don’t have to smell the dang stuff), and start brushing the entire model. It’s going to look like a mess.

Step 4

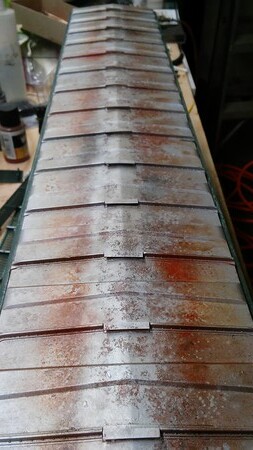
This is the hardest part. After spreading the paints around, clean the brush. Then slowly streak and clean off the oil filter weathering. Rise your brush repeatedly. It will look something like this. Let it dry, and let it dry. I normally wait 24 hours before I touch it again. If it doesn’t look good, you can go back and wipe the oil paints off with more mineral spirits. Or you can do a second wash.

I will see what it looks like tomorrow. It will probably need another layer. If I was good at this, I probably could do it once. While I was waiting for this to dry, I painted some burnt umber on the trucks, wheels (after installing roller bearings!), and on the boxcar floor. Next up, oil filter wash for the two ends. Then figure out what to do next. Probably start adding some rust scratches and dents.

Boy that came out really good. The first photo looked like someone puked confetti on it and I was wondering where you were headed.