Large Scale Central

Mason Bogie

cylinders from the front

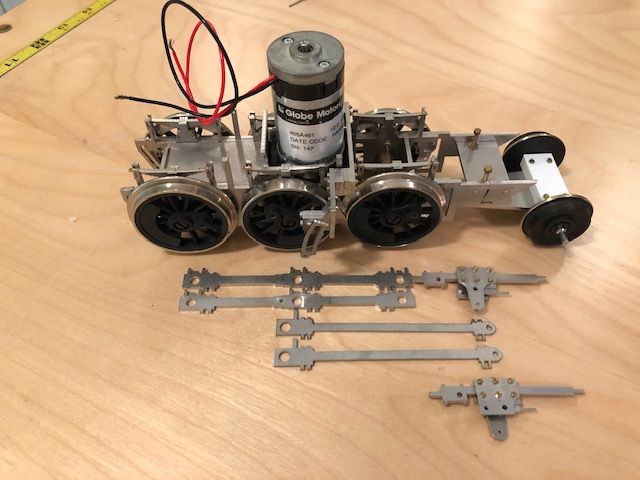
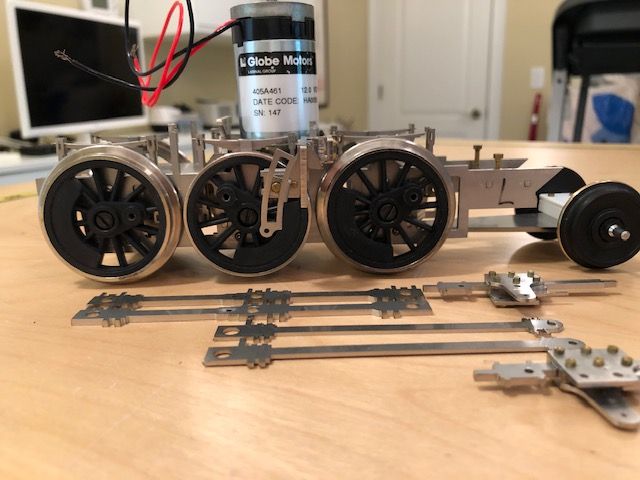
new update on the Mason Bogie project: decided to keep the orange stripe on the side of the tender then messed around for naming on the side of it, wanted my The Falls with progressing downward flow like my other tenders but rivets and silhouette lettering don’t mix and that are is full of rivets, then printed words coquina falls in two different lines and installed above and below the rivets and still didn’t ring my bell, was trying to simulate Breckenridge, Tenmile, etc. but just didn’t work out, but did find a picture of one that had a large engine # in that area and am now working on a stencil so I can paint it on. Been working on the cylinders and although the spreewald engine that I’m using for the drive had round cylinders the upper valve part didn’t look anything like walschaerts valve gear I made one to fit on top of their round cylinders using the tops to a old battery powered Bachmann set that I had. Surprisingly the spreewald plastic for their cylinders is model masters compatible and bonded great. Now the side rods and valve gear isn’t quite the correct kind but close enough for me + the tops for the cylinders were a little large but fit nice and really don’t look out of place, you know me not a rivet counter but like rivets which will be added later. will up date this thread when more is done, Billspreewald clyinders cylinders from the rear

More done on the Mason Bogie project and was able to get the Lionel cowcatcher placed and attached to the frame cowcatcher from the frontcowcatcher from the side

So, how does the drive assembly swivel when its all mounted to one frame?

David Maynard said:

So, how does the drive assembly swivel when its all mounted to one frame?

David I haven’t gotten that far but plan on doing it like LGB’s Forney (which is really a mason bogie) or their mallet. Got most of the info from http://www.ross-crain.com/rr_dsp6e-fletcher.htm

and http://www.pacificng.com/ref/mason/pdf/Dave-Fletcher-Iss33April-09.pdf, but when I get it figured out I’ll post it, Bill

XX

David Maynard said:

So, how does the drive assembly swivel when its all mounted to one frame?

If you can find a copy of this it will answer that,

Oh, you were probably asking about the model, well, anyway, the book is worth reading.

Moving along, got the cab, tender, cowcatcher, cylinders and rear bogie painted and all body parts screw together and on sub frame, now time to start planning the way to articulate itcowcatchertenter to body RSside pix

Bill, if you haven’t already done so, check out this site

http://forums.mylargescale.com/27-masterclass-articles/20743-masterclasses-articles-index-downloads.html

Look under the Mason Bogie build topic. There’s a wealth of information. You can see how Dave pivoted the drive mechanism.

Doc

Don Watson said:

Bill, if you haven’t already done so, check out this site

Thanks Don, yes David did unbelievable work, way above my skill level, I have seen most of what is on that site from (http://www.ross-crain.com/rr_dsp6e-fletcher.htm) site that I found some time ago, but it looks a little more user friendly that the ross-crain one that I used. Biggest problem is the type of motor block I have chosen mainly because I had one and that being a LGB spreewald. The motors used by the master builders were vertical mounted and the LGB is horizontal meaning the motor block has a lot more bulk to it. This build is more of use what I have rather than everything is perfect. Certainly thank you for looking out for me, Bill

http://forums.mylargescale.com/27-masterclass-articles/20743-masterclasses-articles-index-downloads.html

Look under the Mason Bogie build topic. There’s a wealth of information. You can see how Dave pivoted the drive mechanism.

Doc

X

Bill,

I understand your issues with using the existing drive. In case you’re interested, I do have a partially built laser-cut SS drive chassis with motor and all the parts necessary to complete the assembly of a close-to-scale drive mechanism. The instructions are provided on the site mentioned before.

(http://largescalecentral.com/FileSharing/user_2849/Mason%20Bogie/MB%20Drive-1.jpg)

(http://largescalecentral.com/FileSharing/user_2849/Mason%20Bogie/MB%20Drive-2.jpg)

I’d be willing to part with it for monetary compensation.

Doc

Don I appreciate the offer and will keep it in mind, retired and on a budget and try to use what I have, that and I’m stubborn to the point of stupid. I spent 3 months trying to get a red LED to blink on the top of my city water tower just because I wanted it to work off of solar power. I use and have gotten pretty good with bashing store bought cheap solar powered pathway lights, Wal-Mart @ $.98, and had terrible problems with getting it to work because of the IC in the LED that made it blink. In the long run I was able to use part of it but not all, sad thing is I could have used a $3.00 one that I had but just had my mind set. Thanks again for the offer and help, Bill, That drive you have looks like a piece of art

CWT

coming together

Got a little more along on the mason bogie project, made the dome bases and they are now on there way to the paint shop, have the boiler running boards fitted and the upper section of the fire box adjusted and glued, now starting to look like an enginedome bases

quarter view from front

quarter view from front

Further progress on the mason bogie, boiler painted using cab light green and missed with silver over spray and the fire box I added rivets and colored both it and the smoke box with a dark gray metallic graphite. Pretty much most of the detailed fitting is done allowing a better look at the articulation suspension. which will be next along with the coloring of the running boards. Domes are done and screwed to the boiler with single 8/32 screw and leaving only the bell to be built and fitted to the top of the boiler. More to come, Bill

quarter view

Looking good Bill.

Doc

Don Watson said:

Looking good Bill.

Doc

Thanks, Doc. Did you ever come up with a list of other parts you had?

Bill,

See private message.

Moving along at a snails pace the Mason Bogie is taking shape. Finally got everything fitted, what a pain, being as I’m not a master builder I adjust as I go along. Funny after fitting 1 piece and going to another when rechecking now the first piece is off a little more readjustments and so it went, on and on but finally everything is now fitting. Next is fitting the headlight and making the bell bracket and mounting, always touch up paint and the motor chassis has to be re assembled but the tunnel is getting shorter, more as it progresses

running boardsside with cars

Since last post I have got the headlight done and mounted + got the side gear in place except for the reversing bar but moving right along, ordered the Gscale graphics rail boss 4 and a charging (door way) board and still looking at mounting the batteries in the boiler, more to come, Billheadlightrunning gear

As that saying says, it all adds up!

Coming along very nicely, Bill.

front view

More progress on the Mason Bogie, got the boiler handrails done and piping for the sand dome and was done with 1/16" brass wire, reused the stanchions from the original Lionel 0-6-0 and was going to purchase 2 more to put 3 on each side but after reviewing the shipping cost I decided on 2 on each side. Received my G scale graphics R?C system and am looking forward to getting it install but first will have to make some more detail parts like the bell and the firebox but at least it is starting to look like something, more to follow.

side with carsside view