Large Scale Central

The Jackson & Burke RR gets a turntable

I needed a way to turn my locomotives with my new RR design - an out and back. I became inspired when I got some plans for the EBT Turntable at Orbisonia.

I settled on a 3 foot diameter turntable. Using 1x3 TUF board (a composite plastic), I cut two long side pieces and two shorter ones for top and bottom; then tapered the two side pieces.

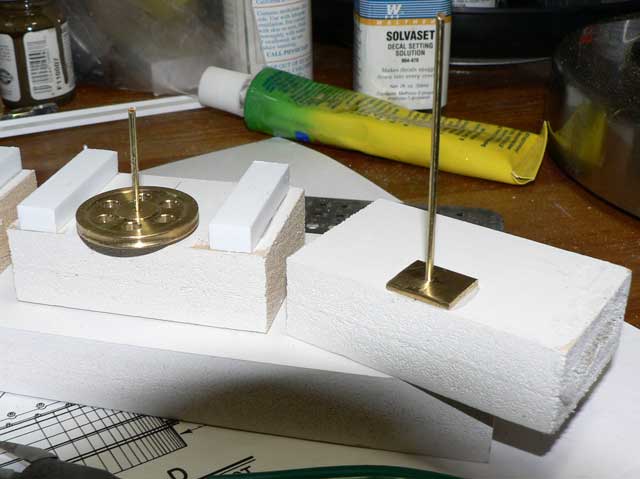
For my pivot, I got some parts from McMaster-Carr: 2 delrin sleeve bearings, a 3" steel rod, and a collar to hold the rod in place. Here it is shown upside down…

My idea was to make this a continuous 3 point balance turntable, with wheels on each end contacting the rail. I used some brass pulleys from my scrap box along with a brass rod for an axle. These were sandwiched between two spacer blocks.

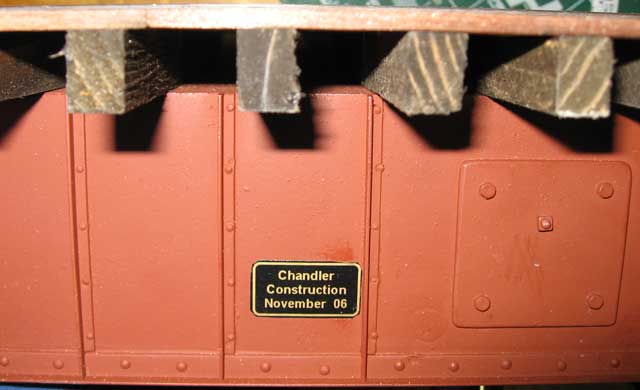
Finally, I added plastic “T” beams along the bottom, and vertical angles along the sides. These were held with glue; then escutheon pins - to give the idea of rivets.

A styrene hatch (held on by bolts) covers an access hole in case I ever need to get to the collar holding the pin in place. …to be continued…

I made a base from wider strips of TUF board, reinforced with strips underneath. I glued everything and then used deck screws to clamp it in place.

I built up the walls using Precision Products Perfic panels cut to size and bent and glued to supporting blocks that were screwed in from underneath. I sprayed the base assembly with Krylon gray primer and the bridge with ruddy brown.

Next, I added some spacers and ties and spiked the rail in place. I used code 250 brass from AMS.

Next, it was time to plank the bridge. Well, first I glued and nailed the ties, spiked the rails in place, and then glued down redwood strips. I nailed these in place with very small brass ship nails. I really don’t like relying on just glue alone. [:)]

Naturally, I needed a builder’s plate…

After drilling some drainage holes, I put down some landscape cloth and then covered it all with crushed gravel, built up thicker under the rail. It’s held in place with Titebond II glue.

So, it’s now ready for some finishing touches.

What’s left? – I need to build some railings somehow. – I need to fashion the “Armstrong” levers – One final coat of sealer on the deck Then it will be time to mount this next to raised platform that will host my yard.

Excellent! :slight_smile:

Warren

Looks great Bruce :slight_smile:

Thanks for the construction details.

Railings on your chosen prototype are just plumbing pipe. If you can find some scale T and elbow fittings you could make the rest from styrene or brass rod.

JR

Dang, Bruce, thats very cool!

GEeeze now I’m actually gonnahave to do something to mine just to keep up with The Bruce…

Thanks guys. As you know, I’ve been stuggling with how to make the railings. I finally adopted this approach. – Cut 1/8" brass tube into 1/4" strips – drill 1/8" inch hole in each of the tube pieces. These will act as the top of the TEE – cut tube into 1/8" long pieces for the vertical piece of the TEE – Next I put 5 of the top TEE pieces with the hole, on a 36" 3/32 brass rod – Bent the 36" rod at each end – Cut vertical posts out of same rod – Threaded each rod – Drill holes in the bridge, making sure to align with the ties – Insert pieces into bridge. I have “almost” a mechanical connection, making it easy to keep everything in place – Solder The result looks something like this.

Now, it’s ready to be painted

Painted and installed, along with my “armstrong” handles

Hehe! Don’t you just hate these exceptionally neat and talented modelers? :smiley:

Really fine job Bruce. That’s a great piece of work! I may copy some of your method(s) on my next turntable. Thanks for documenting everything.

Wow, that is fantastic! Thanks for posting the construction details, it makes a potentially intimidating project seem very doable.

Now if only I could find room to squeeze a turntable into my layout…

Thanks guys. I hope so see some more turntables show up… And, even though it’s not complete, I couldn’t resist shooting a picture of my Connie on it.

Plenty of room on both ends…

Thanks again to Richard Smith for inpiration and advice.

Bruce you do outstanding work maybe you should write this one up and send it in for more cash. than you can make all of us one

Bruce ,
I’m impressed .
Mike

Thanks guys. Anyway, it’s now finished. Just finished putting a coat of Behrs on it to seal the planking…

Bruce,

Do you plan to leave this out all the time? It just lifts off the axis, doesn’t it? So you can maybe just cover over the pit in the rainy, icy season.

Ric,
It does lift off easily. I’m not sure yet…just another thing to store inside and take back and forth! But, it might make sense to try and find some room.

Ric ,
You raise an interesting question . Should we aim to make out outdoor stuff totally weatherproof ?
I always set out with that in mind , but find myself taking in structures that have been particularly demanding on construction time ,"just in case " .
A thought that occurred to me , not in any way reflecting the quality of the turntable --which I think is delightful-- ,why not put an inverted dustbin over it ? Er , dustbin . Trash can ? Right , you got it , so you get this round hollow vessel , and weighting it down with a suitable back breaking object , cover your t/tble .Thus you afford protection from the elements and passing fauna , which I would shoot , personally . And avoid casual damage caused by tripping over a kid’s bike while carting it into —where ?
Never mind the daft questions about what’s under there , tell them you are breeding something . Dangerous . That’ll keep their trunks out .
Mike
ps , Any sort of cover would do , really . it could even be decorative . Use an inverted glass fibre pool liner , then it can be a mountain .
I’d better go to bed .

I think if we live in an area that has a “down season”, then things need to be “winterized” or whatever you want to term it. Bring it insikde if necessary in the dead of winter. But I like to have things out on the line. It gives me great satisfaction to have the railroad stuff amongst everything else in the yard. I want it to be part of the landscape. It has caused me to become more utilitarian in my modeling. When I started, I built a wooden “Howe” truss bridge, but now I have plans to replace it with a solid decked I beam bridge that deosn’t move as easy and will still be sitting there long after I’m gone. Buildings that are left out need extra maintenance, but I do want them to be able to take the pressure of nature. I personally don’t like covers over stuff, but it has to be built to take the weather. I don’t think we can expect the weather to be more tolerant because we built a delicate model.

I think your approach is quite a good one , Ric . After all , we have to perform maintenance on our real houses , so why expect models to be different ? Part of the "keep it in cotton wool " mentality must be due to either the cost of some of the kit built accessories , or the amount of time spent building something from scratch .
With my first outdoor layout in the late 60’s or early 70’s , I scratch built lineside structures which I intended to cover when the weather turned nasty . Well , the weather was quite benign when the roof of a freight shed parted company with its walls . Wrong glue , you see . I thought that when the glue spec said “not suitable for outdoor use” it meant "cover it up if you use it outdoors " Now don’t ask why I should think that , but I did.
I got “undercover” and “outdoors” intertwined . Result ? A neat pile of timber on the track , in late summer . Freight Shed shed its roof , no less . I had ensured that the glue could not be reached by water . Clever , but they really mean “Dampness” when they say “Outdoors” .
The rebuillt freight shed is nailed and chemical treated , it would out perform Noah’s Ark .
So , I learned , but still have difficulty over what stays out and what gets put away .
Part of the problem was experience gained in tropical conditions with glues . The Mosquito aircraft we used in the Far East survived the monsoon rains , and as you may know , they were wooden aircraft . What stopped them flying was not the damp , it was bugs in the fuel tanks . Genuine live things that sat drowned in high octane whilst happily chewing the fuel tank joints .
Nature can be formidable . And unpredictable .

Well, it started off pretty cool but finally warmed up enough to get this installed outside.

I will probably take the bridge in for the winter…no sense leaving it out. I do not plan to cover the pit. We’ll see what happens when spring rolls around.