Large Scale Central

Finishing a Brian Briggs Model

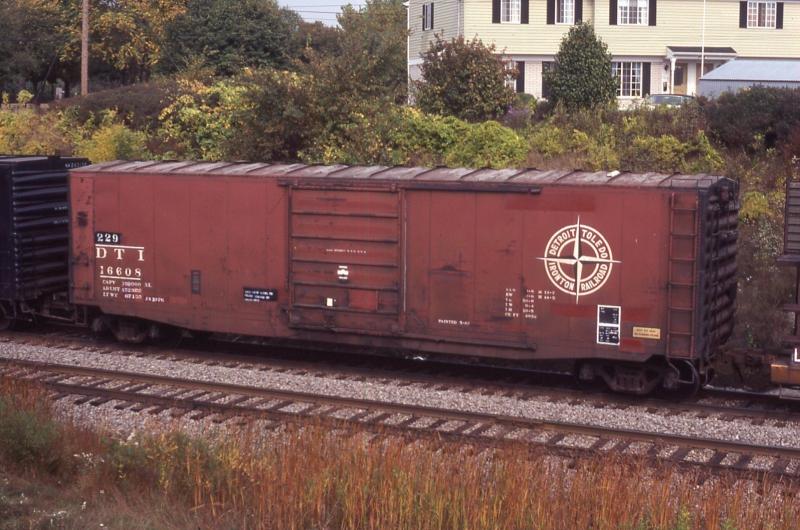
The old timers around here remember the late Brian Briggs and his excellent modeling. When he passed away a few years ago, I was able to purchase a uncompleted model from his wife. It sat, and sat, and I wasn’t sure what I wanted to do with it. Then about a year ago, I got a random email from a HO modeler that was a friend of Brian’s and he ended up with 10 pounds of large scale decals. He knew that I had acquired one of Brian’s models and was wondering if I was interested in the decals. A year later, and 10 pounds of decals later, I finally have the decals I need to finish this model, along with a few prototype pictures to help me figure out what Brian was working on.

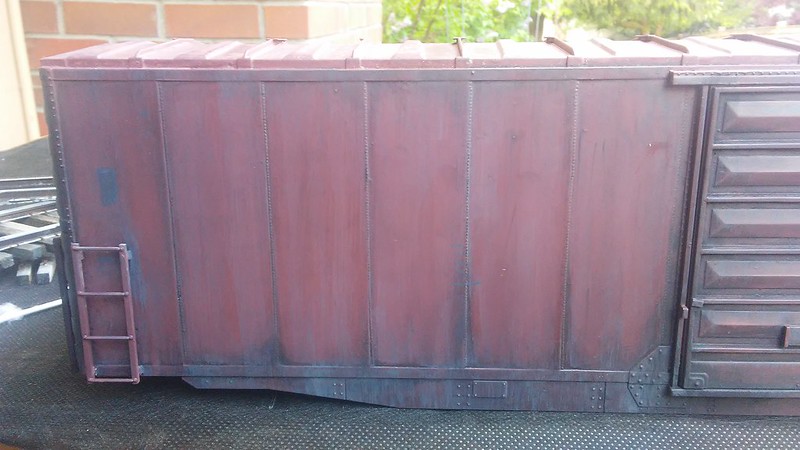
This weekend I broke out the airbrush and primed the model, and begin the process of weathering and painting. I’m not looking for an exact model, but something close enough to the picture that I have. These cars really wouldn’t be seen much around the area I’m modeling, but I would like to have a tribute model to Brian that will make an occasional visit out on the layout.

So using the same methods I figured out on the NP mechanical refeer weathering project for MIK, I started with a rust base color, layer different rust colors using the salt method, and then finally sealed all that for a layer of hairspray and boxcar red.

Here is where it stands of now. I’m going to do one more layer of clear coat, followed by hairspray and a lighter (or darker) red color. Then the experiment is to try and chip that layer away to get a light/dark color blend that tricks the eye into thinking the sides are welded. The ripping effect that you see on lighter colored paint schemes.

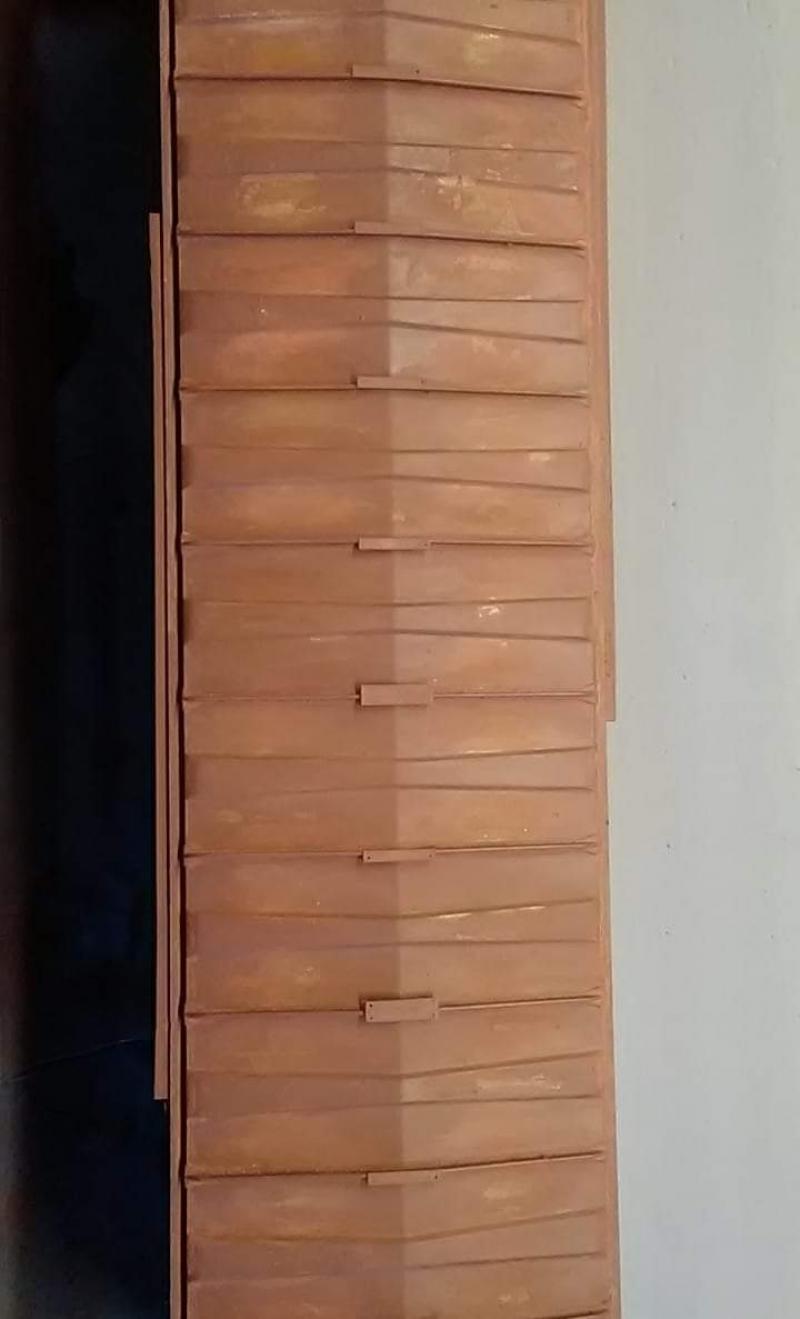
Boxcar red is a hard color to realistically rust… The colors are so close, and depending on the lighting it either looks good or crap.

Craig

Just searching the archives of Brian’s builds and low and behold his photo links are still active. If you really want to waste some time, check out his photo bucket page. Lots of photos!

https://s1044.photobucket.com/user/DTI973/library?page=1

https://www.largescalecentral.com/forums/topic/14194/back-to-1-29-ps2cd-2-bay-hopper?page=1

https://www.largescalecentral.com/forums/topic/14443/coil-car?page=1

https://www.largescalecentral.com/forums/topic/15990/86-hy-cube-boxcar-in-1-29?page=1

great stuff

i am pretty sure he would be happy to know this is still on someone’s bench

Brian was one heck of a model builder. I miss watching his posts.

Here is some slightly better photos in natural light. I started to add some Archer weld decals before the next layer of fading/paint is applied.

The roof. I used hairspray instead of the chipping fluid I had on hand. I don’t know if it was the hairspray or the really old Polly Scale paint, but the chipping was a lot harder to chip. In some cases I ended up chipping all the way to bare plastic. Not a big deal because I can always go back and add burnt/raw umber colors.

Roof update… I actually have already covered this with the 2nd layer of red and chipped it, but I have no photos. Starting to emerge…

Natural lighting vs workshop lighting…

Craig, on your roof with the hairspray method, did you use the Poly Scale for the lower layer? I have always been of the understanding that the lower layer has to be a non water based paint to keep it from coming off when chipping the top layer. I haven’t tried the hairspray method but want to do it on an upcoming project.

Chris,

I only paint with acrylics. What I forgot to do was seal the bottom layer with clear coat before apply hairspray. I think that would have helped prevent going down to the plastic. Or wait more than 10 minutes between base coat and hair spray. If you wait 24 hours the acrylic paint has time to fully cure and dry, but I was in a hurry. Mistakes where made.

When you go out and buy hair spray, get the cheapest kind, but in liquid form so you can spray it on via your airbrush. It covers better than the cans.

Looking great Craig! I’ve got my tub of popcorn and am ready to follow along on this one.

Got my Evans car to strip and turn in to the WSOR God Bless America decal set you sent me. When I get going on it I’ll post photos. In the mean time coaching my 9 year old’s baseball team is keeping me pretty busy.

Played around with one side a little bit more, but I think I over did it a little.
Here is the other non-washed side.

https://live.staticflickr.com/65535/47086074204_ae8dca153b_c.jpg

I added some washes ( I think too thick), along with some black chalk around the lower side sill and door area. I’m guessing it will lighten a bit with a clear coat to seal it all in. I also rough outlined some of the major scratches and paint patches. I think I will go over and redo these with oils after the fading, and dirt are finished.

https://live.staticflickr.com/65535/33998183608_5a48a1ec66_c.jpg

I also got a little to greedy with my washes after applying chalk. This morning I realized that the wash was too much paint, and not enough wash, so I took some q-tips out and cleaned the panels on one side. Much better.

Before cleaning
https://live.staticflickr.com/65535/33998172438_5c419f6e8c_c.jpg
After cleaning
https://live.staticflickr.com/65535/40908994493_0da3d4238e_c.jpg
The other side without receiving treatment of q-tips.
https://live.staticflickr.com/65535/40908993263_e29bf9dbcc_c.jpg

Thoughts? By no means any expert here, but slowly getting better (I think)…

I think it looks perfect.

I think they call that ‘My-T-Fine’ (https://www.largescalecentral.com/externals/tinymce/plugins/emoticons/img/smiley-cool.gif)

A bit part of weathering is to know when you’ve overdone the model. The more I studied the model under actual sun light instead of the workshop lights, it looked a little overcooked compared to my proto photo. So a few q tips later with thinner…

Still need to do the other side of the from the door, but it looks better than it did last night. Realistic weathering has to be built up slowly, and I think I was trying to get to greedy last night.

Shouldn’t you have decaled the thing before you weathered it?

Looks good!

David Maynard said:

Shouldn’t you have decaled the thing before you weathered it?

Good question. And I thought long and hard about it as well. Most of the time with weathering, you end up removing,said weathering from lettering, logos etc. This is the plan, get to model to the 90% done stage, apply decals (notice some cleaner areas than other) then blend it all together with a earth/grimy wash. That gives the decals just the right amount of weathering.

i think weathering is just as much about removing paint as it is about applying paint, if not more so

John K. Saunders said:

i think weathering is just as much about removing paint as it is about applying paint, if not more so

Yes, that is correct. The other half is learning when too much or too little has been applied to be removed. Realistic weathering is no easy task.