Large Scale Central

3D Adventures

an old dog, trying to learn new tricks…

here i will share my experiences with the new tecnic of 3dimensional printing.

i bought me a DaVinci all in one printer.

to set it up was a real bitch. not the hardware. apart from missing parts and acessories, that was easy to set up and print the included demo prints.

but the software…

between my own mistakes and the software’s features it took me some effort, to get it working.

the install itself seemed simple enough. insert CD, press “install” and wait. the suggested upgrade failed. (bad net- connection, woodoo, my stupidity… who knows?)

result: the software did ignore, that there was a printer nearby.

after i wisely deducted, that the reason for malfunctions might be, that the english software didn’t like my spanish win8, i formatted the dik and installed my good old win XP SE3.

(alzheimer light gave me the need, to get help from a 30 year old computer kid, to succeed)

there we went again. - failure.

then we deinstalled the software again, deinstalled each and every antivirus, adblocker etc. even switched off the firewall.

then we installed the software, did the update, and i … - … printed!

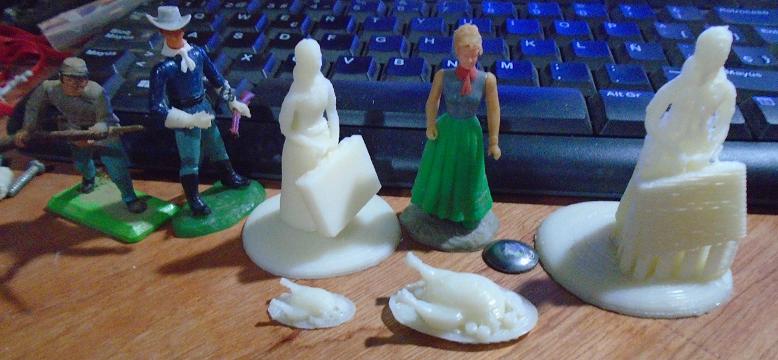
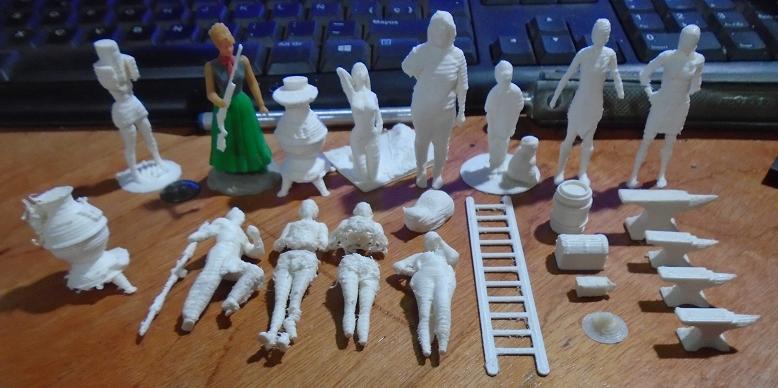
what did i print? - from one of the dozens of 3D file libraries i chose a woman with a suitcase (free download .stl file)

the file contained a figure, that i estimated by its height to be more or less 1:16.

in the printing program i reduced this to 42% and printed. result: the left lady in white. (when i cleaned away the excess material, that the program prints under overhangs, i broke off her feet. (the skirtseam should be one hands width above the footplate).

then i saved the reduced figure as a new file. then i wanted to print this new file. - then nothing went anywhere anymore.

reinstalled the software and update, printed a barbie-sized turkey, after reducing it somewhat.

then i reloaded the original turkey file, and reduced it even more for print. both came out satisfying.

then i tried to print the file of the reduced woman again… and reinstalled everything after the try.

(seems, that the program does not like its own saves)

then i took the original file again, choos a little less reduction, a .3 plastic string instead of a .2 and quicker printing.

the result: the figure looks less detailed. (the white lady to the right. note the support material below the suitcase and around her arms)

(the rebell is 1:32, the yank and the lady in green about 1:30)

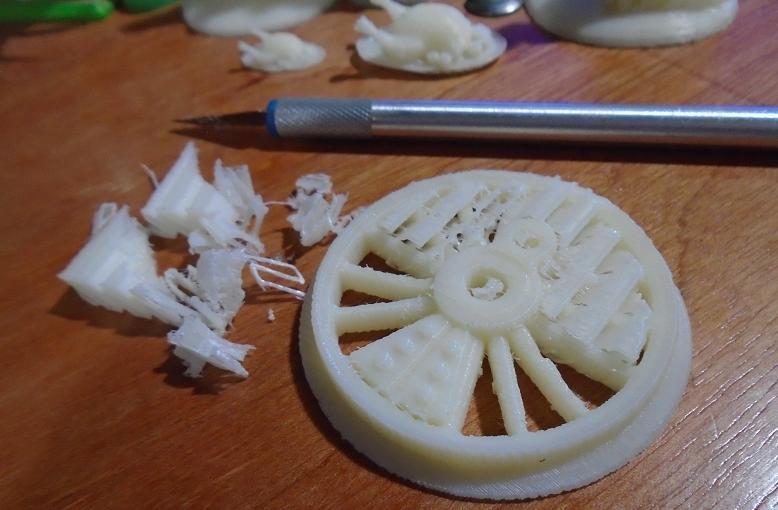
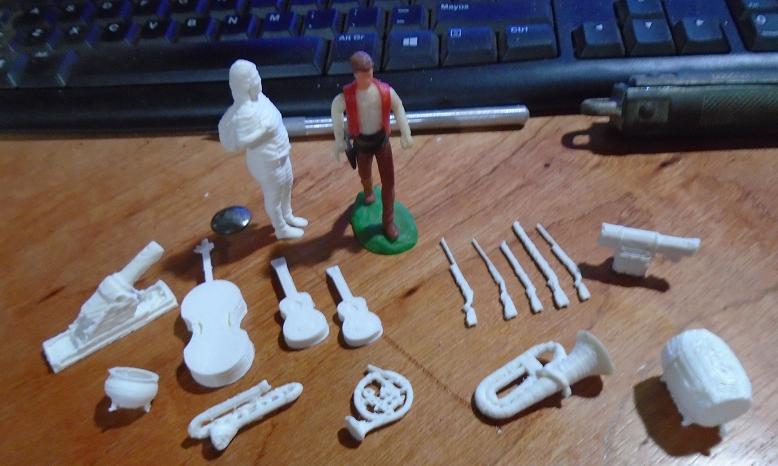
in one of the libraries i found free files for a 4-4-0 (like the General) with tender in 1:32.

to learn the dimensions i printed one driving wheel. (i partly took out the support material) the quality could be set better, i did a quick and low material-use print.

the wheel has the exact measurements of the drivers, the bachmann 4-6-0 locos have. (as i am in the trackpower camp, maybe i will be hunting for wheels soon)

now the printer is busy. i am printing a tender body, for comparison with the tenders, i already have.

(printing time 11 and a half hour…)

the printer comes with a scanner too.

but about that i will write later. when i crossed that bridge of installing, failing and hopefully succeeding)

Korm, I’ve been 3D printing for about a year, and have had a little less trouble than you. Clearly there is a learning curve on this. I’ve built mostly replacement parts for damaged bird houses, windows, etc. Biggest project has been a train order station (no waiting area for passengers) and a tram in what appears to be S-scale. Fun and games!

for me, the biggest fun in this thing is, to get the gears between my ears moving again.

i came now to the same point, as you did with your station: i learned, that there are .stl files, that don’t fit the printing area of my printer.

so now i will print little figures, while i try to learn, how to “cut” .stl pieces into separate smaller parts.

(i already envy the “F” scale guys. for small assesories they got the better scale.)

maybe, in the long run, a combination of printing and resin pouring will be the best.

i learned a lot today. (sunday school?)

first i tried my luck with a nude woman.

i printed her at about 30% of the size the original file had.

there is not much to say about her. even, if i will learn how to smoothen the superficial “rings” from the filament (under a looking glass she looks like a leper), there will still be the point, that the printer was not able, to produce details, like facial features. - definitive just background quality.

that brought me into a more warlike mood:

i took the file of a gatling gun.

in the “printing-window” that was shown in red, instead of blue. and it was bigger, than the printing area.

so i clicked yes to the question, if i would want to resize it. that gave me a model of 8" length.

i printed that thrice. first at 30%, than at 35% and finally at 50%.

see the results:

ehem…

so, what did i learn today?

  • i learned, why that Hawaiian guy (Richard, i think), has his detailed figures printed at shapeways on their professional equipment.

  • i learned, that at my scale (1:30) a casette/spool of filament should give about one hundred figures.

  • that with complicated structures (like the Gatling) more than 50% of the material goes into the support structures.

  • that separating the support from the model is a real bitch. specially on wheel spokes and the like.

so, in the future, i will try to select (or make) models, that consist of different parts, preferably to be printed flat on the printing table, and be joined afterwards. that might save support material and frustration at cleaning the pieces.

next i will try to print some doors, windows and walls.

Korm Kormsen said:

alzheimer light

I need to remember that. It describes me most days (http://www.largescalecentral.com/externals/tinymce/plugins/emoticons/img/smiley-cool.gif)Looks like you managed to overcome the frustration level and get some real results. Nice!

yes, but the real result is the new knowledge. to see, what goes with this tecnic, and what not.

todays door- and windowshutter panels look marvellous.

so, seemingly, this kind of modeling seems to be preferably for flat objects.

After using the present 3D printer using string trimmer filament line, the printing is some what below my expectations. Results varies and not even close to usable with out spending time too manually smooth the surface and also get rid of all the supports needed.

I am encouraged with the latest technology called “3d UV Laser Printers” which works with much better resolution that you can get now. These type of printers are now coming to market.

Here is one and there are several more if you search.

https://search.yahoo.com/yhs/search?p=video+uvlaser+3d+printer&ei=UTF-8&hspart=mozilla&hsimp=yhs-001

first i read “affordable printer” on that site. than i read 3,000 and 3,500 and 5,000 …

so, even if it does not do everything i would wish it to do, my 800 buck printer seems very satisfying to me.

i think, i already could learn, that a good quality depends in big part on a adequate preparation of the printable files.

for instance, the quality of a wheel printed standing up and a wheel lieing flat on the printerbed are very different.

Korm Kormsen said:

i learned a lot today. (sunday school?)

first i tried my luck with a nude woman.

i printed her at about 30% of the size the original file had.

there is not much to say about her.

I think that it did an excellent job, so long as you were printing Rebecca Stamos. (http://largescalecentral.com/externals/tinymce/plugins/emoticons/img/smiley-wink.gif)Otherwise… (http://largescalecentral.com/externals/tinymce/plugins/emoticons/img/smiley-undecided.gif)

that’s just what a friend said, who saw her in person.

(the figure, not the actress)

One thing I notice about the items I have seen printed, is that the use can select how much “fill” is in the object, or how solid it is. If the surface isn’t specked out to be solid, then it looks pretty bad (to me). If the surface is specked out to be solid, then its not too bad, yes there can be ridges and other artifacts, but its still easier to fix those then to scratch build most items. Now the drawing part, that can be a real…challenge.

hmmmm…

THAT is one thing, i didn’t try yet.

(i gave it low fill with every figure, to save material)

i helt the printer busy.

among other things i printed three more copies of that mutant woman.

the first in ab out 1:22. she has a more pronounced face and some warts less. but from the printing layers her skin looks, like she is covered with pelt from head to toe.

then i made a little sister in 1:32. but i turned her around, before starting the print. instead of lying on her right side, as the first two, she was printed sitting upright. the result - instead of being striped lengthwise like a skunk, she is striped like a zebra. and her arm was not printed well.

then, inspired by David i made another one in 1:30. i used layers of 0.1mm, 90% fill and slow print. she has a “pelt” from the printlayers too, but she has as well a pronounced face.

i think i will get some acetone, and try to smoothen these girls.

well, i’m not only frustrating myself with figures, but trying other things too.

first “building” i am trying is a set, to convert cereal packs into play houses.

http://thingiverse-production-new.s3.amazonaws.com/renders/b9/0b/6e/6a/98/IMG_5609_preview_featured.jpg

as i do not plan, to make a cerealbox house, i only printed those files, i find necessary. (no special reason, why two parts are black, the rest white. i just changed filament)

the original files are for 1:25. i reduced everything to about 1:28. and i’m very content with the quality.

here are the parts (including additional windows for another project)

i will glue a second floor plus a false front above that to the plastic front. (veneer boards upon plastic sheet)

than it will be a background flat in my cowtown.

oh, that reminds me, how were these men called, who bought the texan cattle herds at the railstations? just “Agent”?

have a look:

if you look at the first row, or at the two standing at the right, it is plainly seen, that fine things, like legs and arms, do not print well.

fine things do not print well (or break) - that said, look at the rifle in the hand of the lady in green… fine things do not…

sometimes the printer gets moody. the two ovens were printed together in the same run.

sometimes the files or the software is bad. see the two girls, where the waist was not printed, or the one standing on the left. (looks like a prototype for a female robo cop)

the stout lady in the middle has very rough printing lines, the boy and the baby beside her are smoother.

simple forms, like the anvils and the other stuff on the right side seem to result best.

and on we go!

Looks like you are getting there Korm. My brain is too far gone to learn this stuff. I’ll watch.

brain too far gone??

don’t think so! i learn something new every day… even if my wife insists, that i’m doing the same things every day.

but earnestly, this learning of something new equilibrates lots of boring stuff, like bookkeeping for our biz.

and you would be one of those, who could gain most from 3D printing. considering, how few things you can buy in 1:32.

today’s bounty:

(no, the lady is not from today)

a winebarrel and some instruments for the mariachies, a kettle and some toys for the soldiers.

Korm Kormsen said: this learning of something new equilibrates lots of boring stuff, like bookkeeping for our biz.

and you would be one of those, who could gain most from 3D printing. considering, how few things you can buy in 1:32.

Ya know, that is a good point about the mental change of pace, helps avoid, or at least stall off, burnout.
And I guess the hassle of working out 3D printing for figures is ultimately better than chiseling several dozen from little blocks of marble.