as “far” as i am now with learning 3D, i begin to think, the best will be to use printing together with resin founding and woodworks.
but i didn’t try marble chiselling yet…
as “far” as i am now with learning 3D, i begin to think, the best will be to use printing together with resin founding and woodworks.
but i didn’t try marble chiselling yet…
it is astonishing.
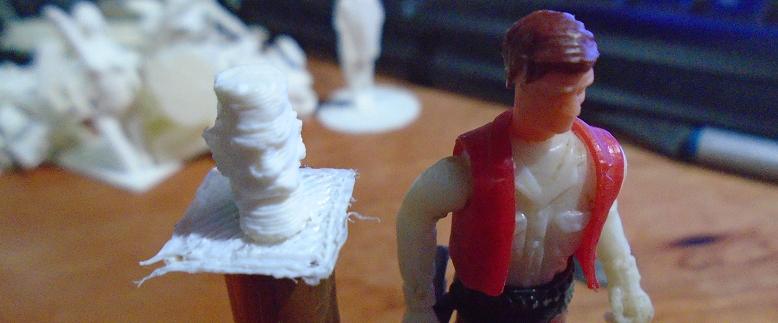
some things turn out so rough and useless, and other things come out in fineprint. look at this head. even without finishing and polishing, the features of the face are comparable with those of the factory made figure.
Korm, it probably depends on the file, and resolution of the details, and what settings you have the printer set up for at that time.
David Maynard said:
Korm, it probably depends on the file, and resolution of the details, and what settings you have the printer set up for at that time.
Which might be another way of saying that when all them little electrons are doing the hoodoo that they do down in the dark depths of the computer, even gods can only guess at what the outcome will be. (http://largescalecentral.com/externals/tinymce/plugins/emoticons/img/smiley-wink.gif)
that guy’s head was three inches high, when i imported it.
most things, i am printing, come in other scales, so i am shrinking or blowing up nearly every file.
i think, Forrest got it right: “…when all them little electrons are doing the hoodoo that they do down in the dark depths of the computer…”
at the moment i am waiting for an english win8.
i hope, when the pc isn’t slowed down by the operating software (XP, SP3 at the moment) any more, that things will improve.
(maybe, even the scanner will decide to cooperate then)
still waitingfor my ordered software.
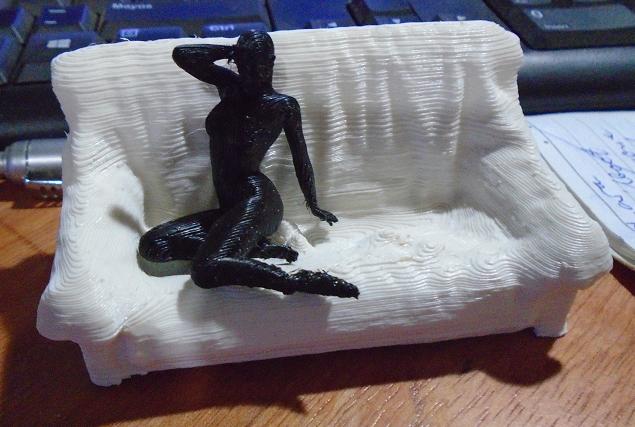
meanwhiles i am printing many different things. from roadkill to couch, whatever looks interesting.
(no, that on the couch is not the roadkill!)
the more i print, the better i see, that my legendary bad luck is hitting again. with this printer i can make perfect prints for 1:25 or bigger.
but in 1:29, or even 1:32 things are just a little bit too small for good prints.
just because it is sunday:
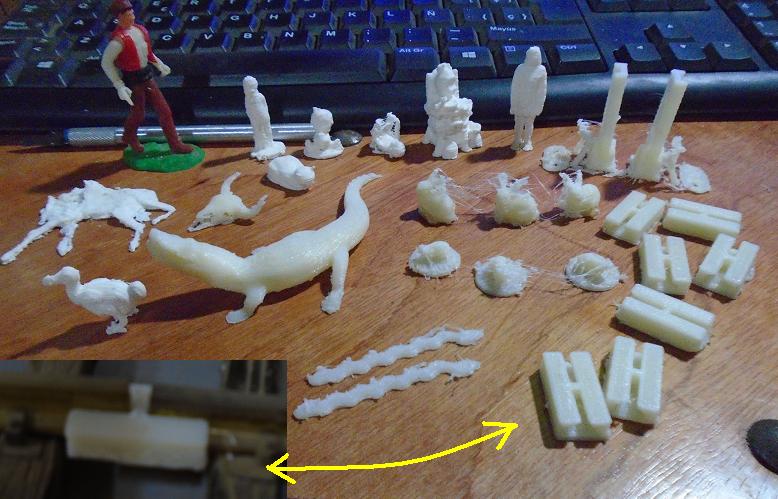
on the upper left the before mentioned roadkill (and no, the two snakes are no roadkill, although they look like a Goodyear advertisement. they are just nothing but too simple)
in the upper row some results from my hunt for children to populate the layout. like the rabbits and the rats, they still need cleaning.
the alligator, that is just trying to further the extinction of the Dodo before it, is already cleaned up for painting.
at the right are some LGB-style railconnectors and some link & pin couplers, as they came out of the printer. link and pin are unusable, but the couplers need just some cleaning to be perfect.
what is new? - i learned, that even nominal the same sort of plastic is very different for printing. the white is much more brittle and less stress resistant, than the off-white.
Korm, look online for a free program called “Netfab.” This is a program you can use to slice .stl files to fit on your printer. BTW, what size can you print on the DaVinci? Also, the PLA only looks like fishing line. It’s a vegetable based plastic with a low melting point. It’s got no UV inhibitors, so paint it if you are going to use it outside.
I just finished the Model RRer magazine trainman’s shanty.
i can print 7.8 x 7.8 x 7.5".
the pla is 1.75 mm in diameter.
the mashine does not print, when the extruder is below 210° C. the table needs 90°.
while i wait for the new software for my pc (to allow it to use more memory and processing power), i am just printing this and that, what i find in the net.
and, yes, the things will be used indoors, and they have to be painted.
how good do the different layers get glued together by your printer?
i found out, that in some cases it is better to turn a piece to another angle, that the direction of the layers corresponds with eventual stress directions in the material/produced model.
nice little building. looks like a tollbooth or a ticket office to me.
painted with water-mix acrylics?
thanks for the “netfab” tip. i’ll definitely will search it out.
(and if you got more tips or warnings - im listening)
Dick, i am trying to comprehend netfabb.
which version do you use? basic?
Since the printer goes layer-by-layer, it does make more sense sometimes to rotate the item. Also, if you’ve got curved surfaces, you might make the curves vertical rather than horizontal to minimize supports, which take material and time.
Most of the time, the layers stick together pretty well. If there is a long unsupported section (like a wide window sill), some of the layers can sag, but they can be glued together or cut away. We keep our printers (Makrbots) at 215ºC.
Netfab’s documentation is pretty bad! Maybe the “paid” version has more documentation. I use the basic version, mostly to either cut projects apart or to find fatal errors in the stl flies. The triangle of death in the lower right hand corner tells you you’ve got a problem. The red cross fixes it… I’m not an expert on it, but can walk you through some of it.
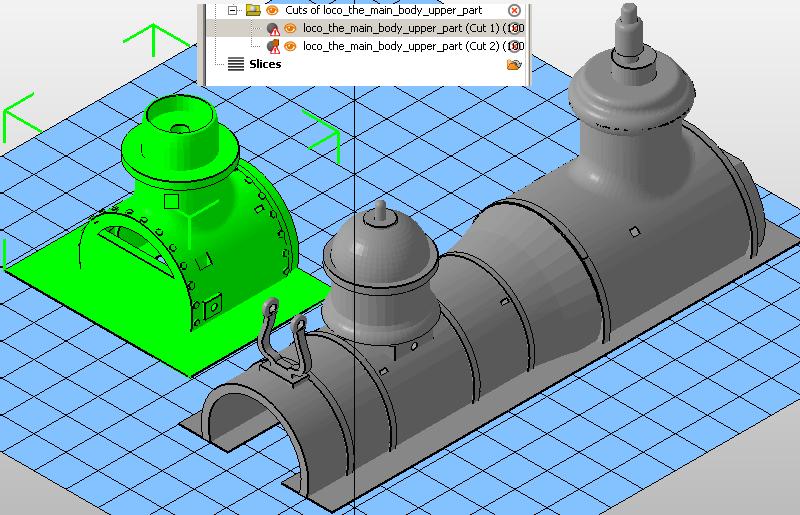
Dick, in the pic below one can see the importance of the angle, an item is printed.
my first try was the white one. it did stand on its front for printing. the whole space between walls was full of supporting material. and at cleaning that out, both curves broke off.
the other tries (slightly different model also) were printed, as they now stand on the table. without any support.
btw., how do you cut a part in two with netfabb basic?
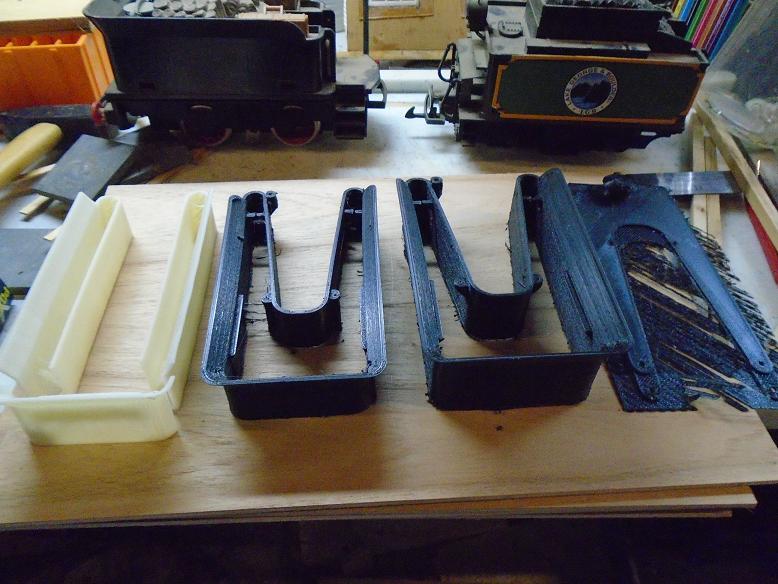
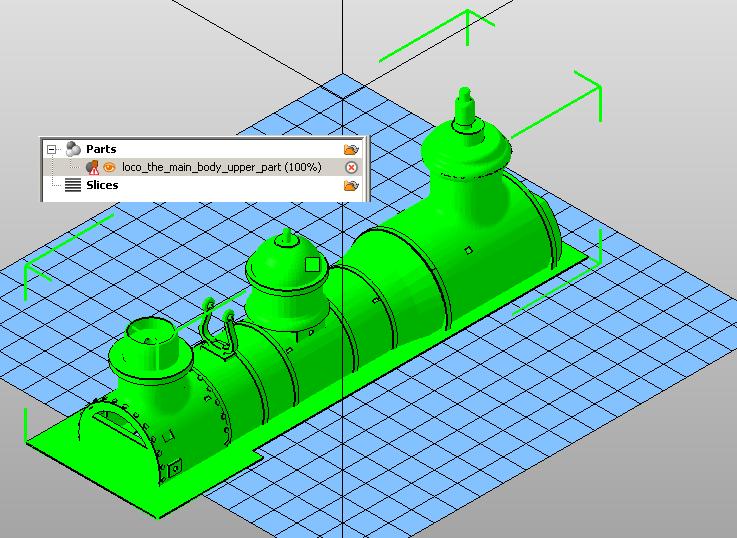
for my western style layout the LGB and playmobil tenders don’t look very apropriate. so i took a tender file from the internet. (the left of the two black ones) it is in 1:32. meaning, only 80mm wide. small, compared with playmobil (100mm) and LGB (110mm)
the length was just to my likening. so i did make the part broader and higher in the computer. (the part on the right)
to my astonishment, i had hit the right dimensines at first try.
with the lid, (the flat thing on the right) that goes on top, i had less luck. first it did not print correctly. with a “raft” (the unorderly stuff filling the emty space around the lid) it did print ok. but i had misscalculated the widtht. so while i write, i am waiting for the printer to make the revised version.
the more, that i toy around with 3D printing, the more i am convinced, that it will be a very interesting addition to our hobby - for certain things, not for all.
I walked myself thorough the process today to make sure it is right. Then I typed it all in here, and it disappeared. Here goes (again).
Open netfabb and load in the .stl file.
With the file open, click on the image and look for a red triangle. If you don’t see one, the file will probably print OK. If you do, click on the white cross on the tool bar across the top.
Now look at the right column. Mid way is a box labeled “cuts.” Inside that box are three lines x: []. y:[], and z:[_]" Those are the x, y, and z axes. Select a box and move the adjacent slider. Watch the file itself. A plane will appear and will move as you move the slider. When it’s where you want it, just stop.
Click on “execute cut.” Click on “Cutting Options.” Click on “only selected parts.” Click on “cut.”
In the upper right corner of the right column is the heading “Parts.” All slices will appear in that area.
Select each file in turn, right click (or whatever is the Mac equivalent – I bought a two button wireless mouse with scroll bar specifically to use with these design/print programs) on “export part” and “as .stl.”
Try it an let me know how it goes.
You are correct, Korm. This is easier to do than to explain .
thank you!
seems, that this is easier to do, than to explain 
well, to let you know:
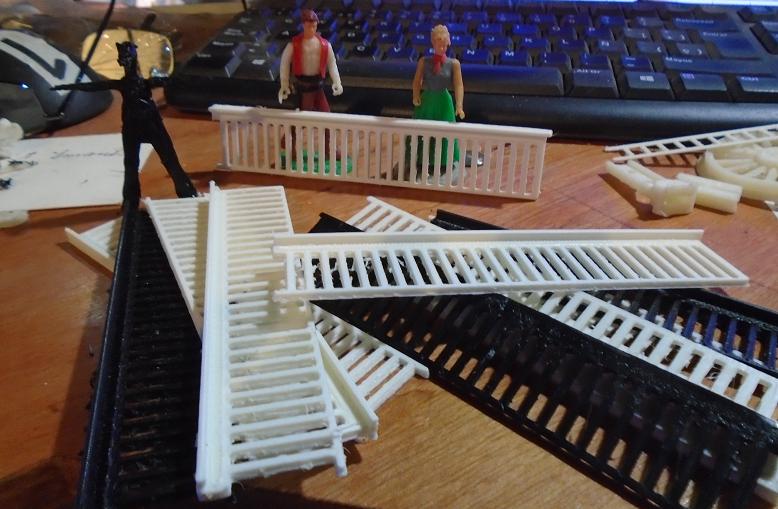
i found a reason, why i should learn to make molds and pour resin:
for my hotel i need 16 of these. and each takes over an hour of printer time.
So, let them print while you are sleeping, or reading posts on LSC.
Those railings really look good, Korm! Is your printer big enough to print more than one at a time? You should be able to do at least a couple. I’d be concerned about leaving the printer unattended over night. You might wake up with an out of scale tumbleweed! But Dave’s other suggestion souncs good to me!
the printer is in the same room, as my computers, workbench and layout. so its easy to have a look now and then.
this davinci all in one has problems to make the first two or three layers.
so sometimes i have to abort. the loss in material of aborting is smaller, when i’m printing single units.
when it sucseeds the first few layers, the rest can print unattended.
time or efficiency are no concern to me. my only deadline is my personal deadline… - and, really, i don’t care, if then there are some unfinished projects left.
this railing i found somewhere in the web. with netfabb i cut away, what i did not need and partially rescaled it.
not even one print, which i had to abort!
the boooooooring part is to clean all the edges before painting.
ps.
the printbed is 200mm x, 200mm y and 180mm z (8" - 8" - 7.5")
I am so amazed by all of this.
Have you Googled “Shapeways”?
I guess it comes down to whatever you can think of.
Just ordered some chain binders. Talking to them about the scales.
yes, i have googled shapeways. and afterwards i silently wished away a tear in the edge of my eye.
shapeways is really very good. but it is very expensive too. calculating in the postage, any good figure would cost me nearer to 150$, than to 100$.
so second or third best will have to do for me.