You need 3’ long cars!
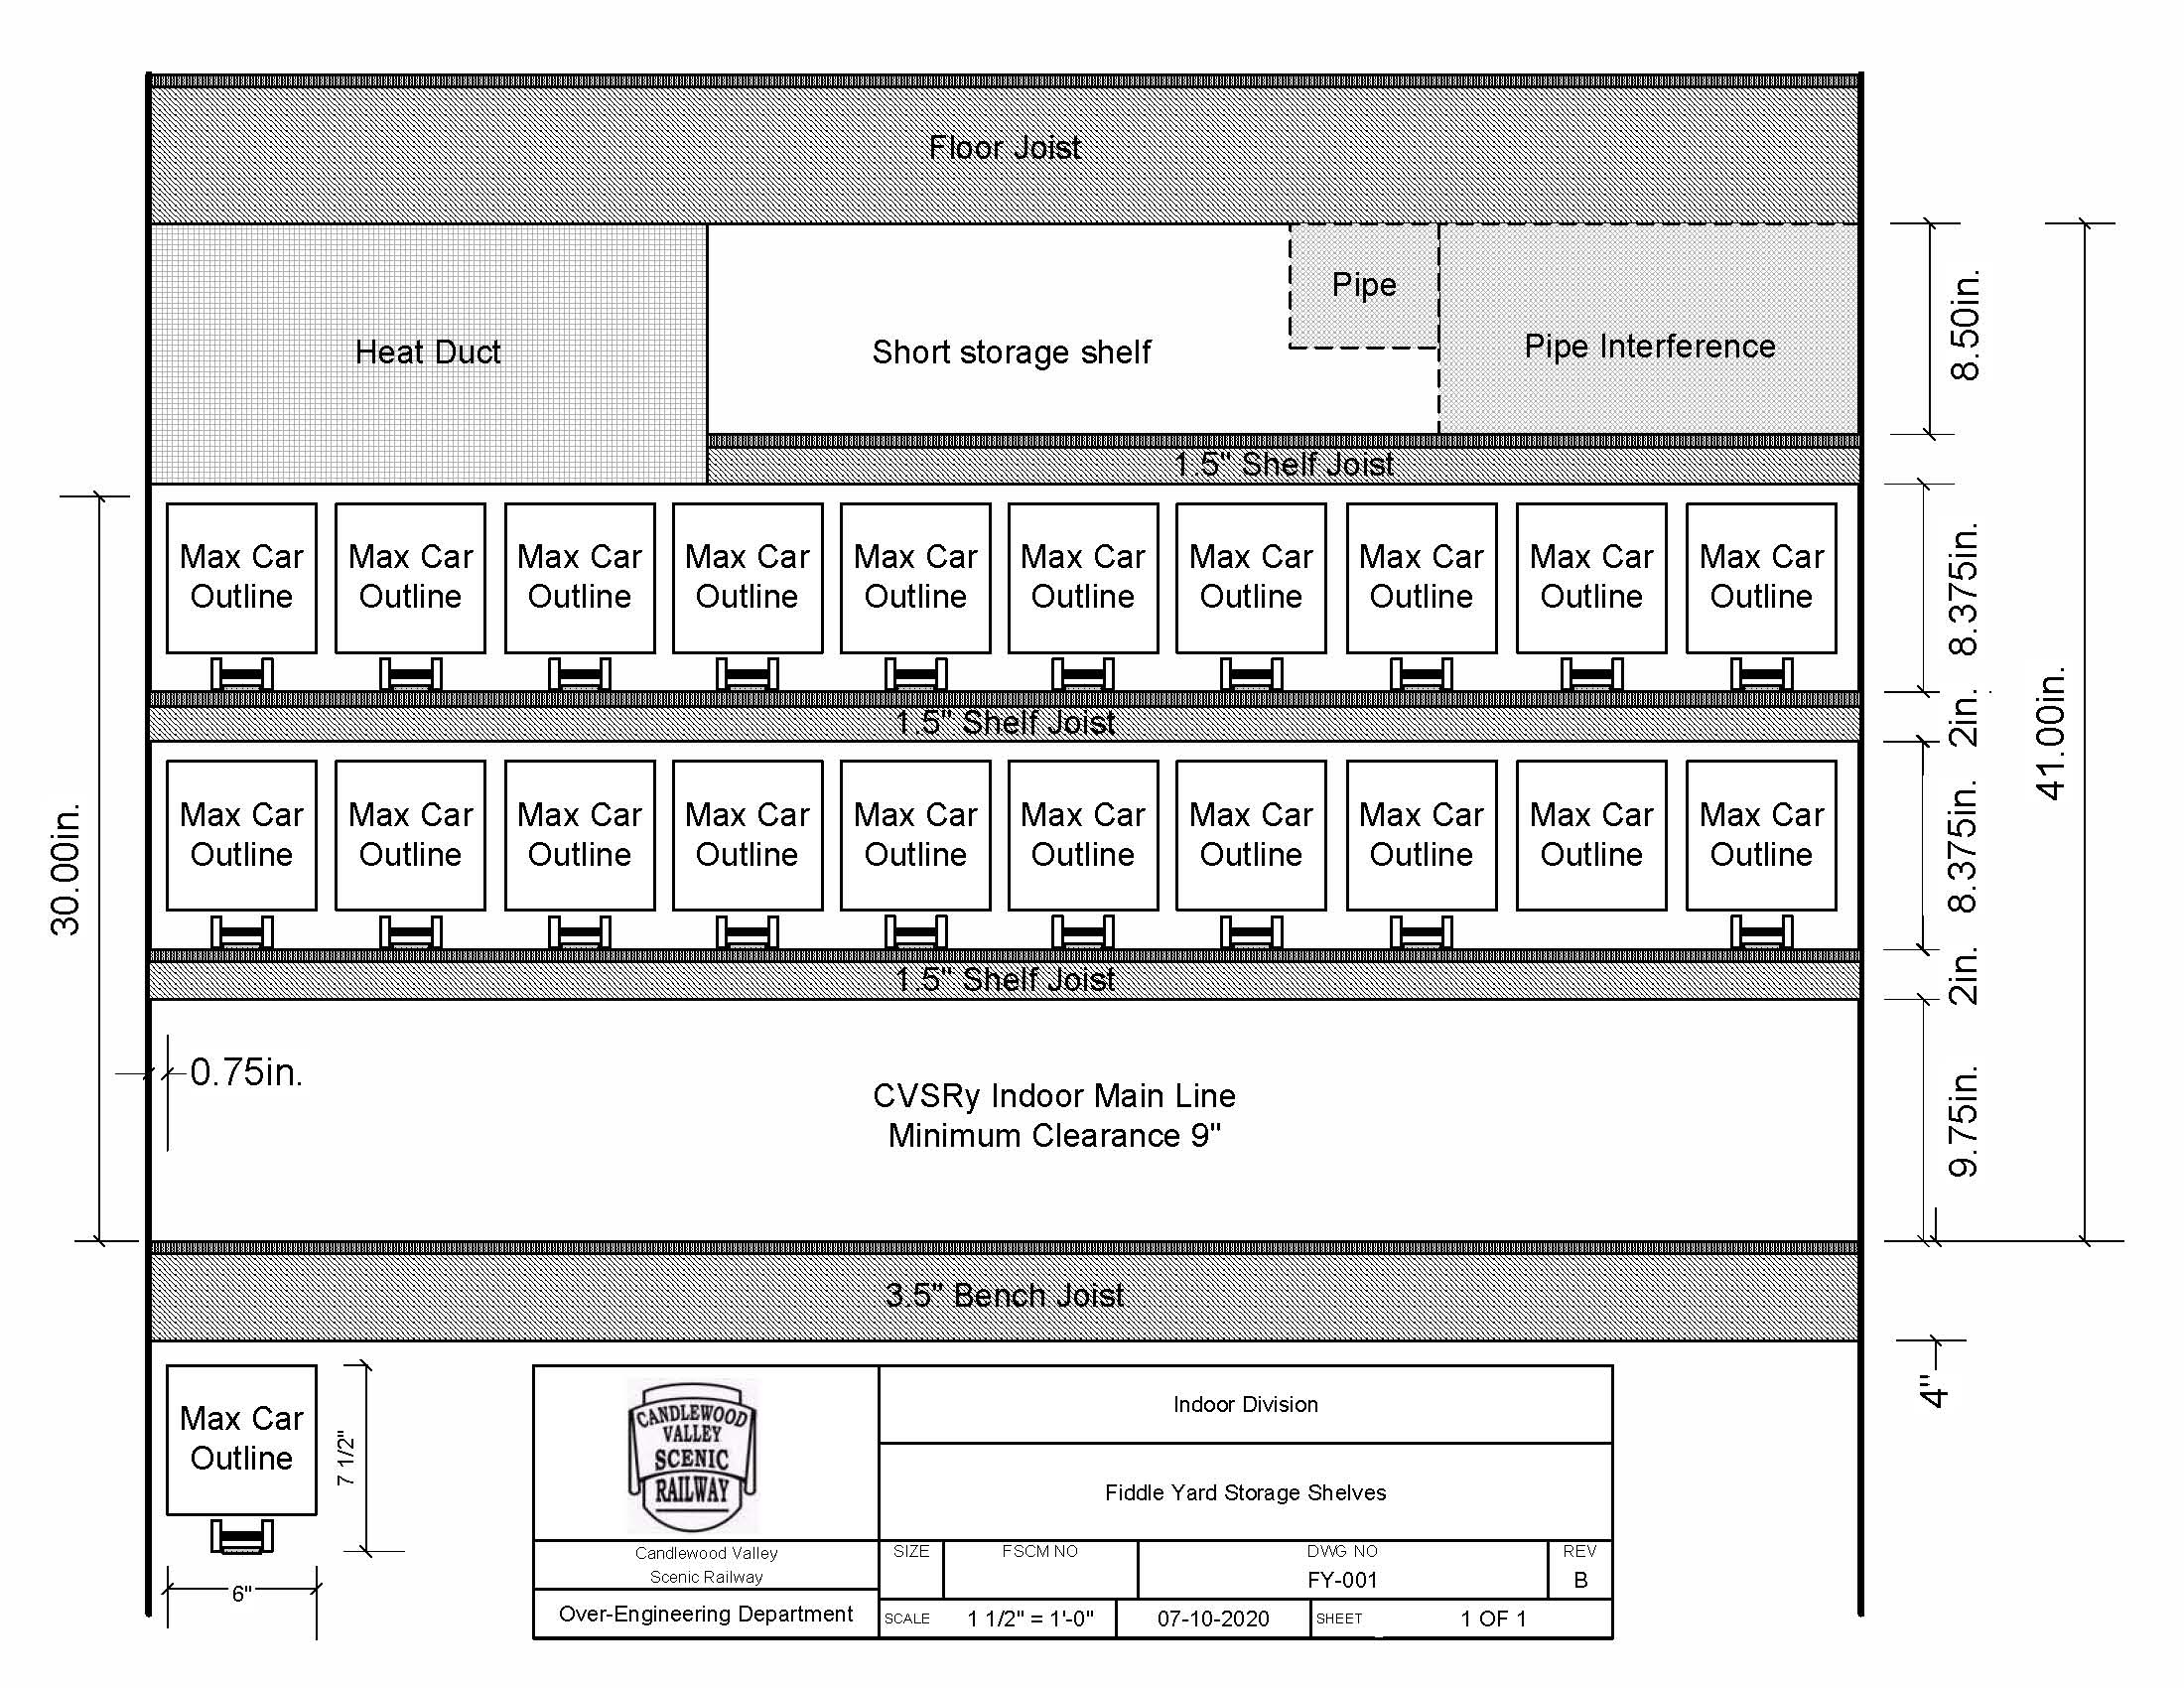
I took Rick’s advice and increased the spacing between to .75" and also added another .125" on top as well. This is the updated CAD file…
There ya go(https://www.largescalecentral.com/externals/tinymce/plugins/emoticons/img/smiley-laughing.gif)
The question is how thick are your fingers… You do have to grasp them …(https://www.largescalecentral.com/externals/tinymce/plugins/emoticons/img/smiley-wink.gif)
Sean McGillicuddy said:
The question is how thick are your fingers… You do have to grasp them …(https://www.largescalecentral.com/externals/tinymce/plugins/emoticons/img/smiley-wink.gif)
Do you really want the exact measurements??? Finger slightly over .5" and thumb close to .75"; Point taken. In reality, all you will need to grab is the coupler to pull the car forward on the shelf giving you lots of free space to pick up the car with fat fingers! Most of my cars are under 20.25" long including couplers, so they will sit back on the shelf by several inches.
Rick, since you are following this I’ll ask you: What is the center-to-center measurement of your guide strips? On my plan they work out to 6.875" on center. I think that’s plenty, but I’d love to hear some real world experience.
Also, did you build your shelves so they tip just slightly to the rear? I’m thinking 1/2 to a full bubble off-level front-to-back will keep the cars firmly in place with no mechanical stops. We don’t get earthquakes very often, but once in a while a big truck, or some foundation blasting will shake the house. Would hate to have a car roll off and drop over 4 feet to the concrete!
I re-checked my largest car; a Murphy Roof Boxcar from Bachmann. It is 20.25" long over the couplers and sits 7.25" at it’s highest point including flanges. It is 5.125" wide including grab irons and details. Comparing that to my “MAX CAR OUTLINE” of 7.5" tall and 6" wide and you will see I’ve built in a little wiggle room there as well. I think I will be fine, but it’s easy to adjust the guide strip locations, even loosing 1 car per shelf if I need to.
The plan is to load my car with enough 2x4 lumber to build the framing and take it to work Tuesday to rip down to 1.5 x 1.5 widths on the panel saw. In the past I have used Ramset Nails to anchor bench framing to the block walls, but for this application I think I will spend the $ and go with Tapcon screws.
Jon,
The C to C spacing on my wheel strips is 6 inches, hence my recommendation to make the spacing wider. As you can see, on the bottom shelf the 2 drop bottoms (D&RGW) can’t sit side be side as they are too wide, hafta have a smaller car in between to make it work. Now 6 inches works fine if your careful but you had/have the extra room that was more or less wasted, not like you were going to get an eleventh car squeezed in there.
My shelving is level because the cabinet doors can/will keep everything in place. With an open face cabinet I would slope to the rear maybe 1/4 to the foot. As far as bubbles go, I’ve been told most of my life that I was about a half bubble off(https://www.largescalecentral.com/externals/tinymce/plugins/emoticons/img/smiley-foot-in-mouth.gif)(https://www.largescalecentral.com/externals/tinymce/plugins/emoticons/img/smiley-laughing.gif).

Jon Radder said:
Sean McGillicuddy said:
The question is how thick are your fingers… You do have to grasp them …(https://www.largescalecentral.com/externals/tinymce/plugins/emoticons/img/smiley-wink.gif)
Do you really want the exact measurements???
Why not as the drawings show such?
Just saying ??
Bob said - “When I build the first set of trains in the morning, I only put on the float the cars that are going to be needed in that session, the rest I mark as OOS. That seems to work well enough for us, though I suppose I should have all the cars that belong there nearby for the 0-5-0 to put them on the ferry, but that just seems messy.”
Wouldn’t a possible solution here, be another car ferry near the storage shed? Or maybe one of the tracks in the yard close to the shed labeled “Car Ferry Lead” or “interchange track” ?
That way cars come out of storage shed and right on to the designated track to be integrated into the day’s operations.
On the old KVRwy, the storage in the garage was called “Fiddle” and was the interchange/destination. The other end of the railroad was in the basement and called “the Southern Division”. Basic premise, that sometimes worked, was the exchange of rolling stock between these 2 locations to mark the beginning and ending of an operating session, no matter how many actual days this took to complete. This evolved in to a completed session was declared once all scheduled trains completed their run, but the exchange of cars between the 2 locations was still the goal.
.
Al Pomeroy has achieved my goal better than I ever did, by having the basement and garage being actual final location for a completed run. Except for the shelving in the basement, cars stay on the track and sit undistrubed like smaller scale layouts between actual times that trains run and the end of a session is when all moves are completed or it never actually ends. (http://largescalecentral.com/externals/tinymce/plugins/emoticons/img/smiley-cool.gif)
Jon Radder said:
I took Rick’s advice and increased the spacing between to .75" and also added another .125" on top as well. This is the updated CAD file…
I don’t know if 9.75 inches is enough on a 7.5 inch high car. However, you could pull it out by the coupler and then get the “5 finger sky crane” in position to grab it.
Jon,
I guess I need to keep up more. any way just went down and measured my setup and I have 9"+/- 1/8 on my shelf’s with a 6" side to side spacing as well. another factor is I have a brake wheel out rule, to minimize any damage potential.
I would look at 1/2 square steel tubing to span the distance, giving you a little more vertical height.
Al P.
Hi Al - Thanks for checking yours. Brake wheel out is a good plan. Steel sounds interesting, but I don’t have the tools to cut efficiently. I think I will be OK, but one of the reasons to attach with screws is so it can be moved if it doesn’t work as planned. I could eliminate that top “short storage shelf” and gain a lot of headroom except under the heat duct.
I think I’m going to let it play out as planned. One thing that may be making people nervous about the height; I don’t usually have guest operators, and when I do, I can be the yardmaster here so that I’m the only one handling cars on and off the shelf.
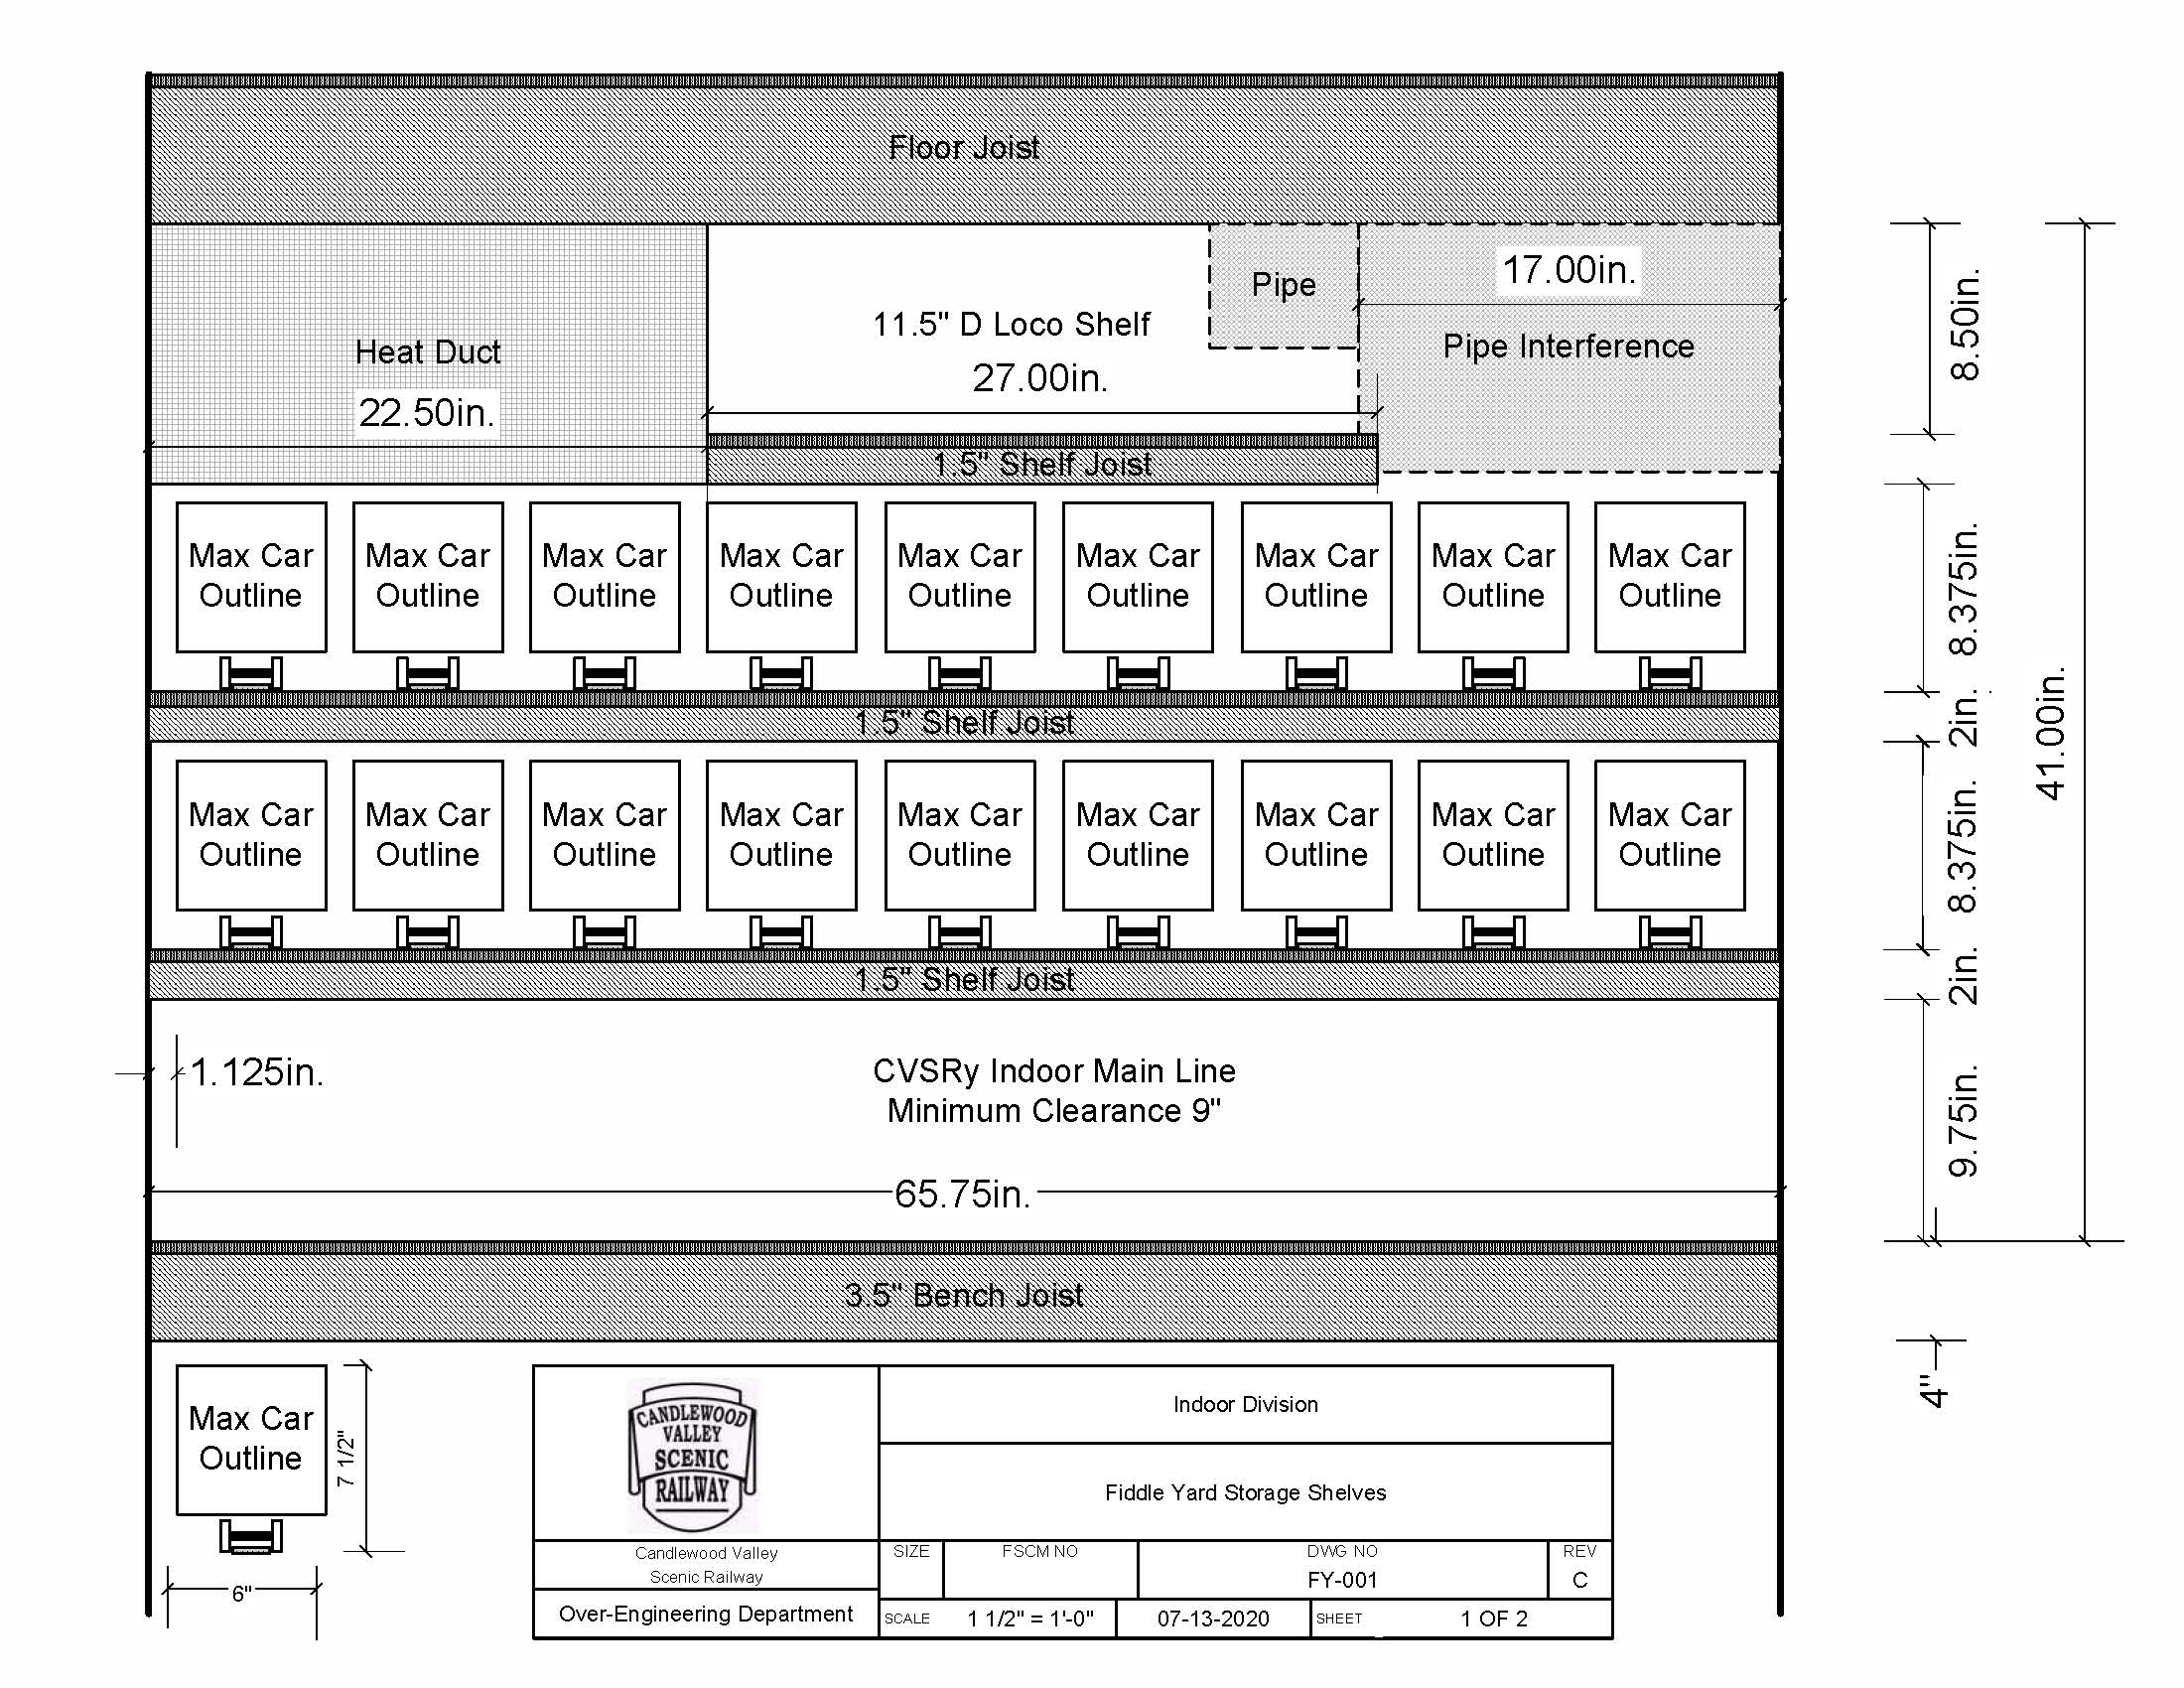
Based on my largest car (Bachmann Murphy Roof box car) I will have 1.125" clear above the brake wheel and a 1.625" clear on the sides. Like I said before, getting extra width clearance will be just a matter of loosing one car slot and moving the guides. Changing height clerence is a little tougher, but I’m happy with over an inch clear on top.
@Ric - 9.75" is the clearance for main line trains. This is taller then the two tunnels , so I’m OK with it. Storage shelf clearance is only 8.375" (https://www.largescalecentral.com/externals/tinymce/plugins/emoticons/img/smiley-surprised.gif)Pulling them out by the coupler has been my plan all along.
Measure twice, cut once. Good advice that I actually followed today and discovered a serious error in my survey data. When measuring the overall width I missed a partition wall stud, so my actual width is nearly 4 inches less. Thus, I loose 1 car per shelf, but gain 3/8" of space between cars! A revised plan was drawn up, the space between cars is now 1.125", plenty of room for my fat fingers (https://www.largescalecentral.com/externals/tinymce/plugins/emoticons/img/smiley-wink.gif)
Here is REV C…
Double check always saves material. Nice catch Jon. (https://www.largescalecentral.com/externals/tinymce/plugins/emoticons/img/smiley-cool.gif)
Shut up Rooster
Ya What he said ^ (https://www.largescalecentral.com/externals/tinymce/plugins/emoticons/img/smiley-wink.gif)
There is no joy in Mudville tonight.
The saw and paint rooms at work are my domain, or were until I was furloughed in March due to COVID. The business, however, remained open and the folks who stayed on did the cutting, painting and next to no clean up. Apparently they didn’t treat the saws too nicely either. The other day I noticed they killed an expensive 80 tooth blade on the 12" miter saw; several carbide teeth have gone missing! Then today, while cutting a long piece on the panel saw, the motor started making an awful noise and shooting sparks out the vents. I opened the covers to check the brushes, which were fine but it feels like one winding on the armature may have shorted and warped the commutator. No one local works on the Milwaukee brand saw motors, so we ordered a new one from the factory. $600 later it will be delivered Thursday on UPS.
I can rip the 2x4’s on my table saw, but without proper feed rollers, ripping 8 foot lengths is a little dicey, so maybe I will wait. I just hope aligning the new motor and squaring the saw is not too difficult.
Oh, somewhere in this favored land the sun is shining bright;
The band is playing somewhere, and somewhere hearts are light,
And somewhere men are laughing, and somewhere children shout;
But there is no joy in Mudville—mighty Casey has struck out.
I remember eons ago having to stand up if front of a crowd and the class had to recite that poem … (https://www.largescalecentral.com/externals/tinymce/plugins/emoticons/img/smiley-yell.gif)