Large Scale Central

small tools

Devon Sinsley said:

David Maynard said:

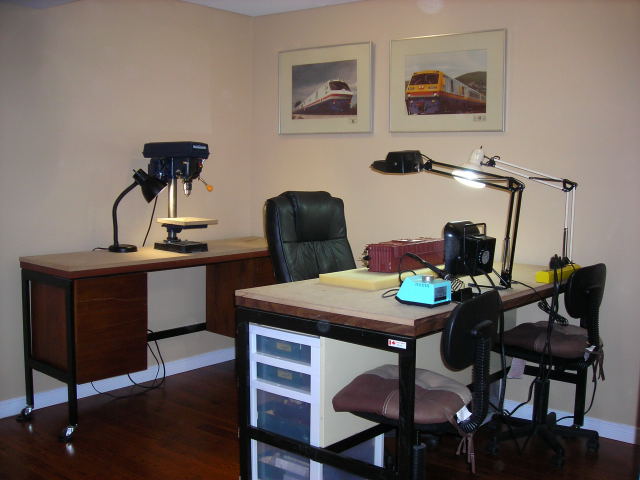
I have a Proxxon mini table saw. I would like to have a larger table saw to make my big wood into smaller wood that the Proxxon could handle better, but I make due, since I do not have the space for a larger table saw.

I have a drill press, and I have a grinding stone that I chuck into it for grinding switch points and such. I also have a home made die to put into it for pressing rivet effects into sheet metal.

What size blades does the proxxon use? I am thinking my rock saw would work well as a mini table saw. It will take the 5" range blades.

As for the drill press as a rivet indenter I like that idea. What do you use for the die. Seems like a rounded punch or even a reworked old drill bit may work. That is a good idea.

The blades on the Proxxon and larger Microlux saws (same saw actually) are 3 and 11/32nds of an inch in diameter. I have cut strip-wood as small as 1/32nd x 1/32nd on the saw. But a zero clearance plate is a necessity.

For my rivet embosser, I ground a rounded punch form into the end of a large nail. For the die part, I use a medium nail set. In the end of the nail set is nice half round concave shape. It makes rather nice looking rivets in soft metal and card-stock.

I am not following the rivet embosser. I am assuming there is a top and bottom portion. Your chucking the rounded nail into the drill press chuck and then lying the sheet materiel on the die and when depressed the nail pushes the sheet material into the concave die right? If so I don’t understand how your positioning the nail set (or even what a nail set is exactly).

Devon Sinsley said:

I am not following the rivet embosser. I am assuming there is a top and bottom portion. Your chucking the rounded nail into the drill press chuck and then lying the sheet materiel on the die and when depressed the nail pushes the sheet material into the concave die right? If so I don’t understand how your positioning the nail set (or even what a nail set is exactly).

Yes, the punch (nail) is chucked into the chuck. The die (nail set) is clamped into the clamp bolted to the table. Then the material is laid on the nail-set, and the die pressed down embossing the material.

A nail set is a tool used with a hammer to “set” the head of the nail flush the the material its being driven into. The end that goes against the nail head has a concave face, so it grabs the nail head better, and that concave shape is what I use as my die.

The die, rounded nail

The punch and die

Sample rivets. left one with the die (nail set), right one with just the punch, no die

David Maynard said:

A nail set is a tool used with a hammer to “set” the head of the nail flush the the material its being driven into. The end that goes against the nail head has a concave face, so it grabs the nail head better, and that concave shape is what I use as my die.

Oh, I forgot there was a time before compressed air was invented and people hammered finish nails. This makes sense, so where does one find a nail set… do museums generally part with them???(http://largescalecentral.com/externals/tinymce/plugins/emoticons/img/smiley-tongue-out.gif)

Thanks for the pics makes sense now

Nail sets are still very common items. Any hardware store will carry them usually where the hammers are sold.

I use them when making turnouts, in places where the “spiker” won’t fit, like between the rail and guard rail, and near the frog, where the rails come together.

Devon - an interesting post.

I bought in to the miniature tool market a few years ago and I really enjoy them. I know you asked about power tools, but I’m going to start with some hand tools that I find very useful.

First off is this nibbler. Great for going through metal, but will also work with plastic.

If you’re going to do any sort of hand laying track, the “Spiker” is one of the best tools available. Puts in two spikes at a slight angle with just two whacks of a small hammer.

Micro-mark is often viewed as an expensive source, but their line of mini power tools is awesome. I have the belt sander, mini-drill, and right angle disk sander. Not pictured is their miniature jig saw, which I don’t use all that much.

I recently purchased a Proxxon Pen sander - a really nifty tool; but, don’t get their sandpaper - it’s exorbitantly expensive. I bought some 3M adhesive sandpaper for a fraction of the cost and just cut the shape myself.

Lastly, a thin beam square that I use all the time. Not power, but effective.

I have a large drill press which is useful, but when it comes to drilling small holes, this setup can’t be beat. It’s from Proxxon and is very sturdy. The little vise is a separate purchase, but really helps making accurately spaced holes.

Now that’s strange. On my computer and in the freight shed it is oriented properly, but not so much here. I don’t see anyplace to change orientation.

I don’t have enough room for a full size table saw. Not only that, but I really like using the Micro-lux version.

If I need to cut big boards I just order them already cut. I don’t like making sawdust that much.(http://www.largescalecentral.com/externals/tinymce/plugins/emoticons/img/smiley-embarassed.gif)

So, that’s a quick list of some of my favorites.

The most used power tool in my train workshop is my drill press. It is mounted on a government surplus credenza with the modular book shelves removed from the center so I can sit and work in comfort. It has a steel frame, sturdy top and hardwood drawers on roller glides. The drawers are handy for holding drill bits and other accessories. I added a 3/4 inch MDF work surface, and a goose-necked work light.

It sits right behind my work table so I can swivel my chair to use either without moving.

There is an article on the OVGRS club web site about bench tools that I have used during my 24 years in the hobby.