Large Scale Central

SHASTA PACIFIC 3.0

This societal lockdown does have some advantages, getting lots done on the new railroad addition(https://www.largescalecentral.com/externals/tinymce/plugins/emoticons/img/smiley-laughing.gif).

I only had enough track left to do about a third of this planned new addition, about that time I got a call from Dick Smith of the Port Orford Coast RR wanting to know if I was interested in helping him with the abandonment of his line. A deal was quickly worked out and the wife and I went over to visit and spend a cople of days helping Dick dismantle the RR. We bought all the track work and brought it home to use, so the Port Orford Coast Rail will continue to live on the Shasta Pacific/South Fork Timber railroads(https://www.largescalecentral.com/externals/tinymce/plugins/emoticons/img/smiley-laughing.gif). Thanks Dick!!

Getting the track down, this area used up the last of my AMS brass track. The rest will be Micro-Engineering aluminum in AMS ties and Llagas Creek aluminum. It is fun trying to get the railclamps to work on this hodge-podge of track and switches from different companies.

The lift bridge to access the center of the loop. The loop center area will have the town of Fields Landing and the sawmill and train yards.

If the weather co-operates we should have trains running on the addition by the end of next week(https://www.largescalecentral.com/externals/tinymce/plugins/emoticons/img/smiley-laughing.gif)

1 Like

That will be a nice run. I think the live steam bug is nibbling at me - it would be nice to have all elevated track for that (https://www.largescalecentral.com/externals/tinymce/plugins/emoticons/img/smiley-embarassed.gif)

Between rain showers over the last couple of days I have managed to get some more track laid.

The arch bridge is installed and track laid to a couple feet past the bridge. One thing I learned a couple years ago when I installed the other arch bridge is that you don’t anchor the bridge feet solid at both ends of the bridge. As solid as the table structure is it still expands and contracts enough to tear the Styrene bridge feet all to pieces. On this one I am going to place a 1/4 X 3/4 Redwood “dam” around the feet so the can’t be easily bumped sideways and let them float.

Looking the other direction, the stright leg will go into the sawmill yards in the future and just past the silver lift bridge there is a switch, to the left, that will be the main line into town and the rail yards.

Barring rain showers I should be getting a train around this addition tomorrow or Tuesday(https://www.largescalecentral.com/externals/tinymce/plugins/emoticons/img/smiley-laughing.gif)

Should be fun.

1 Like

Hey Rick,

Are there provisions in your lift bridge to pull the ends of the sections into the proper place? I need one myself and with the high quality of today’s materials I was trying to figure out how to make sure the ends were always in line.

Thanks,

Chris

Hi Chris,

I use a pretty simple method and it has worked very well for me on probably 6-7 bridges. The bridge in these pictures is the second one in servive on my current RR. I also use the same latching method on my turntables, works well there too.

On the hinge end I mount the hinge blocks against the ties so they sandwich the ties and hold them in alignment. As you probably already know the hinge pins have to be at or just above the rail top so the rail swings up and away when you lift the bridge. So I get double service out of the blocks as they have to be there anyway. Yes you can bend your strap hinges into a “double ell” configuration and eliminate the blocks but then you have to come up with a rail alignment system(https://www.largescalecentral.com/externals/tinymce/plugins/emoticons/img/smiley-foot-in-mouth.gif)(https://www.largescalecentral.com/externals/tinymce/plugins/emoticons/img/smiley-laughing.gif)

On the other end I just use a simple slide block to latch and align the rails. The slide is made from a piece of 26-24 gauge metal that just slides tightly between the rails. On that I glue a piece of .60 or .80 Styrene for heft, narrower to clear the flanges, and drill a finger hole for easy sliding. The screws act as slide blocks and the slide stays on the bridge end when it is lifted. You can see the nails used to tack the track to the bridge deck (third tie in, bottom). I use the fender washers and screws to fasten the track down and still allow the track to float with temp changes.

Edit for disclaimer. don’t use the metal slide with track power(https://www.largescalecentral.com/externals/tinymce/plugins/emoticons/img/smiley-foot-in-mouth.gif)(https://www.largescalecentral.com/externals/tinymce/plugins/emoticons/img/smiley-laughing.gif), in those situations I have used an all Styrene version and it works just fine though not as durable

Maybe there is something here you can use(https://www.largescalecentral.com/externals/tinymce/plugins/emoticons/img/smiley-laughing.gif)

(https://www.largescalecentral.com/FileSharing/user_1952/SP%20in%20Oregon/SP61.jpg)

Is there enough clearance for …say a plow …

I think you could flip the hinges over. …

Sean,

That is a consideration for sure if your running a plow or maybe a flanger. Problem with turning the hingers over is getting them to over 90 so the bridge weight is against the rack. I don’t think that any of this is going to be a problem on the Shasta Pacific because I’m never going to get that dam* plow finished anyway(https://www.largescalecentral.com/externals/tinymce/plugins/emoticons/img/smiley-foot-in-mouth.gif)(https://www.largescalecentral.com/externals/tinymce/plugins/emoticons/img/smiley-laughing.gif)

Rick Marty said:. I don’t think that any of this is going to be a problem on the Shasta Pacific because I’m never going to get that dam* plow finished anyway(https://www.largescalecentral.com/externals/tinymce/plugins/emoticons/img/smiley-foot-in-mouth.gif)(https://www.largescalecentral.com/externals/tinymce/plugins/emoticons/img/smiley-laughing.gif)
Look into my eyes…Prepare NOW!

If the Donners would have prepared they would have been eating a turkey diner instead of ( ea_h ot_er) about 175 years ago!

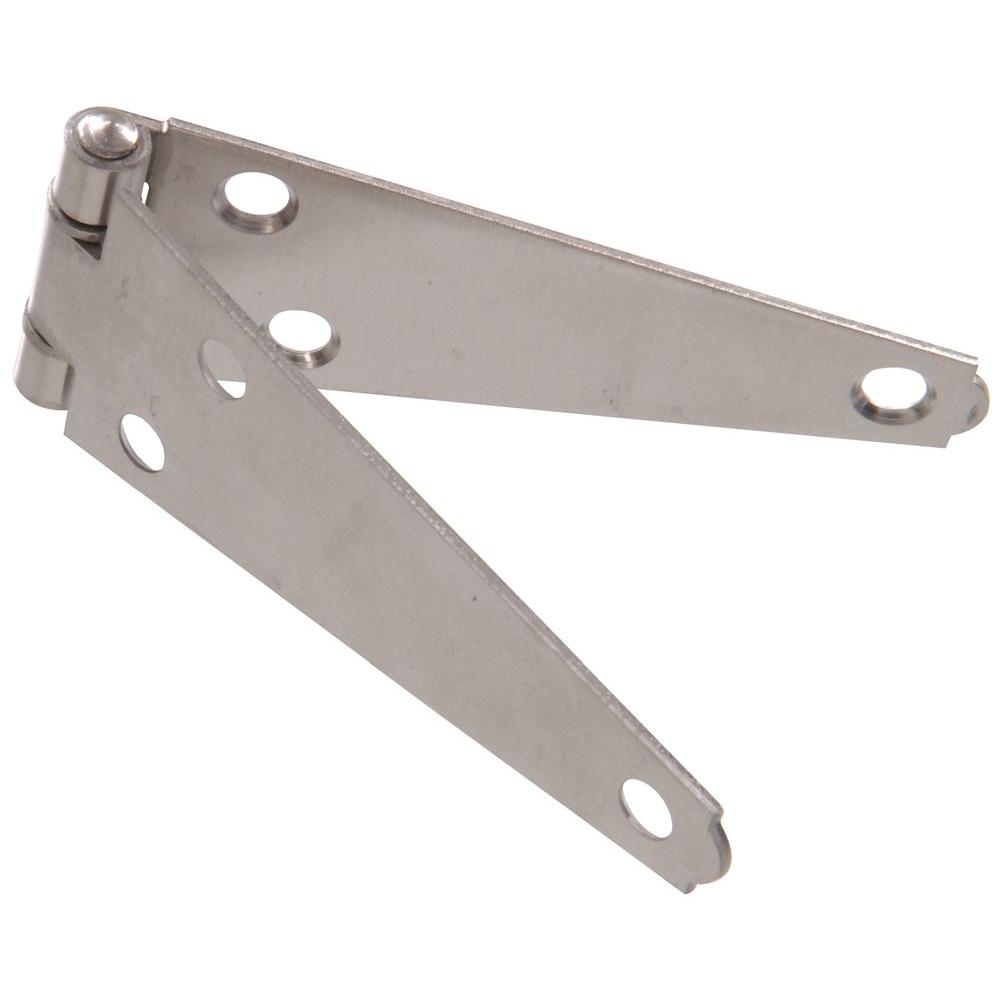
Hardware Essentials 4 in. Stainless Steel Heavy Strap Hinge (5 ...

I believe you might have to remove a little metal between the barrel and the first two holes to make the slot/tongue a little longer …

Just try closing it the other way and you will see …

One of these days, Rick, we’ll get back out there. Think I’ll wait till your done though, so I don’t get put to work…(https://www.largescalecentral.com/externals/tinymce/plugins/emoticons/img/smiley-wink.gif)(https://www.largescalecentral.com/externals/tinymce/plugins/emoticons/img/smiley-cool.gif)

Ken Brunt said:

One of these days, Rick, we’ll get back out there. Think I’ll wait till your done though, so I don’t get put to work…(https://www.largescalecentral.com/externals/tinymce/plugins/emoticons/img/smiley-wink.gif)(https://www.largescalecentral.com/externals/tinymce/plugins/emoticons/img/smiley-cool.gif)

I am really sorry that I will never get to see you again Ken, for as every one knows a model railroad is never done(https://www.largescalecentral.com/externals/tinymce/plugins/emoticons/img/smiley-foot-in-mouth.gif)(https://www.largescalecentral.com/externals/tinymce/plugins/emoticons/img/smiley-laughing.gif)

(https://www.largescalecentral.com/externals/tinymce/plugins/emoticons/img/smiley-wink.gif)(https://www.largescalecentral.com/externals/tinymce/plugins/emoticons/img/smiley-cool.gif)

First train on the new addition and believe it or not, everything ran smoothly. That gravity switch works perfectly, so far(https://www.largescalecentral.com/externals/tinymce/plugins/emoticons/img/smiley-foot-in-mouth.gif), and the grade changes seem to be smooth enough in transition(https://www.largescalecentral.com/externals/tinymce/plugins/emoticons/img/smiley-laughing.gif).

A couple of pictures of the first trains.

Number 22 pulls the first couple of cars through the loop.

Shay #9 running light drifts around the heigh curve.

On to more things railroad(https://www.largescalecentral.com/externals/tinymce/plugins/emoticons/img/smiley-laughing.gif)

1 Like

Looks great Rick.

Well with other projects getting caught up and the Spring yard work well in hand I thought, since we are spending so much time at home now days, that I would kick of another small project.

I need some engine facilities for the Redding yards, nothing large or fancy just a little something to go with the loco cab oil shed that I built a few months ago. See here https://www.largescalecentral.com/forums/topic/29810/oil-shed/view/post_id/391517

I have a reconditioned MTH water column up-scaled to 1:20 for water and I thought a small oil tank and pump system should be just the ticket, so got a Start on it a couple days ago.

This little tank will only hold about 7,000 gallons of oil just for use by the yard goat and the local freights, the road locos will still refuel at the Southern Pacific tanks at their yard just up the track. A working agreement has been in place with the Southern Pacific for sveral years to do the heavy service and maintainence on the Shasta Pacific locomotives in exchange for LCL freight service of the Southern Pacifics goods to the coast. We were even able to talk them into installing duel gauge track in their yards to smooth the flow of loco and car movement.

For those always gripping that my work bench is too neat and clean, this is more what it looks like during construction rather than open house(https://www.largescalecentral.com/externals/tinymce/plugins/emoticons/img/smiley-foot-in-mouth.gif)(https://www.largescalecentral.com/externals/tinymce/plugins/emoticons/img/smiley-laughing.gif)

Will post completed picts in a couple days.

1 Like

Still looks neater than mine when I’m in mid project. OCD?

Well the fuel tank and transfere pumps are done, this is about where it will be planted along with the oil shed and water tower, I will get another picture when it is all in place.

This area, the Redding Yards, is under a patio cover so is protected from the sun and rain so these buildings stay out all year with little or no weathering issues.

One thing about posting pictures it shows what has to be adjusted,changed, or re-done(https://www.largescalecentral.com/externals/tinymce/plugins/emoticons/img/smiley-surprised.gif)(https://www.largescalecentral.com/externals/tinymce/plugins/emoticons/img/smiley-laughing.gif)

1 Like

That pad looks like it’s got some rock in it, because it wanders a tad!

My ballast is always off to see the neighbors!

Nice addition to the RR, Rick. Makes for a very convincing scene.

The Redding Yards service facility is starting to come together Just a couple more structures to add then call it done.

Each “structure” in this area is built as a diorama and set into the scene seperatly. All structures in this area will be/are lighted so eventually

I can run buss bar wires under the table and get everything illuminated.

A couple pictures of the progress so far

From this end the lead from the turntable comes into what will be an open sided service shop with a small pit. Then the loco cab oil shed then the fuel facility just recently shown.

On this end is the water column, pump house and speeder shed, just finished today. The speeder shed is an Ozark kit, the water column is from MTH bashed into 1:20 scale and the pump house is a little building from, actually I have no idea where I got it.

A few Ozark details help complete the scene. I took an Ozark hand pump and turned it into a freeze proof hydrant by dumping the pump handle and adding a valve handle.

Just a shot down the yard track

An overall of how the dioramas fit into the Redding Yards scene.

A couple more structures and this area will be complete, for now(https://www.largescalecentral.com/externals/tinymce/plugins/emoticons/img/smiley-foot-in-mouth.gif)

Later.

1 Like