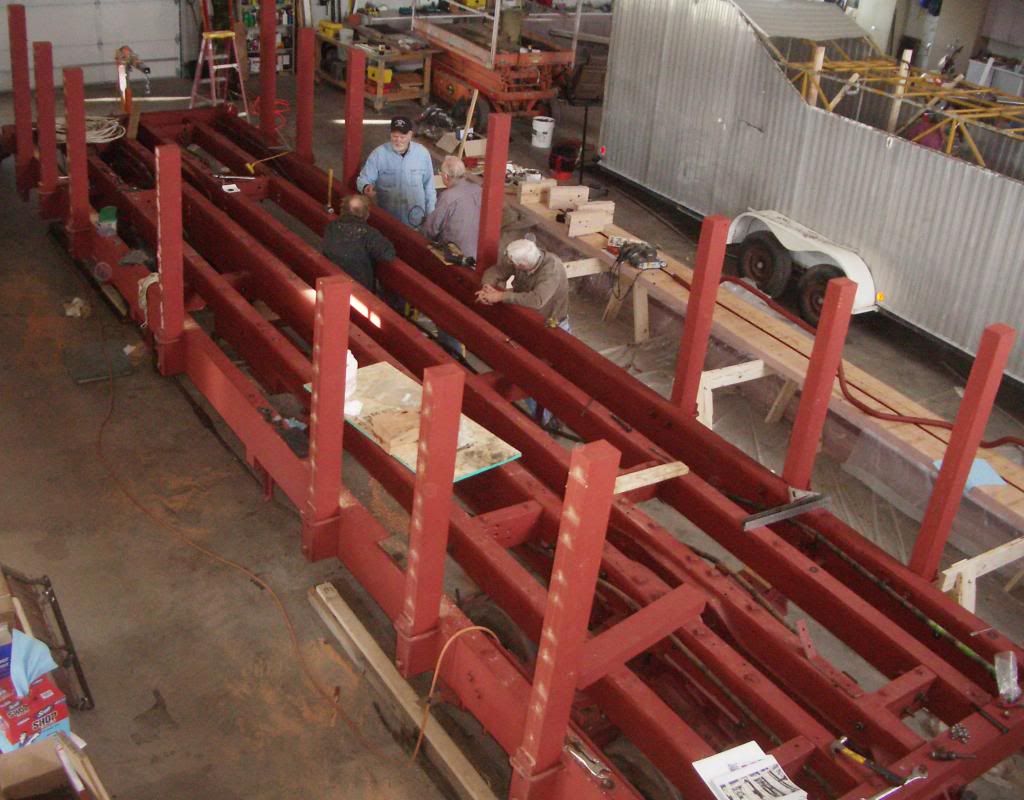
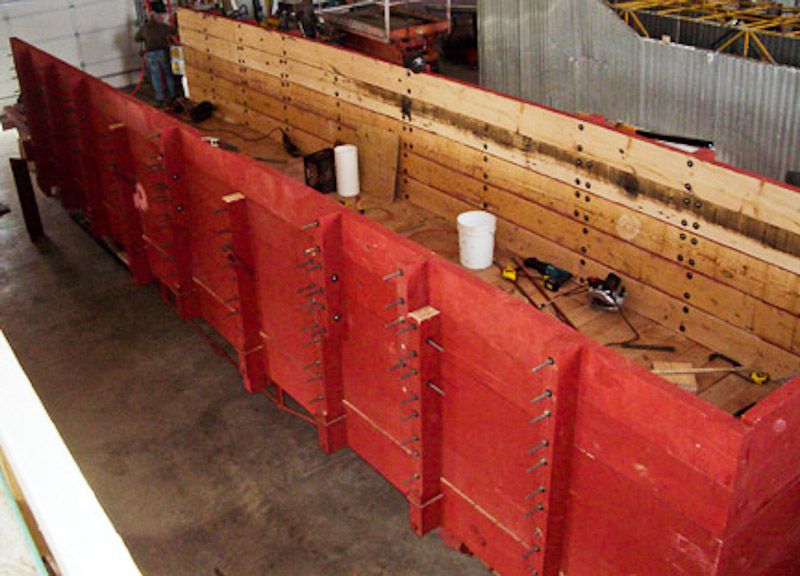
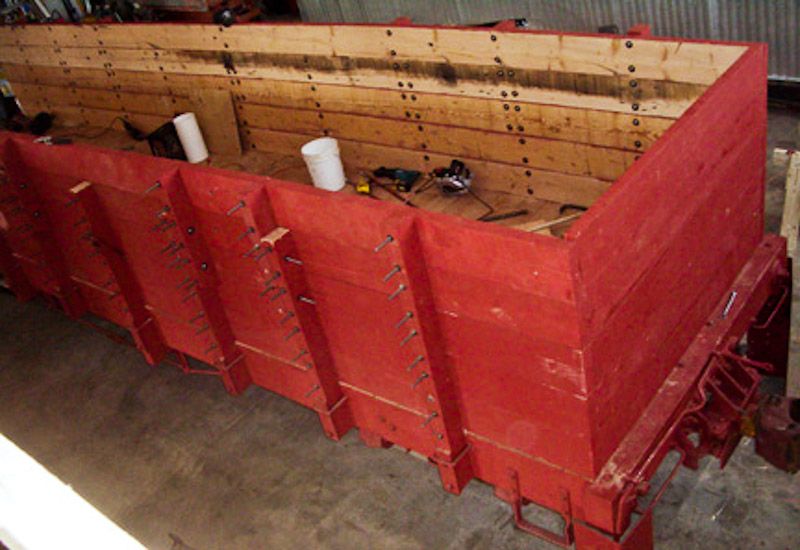
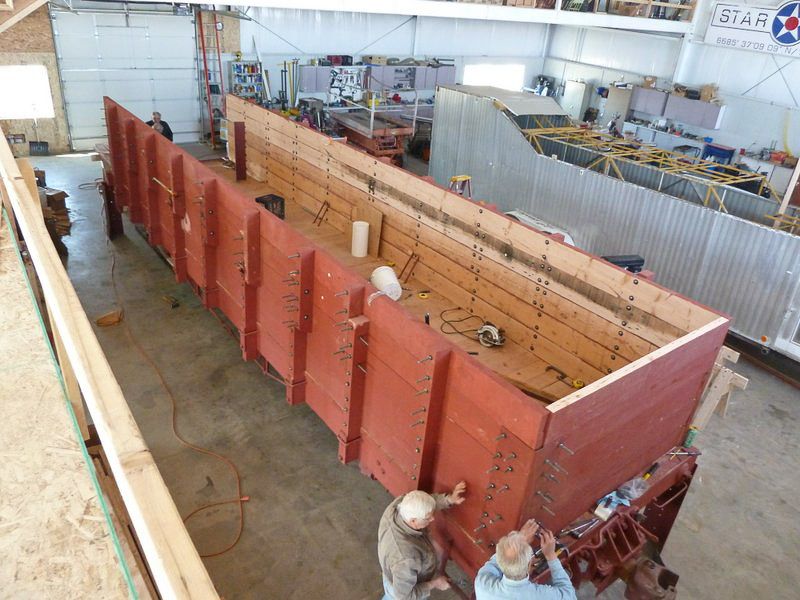
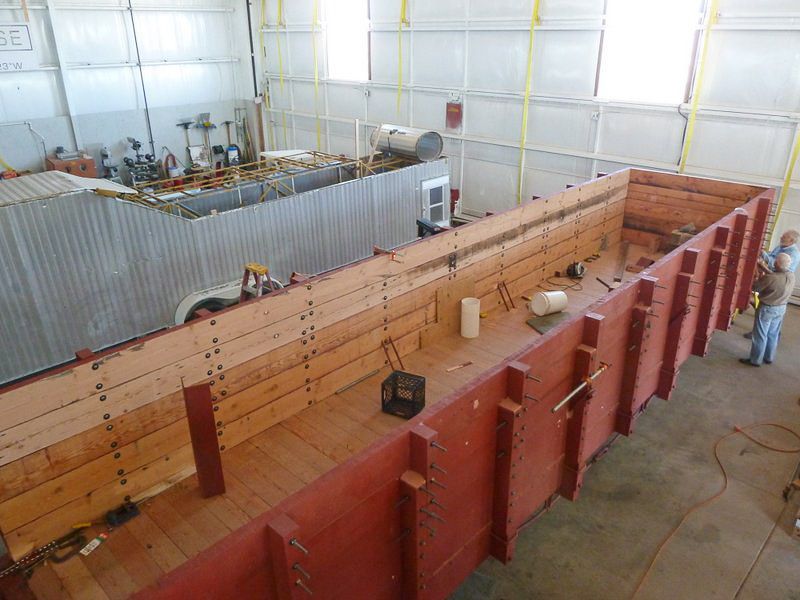
Up-date on the High Side Gon work… George and workers got it on it’s trucks…
http://freightsheds.largescalecentral.com/users/dave2-8-0/_forumfiles/Hisidegon5Dec12.pdf
Up-date on the High Side Gon work… George and workers got it on it’s trucks…
http://freightsheds.largescalecentral.com/users/dave2-8-0/_forumfiles/Hisidegon5Dec12.pdf
Nice. Proves how easy we have it working in scale 
Thanks for the link Dave. Very cool site and “Good work.” to all you guys!
Narrow Gauge Lover, your links were v. cool as well. Thanks, fellas!
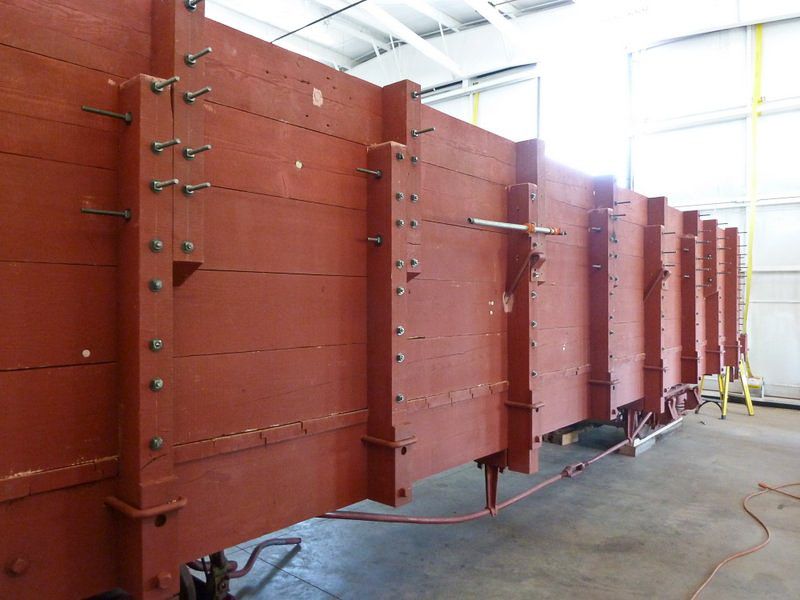
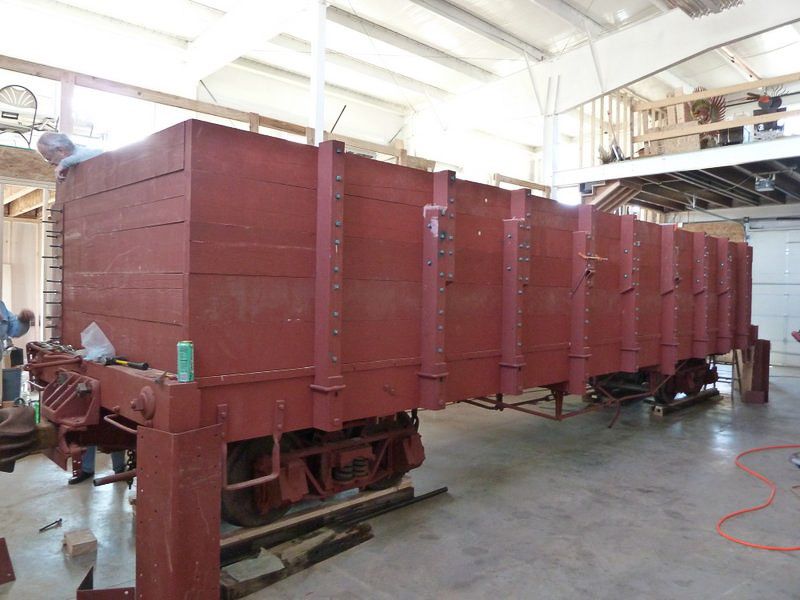
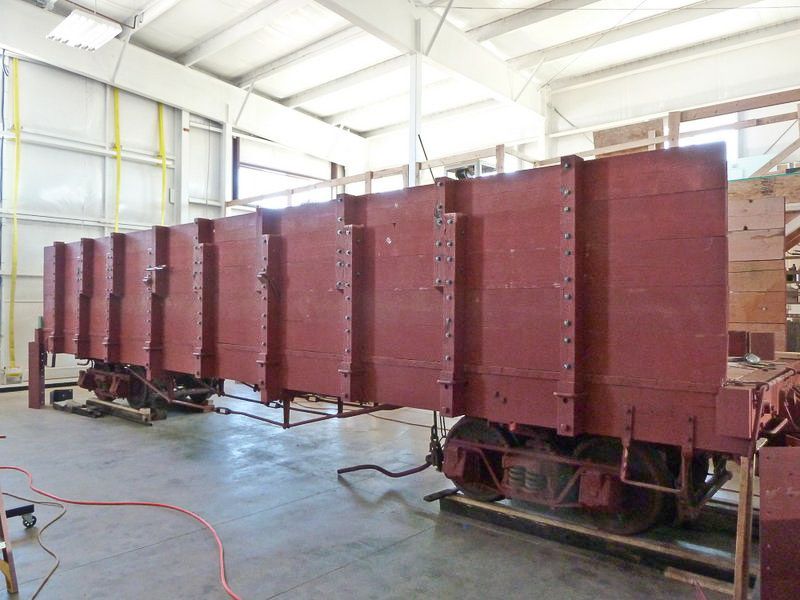
How to flip a High Side Gondola…
Here’s a short video of flipping the gon and setting it on the trucks… I wish I hadn’t had to work that day…
http://www.youtube.com/watch?v=0Xj8dYygKn8&feature=youtu.be
BTW the flip was in Arboles CO. Not Durango as the tail said.
Enjoy
Very cool. I was wondering how they’d get it turned over.
Looks GREAT ! I love seeing these old freight cars restored.
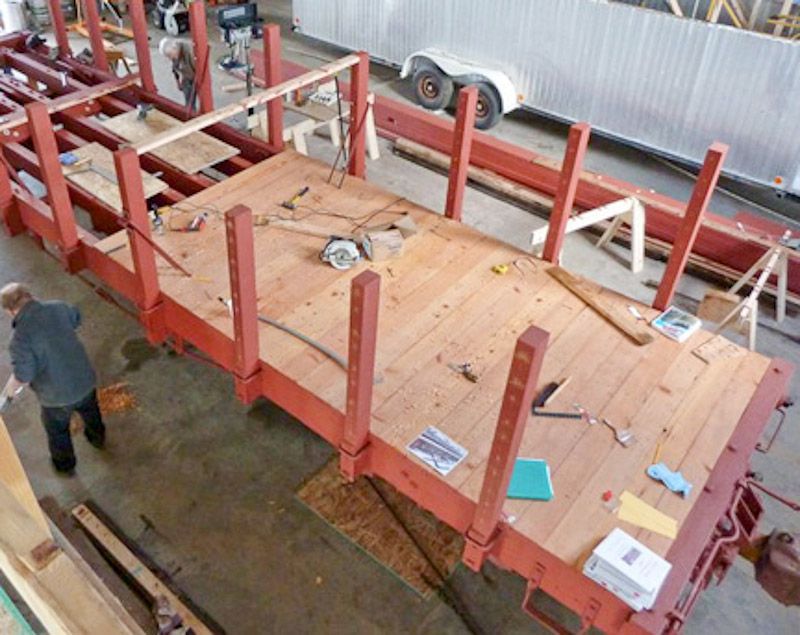
Update: High side gondola re-build comming along, They (I had nothing to do with the work progress) got the side posts drilled for the boards to attach.
(http://i1234.photobucket.com/albums/ff403/dave2-8-0/Gondola-03_zps54627e96.jpg)
The website has been rebuilt and it’s now easy to follow along with this build.
From the Durango RR Historical Society:
Note ( I did not get a chance to help on this project yet again.)
Durango RR Historical Society members:
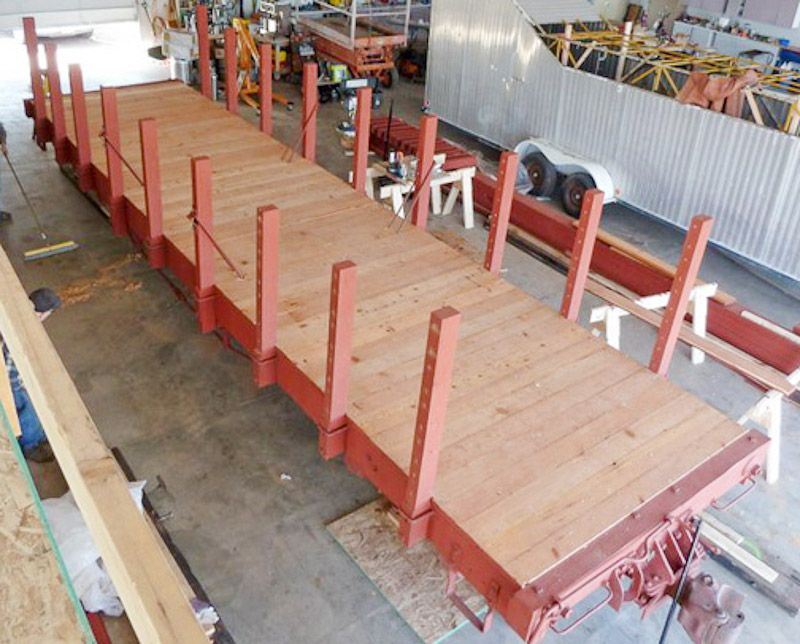
We have had two work sessions most weeks since I last reported to you on Feb 5. What a difference these weeks have made.
(http://i1234.photobucket.com/albums/ff403/dave2-8-0/130312-17ddd-allposts-w_zps0000d800.jpg)
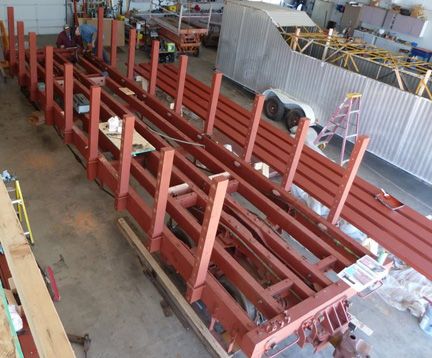
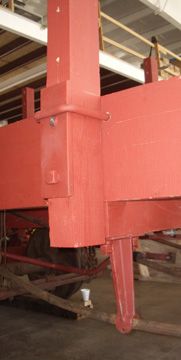
Mar 12. All posts are installed, except the extensions, which will be attached to all the posts except the four on the ends. Photo by Duane Danielson
(http://i1234.photobucket.com/albums/ff403/dave2-8-0/130315-39-Boutsidebrakegear-w_zpsb2765e3b.jpg)
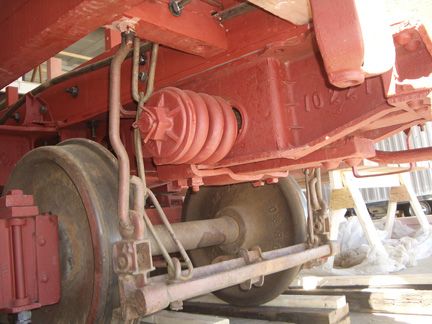
Mar 15. All the brake beams and hangers are installed. Here is the outside gear for the B (brake) end. This and other photos below by George
(http://i1234.photobucket.com/albums/ff403/dave2-8-0/130315-48-Ainsidebrakegear-w_zps0991be1d.jpg)
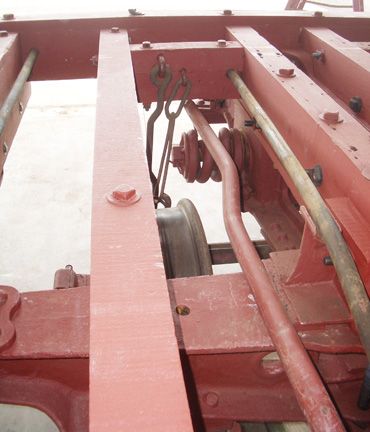
Here is the inside gear fro the A end. The air pipe is still loose.
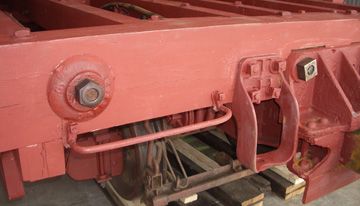
(http://i1234.photobucket.com/albums/ff403/dave2-8-0/130315-44-Bsillhardware-w_zpsffc9be3f.jpg)
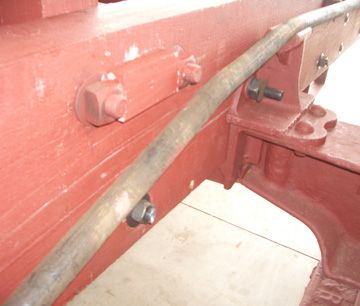
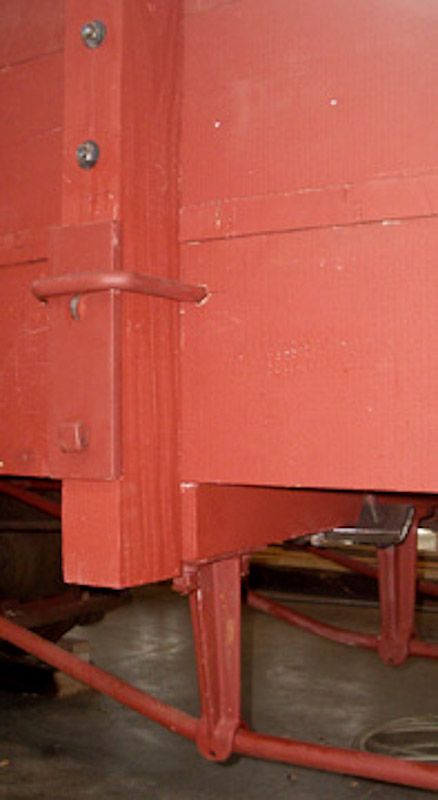
The brake stirrup and a grab bar are installed on the B sill. All grab bars on the sills are installed.
(http://i1234.photobucket.com/albums/ff403/dave2-8-0/130315-50-Benddetailinside-w_zpsbb6982fb.jpg)
Two truss rods at the B end, along with the air line loosely in place.The distance block holds a brake hanger, brake hanger carrier, and a safety chain.
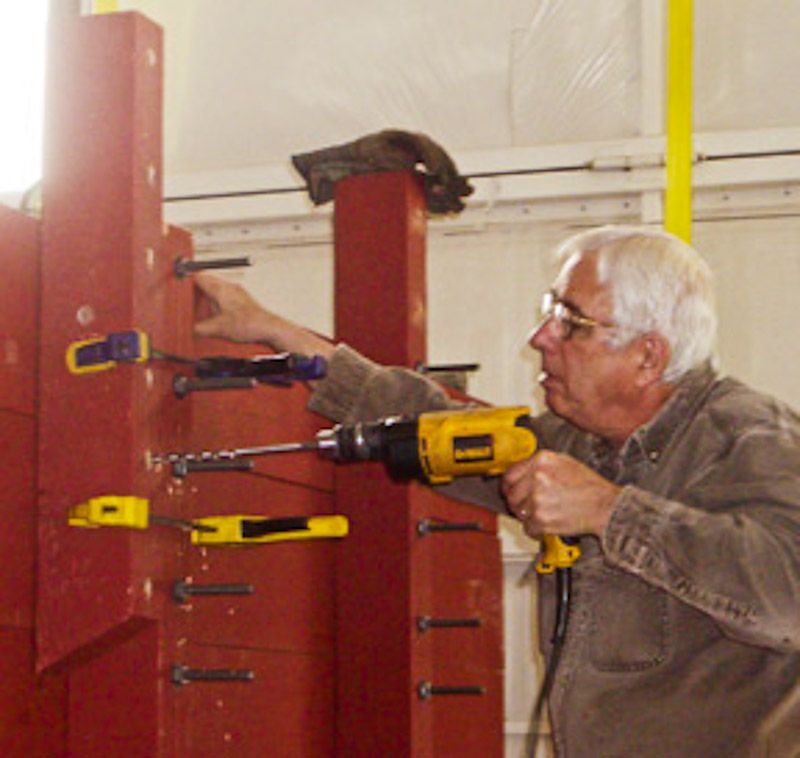
(http://i1234.photobucket.com/albums/ff403/dave2-8-0/130315-46-posthardware-w_zps8680f7f5.jpg)
Steel plate, bolts, and U-bolt for a post. Two holes precisely drilled for the bottom side board.
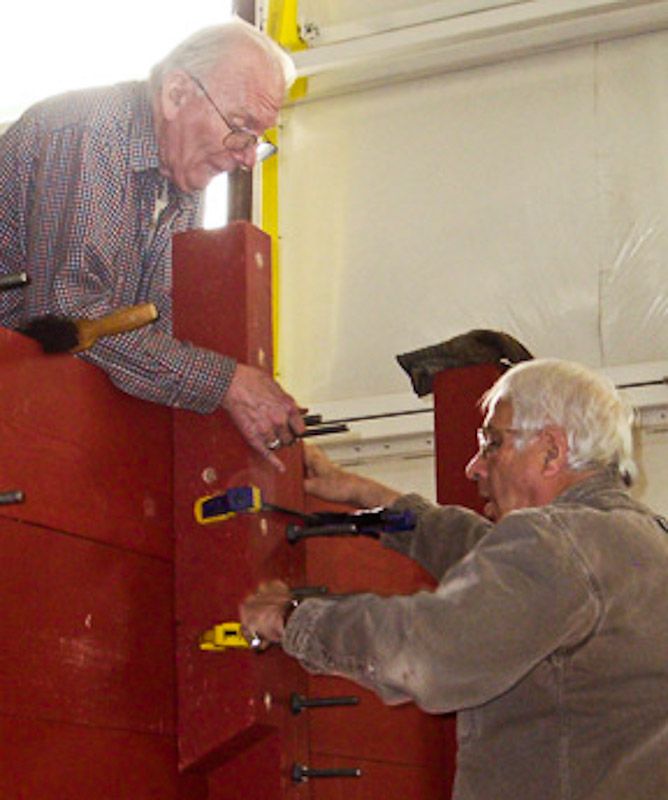
(http://i1234.photobucket.com/albums/ff403/dave2-8-0/130315-51-Uboltlock-w_zps57e0281e.jpg)
The two nuts for a U bolt and their wood locking block nailed in place.
George Niederauer
The wood locking block is cool. They really knew how to do things simply and inexpensively back then. Today we’d use a chemical thread lock. 10 years in the future when it needs to come apart they would discover the wrong type of chemical lock was used and break the fastener trying to unbolt it.
Safety wiring is a good alternative to chemical thread locker.
@Jon - Break out the 7mm gas wrench, one size fits all. Heat up the nut and I don’t care what kind of thread locker was used, it will come apart. On another note on the same subject, I read somewhere that Pine pitch was used as a thread locker back in the day.
Bob C.
Just noticed the 2nd queen post on the bolster… Now there’s something we never model…
An update on the High Side Gon re-build, by the Durango Railroad Hist. Soc. Unfortunately I have been unable to help at all.
We have continued with two work sessions. Since my last report to you on March 16, we have been working on the floor, brake rigging, air lines, and miscellaneous hardware.
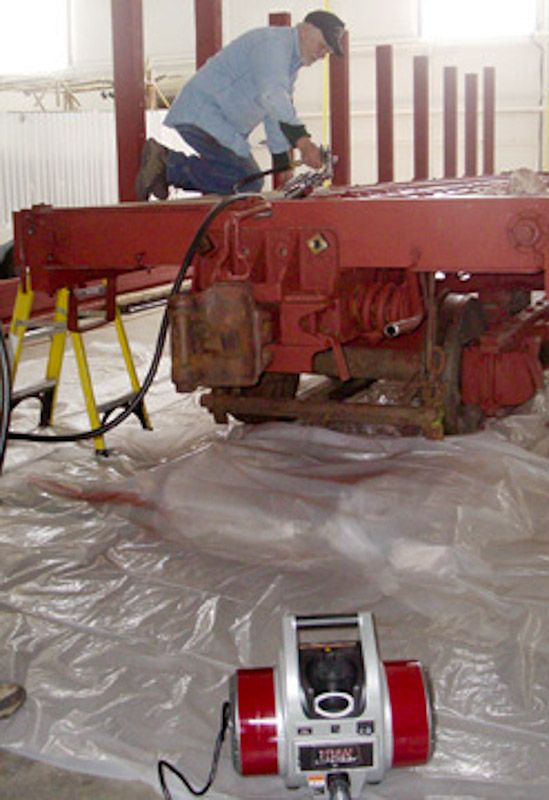
On March 22 Dennis painted the frame and truck structures with our new low pressure paint sprayer. Photo by George Niederauer
(http://i1234.photobucket.com/albums/ff403/dave2-8-0/130322-57-Dennispaints-w_zps29ca58bd.jpg)
Most visible is the floor. By March 29 we had completed nailing down half the floor. Most planks have to be marked and drilled on the bottom side with a large Forstner bit to fit over the protruding bolt heads and washers. The old fir is tough, so we had to drill holes through the planks and into the sills so that the spikes (40d) would not bend under the pounding with our heavy hammers. The 2x4 across the top of two posts is hold the spread at the correct distance, so we could drill the holes for the side wall braces (long U-bolts) in the right spots in the floor planks. Photo by Duane Danielson
(http://i1234.photobucket.com/albums/ff403/dave2-8-0/130329-14ddd-halffloor-w_zps20447200.jpg)
At last, on April 4 we finished laying the last piece in the floor – in the center – we had worked from both ends. Photo by Duane Danielson
(http://i1234.photobucket.com/albums/ff403/dave2-8-0/130404-ddd20-floordone-w_zps568b6562.jpg)
Fantastic looking!!!
Pretty impressive diorama you got there…That Bachmann almost looks real!
Update on the High Side Gondola (again I was no help this week).
DRHS members:
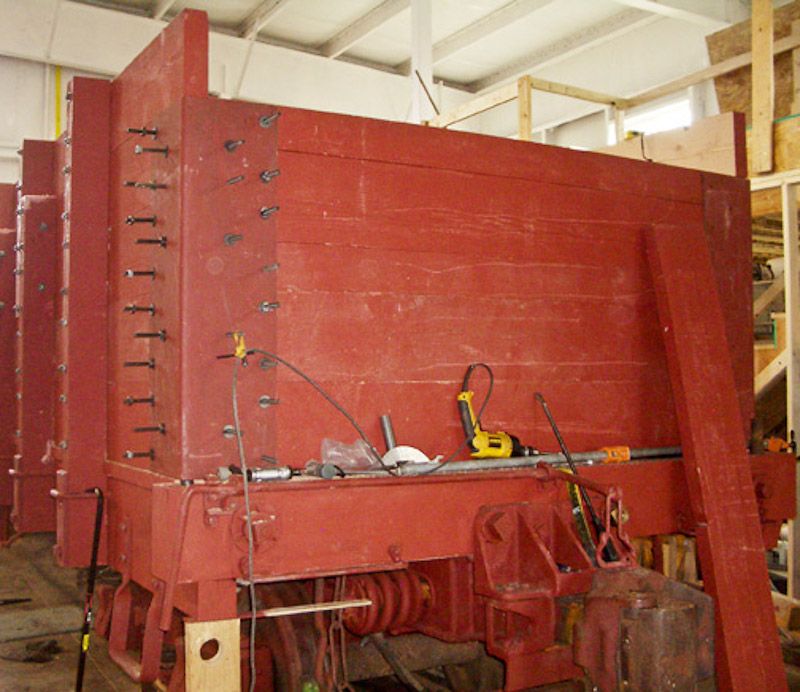
Yesterday we installed the top two side boards and stacked the end boards at the B (Brake) end. It is a tedious job. More than 340 bolts will be installed in the side and end boards when it is done. Four post extension (‘sisters’) need to be installed as do several bolts. Only a few of the excess bolt ends have been torched off.
(http://i1234.photobucket.com/albums/ff403/dave2-8-0/1300416-70-Tonydrillssisterpost-w_zps47a0c718.jpg)
After Dennis D’Alessandro and Duane Danielson clamped a post extension (‘sister’) in place, Tony Palmer drills the holes through the side boards.
(http://i1234.photobucket.com/albums/ff403/dave2-8-0/130416-72-DuaneTonybolts-w_zps2faf5b07.jpg)
Then, Duane and Tony install the bolts, while Dennis continues to torch off the ends of other bolts.
(http://i1234.photobucket.com/albums/ff403/dave2-8-0/130416-74-sideboardsallin-w_zps3be6a267.jpg)
All the side boards are now in place, with most of the bolts installed.
(http://i1234.photobucket.com/albums/ff403/dave2-8-0/130416-73-endplanksinplace-w_zpsfe7ee127.jpg)
We had just enough energy left at the end of the day to put one set of end boards in place, on the B end.
George
Durango Railroad Historical Society
Box 654
Durango, CO 81302
www.drhs315.org
Progress is looks great.
Think about how much work this has been for men with modern power tools and technology at their disposal.
Then think back to the time when these were first constructed; men worked from blueprints (or memory) with hand tools and sweat. They probably could turn one out in half the man hours it takes to do it today. Partially because they knew their jobs like the back of their hand.
And going back a few posts to the queens post on top of the bolster… I took a close look at the underside of an Accucraft D&RGW Flat a few weeks ago. If it were to be modeled you would need a flashlight and a mirror to see it so I guess it’s OK that we don’t :]
Some added photos from this weeks work on the Gon. Work (for salary) gets in the way of all the fun things one would like to do. Photos by Duane Danielson:
(http://i1234.photobucket.com/albums/ff403/dave2-8-0/P1010644_zps68df2dd9.jpg)
(http://i1234.photobucket.com/albums/ff403/dave2-8-0/P1010643_zps6eb8594f.jpg)
(http://i1234.photobucket.com/albums/ff403/dave2-8-0/P1010642_zpse49ea592.jpg)
(http://i1234.photobucket.com/albums/ff403/dave2-8-0/P1010641_zps1d88e18c.jpg)
(http://i1234.photobucket.com/albums/ff403/dave2-8-0/P1010640_zpse1b47033.jpg)
(http://i1234.photobucket.com/albums/ff403/dave2-8-0/P1010639_zps57c62032.jpg)
More updates on the High side D&RG Gon restoration by the Durango Railroad Historical Soc. As all the work sessions have been scheduled during my regular work days I have been unable to lend a single hand again.  .
.
Durango RR Historical Society Members:
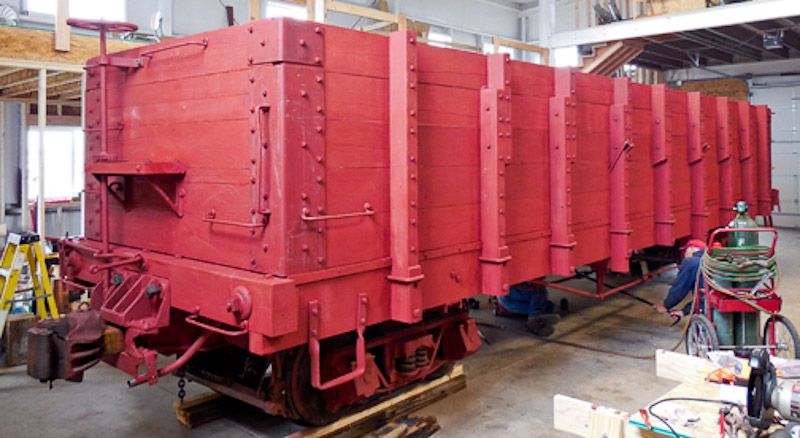
We have been making steady progress on the gondola. Almost all the brake rigging is in place, including brake shoes and brake wheel. Almost all air brake piping is in place except the triple valve and its fittings. The body is almost complete, except for tightening a few bolts and cutting off excess lengths. Next week, we will start painting the final coat and lettering. Here are some photos showing the status as of April 30.
George N.
(http://i1234.photobucket.com/albums/ff403/dave2-8-0/130430-78-Bend-w_zps251b2b4a.jpg)
(http://i1234.photobucket.com/albums/ff403/dave2-8-0/130430-84-Aend-w_zpsda3dab88.jpg)
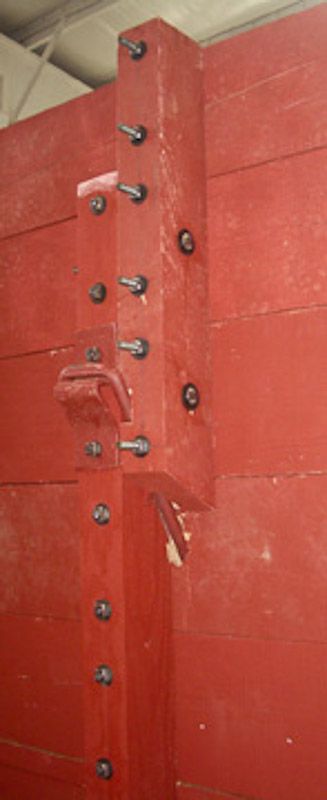
Each side has two braces (long U-bolts) attached to a bracket on a post, extending through the side board and floor plank to a metal plate (unpainted) set in a notch in the cross timber, which you can see by looking closely at the far right.
(http://i1234.photobucket.com/albums/ff403/dave2-8-0/130430-79-postextension-w_zps42749164.jpg)
(http://i1234.photobucket.com/albums/ff403/dave2-8-0/130430-80-postampbrace-w_zps0e39260f.jpg)
Photos by Duane Danielson:
Durango RR HIstorical Society:
Tomorrow (Wed) will be a banner day for the High Side Gondola. We move it to Silverton. The truck arrives at the hanger about 9am and should be loaded in an hour, so it should arrive about 1130am or so. Come see the event in Silverton. We could also use some help in unloading parts and tools and in removing the tarps and structure from the Drop Bottom Gondola.
Here are some recent photos:
(http://i1234.photobucket.com/albums/ff403/dave2-8-0/130506-5-painttopcoat-w_zps2f1350a5.jpg)
(http://i1234.photobucket.com/albums/ff403/dave2-8-0/130506-3-painttopcoat-w_zpsa31b5c54.jpg)
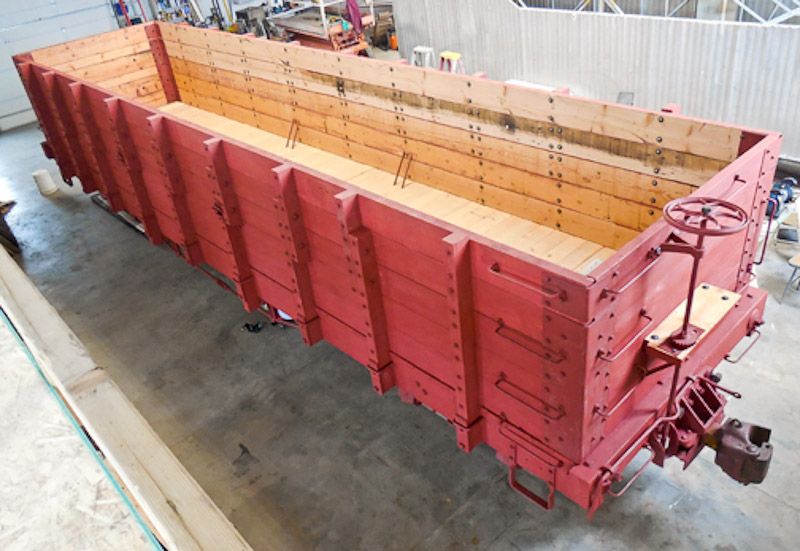
May 6. Top coat painted on entire car and interior cleaned out. Since then bare interior boards (lighter color) have been sealed, as well as the top of the brakeman platform.
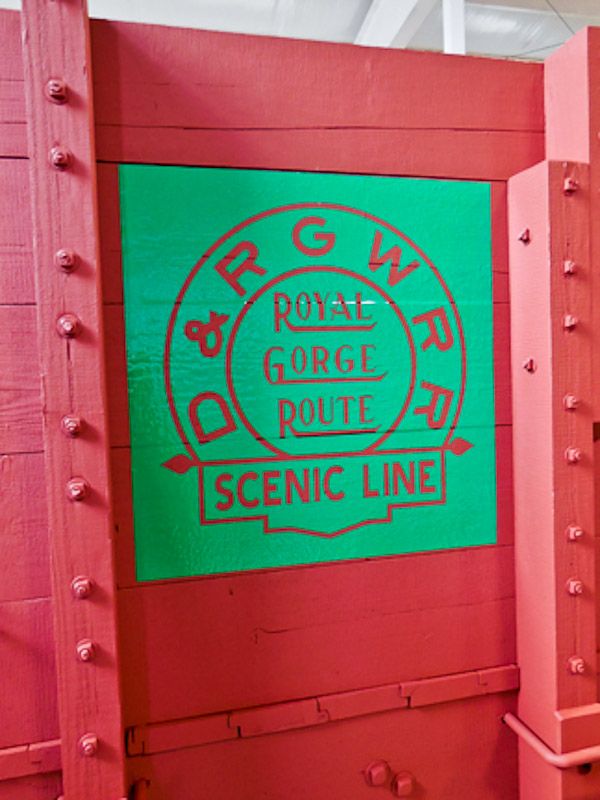
(http://i1234.photobucket.com/albums/ff403/dave2-8-0/130508-greenheraldstencil-w_zps8df41476.jpg)
May 8. A vinyl stencil ready for painting. We tried to convince Dennis to hold this for Christmas, but he wouldn’t have it.
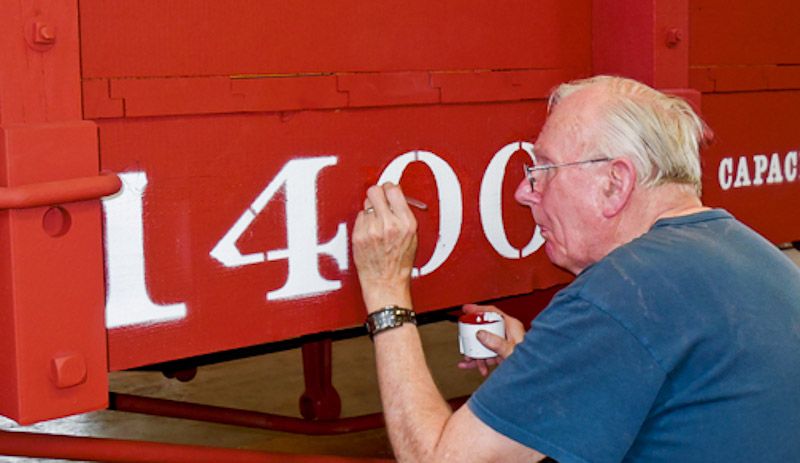
(http://i1234.photobucket.com/albums/ff403/dave2-8-0/130513-08-Duanetouchesup-w_zps3f489710.jpg)
May 13. Duane Danielson touches up lettering after Dennis and he used the stencils.
Again I had absolutely nothing to do with the work this week. Dang I wish I could retire.
I will be spending the week of June 9th in Silverton CO. working on D&RG #315 preparing for its “Annual inspection” in preparation for the D&S RR Railfest in August, and the special Photo Charter on the C&T RR in Sept/Oct. Any one in the area would be welcome to stop by and get dirty, and say howdy!