Large Scale Central

LGB 0-6-2T: BadMotor, Bad Gears, Both, or Something Else?

Eric, it’s hard to tell if you multiply the number by 10 or not. If this is a digital meter, then it should read amps directly.

0.135 amps at 10 volts under no load is quite reasonable, as these locos often pull under an amp in the loco and running on the track (remember the stock power supply from LGB is 1 amp).

I suspect your previous reading when it was running was 0.4 amps.

So this all seems right, I say that the gears are the issue.

Greg

Greg,

Thanks. That was the direction I was leaning.

Eric

OK, I spoke to to folks at TrainLi and ordered new gears, forward and aft. They should be en route shortly!

One more question, though. I noted an external thrust bearing behind the after worm gear. There is no external thrust bearing ahead of the forward gear. Should there be one, or did this go AWOL? Does it really need one? Is its absence the source of my problem, in fact?

Thanks again, and enjoy your weekends!

Eric

Quick update…

New fore- and aft gears are on hand. I’ll begin the replacement this weekend. If this doesn’t work, I may have to suck up the shipping costs. Fingers are crossed again!

Have a wonderful weekend, all!

Aloha,

Eric

OK,

Finally got “Gustav” all broken down. He is an older loco, and he has no separate motor block. Rather, he divides down the center line. That is wher I got stumped. There is a glide plate that the arm that connects the trailing wheels to the body slides along. This goes over the centerline split. I am pointing to it with the screwdriver in the picture below:

This appears to be glued in place, with the supporting plastic slightly narrower so that they align with holes in the floor. I am pointing to one with the screwdriver, and if you look carefully just above it, you can see light breaking through the other hole just below the screw holding the brass bus bar in place:

So, how do I remove this thing? I considered making a narrow cut, then, after verifying the repair worked, gluing a piece of styrene over the cut. I’d prefer not do that, however, and I was wondering if there is a solvent I could try to loosen the bond between the glide plate and the body of the loco?

As ever, your help is appreciated. In the meantime, this is giving me lots of practice for my conceptualized loco resurrection / first ever kit-bash project.

Aloha,

Eric

OK,

I am utterly stumped as to how to proceed with this repair.

I had a chance to return to this repair and really investigate that glide plate. An arc of plastic runs the length of the inner arc, and it is solidly welded in place. I am worried my plan to cut and patch will interfere with the travel of the trailing truck post repair. I thought about just prying the sides far apart long enough to swap out the gears would work, but I don’t really want to overstress the plastic on the old boy.

Is there an LGB safe solvent I can use to get this part off? If not, I am going to have to send my U-Lok off for repair.

Below please find the page from the original tech sheet:

This old model differs significantly from the newer ones, which have a removable engine block. There is also significant difference in how the engine’s body mounts to the chassis between what I have and newer variants (Courtesy of TrainLi: https://www.trainli.com/LGB-PDF/LGB%20Engines/2070D-1.PDF), so getting a new chassis is probably out of the question. I have been watching e-bay, but I am loathe to inherit another used up loco, and new ones are still less than an estimated repair.

This old U-Lok is not far enough gone to warrant scrapping, but I hate to blow money on shipping to swap out an $8 pair of gears.

As ever, I am grateful for the help.

Aloha,

Eric

Based on advice elsewhere, I will try to remove that glide plate by dissolving the bond with MEK today. This will allow me to finally separate the two halves of the hull to swap out those idlers.

If this “assault” fails, I am out of options on this one. I’d consider breaking Gustav for parts, if there were things to be found out here to kitbash. The old fellow has sentimental value, though, that would make it hard to put saw to plastic, especially given my elementary skills. Pricewise, it’ll be a toss-up between a repair and a powered tender. If I take the former route, I may beg CINCHOUSE for funds to have “Gustav” converted to Battery and RC. Then at least the modification and repair will cost more than the shipping…

Update to follow.

Enjoy your weekend!

Eric

Oh, that is what that screw does…holds the rest of this together…(http://largescalecentral.com/externals/tinymce/plugins/emoticons/img/smiley-embarassed.gif)

All stop for now…

After pulling Gustav apart, I found the after thrust bearing, which was nice. Then I easily swapped out the idlers and screwed the two halves of the hull together. I noted no amount of jiggling would get the after idler to remain engaged with the gear on the rear axel, so I pulled the old guy back apart. Turns out, the gear on the rear axel had split along its shaft, allowing the gear itself to slide along the axel, come out of alignment, and ultimately lead to the failure of this loco, to include damage to the after idler. Or at least that’s my theory…

Have to contact TrainLi and see if I can get this part.

Aloha,

Eric

Eric,

Just finding what is causing the problem IS progress! (https://largescalecentral.com/externals/tinymce/plugins/emoticons/img/smiley-wink.gif)

Joe, yes, I suppose it is progress. Now I have an excuse to make an order with some goodies, too!

At any rate, to close out today’s activities, below please find a picture of the damage idlers. The screw driver points to the screw I didn’t see for weeks. (Dumb, dumb, dumb…).

Next, you can see Gustav laid opened up with the new idlers installed. I had a discussion off-line as to whether the old boy had an internally or externally thrusted motor. Too bad I didn’t have money on that discussion!

Finally, the damaged drive gear. You can see the grease oozing through the crack, and you can see the serrated part of the axle that once held the gear in place:

And now, if I don’t walk the cattle dog, I will have more problems than a broken loco!

Aloha,

Eric

Eric,

Split axle gears like that are very common. They can be repaired by pulling the metal axle out and driving a suitably sized piece of brass tubing over the stub and pressing the axle back in.

I have done this a couple of times myself. It works.

A few words for caution to all when working on old LGB engines.

There are 4 different types of motors made (both in short and long shaft versions).

The first one was used in the ‘growler’ back in the 70’s. When running this engine was very noisy and ‘growled’ hence the name.

Next are the 2 with the red and black removable brushes. First one had a shaft that moved back and forth hence the ball bearing at the end of the shaft in the motor block. these are needed or the motor will fail (keep the ball bearing in place with a dab of grease when working on these.

2nd black/red brush units did not have the lateral shaft movement and the ball bearings must be removed or motor damage can occur.

Lastly is the newest sealed motor without the removable brush assembly. No ball bearings needed for this motor either, remove them if present.

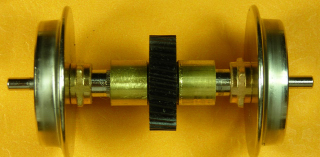
Also note that some of the older engines had a motor with the non brush end with a shorter mounting end. I found these in an original 2085. I had a friend turn the motor on his lathe to make it fit.

If you do not do this, the motor will not fully mesh with the plastic gear and eventually strip the gear.

So, I always check the shafts of motors for lateral/end to end movement and the motor ends to be identical when changing them out.

Eric, in the picture above the gears ar rnot aligned for proper placement of side rods. The axle ends must match exactly. I always place them in the motor block with the slot in a vertical or horizontal position to be sure they match perfectly. your picture shows a 90 degree offset. should be 0 degree offset for side rods to not bind. It is the opposite side of the block that gets the 90 degree offset and this is important when installing wheels on the newer axles which have round ends, not keyed ends like your engine.

Dan & Joe,

Thanks for the tips and advice. The part about alignment, Dan, will save me hours later in the process.

TranLi had the part. This time around, I am going to buy a replacement part, as I “have” to order some other random stuff, anyway. With a fleet of old engines, I will get to use Joe’s fix later, I am sure.

Now I am just crossing my fingers that changing out the gear is a simple matter of pushing off the old one and installing the new one. I sense another learning opportunity, however ill desired such an opportunity may be.

Aloha,

Eric

When pressing a new gear on an axle I use a flat washer to push against the plastic gear and then a small socket to push the washer in my vise. This prevents and damage to the gear teeth edges.

Dan,

Thanks again. I also received the following from TrainLi:

  1. Take a picture and particularly pay attention to the crank shaft posts line up this is called quartering.
  2. Mark the existing gears=’s position
  3. Lay the wheel above the slot and tap with a metal tool slightly on the axle until the axle falls out
  4. Lift the gear now above the slot and tap the axle until the gear is of
  5. Invert the remaining axle and stick the gear on, then tap until the gear is on position
  6. Lay down the wheel on a flat surface with a hole for the siderod mount. And pay attention to the quartering.
  7. Tap the axle until the axle is flush with the out part of the wheel

And now I wait for the part!

Eric

All,

I wanted to begin to close the loop on this one. Basically, I gave up, and I took advantage of my parents’ recent visit to send this venerable old locomotive to the Mainland for repairs. Still, I owe one and all a thanks for letting me hash out the trouble shooting on this page. I applied those skills to last week’s “garage find” pre-1991 vintage 2018D. Getting the old girl out of the box, operating, and on the tracks was a whole lot less problematic given the experience listed above!

I’ll officially “close” this post when my 0-6-2T returns home to us, probably later this year when I make my annual trip Mainland relatives.

Have a great week!

Eric

Eric

Dan works for train-li as their repair person … (https://www.largescalecentral.com/externals/tinymce/plugins/emoticons/img/smiley-laughing.gif)

Sean,

Thanks. Dan has been a guiding light in this and some other troubleshooting. In the end, it worked out cheaper to use my parents as couriers and to get Gustav permanently fixed than to keep playing rousing games of “Find That Fault” and “Guess Which Part.” I am learning with each order to pick one or two random items of consumables (traction tires, idler gears, coupler springs, etc.) to keep everything available for service.

The worst part of this, really, has not been the failed repair attempt. I learned quite a bit about LGB locos from it. Rather, it is the fact that Gustav traditionally serves to pull our “beverage” train when we entertain. Alas, we have had to use our Stainz-es, much to the disappoint of at least me!

Eric