Large Scale Central

Hale & Norcross

Cliff:

Those platforms (and the whole frickin’ thing) are just great. It seems like going print/cut from a 3D model allows you to scale things up an order of magnitude and you get such an intricate and great fitting structure that my eye (at least) just finds it fascinating. It may not be super-detailed but it is sure super-jaw-dropping.

Looking really great Cliff, the decking looks great

Dennis

photoshop this one Cliff (http://largescalecentral.com/externals/tinymce/plugins/emoticons/img/smiley-cool.gif)

Hi guys, and thanks so much for all the kind remarks!!

Jim, I sure appreciate how you described it, thanks buddy.

Thanks John, Bruce and Hollywood for the further ideas, it’s a very cool direction to head in! Bruce, your photos look great, wow.

Cliff Jennings said:

Hi guys, and thanks so much for all the kind remarks!!

I currently am, and thanks so much for the build log!!

On the plane from MD to CA today, I finally put down the Sudoku and did something useful. (http://www.largescalecentral.com/externals/tinymce/plugins/emoticons/img/smiley-laughing.gif)

Here’s the wiring plan, with the red representing #18-2 red/black wire, and green being the plastic supports for the LED tape.

The conduit stub-up and barrier strip are at the lower left. Most of the strips are down-light, but a few need LED’s on the upper side, to illuminate high windows. A “J” indicates a jumper connection where those upper tapes will be present.

I’m going to try to keep things simple, with the LED tapes soldered to flying leads which are wire-nutted into harnesses for each module, ending in a home run to the barrier strip. LED tape will be adhered to the plastic supports with 3M VHB tape (really good stuff!), and the supports will be wire-tied to the structure via drilled holes.

This seems pretty straightforward, and also easy to modify when we get to the photo-in-the-window stage.

On that front, the Papplewick Pumping Station boiler room is so impressive… but I need a shot of 4 boilers mainly from the side of the first one, not an end or corner view of 6. Still, they’re pretty cool, and built around the same time (well, 10+ years later than the H&N. close enough).

And sans bookshop in the foreground. (http://www.largescalecentral.com/externals/tinymce/plugins/emoticons/img/smiley-foot-in-mouth.gif)

After lighting the structure, there are many things that need to happen to close out the main structure phase of this. (The roof phase will be almost as involved, and I need to pinch things off here).

The big lingering thing for the structures is the ore bin. It’s timbers are easily added, but the 10 chutes / gates are very involved. I’ve decided to 3D print the large chute parts myself, and have Shapeways handle the small detail parts. I can’t do fine detail. Here’s the Shapeways stack:

Assembly of these will take quite a while, probably too long for this season. I need to get to the roof assemblies, because the shingling, catwalks, cupolas, trim and stacks will take forever.

So I’m probably going to punt on the chutes for now. Or, make a blob model to 3d print and glue into place. Yes, it would be fun to make the chutes / gates this detailed, but very time consuming. And I’m having trouble affording my annual trip to the V&T conference in October, so some things are getting pushed to the side…

… hence my sweet deal on that B’mann mogul on Ebay, which I need to at least clear $200 on…

http://www.ebay.com/itm/272831008801

Anyway, I’m needing to cut corners and getter done. I don’t want this project occupying my shop over the winter! (http://www.largescalecentral.com/externals/tinymce/plugins/emoticons/img/smiley-laughing.gif)

Also, I’m reworking the ore bin exterior framing, because its front face will hold the chutes / gates. I’ve ordered #0 nuts / screws / washers, and will bolt it over the ore bin structure (vs gluing). With #0 lag screws in the middle. That way, it’ll be removable for later dress-up, even if I feel like not doing squat on the chutes for now. (http://www.largescalecentral.com/externals/tinymce/plugins/emoticons/img/smiley-tongue-out.gif)

===>Cliffy

Probably a bit late on this, but you can soften the edges of laser-cut letters, etc, with some judicious use of a propane torch. Gets rid of the hard angles.

Great idea Bob, thanks. I’ll do that on the ore bin frames.

Cliff

You might need some of these for the doors or walkways

Thanks, that would be cool Sean. In the era I’m modeling though, they had just electrified their interior lighting. But for exterior lighting, I’ve only seen evidence for occasional gas lamps on the streets. Thanks for the suggestion though.

I was able to do a bunch of stuff Friday (I had to take a late Labor Day) and today on wrapping up the platforms & tank, and getting into the lighting.

Here’s how the (very weird) tank assembly turned out.

The lighting is lengths of 12v warm white LED “tape”. There are around 21 “light bar” assemblies, consisting of a rectangular plastic tube and LED tape on either the lower side, upper side, or both. The LED tape, though adhesive-backed, is adhered with 1/4" 3M VHB tape. This is a far more reliable bond, as I’ve learned the hard way with these tapes. Here’s a few of these light bars.

Here’s how the installation was looking like.

Reason for the up-lights is a) to illuminate upper windows, and b) illuminate the cupolas, mounted on the roof assemblies. Speaking of which, my main bozo screwup du jour was forgetting that the roof assemblies (for the biggest 2 modules) have legs that come down, so they can be worked on easily. That big oops brought about a number of light bar relocations. Other than that, things went (reasonably) smoothly.

Each module has its light bars wire-nutted together (sometimes in several places). Each has a lead terminated in a dual banana plug, and the four plugs come together in the main module.

Here’s the same shot with the room lights off.

And the uphill side:

There is about 11’ of LED tape involved, drawing 0.5A at 12v.

Tomorrow I need to resolve the power issue (I’ll be scabbing off DCC track power for now) and the diffuser issue(s). Mo’ later…

===>Cliffy

Looking great!

You might want to be able to turn off the lights in various sections of the complex. For effect.

John

Thanks John!

And that might be cool, I’ll think about it.

Or you could place some nondescript dark gray objects near the windows. They would block some of the light emitting from the windows, and suggest machinery, equipment, supplies or contraband sitting inside the building.

Just thinking out loud, so please don’t chastise me too hard.

Rock breaker/ crusher and hammered to pass through a Grizzly >

Ball Mills and other types to make fine sands >

Stamp mills to pulverize the ore and vibrating willfrey tables or amalgamation tables where the metal sticks to mercury as the ore is washed down a sluice or tray >

Chemical tanks, separation tanks and a retort to evaporate the mercury and trap it for reuse >

Remelt the amalgamation sponge into ingots >

All can be run at different times.

The boilers are 24/7?

You bagging your high grade concentrates?

All possible actions in your mill…

I figured you’d animate a timer for the lights to match the industrial sounds you are planning…(http://www.largescalecentral.com/externals/tinymce/plugins/emoticons/img/smiley-wink.gif)

John

David, yep, that’s more along the lines of this project’s scope; but perhaps at a later time. Thanks for your thoughts in all my lengthy and sometimes tiresome build logs, I appreciate them very much!

Hey John, those are all great ideas for mill interiors. However, this isn’t a mill. Also, there will be no interior. I’d like to do the interior on the next mine, and that would center on the main hoist / shaft area, which includes the enormous pump engine. If this were an indoor layout, I’d love to detail the other main sections of the building: the cable tarring room over the ore bins, carpenter shop, etc. But for this model, no interiors; it’s just not designed for that. But thanks Brutha, we’re on the same wavelength.

The first objective today was get the power supply figured out. Until I lay a 12v utility bus on the layout (hopefully next spring), I’ll power this thing from rail power (DCC). It only draws .5A, my track PS does 10A, and the 2 locos I can run simultaneously draw around 3A each. So there’s plenty of extra for this. Here’s the connection area:

At the left is the main barrier strip that accepts the wires from the rails (21V DCC). Just to its right is the full-wave bridge rectifier, and to the right of that is the DC-DC voltage regulator. These are pretty cool, you can dial in the output voltage needed. About $5. The output from this is set to 12v DC to the LED’s (but I’ll probably back it off to around 8 or 10v, it doesn’t need to be this bright). On the wall exterior below the barrier strip is a round waterproof rocker switch to turn the whole thing on/off.

I was pretty happy to scrounge all the needed bits from (failed) prior projects!

Next came the window diffusers. I experimented a lot with various sprays on plastic sheet, here’s an example.

In addition to “picking up” the light and making the window illuminate better, you can see why I need to hide all the interior wiring & etc.

Nothing was really working, because the only translucent material that looked good was also not adhering well to the plastic sheet I sprayed. It was asking to flake off. Rrrr. I wasn’t interested in making this a sub-sub-sub-category science project. Fortunately, I noticed some stuff seeming to have the right opacity: a roll of poly drop cloth! And sure enough, pieces of this gave enough opacity to hide the interior, and plenty of light transmission. I measured and, using double-sided Scotch tape, adhered pieces all around. I used a popsicle stick to burnish the tape joints.

I may wrap more poly sheet strips over some of the up-light bars, because testing showed that this really helped in the few cases when they were visible through a window.

After that diffuser effort, I put the whole thing together – roofs, cupolas, everything – and here’s some shots of that.
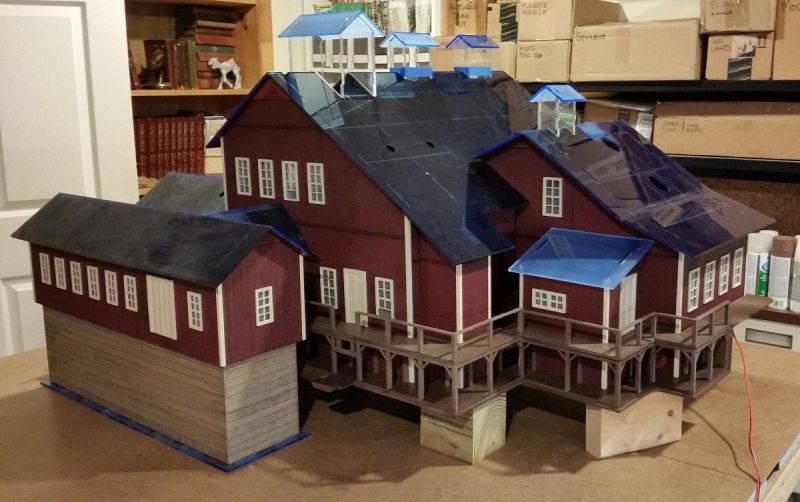
For this build, I’m calling it a day on the lighting, and what one sees through the windows. That’s good enough for me. At some later time I’d like to detail the “interior” with photos, silhouettes, that kind of thing.

My next focus will be on the ore bin, with its chutes. Lots for me to 3D & 2D print there, even though I’m having Shapeways make the detail bits. This will take a long time, since there are 10 of these chutes to drill / fit / assemble / install. I have no idea how it will go, but hopefully not too roughly.

After that, roofs… oh boy…

Thanks for hanging with me guys,

===>Cliffy

Wow Cliff looking so good, you have really kept our interest peaking on this build. You are such a good presenter with your models.

Your liteing will look great on the layout

Dennis

Yea, what Animal said…(http://www.largescalecentral.com/externals/tinymce/plugins/emoticons/img/smiley-wink.gif)(http://www.largescalecentral.com/externals/tinymce/plugins/emoticons/img/smiley-cool.gif)