Large Scale Central

Challenge Accepted - Large Scale Fantasy Locomotive

First, let me offer my prayers for those in Dorian’s path.

Now on to the update:

I was lashed to the house for various reasons last weekend, so I set up the work area for a variety of projects, following the guiding principles of CINCHOUSE: This cannot just be your hobby.

Over the course of the day, the boys and I built a pair of Estes rockets, Younger Daughter repaired her Strawberry farm and learned to use a Dremel motor tool, Oldest Daughter helped me address some roadbed issues, and, after some work with a handheld disc sander, Little Thomas got his coupler mount!

Oldest Son decided the train crew should be chased by a dragon for dramatic effect to mark the moment.

After doing a height test on the coupler, I wanted to subject it to a stress testby dragging this train around the track with another loco, but, as I was running the wires, Kid-zilla beat me to the punch:

He set up a test train, ran it backwards and forwards at scale test speeds of 756 mph, and announced that “The coupler gets stuck!” Sure enough, it does…

…so I removed the hook and Kid-zilla completed the test. We did hook up Diesel Dan for a more dignified test. Little Thomas will clear our switches, cross-over, and handle less than perfect roadbed while under load. In short, he’ll pull.

The next step will be to put some sanding sealer on that wood so it’ll take paint and look less like wood. I can worry over how to close the gaps up forward between coats. I am open to suggestions here:

I’d order the motor, but, naturally, being flush with overtime, we are in the midst of the 2019 run of “Dance of the Dying Appliance.” As the work situation remains unchanged, I can expect “Lament for Broken Car in E Minor” as an unwelcomed encore, so I am holding off for the moment. I have plenty of plastic work to do on Little Thomas to keep me busy in the meantime.

As an aside (and in a shameless “proud Dad moment”), I thought it’d be fun to share if you combine projects, a digital camera, some PLAYMOBIL, and a three year old:

I had no idea Kid-zilla had gotten hold of my camera, and this was the best of about 30 pictures in his “locomotive repair series.” I’m pretty proud of the little terror!

I think I am over the hump with this in terms of engineering! Thanks for the continued patience.

Eric
Eric Mueller said:

I was lashed to the house for various reasons last weekend, so I set up the work area for a variety of projects, following the guiding principles of CINCHOUSE: This cannot just be your hobby.

A dirty mind is a terrible thing to waste!

There’s nothing quite like the lash…But I digress…Took a pause this weekend to have a “good think.” The way forward will involve wood (shudder), cut, shaved, and sanded to fit under the smokebox. Given my incredible ripping skills, I just bout stock 1/4"x1/4". The other issue I have to deal with is the reserving gear. On the STAINZ, the come up the outside of the chassis then pass up and over and “into” the cab. On this hybrid, it passes up “behind” the side tanks. I’ll have to secure them in a way that lets the thing roll.

Have a great week everyone!

Eric

Meanwhile, from the back of the workshelf…

Progress lurched forward. As predicted, the cars required repairs right on schedule for maximum overtime consumption, and I had to prioritize some purchases, choosing to replace 12" track sections over a new Buehler for Little Thomas:

This didn’t do much for Little Thomas, but it really improved how the rest of the trains run once the boys and I got this installed.

Back on target, I did test fit a burnt out short shaft Buehler to make sure I eventually order the right part. Oldest Son and I tried out a new miter box to cut some store-bought strip wood and, a “must” for one of our projects, some craft sticks to plug the holes under Little Thomas’ smoke box. Clearly, there is some sanding to do to get it lie level:

…and I am not sure if I want to lay another timber across the front as an end beam bumper. These were common on the real things, but might be the “detail too far” on this project.

A side aspect shows a small gap just aft of the wooden fillers, but I can live with that. The STAINZ has something similar, and this is a STAINZ / 2075 hybrid.

This shot also reveals an issue with the reversing lever. If you compare it to a STAINZ, the silver bit runs up, and the black bit fits over the frame.

That ain’t gonna work… For the moment, I ran the black bit into the holes ground out to accommodate the chassis, as though the levers ran between the boiler and the side tanks:

I could make them fast by securing them to something glued to the deck, or I could just let them hang loose. I am not sure, and I may have to see how this runs before making the final decision.

The side view also showed the gap between the deck and the cab / boiler shell. This is a function of the hinges I used to connect the two. I am becoming less enamored with this idea, and I may remove the hinges and substitute them for a strip of wood running fore and aft along each side, and screwed into the deck. Then I’d just use some screws to secure the cab / boiler to the wood. Watching the boys opening and closing the shell and saying “Chomp! Chomp!” also disabused me of the longevity of the hinge idea…

Sanding, fitting, and fiddling to follow, but I think I am ready to power the old boy up upon release of the funds! Updates as appropriate. In the meantime, thanks for the ideas and the patience!

Eric

Eric that will work, all my kit bashes I have just provided a slot for it to fit in and never had a problemPT Tubifo 2-4-0

Bill, thanks. I’ll go with that.

Update:

I have been on the road and otherwise distracted, but I did manage to shave, cut, sand and fit all my wood “fills.” I have to look to the funds before getting the motor, but, in the meantime I plan to disassemble the chassis to give it a nice coat of flat black like the boiler / cab and devise an alternative method to fasten the boiler / cab to the deck.

I cannot believe this project has been underway for a year. Thanks for the patience!

Eric

I’m personally not buying the crap about being on the road Eric considering you are in Hawaii?

It’s all good and I’m patient !

(https://www.largescalecentral.com/externals/tinymce/plugins/emoticons/img/smiley-cool.gif)

They do have roads in Hawaii, just not real long ones!

@Rooster & Greg: PPbbbbtttthttt!!! (http://largescalecentral.com/externals/tinymce/plugins/emoticons/img/smiley-tongue-out.gif)We actually have almost 10 miles where you can legally drive 60 mph! So there!

Its all relative.

I think “Roosta” has some relatives on Kauai … (https://www.largescalecentral.com/externals/tinymce/plugins/emoticons/img/smiley-wink.gif)

@Sean: Fo’ real, brah!

Eric Mueller said:

@Sean: Fo’ real, brah!

Lets all gather round the campfire while roasting weenies and marshmallows while Sean tells the stories.

Rooster ’ said:

Eric Mueller said:

@Sean: Fo’ real, brah!

Lets all gather round the campfire while roasting weenies and marshmallows while Sean tells the stories.

http://www.countingmychickens.com/counting-chickens-in-kauai/

OK, to get back on “track,” I thought I’d post some proof of progress…

As mentioned, I abandoned the hinges. The boiler/cab never sat right, the nuts kept falling off, and it looked bad. The hinges went in the box with the other abandoned ideas from this project , such as the surviving Tamiya motor, a rechargeable battery pack, the associated charger, a DPDT switch, Velcro taple, and original chassis for some future project. Live and learn…

After a good “think,” Oldest Son and I got out the miter box (also a purchase courtesy of this project) to cut some timbers:

I should add of all my “crew,” this is the one I came closest to losing to the “Silicon Succubus” (Not his fault. Stupid parenting choice on my part in letting him watch me play a computer based strategy game a couple years back.). Oldest Son’s interest when Little Thomas comes off the shelf for tinkering more than makes up for the financial investments in the project to date. It doesn’t always stop the whining about our lack of Play-Box-Station-Whatever 27, but it is a valuable weapon in the armory!

Anyway back to the project…We then glued these inside the saddle tanks as shown:

The plan is to drill tap holes through the plexi-glass deck into these “timbers” and then secure chassis to boiler/cab with wood screws. If it works, great. If it does not, I am out some pre-cut modeling timbers. I will have to hide the screws’ heads at some point, but, while running boards would be prototypical for the Islands, they will not survive long on the Triple O based upon the short lifespan of Diesel Dan’s hand rails, steps, horn, uncoupling lever, etc. Loved locos seem to get handled roughly, and, for whatever reason, the crew loves Little Thomas. I like to think it is because they sense the family history in model and have invested themselves a bit into seeing “him” come to life again.

I’ll try to do the test fitting this weekend. If it works, then it is time to strip and paint the chassis. We can then try to learn yet one more new thing - applying dry transfers - as we wait for free funds for a new Buehler motor. Then, Rooster, I will be in the position to avail myself of your offer detail parts that make sense relative to this locos intended use and likely primary operators!

I have declared “the end is in sight” before, but maybe…MAYBE…it is in fact true this time!

Aloha,

Eric

Update:

Finishing transforming cardboard into and 0-4-2T for Kid-zilla’s costume took priority over Little Thomas. On the “upshot,” I have a bug that will keep me at home tomorrow, so hopefully Little Thomas will get some attention. Procrastination aside, TrainLi just got my annual bits and pieces order, and part of it included the new motor.

I’ll call that order progress and call it a night.

Eric

Update:

First, proof of legitimate reason for procrastination last weekend. Someone asked to be a train for Halloween. Shockingly, someone obliged this desire:

Whatever it takes to keep them interested!

Back to the subject at hand… I was ambulatory at about midmorning, so I figured I’d take a crack at this while I had the house to myself. As part of garden therapy, it was very important I set up my work area first:

The garden therapy implements were carefully selected to be able to fit in the tunnels during passing squalls. All part of the program.

After this very necessary step, I actually sat down to work. It struck me that it would be best to totally break down the locomotive in order to align the deck plate to the cab/boiler. It figured it would also facilitate painting the various wood and clear plastic bits that don’t meet even my standard of “good enough!” Having learned from past mistakes, I took photos of the disassembly process, taped washers and screws to their various components, and put everything into little bins. The next result looked like this:

Boy, was that chassis a LOT easier to break down than the old “clam shell” style! I did manage to drop at least one of each part, which is my goal (normally I drop more) as I tore it all down. Next up was running the various pieces and parts to my hi-tech spray booth (carboard leaned against a coconut tree) for some flat black primer. This required some tricky timing as I dodged squalls. Luckily, thus stuff dries in about 15 minutes! I did tap four holes in the deckplate and wooden beams to receive the screws that would hold this all together. I test fit one screw partially, then took a leap of faith, tottered to the coconut tree, and painted the deck.

By this point, Kid-zilla and CINCHOUSE returned. Kid-zilla involved himself in the reassembly process:

The only hitch were some metal rods that fell on the floor that had no obvious “home.” Remember those pictures I took? So did I (for once)! These are posts that take power to the lights, if installed. Overall, though, reassembly was a snap. I won’t be afraid of using this chassis in some future project! First things first, this has to get done, and Kid-zilla and I had Little Thomas back together in less time than it takes to type this.

The crew of the Triple O brought out the Big Thomas, a real LGB m2075, to allow for a side by side comparison:

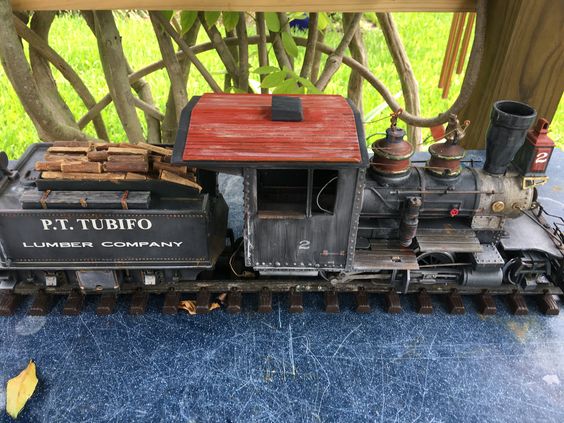
You will excuse me if I say I am rather pleased with our efforts to date, despite the setbacks over the last year. Little Thomas looks more like a functioning loco than “he” has in about 30 years! Side and stern shots follow:

Clearly, there is a gap between the deck and cab/boiler, though a much smaller one than the hinges left. In addition, everything is far more securely attached. From normal viewing distances, this is OK, though I may add a “skirt” to the boiler and cab to hide both the gap and the screws. Also, the sanding filler did not do as good a job hiding the wood grain on the chassis extension as I had hoped. Again, from normal viewing distance, this is not an issue. Some sort of end-beam buffer with stanchions rising up might do the job of obfuscating the grain lines, but, with a train in tow, I am wondering if this is a detail too far. Both the forward and rear couplers could do with a buffer of some sort, though, and I am open to suggestions.

The motor is on order. The dry transfers are on hand (have to figure out how to use those). I think I am ready to hit you up for those detail parts, Rooster!

The next update will follow either a.) the motor installation or b.) OPERATION DRY TANSFER, whichever comes first.

Aloha,

Eric

Eric, looks great, I think Tom Trigg is smiling down on you

Update:

Still undergoing garden therapy for this bug, so I thought I’d try the dry transfers. I had hoped to carefully cut out each letter, align them nicely on a piece of tape, and then rub everything off as a whole, but I failed miserably. Attempts to separate letters from the sheet obliterated neighboring letters or resulted in the disintegration of the target letter. In the end, I ran scotch tape to form a straight edge and then eye-balled everything into space. Some of it looks a bit…rustic…yes, that is the word! I also didn’t center Komaka iki (Little Thomas) on a nameplate. I’d scrape it off, but “K” is a letter in short supply! Woodland Scenics apparently did not have the Hawaiian language in mind with its letter mix. Anyway, I’ll have oldest daughter free-hand a plumeria in the open space. All will be well.

Once I get some more "K"s (free handing failed miserably), I’ll finish the lettering and post the photo. Getting those letters almost makes me glad to get back to work shortly.

Aloha,

Eric

P.S. Thanks, Bill!