B
Brilliant, Sean; simply brilliant…
Fred Mills
B
Brilliant, Sean; simply brilliant…
Fred Mills
Sean McGillicuddy said:
Or just shut off the lights and smoke ….
My problem would be, I don’t want to…
Jeeze, ignore them, do what I said… then you can have an answer. You should have the ability to measure your track voltage… I gave you a simple method, a cheap meter and a $1 full wave bridge.
Greg
Greg Elmassian said:
Jeeze, ignore them, do what I said… then you can have an answer. You should have the ability to measure your track voltage… I gave you a simple method, a cheap meter and a $1 full wave bridge.
Greg
Thanks Greg, I’m looking into getting one.
Steve
So, the RRampmeter is really the tool to use, since it can read direct from the track, and when you are not using it to chase down track issues, you can leave it in series with your output and measure DCC voltage and current… but if you don’t want to pony that up, any old DC meter with a full wave bridge converting the DCC to DC will be enough.
https://www.dccspecialties.com/products/rrampmeter.htm

In any case, this will help you stop burning out your bulbs… I first noticed this as I used to leave track power on all the time, with a couple of trains on the track, then I noticed one marker light was out, then another, and by the time I smartened up, I’d burned out the marker lights on a caboose and several locomotives… and as you know, Aristo steam loco marker lights are not sitting for sale on shelves in the local Walmart.
Best, Greg
Steve said:
I have a very dumb question…
So, I picked up an Aristocraft Caboose which has lights and smoke… I run DCC, so I need to do anything special to this car or am I okay to just throw it on the rails and let 'er run? I know nothing about electrical stuff.
Thanks
Steve
I’m suspecting you will be just fine throwing it on the rails and let er’ run. However “I personally do not own an ART-42104”. I do believe the others that do “own one and run DCC” already have you covered.
This post has been edited by : Rooster
The lights may burn out and the smoke unit overheat on DCC unless you run lower than 18 volts DCC
Steve said:
Hi Greg,
It’s piko’s dcc system and it says this… “Provides up to 5 amps of DCC power output at up to 27V NMRA DCC track voltage”. This help?
Thx
Steve
Steve, You are reading this on the Piko America ordering page.
The 27VDCC shown there is either a typo or some misunderstanding.
If you check the manual for the Piko DCC Central Station (which you should really use as reference), it states that the DCC voltage is 22 VDCC regulated.
Dan Pierce said:
35010 is 20 volts DC input but 22 volts out??? How do they do that???
This is certainly possible - it’s called a DC-DC Converter
However, I doubt that the Piko Central Station is using that type of circuitry.
But if one checks the Piko manual rather than just a sales blurb on the Piko America website, one will see the following specs:
Allowable Input Voltage: 16 - 24 VDC
Total Allowable Load: 5.0 amps
Output Voltage: appro, 22 VDCC, regulated
(translation of the German part - the English translation in the manual is slightly different but the meaning is pretty much the same)
Steve said:
Separately, the piko DCC totals over $800.00, I was thinking at that price it was a good system. Lol
There is nothing wrong with the Piko DCC Central Station that I’m aware of.
Like Greg said, measure the actual track voltage with either a DC meter and a diode bridge like Greg said or buy a RRampmeter
Considering the amount of money one spends on DCC equipment, I think a RRampmeter is a good investment to monitor and troubleshoot.
I want to thank everyone for all your help and suggestions, but I think it’s time I just throw in the towel. I have never had any luck in model trains even when I was a kid I had problems. No matter what scale zi do, I just can’t get lucky.
Here is just an example of what I mean. I ordered 2 USA Trains GP9’s had them add DCC and Sound. 725.00 a piece. I get both today and every single can window has fallen out. The one has the front step (cow catcher? By coupler) on the one side broken. The other has a broken wiper in the back window. That one cant be easily fixed. I very picky when it comes to the way my trains look, and I take care of them… so I box them back up and go into working on the lift out. 5 hours later, I have totally messed it up to where there is no way of fixing it.
So again, thank you everyone for the help you did give me.
Steve
Steve, I just took 2 days preparing 4 aristo craft passenger cars for kadees and “shaping them up”.
Tons of windows fell out, the kitchens in the diner cars all loose and bouncing inside the car, broken this and broken that. All fixable. When you have an HO model and your face is 1 foot from the loco, that’s where people strive for perfection, and close inspection is possible.
In large scale, you are many feet away, some of these small details will get broken, you surely are not the only guy with a broken step on his GP9!! I have 3 and all have had at least one step broken.
I’d counsel you to enjoy the (literally) big picture. Of all the scales this is easiest I think, just because of the size. You can repair stuff with blocks of wood, tire weights, etc.
Take a breather, run a train or two, even without windows. Enjoy yourself, and don’t be so hard on yourself. Perfection is difficult in life and is highly over rated!
Best, Greg
Steve, I agree with Greg. Large scale is so much easier to repair then the smaller scales. Take a break, relax, and come back to it later with a clear mind and fix the stuff.
Greg Elmassian said:
Steve, I just took 2 days preparing 4 aristo craft passenger cars for kadees and “shaping them up”.
Tons of windows fell out, the kitchens in the diner cars all loose and bouncing inside the car, broken this and broken that. All fixable. When you have an HO model and your face is 1 foot from the loco, that’s where people strive for perfection, and close inspection is possible.
In large scale, you are many feet away, some of these small details will get broken, you surely are not the only guy with a broken step on his GP9!! I have 3 and all have had at least one step broken.
I’d counsel you to enjoy the (literally) big picture. Of all the scales this is easiest I think, just because of the size. You can repair stuff with blocks of wood, tire weights, etc.
Take a breather, run a train or two, even without windows. Enjoy yourself, and don’t be so hard on yourself. Perfection is difficult in life and is highly over rated!
Best, Greg
Thanks Greg for your words of encouragement. I just get disgusted when I pay that kind of money and it comes broken. I don’t make much money and the only reason I can afford this is Bill’s are limited right now, and I do have to save to buy the stuff. I contacted the place of purchase they offered no help at all other than saying, if you ship it back it will most like break more. I have no local hobby shop, so I have to mail order.
I can’t run trains, lol that is one of the problems… the lift out section would of completed the two main lines, with it destroyed now, I would have to tear down and rebuild the two 4 x 8 sections. I put hangers up and can’t remove one of them. I will most likely have to find another way of doing it. Right now though I’m drained.
Thanks again,
Steve
David Maynard said:
Steve, I agree with Greg. Large scale is so much easier to repair then the smaller scales. Take a break, relax, and come back to it later with a clear mind and fix the stuff.
Thanks, I’ll be taking a long break… see if I can’t figure out another way of doing the lift out.
Steve
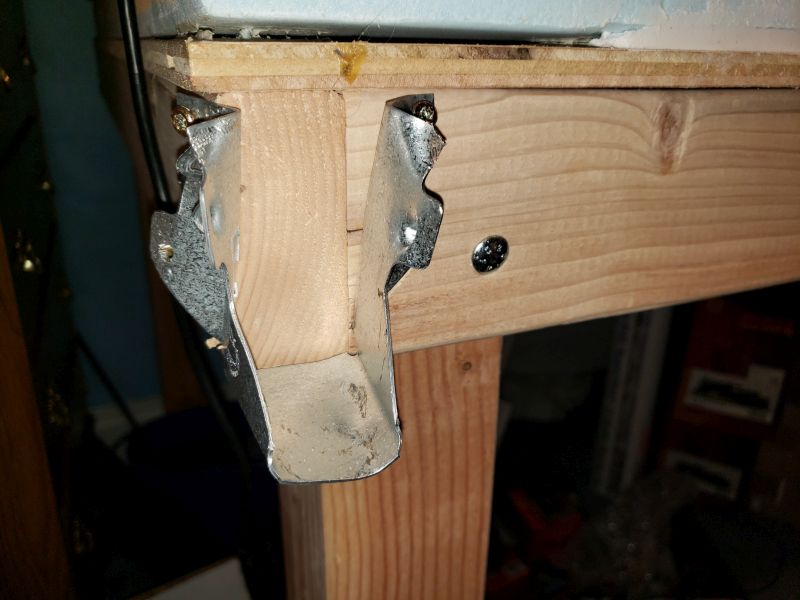
This can get rid of that nasty bent up first attempt…

Just hammer it between the wood and hangar to start, then move to under nail head and keep hammering and prying until your hammer’s claws can get under it…
I have plenty of experience undoing failed great ideas!
I had to learn to pick my battles for perfection.
An accident revealed it, but I’m on my 3rd layout rebuild … to me it’s part of the hobby. Termites! Delicious pine legs out, cinder blocks in…
I’d suggest setting your lift out on an edge, rather than into a channel, too much friction.
Looks like the ‘too heavy to lift out’ was to be fashioned with 2x4s(https://www.largescalecentral.com/externals/tinymce/plugins/emoticons/img/smiley-surprised.gif). 2x2s cut the weight in half, but I’d use 1x2"s (on edge) to frame the 1/2" ply to keep it flat. Those same 1x2s get nailed around the inside of the opening to support the set in shelf at a height to match the foam top sheets.
I still favor hinged bridges as they are always lined up. A pin in a hole on the underside ensures it.
The Only rule we have is: Have Fun. We insist on it.
John Caughey said:
This can get rid of that nasty bent up first attempt…
Just hammer it between the wood and hangar to start, then move to under nail head and keep hammering and prying until your hammer’s claws can get under it…
I have plenty of experience undoing failed great ideas!
I had to learn to pick my battles for perfection.
An accident revealed it, but I’m on my 3rd layout rebuild … to me it’s part of the hobby. Termites! Delicious pine legs out, cinder blocks in…
I’d suggest setting your lift out on an edge, rather than into a channel, too much friction.
Looks like the ‘too heavy to lift out’ was to be fashioned with 2x4s(https://www.largescalecentral.com/externals/tinymce/plugins/emoticons/img/smiley-surprised.gif). 2x2s cut the weight in half, but I’d use 1x2"s (on edge) to frame the 1/2" ply to keep it flat. Those same 1x2s get nailed around the inside of the opening to support the set in shelf at a height to match the foam top sheets.
I still favor hinged bridges as they are always lined up. A pin in a hole on the underside ensures it.
The Only rule we have is: Have Fun. We insist on it.
I will make one more attempt in a few days… rats I should of used nails instead of wood screws… I’ll do the 2nd attempt with nails…
Thanks for that tip!
Wood screws should be easier to take out than nails. Just unscrew them. Even if you stripped the head of the screw. There are screw extractors that are sold at Home Depot or Lowes that make taking a stripped screw in wood easy. Good luck with your project. Stay at it and it will eventually be completed. Building anything can be frustrating at times.
Steve said:
I have totally messed it up to where there is no way of fixing it.
Doubt that.
Steve,
BTW …looks like you already have the legs carriage bolted so this is great! Forget about the deck joist hangers and think lighter as it’s only a lift out section INDOORS!