Large Scale Central

Cleaning up Around Town - Material Study & Structural Rework

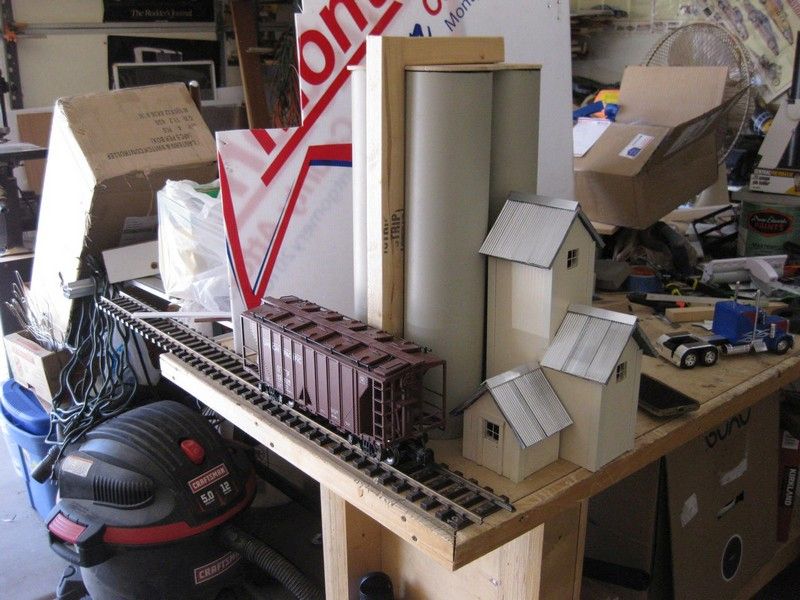
My loco-fixing campaign having ground to a halt for the time being, I turned to the second of three summer projects, which was addressing the repairs of our various buildings. Most of these are donations from my father-in-law, who has a knack for turning scrap into art. He set a standard that works for us, which I’ve described as place between toy and model. The little town of Haluku’ilio exists because of his contributions, most of which are below:

They vary in technique from scraps of lumber squared off and decorated to proper frame buildings. Our own contributions (the pump house under the water tower, necessitated by its legs’ lost battle with the late Mr. Otto, our cattle dog), the little yellow house, and, of course the Mik Builds used other materials like HardieBacker and foam as cores with various materials used as cladding. Weather, rot, kids, and dogs (to include Mrs. Opal and Ms. Pearl, our new fur buddies) have taken their toll, so it is time to evaluate each, repair what we can, and repurpose what we must.

The goals I’ve set are:

  1. Honor the builder’s intent. The net result should show the mark of the original creator. The Triple O is a product of many hands, many thoughts, and more than a few donations of bits and parts. I’ve come to see it as a bit of a “heritage railroad,” so I don’t want to obfuscate the origins.
  2. Improve what we can. We have picked up some ideas (thanks, guys!) on material selection, material preservation, adhesives, etc. I want the end results to be sturdier, if possible, in the end.
  3. Detail as appropriate. The dogs have shown little respect for the railroad, so minute details won’t last. Little hands and well meaning parents still reach, prod, and poke. We’ve no place to store structures inside. Stil, things like window pains, signage, door frames, etc. should make these look better, improve our skillsets, and not violate Goal #1.
  4. Evaluate the Materials and Techniques Used. This is a great opportunity to see what materials hold up and what methods hold things together. This, in turn, can inform future purchases in terms of tools and materials.

As ever, I am abiding by my prime directive, “This can’t be just YOUR hobby” which I operationalize as “All may participate, none must participate.”

No real timeline on this, as I intend it to be a running project (the church is already under repair). I just find putting myself on record helps me keep moving forward.

Eric

The Triple O had to serve as a center point for entertaining and the lanai an area for dining and convivials, so we prioritized Saturday to clearing away model and craft projects and ensuring 'trons would flow through the rails to enable the “Festzug” to ply its trade. Success! The prior weekend, though, I did attend to the church, which is only about two years old. My camera broke, and I’ve not quite the got the knack for using a tablet, so pictures will be scarce.

This little building is one of my father-in-law’s framed structures:

The wood showed very little rot, and all but a few glue joints were solid. O.D. and I cut up an old signboard to serve as a subroof, painted it matt black, and used construction adhesive to make it fast to the rafters. My father-in-law had not installed window panes. Instead, he had glued a thin fabric to the inside of the frame to emulate stained glass. Both O.D. and I decided to upgrade the windows, and, after a unanimous vote by the 1:24-ish vestry, I cut up some plastic trays Pete Lassen sent a while back and affixed the new windows using E-6000 (We are about 25% through the stash, Pete L.!)…

We both decided to light the interior. Having experimented with solar lights, we’ve found that they are expensive and short-lived. We have found a 2xAA battery clip, some scrap wire, and an LED have been makes a more cost effective and lasting solution. We employed a trick from Bill Barnwell and lined two sides of scrap with conductive tape, soldered on some bulbs, soldered on the battery clip, and set the latter on a small shelf in the bottom of the steeple where it is free of ground dampness. The LEDs all got a coat of yellow from the girls’ alcohol marker. You can see the thrust of our efforts below:

After that, we used construction adhesive to reapply the strips of roofing to the plastic sub-roof. Interestingly, this is not holding all that well. I have to seal things up later, and I may try gutter flashing when I do. Alternatively, if I can find a self-adhering roofing material, I may just get that.

Rather poor night shots are below:

Neither of us like how “gutted” the church looks. We are looking for something to apply to the interior to obstruct the view without dampening the light too much. We’ll keep our eyes open as we address some of the other buildings.

Sealing and signage to follow in turn, but, for now, this structure is stabilized. We’ll attend to those tasks later and move on to the next building danger of collapse!

Eric

Eric,

Rust-oleum makes a spray product called Frosted Glass. It is made to obscure vision through things like shower doors.

I have used it on scale building windows for a long time with pretty good success. It is made for glass but I have also used it on Acrylic, and several kinds of cut down plastic packaging.

Sometimes takes 2-3 coats depending on what you want.

Old Hawaiian saying: “NEVER clear the lanai”

Edit: Spelling still counts, I guess.

I remember the 2nd time I visited Hawaii - I was still a cadet at USMA (the first was to visit my Dad - he was off for R&R from Vietnam) - the news kept parroting “Lucky YOU live Hawaii”. Been back many times since, but my favorite stays are with Maui - perhaps because they are sort of recent (well, to an old guy, anyway).

It’s a special place, that’s for sure.

@Bruce: Yes, Hawai’i is a really special place. The Navy brought me here in '97 and left me here (though as a “part timer”) in '04. I had spent the intervening years ensuring I could stake a claim whenever life made that possible. The jobs are here on O’ahu, though, if we could, we’d settle on Kaua’i.

Meantime, in and idealized 1:24-ish PLAYMOBIL scale version of a Hawai’i that should have been, I had time to look into the next building, the small, green store:

My father-in-law names these structures for the grandkids. I had to make this anonymous. The garden center has been serving PLAYMOBIL, Barbie, LEGO, etc. for 5 years, and its plywood walls have started to delaminate. The back wall is the worst:

The plan is to replace the front and side walls with styrene, prime them, and paint them. The interior is much simpler than the church:

Clearly, the structure’s strength comes in part from the walls. I am wondering how best to remove those walls without breaking the framing. I may just remove the back wall to be safe. Regardless, when done, I think we may brace it with some wood cross beams or foam.

The roof is pretty simple, with the shingles sitting on thin “beams.”

I think in its new form, the signboard will sit directly on the roofbeams rather than leave that gap. What survived four toddlers and a their friends may not be so lucky with our new pups!

It’ll be up to the kids if we light this one or not. It’d be cool if we can find a way to only light the display windows, I think, but, then again, how many small town garden centers keep their lights on at night?

More to follow…

Eric

Styrene seems to be a good choice - I ALWAYS had problems with plywood outdoors and we don’t get the rain you do there.

Eric, on my Sand Silo complex, I took an old cheap plywood birdhouse that had started delaminating, covered it in coroplast and went on from there, some pin nails under to keep the delams from causing problems. I also used some Aluminum angle on the corners to hide the edges

I don’t know if your building is too far gone to do this but thought I would mention it

@Pete & Bruce: Thanks for the input. After examining the walls, all but the front wall, which has a low section made of some sort of stripwood planks, had to go. As little window awnings come right to the side of the building. This would make some sort of angle piece hard to fit to cover the end of the signboard, so I think I will go with styrene.

Ripping off the bad walls and scraping the frame clean(er) 1.) drew blood, and 2.) caused the framing to come apart in areas. A band-aid addressed Issue #1, and I gleefully grabbed the brad nailer I bought specifically for this series of projects to address Issue #2. I now know to look for the length of the brads as well as the gage…Wish I would’ve noticed that before I opened the package. (http://largescalecentral.com/externals/tinymce/plugins/emoticons/img/smiley-frown.gif)Live and learn… I grabbed my clamps and TiteBond III, only to find my clamps were too big, and POP! went another bit of framing. Finally, I grabbed my bottle of RapidFuse. This stuff is miraculous. In the end, I stabilized the frame, and it is ready for new walls.

I decided to go ahead and pull up the roof, and lo! a cracked roofbeam:

I’ll brace that later. At this point, I decided to fix a toilet so that I could say I finished something this weekend!

I’m heading into some strange hours over the next couple weeks, so progress may slow.

Enjoy the rest of your weekend!

Eric

Update:

Working in fits and starts over the last two weeks, I cut, scribed, and distressed three sheets of styrene. These were rather thin, so I am wondering if any of that scribing will stand out post-painting, but it was worth a shot! I took advantage of the thin scraps to make some simple batten strips to ad a bit of textural interest. The 1:24 crew shows the results below:

I am really liking styrene as a material While my cuts are not the straightest (definitely in the good enough category), this stuff is just SO easy to work with, I actually look forward to seeing what I can do with it. Unlike wood…Wood still defies me…And I owe Kid-zilla a crane car…

Today, Kid-zilla and I masking the wooden store front. We donned safety goggles to paint the inside flat black to make sure it will be opaque, then hit the outside of the new walls with white primer. At this point, it is ready for O.D. to repaint. I plan to stiffen the roof with some foam scraps, make a subroof of signboard, then glue the original shingle roof back over that. While not finished, it is far enough along to clear lanai space for a B’mann 10-wheeler repair and to study and plot a way forward for the next building, the Marine Supply.

This building took a beating. My father-in-law built it to sit along the shores of Lake Inferior and to look like it sat on a dock. In fact, it once stood on a dock (that rotted away years ago…no plans to replace it with the current canines!). It suffered from my attempt to put in a solar light. It fell into Lake Inferior. Most recently, Pearl, our latest rescue dog, discovered Lake Inferior, and decided the Marine Supply would prove no obstacle to a cooling dip! As a consequence, all the railings and one of the little stair cases are now gone, the deck has holes, and, most worrisome one the little support legs is gone:

Oldest Son and I discussed this project (Please, oh, please, let him be interested enough to be part of this!). We both want to keep that “pierside look,” but we both doubt any post will survive contact with a 45 lb lab mix bent on a cooling dip. I was thinking of cutting a foam base, slightly smaller than the deck and painted black to make it less obvious. We could then cut some posts and bollards to line it. They latter would be strictly cosmetic and - in theory - easy to replace. The former would undergird the deck, making it a bit more resilient. The alternative would be to have that foam base come right to the edge and carve and paint it to look like stone. The roof will get a signboard subroof like the other buildings, a covering of what-I-have-on hand over that for texture, and the whole will get a nice LED lighting system. The end goal is the same as the others: we stabilize the structure, maintain the builder’s original intent and style, and add in a few improvements of our own.

I should mention that I am not going to fight the dogs on this one. Pearl likes the pond. Opal, a 45 lb husky-hound mix, likes to stand at the edge and swat the otherwise totally submerged Opal in the snout. I have decided to reposition certain elements of Haluku’ilio (Dog Wallow…Inspired by the late Mr. Otto.) to give Pearl a clear run to the water. Failing that, the buildings will live on the lanai unless we run trains.

Have a great week!

Eric

Looks like a typical beat-up dock to me!

Eric Mueller said:

Update:

Working in fits and starts over the last two weeks, I cut, scribed, and distressed three sheets of styrene. These were rather thin, so I am wondering if any of that scribing will stand out post-painting, but it was worth a shot! I took advantage of the thin scraps to make some simple batten strips to ad a bit of textural interest. The 1:24 crew shows the results below:

I am really liking styrene as a material While my cuts are not the straightest (definitely in the good enough category), this stuff is just SO easy to work with, I actually look forward to seeing what I can do with it. Unlike wood…Wood still defies me…And I owe Kid-zilla a crane car…

Today, Kid-zilla and I masking the wooden store front. We donned safety goggles to paint the inside flat black to make sure it will be opaque, then hit the outside of the new walls with white primer. At this point, it is ready for O.D. to repaint. I plan to stiffen the roof with some foam scraps, make a subroof of signboard, then glue the original shingle roof back over that. While not finished, it is far enough along to clear lanai space for a B’mann 10-wheeler repair and to study and plot a way forward for the next building, the Marine Supply.

This building took a beating. My father-in-law built it to sit along the shores of Lake Inferior and to look like it sat on a dock. In fact, it once stood on a dock (that rotted away years ago…no plans to replace it with the current canines!). It suffered from my attempt to put in a solar light. It fell into Lake Inferior. Most recently, Pearl, our latest rescue dog, discovered Lake Inferior, and decided the Marine Supply would prove no obstacle to a cooling dip! As a consequence, all the railings and one of the little stair cases are now gone, the deck has holes, and, most worrisome one the little support legs is gone:

Oldest Son and I discussed this project (Please, oh, please, let him be interested enough to be part of this!). We both want to keep that “pierside look,” but we both doubt any post will survive contact with a 45 lb lab mix bent on a cooling dip. I was thinking of cutting a foam base, slightly smaller than the deck and painted black to make it less obvious. We could then cut some posts and bollards to line it. They latter would be strictly cosmetic and - in theory - easy to replace. The former would undergird the deck, making it a bit more resilient. The alternative would be to have that foam base come right to the edge and carve and paint it to look like stone. The roof will get a signboard subroof like the other buildings, a covering of what-I-have-on hand over that for texture, and the whole will get a nice LED lighting system. The end goal is the same as the others: we stabilize the structure, maintain the builder’s original intent and style, and add in a few improvements of our own.

I should mention that I am not going to fight the dogs on this one. Pearl likes the pond. Opal, a 45 lb husky-hound mix, likes to stand at the edge and swat the otherwise totally submerged Opal in the snout. I have decided to reposition certain elements of Haluku’ilio (Dog Wallow…Inspired by the late Mr. Otto.) to give Pearl a clear run to the water. Failing that, the buildings will live on the lanai unless we run trains.

Have a great week!

Eric

Eric,

Well done. Sure looks like you’re having fun! Hope the ‘little ones’ appreciate it as well (although you MIGHT NOT find out until 20 years from now!)

Little not much used or cared for backwater supply store look , nailed ! That just to me looked good as is, just some support and maybe a clear path for lab dipping is best option! Not sure if it’s achievable but maybe a container to cover it when not in use , bucket maybe?

Thanks for the positive feedback! A bit of an interesting story about the marine supply. My father-in-law built all these structures from scrap bits based on memory along. This particular building was originally a much larger “scale.” He “fixed” it by building the dock and shortening the door, making it all 1:24-ish PLAYMOBIL scale.

We had a couple things going on simultaneously today - sewing machine repair, garden center re-roofing, B’mann 4-6-0 repair, marine supply repair. Kid-zilla and I fixed the sewing machine, which let me tend to the other three projects on a rotating basis across the day.

First, I thought I’d show what 45 lbs of dog can do to HardieBacker:

The church and garden center had sat on these for years. Guess their new foundation will be paving stone! Speaking of 45 lb of dog, here is Peal doing her Loch Ness impersonation:

I was going to delete this one, but then I realized no one has ever seen a clear picture of Loch Ness!

The garden center got its roof over the course of the day. I cut two sign board panels, spray painted them black, and fixed them the to the walls with E6000. I braced them from the underside with pink insulation foam, covered the top with contact cement (spilled a bunch…), and glued the original roofing tile roof back on. Naturally, I botched the photos. I’ll post them tomorrow. In the meantime, Oldest Daughter and I will have to review our paint supplies.

Oldest Son joined me at some point (Yay!) and took a crack at the marine supply. He has decided we will make some new legs for it to sit on, touch up some broken spots, and fix the roof. To do the latter, he used a variety of tools (painters knife, Dremel, X-acto chisel blade, and disk sander) to prepare the roof beams:

He got these pretty clean, and was justifiably proud of himself!

He has to cut and affix a roof beam, then I’ll let him decide if he wants to light the interior and how he wants to reroof this. I am still working how to restore the old posts such that contact with dog will not snap them again. It was nice to see him take on a project again. He tends to get more interested if electric tools get involved.

I have noticed that, in general, these wood frame structures have held up pretty well. I am not sure what sort of wood my father-in-law used, but it will be worth finding out.

Eric

Update:

The promised picture of the garden center:

The “wood” trim didn’t line up quite right, but, in all, I think I restored this building to be true to the builder’s intent while hopefully adding some improvements. Over to O.D. to paint!

O.S., meanwhile, cut a new roof beam. I am trying to work at the pace of his interest, consistent with “All may participate. None must participate.” We’ve discussed a light. I think it’d be cool to have light streaming from the seems between the planks. It’s up to him.

Eric

Progress and continued interest ( some anyway) is always a positive. Either full in can we do some work on it to , some interest when nothing else is happening is still interest!!!

@Pete: Yes, it’s a struggle, especially as they get older. If they can take lessons in creativity, planning, and problem solving from their (mis)adventures with me in this hobby, I’ll put it in the “win” column.

Today was a soldering day. O.S. proved himself quite the natural (he’s better than I am!) at the task, effecting some quick repairs on the recently lit church and making his own light strip for the marine supply.

We borrowed from Bill Barnwell again, and lined a roofbeam with copper tape then soldered on the LED and the power supply. We’ve found that solar won’t work. Cheap AA battery packs work very well. I am a BIG believer in reinforcing success! Grandpa has some spare roofing material. While we await that, we will cut new support posts. Again, I am trying to move at his pace. Of all the crew, he is least interested in “doing,” and the last thing i want to to do is drive him further from “doing” towards “blobbing” by forcing him to participate.

On the other end of the spectrum, O.D. is doing so much, it is hard to nail her down for some railroad time! We did some gardening today, got her spray paint, and turned-to. She allowed me to photograph her as evidence she is still involved:

The paint was a close enough match. I am still losing the occasional tussle with my tablet, so the final photo didn’t come through. It needs some “Dull-cote,” anyway!

With all projects done enough to move off the picnic table, the next one is this little water tower:

The original base fell victim to the late and still lamented Mr. Otto the Cattledog. I made the “pumphouse” using craftsticks (shocked, anyone?) on a foam core. In fact, I think this project was one of my first posts on LSC to see if this site was beginner friendly. Our continued participation - and growth as hobbyists - is a testament to the community here! Going forward, I’ll let my father-in-law’s tank stand. As I have to deal with these two rascals…

…I’ll continue with the absolutely not OR&L inspired (or any other Hawaiian railroad of which I am aware) concept of tank on pumphouse. I’ve been wanting to try my hand at carving “stones” into a foam core, so I am inclined to “upgrade” the pumphouse to “stone” construction. The tank would then sit on a wood (or styrene!) frame on top. I need to do some internet searching before digging in.

Have a great week!

Eric

Update:

I found myself the Command Duty Officer this weekend with CINCHOUSE ashore on other duties. This project provided lots of little opportunities to fix something, attend to the horde, fixt the house, and return to the project.

Over the last week, Oldest Son had cut replacement supports for the marine supply. After trimming them a bit with the Dremel, I glued them in place:

Some warping had meant some supports are vertical in a non-Euclidean sense, but, once set in the railroad, this disappeared. Of note, you can see the battery box in the background. Later, I repaired teh decks and added a styrene sub-roof:

There is almost…but not quite…enough roofing material left to finish this off. I will leave it to O.S. if he wants to reinstall the railing. Otherwise, this one is pau (finished).

Though I meant to turn-to on the water tower, the nature of the day lent itself better to the Haluku’ilio passenger platform:

My father-in-law used a 2x4 (should’ve entered the Mik!) as the base of the platform and build the small frame ticket booth and platform roof. We added the door and steps and stained it. In all, this little structure only needed some minor patches. The roofing had opened at the peak, so I cut some scrap aluminum from last year’s sugar mill project to cap the roof:

I bent to to shape, then, after experimenting with various adhesives, used E6000 - the second best glue for everything - to affix it to the peak of the roof:

The only issue will be that the aluminum will remain shiny forever. I know there are ways to age it with acid, but I’ve little desire to keep acid around the house.

Before closing, some observations on material and construction choice are becoming clear as I repair these buildings and prepare for the repair of others:

  1. Nothing survives dogs. All buildings between the yard and Lake Inferior now reside on the lanai.
  2. Wood, even relatively soft basswood, will survive the tropics IF painted, stained, or coated. Any hole will lead to rot.
  3. Craft sticks may warp regradless.
  4. HardieBacker is near immortal.
  5. Foam is immortal.
  6. Construction adhesive is not the answer to everything. Sometimes, you have to use TiteBond III or E6000 (If it is NOT foam!).

Not hard hitting lessons, to be sure, but this is, for me, a unique opportunity to study the impact of our climate on various materials and techniques.

Have a Great Week!

Eric

Looking good!

No wonder you get so much done - you always have a group of (funny looking) workers to assist you!