-
(https://live.staticflickr.com/65535/49330866333_3529e45d4c_b.jpg)AutoSave_o’Niels Fabrication Dec 2019 3 by Dennis Rayon, on Flickr
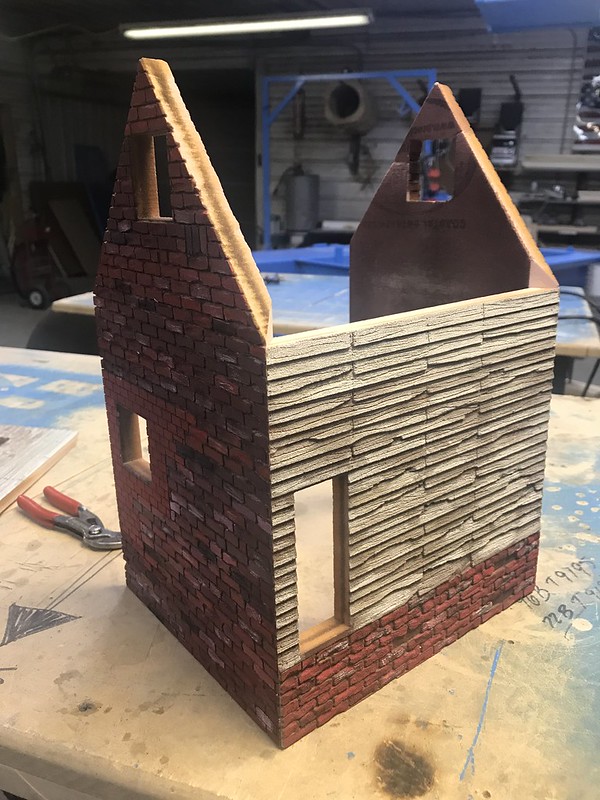
The building nested in the complex
(https://live.staticflickr.com/65535/49319747511_4cb9c8aa69_c.jpg)Neals Fab 2 by Dennis Rayon, on Flickr
(https://live.staticflickr.com/65535/49331553047_2e5e60dddc_b.jpg)AutoSave_o’Niels Fabrication Dec 2019 2A by Dennis Rayon, on Flickr
(https://live.staticflickr.com/65535/49331330091_2ff9ab49bc_b.jpg)AutoSave_o’Niels Fabrication Dec 2019 2A 2 by Dennis Rayon, on Flickr
(https://live.staticflickr.com/65535/49331551832_bbdca34907_b.jpg)AutoSave_o’Niels Fabrication Dec 2019 1A by Dennis Rayon, on Flickr
(https://live.staticflickr.com/65535/49331554632_b2a4a358a6_b.jpg)AutoSave_o’Niels Fabrication Dec 2019 3A by Dennis Rayon, on Flickr
The finished project will be look a little more like the pictures of the model kit by Sierra’s kit.
-
Edit
-
The following users say thanks to Dennis Rayon for this useful post:
David Marconi,FOGCH and Jim Rowson
-
Quote this
(http://www.largescalecentral.com/application/modules/Ynforum/externals/images/post/advforum_reply.png)January 4, 2020 10:29 PM CST Share Thank Report
-
Dan Hilyer

(http://www.largescalecentral.com/public/user/50/f3/01/1f05e_0051.jpg?c=bc9d)
Seeing some of your other models, I believe this will be a fun build to watch. I can just imagine the realism you will add to this project. I like the 3D modeling.

-
-
Quote this
(http://www.largescalecentral.com/application/modules/Ynforum/externals/images/post/advforum_reply.png)January 4, 2020 10:37 PM CST Share Thank Report
-
Jim Rowson

(http://www.largescalecentral.com/public/user/ab/09/02/205a4_9dfb.jpg?c=6c3a)
“Doodle a little” is a massive understatement…
Lots of character in this build I predict. Following with interest
-
-
Quote this
(http://www.largescalecentral.com/application/modules/Ynforum/externals/images/post/advforum_reply.png)January 29, 2020 8:25 PM CST Share
-
Dennis Rayon
(http://www.largescalecentral.com/public/user/33/55/02/250e0_37ce.JPG?c=aff4)
-
Mount Vernon, Missouri
-
Posts
759
-
Thanks
54
-
Thanked
203
-
Well here I am having a few things done, enough to display. I am building this small structure out of PB precision board. A 1/2" thick board
that is used mainly for pattern makers and sign makers. Holds up great in all weathers, soft enough to work with all woodworking tools
and all sharp hand held tools. Has the capability to weather very nicely, with some basic tool, like dental picks.
Pic. 1. This pic is the sides in the laser being used to cut out the used brick, and yes they are drawn out one at a time, well basically
picked out of 12 choices.
(https://live.staticflickr.com/65535/49457994747_4031a2f95b_c.jpg)IMG_4845 by Dennis Rayon, on Flickr
Pic 2. The side walls lasered and ready for the table saw to cut the lap siding.
(https://live.staticflickr.com/65535/49457286253_a616cf7dff_c.jpg)IMG_4840 by Dennis Rayon, on Flickr
-
Edit
-
The following users say thanks to Dennis Rayon for this useful post:
Jim Rowson
-
Quote this
(http://www.largescalecentral.com/application/modules/Ynforum/externals/images/post/advforum_reply.png)January 29, 2020 8:40 PM CST Share
-
Dennis Rayon
(http://www.largescalecentral.com/public/user/33/55/02/250e0_37ce.JPG?c=aff4)
-
Mount Vernon, Missouri
-
Posts
759
-
Thanks
54
-
Thanked
203
-
The 3rd picture are the 2 sides layed out to create the sidings to align up, so I could run together as one piece with each setting of the table saw fence.
I draw on the end cut, the way the angle is set, very easy to run backwards, have not done that yet.
(https://live.staticflickr.com/65535/49457760671_b56d3330ae_c.jpg)IMG_4841 by Dennis Rayon, on Flickr
-
Edit
-
The following users say thanks to Dennis Rayon for this useful post:
Dan Hilyer and Jim Rowson
-
Quote this
(http://www.largescalecentral.com/application/modules/Ynforum/externals/images/post/advforum_reply.png)January 29, 2020 9:15 PM CST Share
-
Dennis Rayon
(http://www.largescalecentral.com/public/user/33/55/02/250e0_37ce.JPG?c=aff4)
-
Mount Vernon, Missouri
-
Posts
759
-
Thanks
54
-
Thanked
203
-
The first few rows of siding has ran across the saw, I am using a 5/16" dado head angled at 12 degrees, The head depth is set at where it just barely
cuts the surface. That way it does not make the wall thickness any thinner.
(https://live.staticflickr.com/65535/49458012616_92d284d2b9_c.jpg)Untitled by Dennis Rayon, on Flickr
-
Edit
-
The following users say thanks to Dennis Rayon for this useful post:
Dan Hilyer and Jim Rowson
-
Quote this
(http://www.largescalecentral.com/application/modules/Ynforum/externals/images/post/advforum_reply.png)January 29, 2020 9:32 PM CST Share
-
Dennis Rayon
(http://www.largescalecentral.com/public/user/33/55/02/250e0_37ce.JPG?c=aff4)
-
Mount Vernon, Missouri
-
Posts
759
-
Thanks
54
-
Thanked
203
-
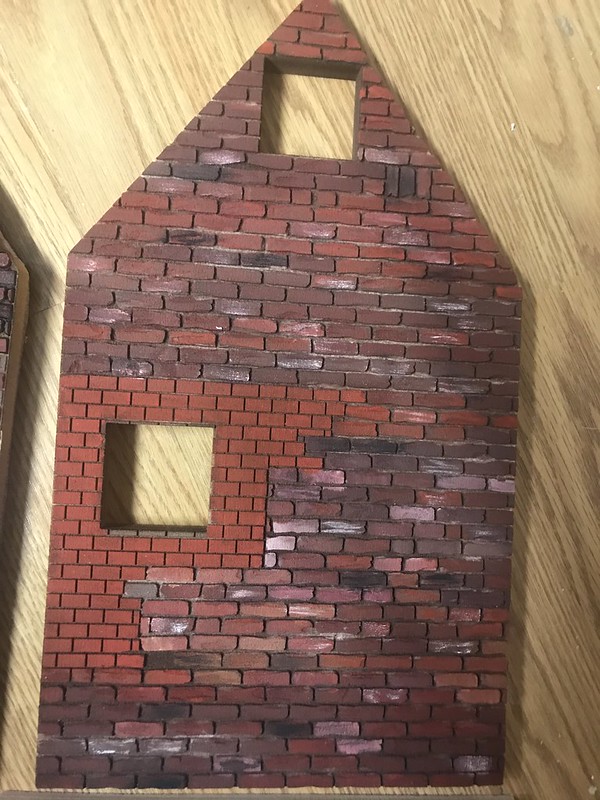
The next few pictures are showing after the sides are cut with the windows and doors removed, then the siding was weathered heavily.
Boards are cut with splits, nail holes were placed at joints, wire-brushed fairly heavy. Then spray painted.
(https://live.staticflickr.com/65535/49457996117_9689ebf42d_c.jpg)IMG_4851 by Dennis Rayon, on Flickr
(https://live.staticflickr.com/65535/49457762676_44f9eb60cc_c.jpg)IMG_4852 by Dennis Rayon, on Flickr
This picture is where the finish paint job is done.
After the paint has been applied, I took a black ink pen and marked the bottom edge to make it stand out as the shadow effect.
Look at the area where the pen is pointing at. Then the next picture shows one side has the bottom edges that has been penned.
(https://live.staticflickr.com/65535/49457996512_40d02dde58_c.jpg)IMG_4853 by Dennis Rayon, on Flickr
-
Edit
-
The following users say thanks to Dennis Rayon for this useful post:
Rick Marty, Korm Kormsen, and Jim Rowson
-
Quote this
(http://www.largescalecentral.com/application/modules/Ynforum/externals/images/post/advforum_reply.png)January 29, 2020 9:34 PM CST Share
-
Dennis Rayon
(http://www.largescalecentral.com/public/user/33/55/02/250e0_37ce.JPG?c=aff4)
-
Mount Vernon, Missouri
-
Posts
759
-
Thanks
54
-
Thanked
203
-
Been all penned on the bottom of the lap siding
(https://live.staticflickr.com/65535/49457763041_a8e9628699_c.jpg)IMG_4854 by Dennis Rayon, on Flickr
-
Edit
-
The following users say thanks to Dennis Rayon for this useful post:
Ray Dunakin, Chris Kieffer, David Marconi,FOGCH, Korm Kormsen, and Jim Rowson
-
Quote this
(http://www.largescalecentral.com/application/modules/Ynforum/externals/images/post/advforum_reply.png)January 29, 2020 9:37 PM CST Share Thank Report
-
Jim Rowson
(http://www.largescalecentral.com/public/user/ab/09/02/205a4_9dfb.jpg?c=6c3a)
Looking good, Dennis. Nice idea on the shadow using the pen. Clever.
-
-
Quote this
(http://www.largescalecentral.com/application/modules/Ynforum/externals/images/post/advforum_reply.png)January 30, 2020 12:45 AM CST Share Thank Report
-
Ray Dunakin
That looks awesome!!
-
-
Quote this
(http://www.largescalecentral.com/application/modules/Ynforum/externals/images/post/advforum_reply.png)January 30, 2020 8:36 AM CST Share Thank Report
-
Sean McGillicud…
(http://www.largescalecentral.com/public/user/e4/4c/02/2489a_e712.jpg?c=1a92)
Ray are you two related ?
 My u-tube My Vimeo
The light in the tunnel might not be an engine , but a light in the caboose of my own train on my Roundy Round Rail Road ! My empire is complete…I think…
-
-
Quote this
(http://www.largescalecentral.com/application/modules/Ynforum/externals/images/post/advforum_reply.png)January 30, 2020 8:52 AM CST Share Thank Report
-
Lou Luczu
(http://www.largescalecentral.com/public/user/184e4/184e4_250b.jpg?c=acd5)
Wow, just Wow!
“If I ever go looking for my heart’s desire again, I won’t look any further than my own backyard. Because if it isn’t there, I never really lost it to begin with.” - L. Frank Baum
-
-
Quote this
(http://www.largescalecentral.com/application/modules/Ynforum/externals/images/post/advforum_reply.png)January 30, 2020 9:08 AM CST Share Thank Report
-
Andy Clarke
(http://www.largescalecentral.com/public/user/184a0/184a0_9513.jpg?c=3a0e)
What they all said ^^^^^^ there… (http://www.largescalecentral.com/externals/tinymce/plugins/emoticons/img/smiley-cool.gif)
-
-
Quote this
(http://www.largescalecentral.com/application/modules/Ynforum/externals/images/post/advforum_reply.png)January 30, 2020 11:10 AM CST Share Thank Report
-
John Passaro
(http://www.largescalecentral.com/public/user/ab/01/02/1fdac_7440.jpg?c=2224)
Laser cutting is cool, your painting is very good, but what I’m really impressed with is how you use that table saw…I wish I could do that.

-
-
Quote this
(http://www.largescalecentral.com/application/modules/Ynforum/externals/images/post/advforum_reply.png)January 30, 2020 11:37 AM CST Share Thank Report
-
Dave Taylor
(http://www.largescalecentral.com/public/user/184ea/184ea_5ec2.jpg?c=f554)
Dennis… I like whats comming along here… BUT…
Since you have posted so much in the modeling section already, will you PLEASE start a thread in the Mik Challenge section, and tie a link to this thread, so that those that want to follow the “Build” can find it.
Personally I thought that you had dropped out, cause I hadn’t seen any build logs…
Thanks
Dave
New Mexico Northern Railroad
D&RGW 315 Crew member, Fireman
RRR #4
 AutoSave_o’Niels Fabrication Dec 2019 2 by Dennis Rayon, on Flickr


