Large Scale Central

Converting Accucraft EBT hoppers to 1:32 couplers

The purpose of this post is twofold. One to show how I have attempted this conversion, and two for seeing if anyone else has a better method or way to improve.

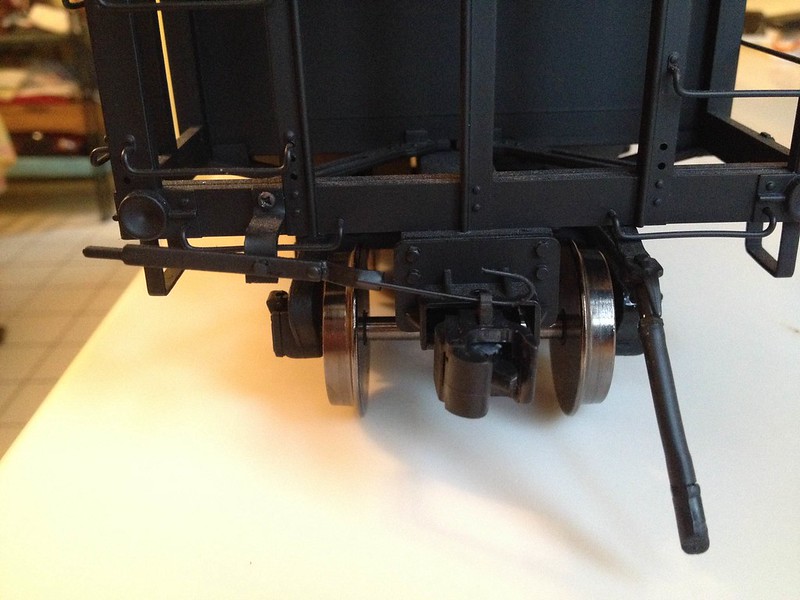
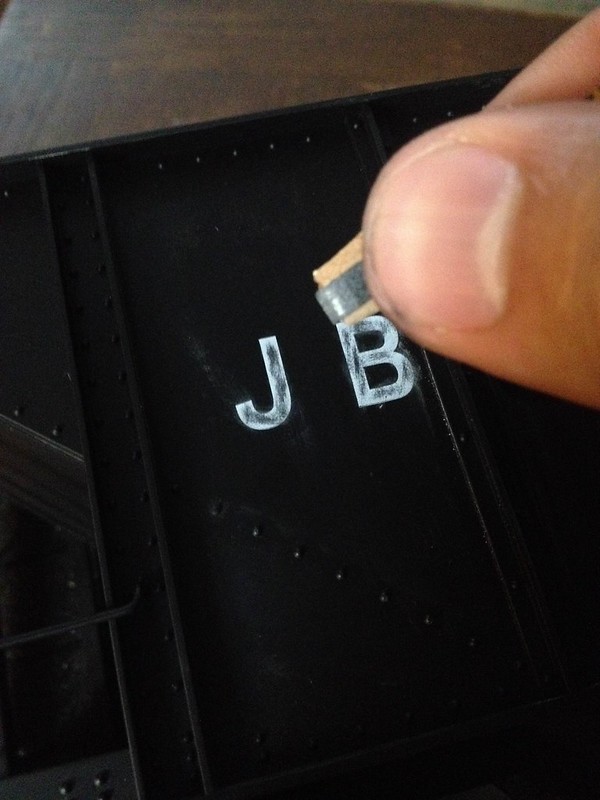
The stock couplers supplied with the Accucraft’s hoppers are full size. The EBT used 3/4 size couplers on their rolling stock. So taking the advice of many on this site, I got a hold of Accucraft’s 1:32 scale couplers which scale out perfectly for the 3/4 size ones that the EBT used. (Thanks John Bouck ! )

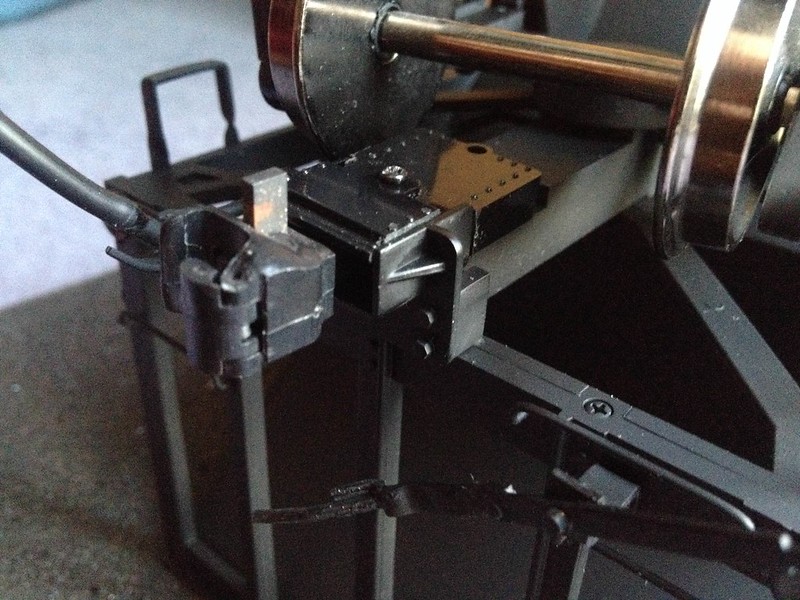
As seen in the picture, I cut the front of each side off of the draft gear box bottom. This allowed the bottom to fit down into the stock draft gear box top. I then used the screw that came with the hopper to bolt things down. The 1:32 scale gear box top was not used. This set up lets the coupler function just as it does in it’s normal draft gear box, with sprung side to side and forward reverse movement. The height above the rails also works out exactly as it should.

IMG_1548

Over all I’m very pleased with the replacement. My only concern is it’s strength. The stock set up has 2 screws to counter the strain of pulling a long train. One from the top and one from the bottom. My arrangement only utilizes one. Will this be stout enough? Or, am I all wet, is there a much better way that I have missed?

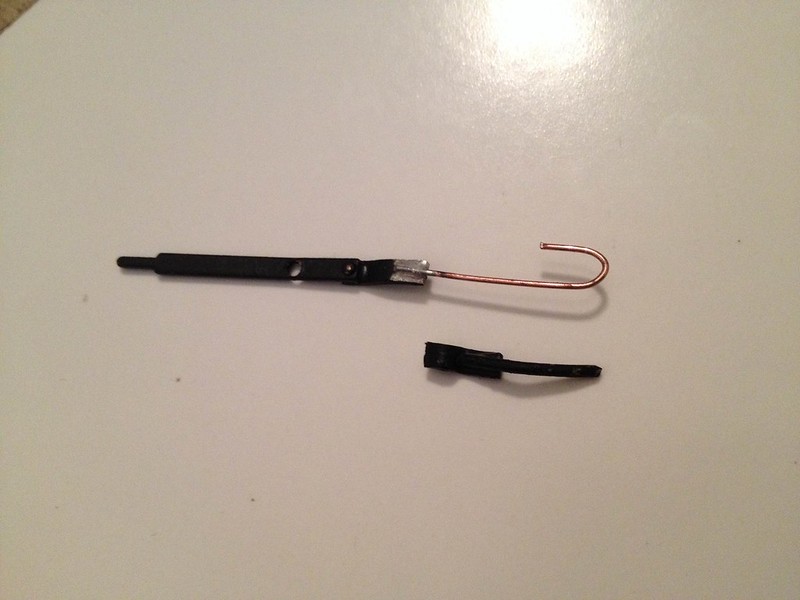
The only other detail I need to work out is weather or not to neck down the end oft the cut lever to fit into the smaller pin hole on the 1:32 couplers or enlarge the hole. There isn’t much room for enlargement on those.

Seams I must be the only lunatic doing this so I’ll report on how I wrapped up this revision.

Again, the stock cut lever would not work because the large diameter rod on the end would have no chance of fitting through the small hole in the new coupler pin. Also, the stock lever bent out from the end beam fairly far for the over size stock coupler. The solution ended up being relativity simple. First thing was to cut off the stock lever at the offending bend. Next I bent a piece of some .032 welding wire I had to shape and soldered it in place. You can see the edited part without paint and the cut off laying below in the first picture.

cut lever mid demo

This second picture shows things painted and installed. It works very well, and I’m pleased to have a system figured out for upgrading the growing fleet.

EBT cut lever

Randy, didn’t they usually have chains going from the cut lever to the coupler pin?

Nope. (http://www.largescalecentral.com/externals/tinymce/plugins/emoticons/img/smiley-smile.gif)I have lots of pictures…

IMG_1186

(http://www.largescalecentral.com/externals/tinymce/plugins/emoticons/img/smiley-wink.gif)

Randy of course you do.(http://largescalecentral.com/externals/tinymce/plugins/emoticons/img/smiley-wink.gif) What was I thinking?(http://largescalecentral.com/externals/tinymce/plugins/emoticons/img/smiley-undecided.gif)(http://largescalecentral.com/externals/tinymce/plugins/emoticons/img/smiley-yell.gif)

Randy Lehrian Jr. said:

The purpose of this post is twofold. One to show how I have attempted this conversion, and two for seeing if anyone else has a better method or way to improve.

. . . .

Randy,

I confess that I didn’t bother to switch the couplers. (I did change wheels to Sierra Valley as Geoff bought a bulk order for his 4 and my 8 hoppers.) Geoff did swap the couplers on all his. I claim you don’t notice (see my “dan’s Steam-up” thread,) as long as they are all coupled and running together. Partly it was to avoid changing the coupler on the tenders of #12 and #15.

My coaches all have 1/32nd couplers though, except #29 which has one of each. My caboose #28 has the 1/32nd 3/4 scale couplers, and I have a Bachmann 2-bay hopper with one of each type of coupler - it’s at the back of my hopper train to allow the caboose to couple to the train.

In fact, I find that you can connect the 1/32nd coupler to a 1/20 coupler manually and it will stay coupled. Don’t try this on tight curves though.

Pete Thornton said:

Randy Lehrian Jr. said:

The purpose of this post is twofold. One to show how I have attempted this conversion, and two for seeing if anyone else has a better method or way to improve.

. . . .

Randy,

I confess that I didn’t bother to switch the couplers. (I did change wheels to Sierra Valley as Geoff bought a bulk order for his 4 and my 8 hoppers.) Geoff did swap the couplers on all his. I claim you don’t notice (see my “dan’s Steam-up” thread,) as long as they are all coupled and running together. Partly it was to avoid changing the coupler on the tenders of #12 and #15.

My coaches all have 1/32nd couplers though, except #29 which has one of each. My caboose #28 has the 1/32nd 3/4 scale couplers, and I have a Bachmann 2-bay hopper with one of each type of coupler - it’s at the back of my hopper train to allow the caboose to couple to the train.

In fact, I find that you can connect the 1/32nd coupler to a 1/20 coupler manually and it will stay coupled. Don’t try this on tight curves though.

Hey Pete, I was wondering if you’d see this and chime in. Actually, that was the first thing I looked at when I saw your post and subsequent pictures of EBT equipment. For me, I see it instantly and can’t abide it in my equipment. Using the stock couplers even adds more space in between the cars. Please don’t think I’m criticizing your methodology or modeling, I’m just very picky about some things. To the point that I’m even considering developing a cover to hide the very incorrect Coupler pocket end detail that Accucraft used. Also thinking about a small triangle sheet to fill the hole in the end sheet above the bolster too.

As far as how sturdy my version of the mount is, I think it will be plenty strong enough after having conducted some pull tests now. The way it’s mounted would force the remains of the 1:32 scale draft gear box to pull through and pull off the stock upper housing to move. I will just make sure to keep that but joint tight to help with this concern.

David Maynard said:

Randy, didn’t they usually have chains going from the cut lever to the coupler pin?

You know I got to thinking and I believe I owe an apology to David. He is very correct in that most railroads and cars do use a chain to link the cut lever and coupler pin. One glaring exception of course is the EBT. Thier cut levers were quite different in design in every aspect, including that they did not use a chain. This is just one of the things that they did their own way which is why I love Ol’e Easty so much.

My quick and somewhat sharp response to David’s question was meant entirely to be in jest, ( and I think he took it that way) but of course we are dealing with written word and no facial expressions and gestures can be seen or inferred. I clearly need to remember that. Sorry David. (http://largescalecentral.com/externals/tinymce/plugins/emoticons/img/smiley-embarassed.gif)

Randy, I took it as intended. I know you, so I kinda know how you speak. No apology needed.

I understand wanting the cars to look right. I do too with my cars, to a point, but I am most concerned with how they work. So I overlook the excessive distance between my cars and the over-sized couplers on them, both in large scale and in HO.

As for how solid your coupler is, if I understand the mounting of your couplers, the screw would have to shear off for the coupler to come loose, very unlikely with the forces we are up against in our scale. Or the coupler box would have to break, an unknown, to me, since I don’t know how strong the box is. But I doubt its that fragile.

Randy Lehrian Jr. said:

. . . .To the point that I’m even considering developing a cover to hide the very incorrect Coupler pocket end detail that Accucraft used. Also thinking about a small triangle sheet to fill the hole in the end sheet above the bolster too.

As far as how sturdy my version of the mount is, I think it will be plenty strong enough after having conducted some pull tests now. The way it’s mounted would force the remains of the 1:32 scale draft gear box to pull through and pull off the stock upper housing to move. I will just make sure to keep that but joint tight to help with this concern.

Each to his own. I confess I am not picky about little stuff like that - I watch my trains from 5-10’ away! I’ll ask Geoff if he has any comments, as he did the same as you.

If I remember correctly, the central spine of these cars is metal, and it takes all the strain. The Accucraft 1/32 couplers have a spring in them, so you might get some interesting effects running a heavy train on a hill! I’ve been known to install a larger screw into the center of the coupler pocket, (needs some drilling to make it work,) and on the old 1:22 hoppers, which were all plastic, I installed a brass strip between couplers to take the strain of the following cars.

You could add a brass strap to the bottom and tie it in to the frame to support the screw. However, I’m inclined to agree with David that it isn’t likely to break. Your local marine store will sell you stainless steel screws if you are worried!

Thanks Pete. I would defiantly be interested in how Geoff went about his conversion. His work has always been an inspiration.

You’re correct about the steel spine, and the screw I used does go into that. I do think this should be strong enough. I’ve also had the same thought about the sprung couplers. Worse case I may have to trade the stock spring out for one that is a bit more stiff, but we shall see. Once I have a few cars converted I’ll be taking them over to a local 2.58% grade that also has plenty of extra rolling stock I can tack on to see what the strain does with a full length train. Thanks for all your input!

Randy Lehrian Jr. said:

Thanks Pete. I would defiantly be interested in how Geoff went about his conversion. His work has always been an inspiration.

. . .

Randy,

I did mention it to Geoff and suggested he post his thoughts. He did remind me that we did a lot of work to set up the car height correctly.

We took off the trucks (finding that several had loose sideframe screws - might be worth checking yours?), and sanded down the metal boss with a belt sander to lower the cars about 1/16th. I forget the exact amount, but as I had an RYM brass hopper sitting on the same track, it was easy to adjust.

Thanks Pete, That’s a good tip. I’ll be checking those screws. I did notice that the Accucraft’s hoppers sat a bit taller than my RMY. That’s also bad news for my mounting setup. If I lower the car then my coupler will not be on the 1.125" centerline any more. Humm…

Randy,

If you lower the car, using a combination of 24" wheels and trimming the bolster, you will need to raise the couplers. Unfortunately, relevant photos are on the old laptop.

I will comment on the Carmer lift bars. To give trouble free operation, the portion of the wire hook that goes through the locking pin needs to be horizontal. This will prevent accidental uncoupling (lifting the pin) as the couplers swings.

Also, looking straight down on the model (top view) the wire hook should have a bend in it that matches the arc of the coupler swing… this will prevent binding and allows the coupler to self center.

One more thing, I enlarge the hole through the pin and chamfer the edges both sides.

Geoff

Thanks Very much Geoff. Very good tips on the Lift bar and lowering. Before I attempt to do any lowering I’m going to figure out the raising of the couplers. I have a feeling this will be the most involved part.

Well, I’ve stepped back, thought about things a bit and made some decisions pertaining to my Accucraft hoppers.

Fist I looked at the wheels, trucks and bolster design to see what would be involved in the modifications to lower them. The wheels seem to scale out at 25", so that’s one inch to large. While I like the design of the bolster, it also makes it very difficult to lower things since you would have to trim the car and truck and possibly re-countersink depending on how you go about things.

Next I got out some photos and my RMY hopper to compare the details all around on the car. There is quite a bit I feel could be improved on. The brake detail leaves a lot to be desired, and on these hoppers most of it was very exposed making it a bit more glaring. The coupler pocket end detail is off, as I mentioned before. The end sheets don’t go all the way down to the bolsters and some other assorted nit picks are present as well.

So at the end of all this I’ve made a decision on what these cars will be to me. They are my ready fleet to get me up and running a railroad. They are decent models but by no means museum quality. To me the effort to alter all the incorrect details and cost of new wheelsets would just not be worth the effort. I’d rather try my hand at building correctly from scratch in brass. I’ll start with 2 bays, which has always been my plan, and then easily be able to modify the design to three bays.

In the mean time I’ll hit the easy glaring things like couplers and cut levers, etc and enjoy running the Accucraft hoppers. Since this means my original coupler conversion will still work, I decided to try removing the lettering from a car to get the appropriate era decals in place.

First I took a strip 400 grit sand paper wrapped around a thin piece of wood and roughed up the lettering a bit.

step1

I finished by some extensive rubbing with a Q-tip soaked in rubbing alcohol.

finished

I made sure to get the glare of the lighting just right in the finished photo to show that this process does remove the black paint as well. In fact that seems to be what comes of first. So I’ll have to do some touch up before decals. The removal takes about 15 minutes per side. Very glad the eight I have on pre-order are plain/unlettered!

Randy, let me pull one of my hoppers out of its case in the garage, and I’ll take a picture of how I modified the bolsters to lower the trucks. It’s a dead-simple fix, I just can’t remember what the heck it is. I’ll also shoot a pic of my coupler mods for comparison. I just screw the 1:32 box to the frame, then “fill in” the space above it with a block of wood painted black.

I agree with you on the details on this car. It seems they did a very good job of copying the hopper door and brake detail off of the Bachmann 2-bay car, as it’s virtually identical to that, though neither bear resemblance to the prototype. Shame, that. Having said that, when I got the first Bachmann 2-bay car, I diligently went through and “corrected” all the things they got wrong. Then I got two more 2-bay hoppers, and–naturally–immediately ran them in the same train. None of the “fixes” I made to the hoppers were remotely evident as the train rolled by. When I got Accucraft’s 3-bay car, went through and “fixed” many of the goofs on that one as well (save for the brake detail, which I figured by that time would never be seen.) Even there, when putting that car in a train with the rest of my 3-bays, it’s darned near impossible to tell the difference. So, I’ve stopped worrying about it. While frustrating that neither Bachmann nor Accucraft took the time to get the subtle details correct (and I know Accucraft had ample documentation because they asked me to supply it to them), in the end–even for a purist–they work very well.

Oh, and you should have your lettering in the next day or so. I’ve not found anything to easily remove the lettering, either. I used Badger’s "ModelFlex gloss black paint to paint in the panels I removed the lettering from. It’s a touch glossier than the Accucraft finish, but once weathered, you can’t tell.

Later,

K

Thanks Kevin ! I would love to see how you tackled the height issue in combo with the coulpers. I wouldn’t mind spending the time to lower them if it’s not such an arduous process. The space between the trucks and car does seem excessive.

I’ve finally made some progress on the hopper fleet. I put a big effort in to have the fleet ready to take out and run on the stage at the FEBT annual reunion. You might have seen an earlier post I made about an airbrush purchase. This project was the whole inspiration for that purchase. The painting went very well and completely hid where the old paint had been removed. Next came the grueling lettering marathon the day before we left. It took me about an hour per car to do the 5 hoppers I have. Over all the transfers went on very easily. I used a small strip of cereal box with some pencil marks on it to keep the letter spacing from certain features consistent on all the hoppers. I’m really pleased with how they turned out. I just need to get them all converted over to 1:32 scale couplers now. There was no time left for that before we went.

20's EBT Hopper 2

20's EBT Hopper 1

Here is an added bonus. The hoppers in action. This also happens to be the very fist steaming of my #12 too! I couldn’t think of a more appropriate place for it to have occurred.