Large Scale Central

SD60f Build

Thanks Guys, I’ll check them out. One nice thing about this model is most of the doors latch from the inside, but I will need some latches for the cab and some tail end detail. Normally I build the hinges with styrene, but premade would definitely be easier.

How many latches and hinges are in the shapeways sets? I don’t see any quantities listed.

The hinges, if I remember, are a pattern for an RTV mold. When I did them for Dirk, I can’t remember if I sent him castings, or the mold itself. If I still have the mold, I could cast the hinges for you relatively cheaply. Like $10 for 100.

The paddle latches are 3d printed in acrylic, direct from Shapeways. They come in 100s.

Burl, if you can give me a few weeks, I want to order a few of your brake wheels, so I’ll just have you add the hinges to the order when I place it.

Okay Guys, we need some 1/16 " styrene and we’ll need the following:

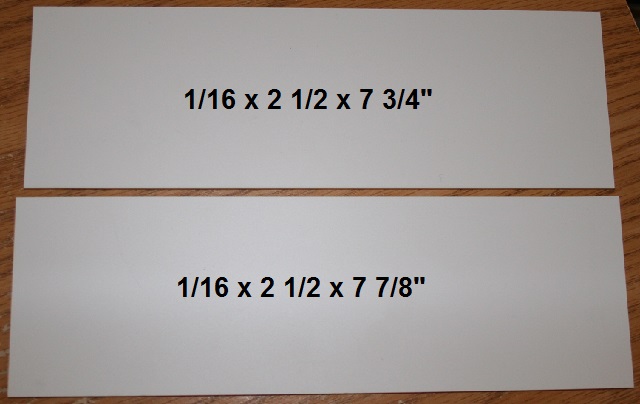
1 - 1/16 x 2 1/2 x 7 3/4"

1 - 1/16 x 2 1/2 x 7 7/8"

2 - 1/16 x 15/16 x 7 3/4"

2 - 1/16 x 15/16 x 7 7/8"

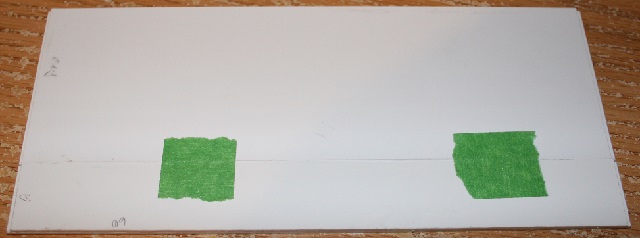
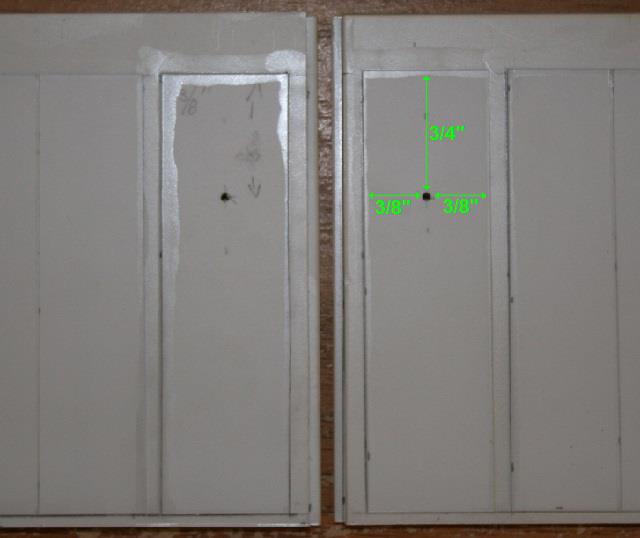
Take the three 7 7/8" pieces and mark lines 1/16" from each end.

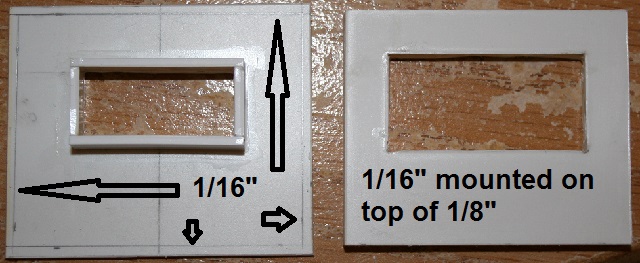
Glue the 7 3/4" pieces on top of the 7 7/8" pieces leaving the 1/16" gap at each end. Mark the end of each piece, and on the narrow pieces, mark a 30 on the center side and a 60 on the outside side.

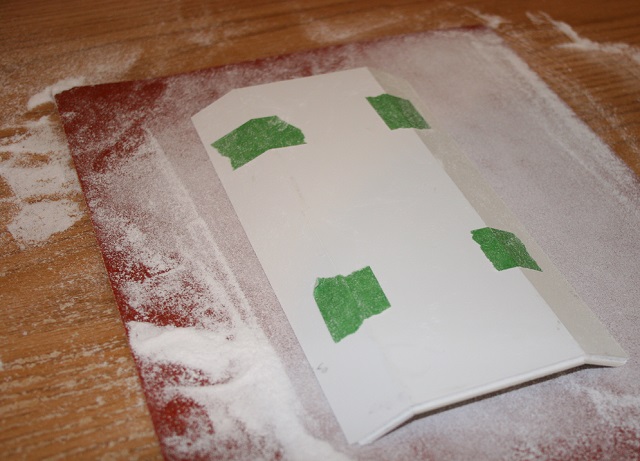
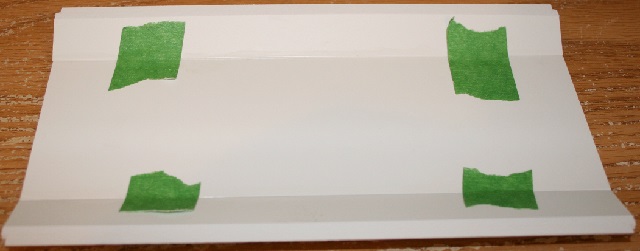
Put some tape on the bottom of the two narrow pieces leaving the 30 side exposed.

Flip them over and sand the edge at 30 degrees until you have a nice sharp edge. I did the sanding by hand. I initially tried with power, but couldn’t get the clean edge I wanted. By hand, I just ran it from side to side. It takes some time, but makes a nice clean edge. The tape protects the bottom while sanding. Remove the tape when done.

Now I made a jig to help glue the angles. Using 1/8" styrene, I cut four 3" x 1 1/4" pieces and I made a 30 degree cut on one end.

One piece I kept as is. The other 3 I cut some 1 x 1 1/4" pieces and glued a jig as shown below.

Now take one of the narrow pieces, place it tightly against your center piece and tape it in place.

Flip it over, and using the jig set the 30 degree corner and tape it again to hold it in place.

Apply the second side the same way, and then glue everything in place. DO NOT remove the tape.

Now to get the 60 degree bottom angles, I put some 80 grit sandpaper on a flat surface, and sanded until I got the nice sharp angles. I’ve left the tape on for extra strength, and the roof was also allowed to dry over night before this step.

Now once the sanding is complete, remove the tape, and glue the areas that were covered by the tape. You should now have a nice roof for your center section.

Looks like you’re going in leaps and bounds Shane (http://www.largescalecentral.com/externals/tinymce/plugins/emoticons/img/smiley-cool.gif)

Very nice!

I should get another build update uploaded this weekend.

Here’s a couple of teaser photos.

Looking good!

Thanks Rooster.

Okay Guys, tonight we’re going to get the middle section 90% complete. I guess I better get some hinges ordered from Burl. :slight_smile:

On your side panels, mark the single doors 3/4" from the top, centered (5/8" from each side) and drill guide holes.

Now we need to drill 9/16" windows. I picked up this bit with sharp teeth at the edges of the blade. It cut into the styrene quite nicely.

Now we need to build a box to assist with assembly of the walls and roof. Using 1/8" styrene, make it 3 7/8" wide and 3" tall. I made mine 3" long, but the length can be anything you choose. I wouldn’t go less then 2 or greater then 4.

Make sure you have enough internal bracing so you can pick the loco up with out crushing all this hard work. I do see some internal bracing from the one pic. I’m sure you have that covered but if you don’t add some and more is always better as we can’t see the inside anyway.

I’m really digging the build log myself, fantastic work so far that you have shown!

Now on the back side of your side walls, mark lines 1 1/2" in from the ends.

Using these lines as guides, tape your sides to the box you made.

Now tape on the roof. Allow the sides to overhang by about 1/32". They will be sanded to a slight curve once dry.

Glue it up once you are happy with the placement. Be careful NOT to glue in the box. Once everything is secure, remove the box and tape. Glue it again to get all the spots you couldn’t the first time.

Cut two pieces of 1/8" x 1/8" x 7 7/8"

Apply one on each side to reinforce the joint.

Rooster, I’m making this section removable, so it’s bracing will be minimal compared to the other sections. My plan is to make the fuel tank sturdy enough to be the lifting point.

Shane

Now place some tape to protect the tops of your side doors while sanding.

Carefully sand the lower roof edges. You want a defined curve, but nothing more.

Here’s a close-up. You just want to take off enough to curve the edge, and smooth it up.

Now take some .06" angle and cut two 7 3/4" lengths.

Secure one on each side above your side doors. This is your drip lip for all your running in rainy weather. :slight_smile:

Now cut two 1/8" x 1" x 7" pieces.

Mount these on the inside of both sides. keep them 1/2" form the window end, and overhang them by 7/16". These will help the section sit properly on the base. These will slip behind your base side frames.

Okay, now we need an exhaust vent to get those nasty diesel fumes out.

Now on the end OPPOSITE of the windows, measure out where the vent will be placed as shown below. The measurements from the end are for the upper layer only. DO NOT include the 1/16" lip. The 1 7/8" line will not be used in this post.

You can choose how to cut the hole. It gets covered up, so it can be a little rough. I measured it off to drill two holes. Of course I started with two guide holes.

I used the same bit I used for the windows. The holes pass the lines a little, but as it will be covered I’m not concerned about it.

Now cut it out to the proper shape.

OPTIONAL STEP

We’re going to add a layer to the end of the roof. If you skip this, I doubt that most people would notice.

Cut a piece of .01" styrene 1 7/8" x 5". Mark it into 3 sections 1 1/4 - 2 1/2" - 1 1/4". Fold it along the dividing lines and place it using the 1 7/8" line you marked in the previous step.

Carefully glue it in place leaving the overhangs. Remember not to use too much solvent as .01" is easily distorted.

Once dry, place some solvent along the underside edge, and then carefully roll it over the edge and hold in place until it bonds. Again be careful to apply even pressure so that there is no distortion. It should end just over the drip lip. Trim if necessary.

If you did the optional step, cut out the hole once dry, and glue again around the edge of the hole.

Now we’ll need a 1/16" piece 1 7/8" x 2 1/4". Cut the hole as shown below.

For the stack We’ll need two 1/16" x 1/4" x 1 1/4" and two 1/16" x 1/4" x 1/2".

Now we need one 1/16" x 1 3/4" x 2 1/8" and one 1/8" x 1 3/4" x 2 1/8". Cut the hole on both as shown on the right piece. The space above, below and to the left is 5/16". To the right is 11/16".

The 1/16" piece is the top so make sure you cut a nice clean hole.

Now glue the above two pieces together. Take the 1 7/8" x 2 1/4" piece you cut in the first step and glue the stack pieces around the hole. Also mark a line 1/16" in from each side.

Take the above two pieces, and mount the right piece on top of the left piece. Leave the 1/16" gap around the edge. you will have a 1/16" gap above and below the stack, and a 1/8" gap on each side. If the above right piece has a noticeable joint around the edge, you can clad it with some .01" styrene.

Take your completed assembly and mount it on the roof. There will be a 1/8" gap on both sides.

Now cut five 1/2" pieces of .05" rod.

Mount these in the stack with 1/8" spacing.