Dennis Rayon said:
The picture above shows the 5/8" plywood has been layed and screwed to the cross 2’’ steel tubing, That is the bottom layer that gives
us a good base to screw the upper elevated base and 1" foam to. The upper section was raised for the second track loop. We used 5/8"
plywood that has pocket holes drilled in the edges and screwed to the plywood base below, then another 5/8" top screwed to the 5.5" risers.
Then the foam was glued and screwed to the plywood.
Dennis, What type of glue do you use to attach the foam to the plywood? And could that same glue be used to attach foams pieces together? I have used a similar foam technique with much success for making “stone” portals. They have held up extremely well through four years of southwestern Pennsylvania weather (but not so much to an over-zealous weed wacker). I am considering using the foam for creating rock work on some of my raised/off the ground sections and am trying to come up with a plan. Your handiwork has inspired me to move forward on this project. Thanks, Mark
IMG_5130 by Dennis Rayon, on Flickr
Mark ,We got the glue at Lowes, I will look at it when I get back to it tomorrow. It does not say for foam, but we tested it and it does not react to foam.
Dennis
This is the frame work for the mountain, all of this lumber is discarded wood from my business, so this is freeby.
 IMG_5167 by Dennis Rayon, on Flickr
This shot shows the plywood roadbed that will have a back and forth little miners train
 IMG_5168 by Dennis Rayon, on Flickr
Foam being added on
 IMG_5177 by Dennis Rayon, on Flickr
 IMG_5176 by Dennis Rayon, on Flickr
The straight section of plywood with 3 up right boards holding it up will get replaced with a trestle.
Mountain Carving being done
 IMG_5188 by Dennis Rayon, on Flickr
 IMG_5187 by Dennis Rayon, on Flickr
The Base paint has been brushed on
 IMG_5206 by Dennis Rayon, on Flickr
 IMG_5205 by Dennis Rayon, on Flickr
The diluted Black is being applied 50/50 mix with water
 IMG_5211 by Dennis Rayon, on Flickr
 IMG_5210 by Dennis Rayon, on Flickr
The mountain test fitted
 IMG_5193 by Dennis Rayon, on Flickr
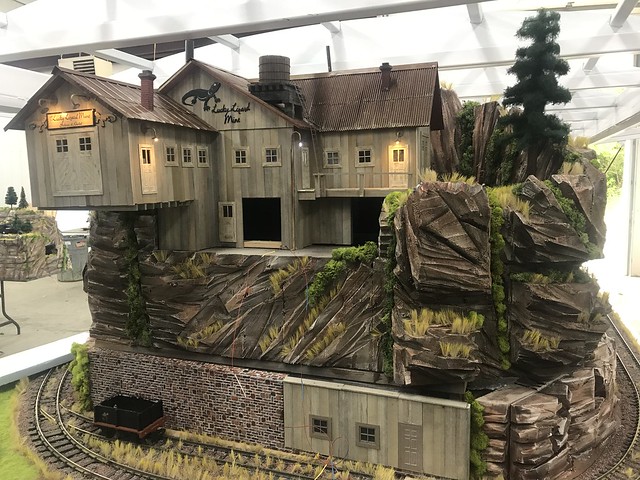
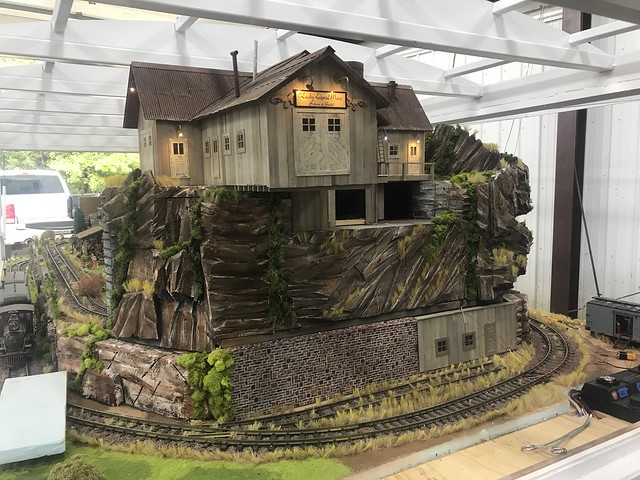
Now the mountain has all the coloring added
 IMG_5220 by Dennis Rayon, on Flickr
 IMG_5222 by Dennis Rayon, on Flickr
 IMG_5225 by Dennis Rayon, on Flickr
Greenery being added
 IMG_5235 by Dennis Rayon, on Flickr
 IMG_5216 by Dennis Rayon, on Flickr
 IMG_5214 by Dennis Rayon, on Flickr
I took one of Tom’s structures and turned it into a diorama, on this side the structures will all be
done in a diorama so they can be changed out as desired easily.
 IMG_5240 by Dennis Rayon, on Flickr
 IMG_5243 by Dennis Rayon, on Flickr
 IMG_5241 by Dennis Rayon, on Flickr
Thanks for your compliments and comments
Nicely done, Dennis! Lots of progress… That quilt shop diorama is fun!
Dennis great job !
Are you the only one working on this ?
It is going together real quick …
Sean
Thanks for the compliments, Tom the owner is also working 5 days a week on it also.
Getting each of the removable dioramas detailed out. Adding grass lots of plant life, and details, of animals, watering tanks beside the grass. I am 3D printing lots of details and we are slowly getting them painted and placed. We also have more to finish and place.
 IMG_5302 by Dennis Rayon, on Flickr
 IMG_5303 by Dennis Rayon, on Flickr
 IMG_5304 by Dennis Rayon, on Flickr
 IMG_5309 by Dennis Rayon, on Flickr
 IMG_5306 by Dennis Rayon, on Flickr
The main Mine
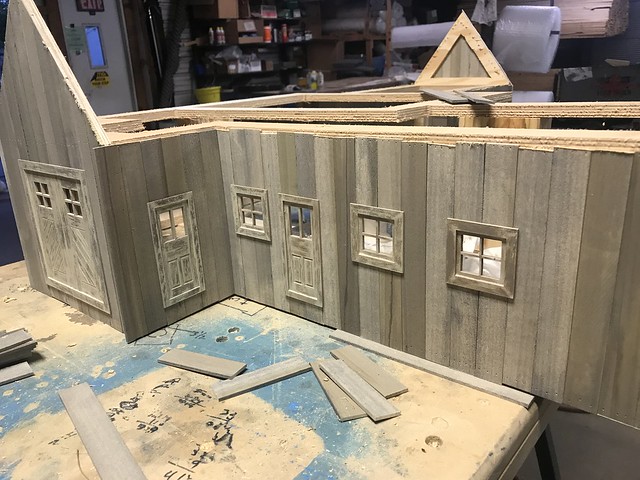
I am working on the mine that sets on the front end of the trailer, here is the area the mine sets, I have the building designed, it has to be light weight. It has a 1/2"
plywood base and matching top, 1-1/4" wide(pics later) then the siding will be thin poplar wood. I cut 150 pieces .110" thick, i have them stained, I lasered cut the windows
and the doors, they are 3 pieces glued together with a groove on all 4 sides. The siding will slide in on all four sides to hold in place. This way I will install the finished
windows and doors as the structure is built, and without cutting any holes. Windows and doors are sized to fit 2 boards wide and the big doors 5 board-wide.
 IMG_5264 by Dennis Rayon, on Flickr
 IMG_5325 by Dennis Rayon, on Flickr
 IMG_5326 by Dennis Rayon, on Flickr
 IMG_5324 by Dennis Rayon, on Flickr
 IMG_5323 by Dennis Rayon, on Flickr
 IMG_5322 by Dennis Rayon, on Flickr
Here is the plywood frame to nail all the siding pieces to.
 IMG_5329 by Dennis Rayon, on Flickr
 IMG_5330 by Dennis Rayon, on Flickr
 IMG_5331 by Dennis Rayon, on Flickr
I have really enjoyed using this technique appling the siding, with the doors and windows with the grooves locking into the siding.

Trestle Built
Well I got the bents built, set them up on a 40" longboard, I pinned the legs to the plywood, Then I squared the two end bents
then pinned a brace to the table to hold secure.
 IMG_5342 by Dennis Rayon, on Flickr
 IMG_5343 by Dennis Rayon, on Flickr
Then I have all together except for the top track stringer boards
 IMG_5344 by Dennis Rayon, on Flickr
 IMG_5346 by Dennis Rayon, on Flickr
 IMG_5353 by Dennis Rayon, on Flickr
 IMG_5363 by Dennis Rayon, on Flickr
 IMG_5380 by Dennis Rayon, on Flickr
 IMG_5382 by Dennis Rayon, on Flickr
 IMG_5379 by Dennis Rayon, on Flickr
Looking great Dennis. I sure would be leary of that side door and the first step.
(https://www.largescalecentral.com/externals/tinymce/plugins/emoticons/img/smiley-cool.gif)
edited to add the pic
Thanks David
Yes that first step is a killer, that is the reason i hired a stair mfg to install a set of stairs.
Dennis
Moonshine still
One of the needed items is a moonshine still, so I 3D printed one , with a barrel and used #12 wire for the coil of copper.
Video
https://www.youtube.com/watch?v=aSbeVP3WNqY
 IMG_5521 by Dennis Rayon, on Flickr