That is a cool way to build them as a group project. How many did you end up building?
Bruce Chandler said:
That is a cool way to build them as a group project. How many did you end up building?
Somewhere in the neighborhood of ten or so. It was a good day, good friends and good stories.
Some may recognize this from a post a few years back but it may be new to others.
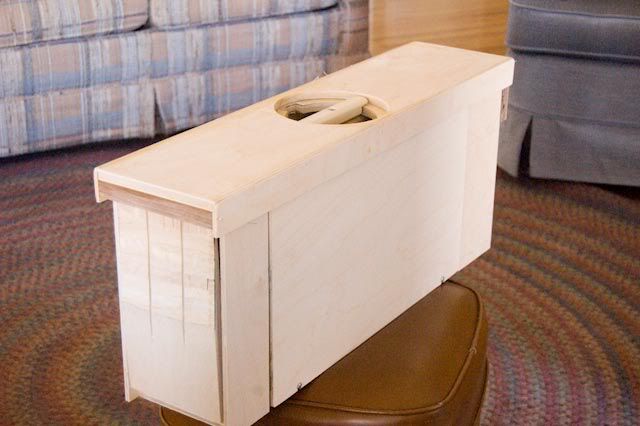
Like others, I wanted to roll out of the box onto the track.
[IMG]http://i376.photobucket.com/albums/oo203/BillGebhardt/Railroad%20General/DSC_0009.jpg [IMG]
But I wanted more protection when in transit. So full height sides.
[IMG]http://i376.photobucket.com/albums/oo203/BillGebhardt/Railroad%20General/DSC_0005.jpg [IMG]
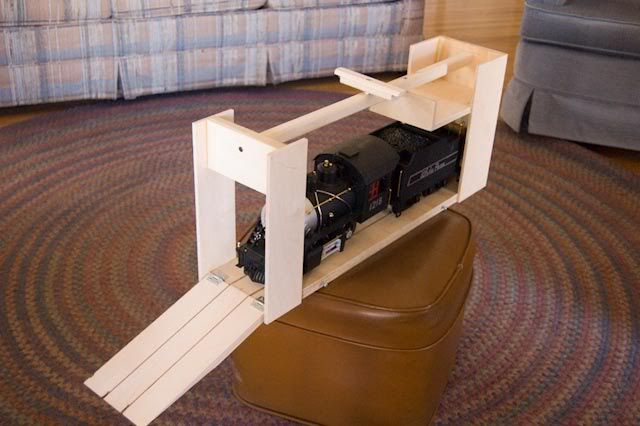
The top comes down trapping the sides. And it can lock everything in place.
[IMG]http://i376.photobucket.com/albums/oo203/BillGebhardt/Railroad%20General/DSC_0004.jpg [IMG]
You can also bury it on the floor of your trunk/truck and pile stuff on top of it.
[IMG]http://i376.photobucket.com/albums/oo203/BillGebhardt/Railroad%20General/DSC_0002.jpg [IMG]
The top’s other job is to create an incline by supporting the carrier when rolling the engine onto the track.
Bill
I’m having a 'ell of a time posting pix. What am I doing wrong?
Yes, it was a very good day. My thanks to Chuck, Mike and the rest. I had a great time and came home with something useful.
But I don’t remember seeing any geezers…
Dennis
You have to click on the little tree icon in the reply box and paste the url in and then click insert.
(http://i376.photobucket.com/albums/oo203/BillGebhardt/Railroad%20General/DSC_0005.jpg)
(http://i376.photobucket.com/albums/oo203/BillGebhardt/Railroad%20General/DSC_0004.jpg)
(http://i376.photobucket.com/albums/oo203/BillGebhardt/Railroad%20General/DSC_0002.jpg)
(http://i376.photobucket.com/albums/oo203/BillGebhardt/Railroad%20General/DSC_0009.jpg)
you can just copy and paste also
Richard
Those are some nice looking carriers, but I only have one question. How do you drive your locomotive out of them if you use track power?
The carriers we make with the aluminum angle allows both battery and track power to be used. The best of both worlds.
Nice!
Only thing I don’t like about mine is there’s no protection for the ends of the loco as you bash it into the doorjamb and suchlike.
Chuck, being a track power guy, your design really has my attention.
Real easy fix for that one Dave
slightly widen the rail slots and press in some brass or aluminum angle
and wire it up
Bill
Bill, I have been saving some angle stock for such a project. Its very hard shiny stuff. I am not sure if its stainless or plated steel, but the stuff has been outside in the weather for quite a while and hasn’t rusted any. But the carry cases are not high on my “someday” list. I have an all purpose carrier for the stuff that is stored inside. It requires me putting the stuff in the carrier, and then lifting it off the carrier onto the rails once I get it to the railroad.
Chuck,
Good point! I need to get out in the world more often.
Bill
I made this for my MTH Challenger, using 3" aluminum. For 1/20 scale that would not be wide enough, I don’t think.

I don’t think I ever took pictures of mine.
Chuck,
I really like your carrier and want to build one. What are the spacers for? Are those the things under the the ends of the angle stock, and are they designed to lift the angle off the ties to set angle at the right height? Should there be 4 of them? Or, am I wrong about their purpose?
Doc
Hi Don,
You are sort of right. The first step in constructing the carrier, after cutting the parts, is to assemble the angle to the bottom 1 by 3 pine. Perhaps I should back up a bit. The 1 X 3 pine has been cut to a nominal half inch shorter than the angle, to allow for the fitting of the end that has the arch. Clear? Not so much? It would be easier with a drawing, but let me see if I can do it with words.
Take a strip of 1/4 inch lath to hold the angle at the proper elevation, and then screw the angle into the 1 X 3, using the pre-drilled holes in the angle. Use a clamp or two to hold things during this step. Ensure that the angle is flush with one end of the pine board. On the other 1X3, hold the angle flush with the other end, so that when you put them together in the carrier, the flush ends will be at the same end. Don’t ask how we found this out…
Now, as to your question about the spacers… They exist only as a help to find the track on the business end of the carrier, and to hold it stable as the loco come out. Only two are needed.
The solid end of the carrier acts to provide a slight up angle to the carrier so that the locomotive can back downhill to the track, perhaps two degrees or so.
Have I cleared things up, or just muddied the waters more?
One other thing, after the build was complete, we took a bastard file and made a taper in the angle aluminum, as shown in Jerry Barnes fine set of photos.
That’s a great help. Thanks Steve. Maybe as I progress, I might have some additional questions.
Don
In case you hadn’t noticed, the hinged side is a nominal 1/8 inch shorter than the rigid side, to allow the hinged side to swing freely.
Madam Mallet’s carrier:
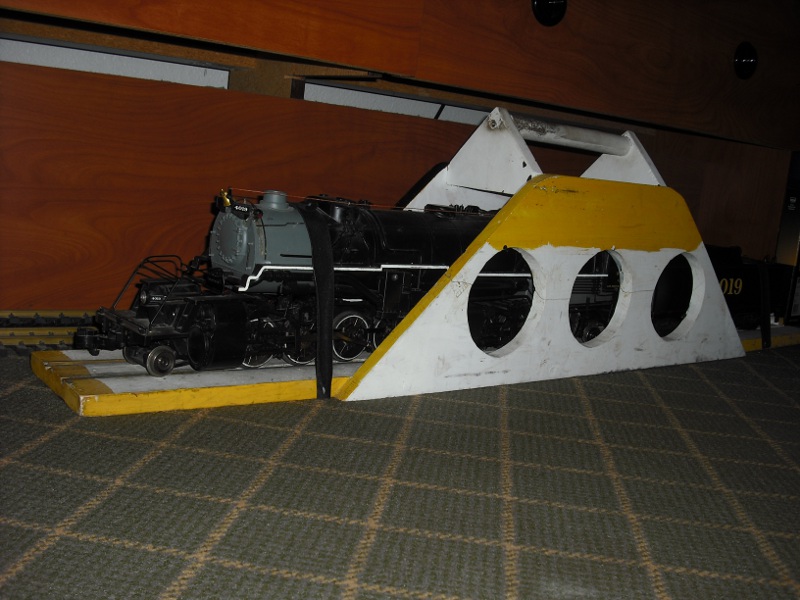
Only thing I don’t like about it is it doesn’t provide any protection. Also, I was going to make it black with yellow 4019 and some yellow and white stripes, but my paints reacted.