Large Scale Central

STMA GP-9 Chop nose.

So I am getting this back on the table. I asked a few questions on how to get it done so I guess I better let you all in on the build. Maybe ot will motivate me to finish the dang thing. Awhile ago I sanded off all the details. Cleaned up the door lines and added Burl Rice’s pad larches from Shapeways.

Now I have filled the 24" fan holes so I can cut new ones for single 36" fan in front and a winterization hatch.

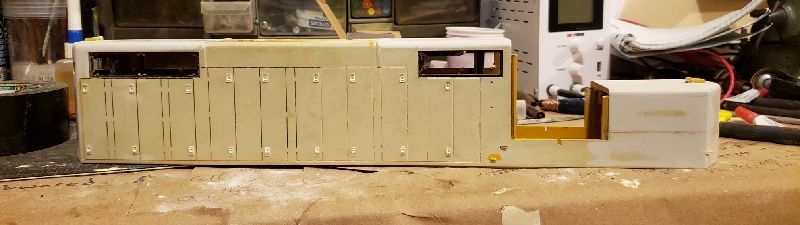
Now I cut down the hood and did some more filling and sanding. Next up is to start adding back things like hinges and louvers on the door.

I am using my 3D printer to print the pile lights, horns, plow, 36" fan, and winterization hatch. Bought some LEDs to add pile lights, cab light, step lights, and a flashing amber beacon light.

Why did you replace the latches?

The chop nose looks good, but see some putty and body work to get that seamless transition.

This is good motivation for me to get back to my GP30 project…

I didn’t replace hatches I replaced latches. Burl designed some very nicely detailed latches. And since I decided to sand it all off I needed new ones. Basically starting with a more or less a blank shell.

Where are you seeing a need for filler. I have everything filled and flush.

Stupid auto correct…

What about the two holes right under the right side grill opening?

To my eye, it looks like it needs a tad more filler just past the cab frame area. Not much maybe 1/16-1/8" long? Kind of right where the yellow area is. Maybe primer will fill that in, but it looks a lot smoother right at the yellow line and then there’s another small spot. These are maybe .005" or .0010" “divots”?

So, not trying to bug you too much. (http://www.largescalecentral.com/externals/tinymce/plugins/emoticons/img/smiley-tongue-out.gif)

Dang it Devon now you’re making me question my latches on the GP30. I need get those etched steps designed for you and myself.

BTW, the latches should be flush with the door, not protruding out like they are.

Did you really want to post this for Mr Anal to see? (http://www.largescalecentral.com/externals/tinymce/plugins/emoticons/img/smiley-tongue-out.gif)(http://www.largescalecentral.com/externals/tinymce/plugins/emoticons/img/smiley-surprised.gif)

Nothing worse than a guy who worked on these thing critiquing your work.

The two holes below the grill are for a grab iron. The latches may need to be flush but the usa model they are not and Burls dont sit flush. Sure I could make them flush but I am not that picky especially on this loco. Its only a diesel not a steam loco.

Also a lot of what I think you are seeing is dirty lines that are filled but you can still see them. We will see when its primed.

Craig far be it from to argue but looking at a few pictures of the 1:1 the latches are raised. The “bezel” sits on top of the door.

Devon

Your off to a great start with your project… I love your enthusiasm! Did you get Burls door panel hinges too?

SMRR engines #101 & #102 look quite similar to Southern Pacific’s last ordered GP9’s.

I think Craig is suggesting the low noses horizontal line is not parallel with the bottom shells horizontal line. It appears to be lower near the cab, compared to the nose. I maybe mistaken but believe the hood should be slightly taller at the cab and lower in the front. That is what I derived from pictures and drawings of same I model.

Michael

Devon Sinsley said:

Nothing worse than a guy who worked on these thing critiquing your work.

Sorry couldn’t help myself. (https://www.largescalecentral.com/externals/tinymce/plugins/emoticons/img/smiley-tongue-out.gif)

IE the door latches. Yes they are raised, but only by 47/64" or .022" in 1/29 per the EMD drawing I have of the T handle latches. Yours look a bit more than that. I’d love you to prove me wrong!

Maybe those sanding lines will disappear, but in my experience the smoother you can get the body prior to primer the better off you’ll be. Yes you can call me out any time.

Michael Glavin said:

Devon

I think Craig is suggesting the low noses horizontal line is not parallel with the bottom shells horizontal line. It appears to be lower near the cab, compared to the nose. I maybe mistaken but believe the hood should be slightly taller at the cab and lower in the front. That is what I derived from pictures and drawings of same I model.

Michael

Good catch. I forgot about that. Yes there is a slight slope to the low nose from the cab to the front. I was more commenting on the putty work and giving Devon a hard time because he’s seen some of my reject models.

Devon,

Did I miss something? I thought we agreed to finish our MIK builds together? Why you leaving me in the dust now? (https://www.largescalecentral.com/externals/tinymce/plugins/emoticons/img/smiley-surprised.gif)(https://www.largescalecentral.com/externals/tinymce/plugins/emoticons/img/smiley-yell.gif)

Michael,

Thats an optical illusion of the picture. I even measured to make sure. Its parallel. And yes those are burls latches.

I was thinking about adding some rivets to the compressed air loco. Its close i should just get it done.

Now I can say mine are raised to prototypical height. I am sure they are nowhere close. When you get yours you can show me how its done. For me fitting Burls in a nice hole and having it come to rest on the lip provided by the latch is much nicer than making an oversized hole and trying to get everyone of them to prototypical height. Not gonna happen. When I have it finished and its running around your track you can nit pick my latch profile all you want. Ill be okay with it.

Devon Sinsley said:

Michael,

Thats an optical illusion of the picture. I even measured to make sure. Its parallel. And yes those are burls latches.

It shouldn’t be parallel. It should have a slight slope.

Devon Sinsley said:

I was thinking about adding some rivets to the compressed air loco. Its close i should just get it done.

Now I can say mine are raised to prototypical height. I am sure they are nowhere close. When you get yours you can show me how its done. For me fitting Burls in a nice hole and having it come to rest on the lip provided by the latch is much nicer than making an oversized hole and trying to get everyone of them to prototypical height. Not gonna happen. When I have it finished and its running around your track you can nit pick my latch profile all you want. Ill be okay with it.

Deal. We can compare notes. I can’t promise when, but it’s not happening anytime soon.

Did I miss the plan for the winter hatches or was that lost with the removal of the small QA fans only to be replaced by ?

Shut up Rooster!

Craig Townsend said:

Devon Sinsley said:

Michael,

Thats an optical illusion of the picture. I even measured to make sure. Its parallel. And yes those are burls latches.

It shouldn’t be parallel. It should have a slight slope.

Mine does unless you can definitively prove otherwise

Rooster said:

Did I miss the plan for the winter hatches or was that lost with the removal of the small QA fans only to be replaced by ?

Shut up Rooster!

Not sure if or where you missed it. But the STMA has three GP9s. All were rebuilt from Milwaukee high nose 7/9s in 1980. When the rebuild happened all three had the front and back twin 24" fans replaced with single 36" fans. And then they put winterization hatches over the back fan. No I can’t say this for certain, but I don’t know if they ever ran them without the winterization hatches. I have spent several trips chasing these locos and have been on board twice. I have never seen them without them.

So that makes my job easy. Replace the front two fans with a 36" fan and put winterization hatches on the back