Large Scale Central

Beating the Boredom - Ozark Backwoods Diesel Boxcab

I shelved the M-2 railbus project until I can get back to my reference books in MD, which is due to happen in a few weeks. Looking around for a small project, I recalled the Ozark boxcab kit, just when they sent me a 10% off deal. I initially couldn’t find it on the website but a google showed a page and the new Ozark website let me order it. I got a confirmation and the kit arrived within a week.

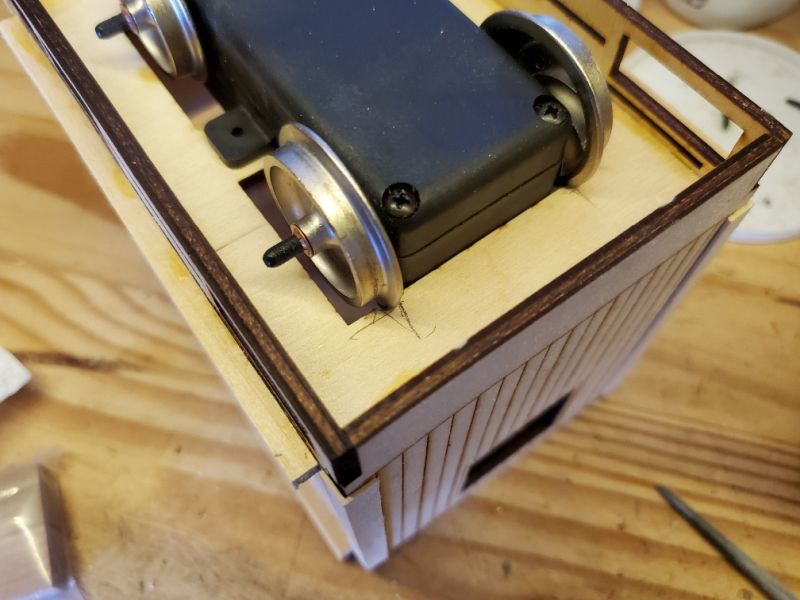
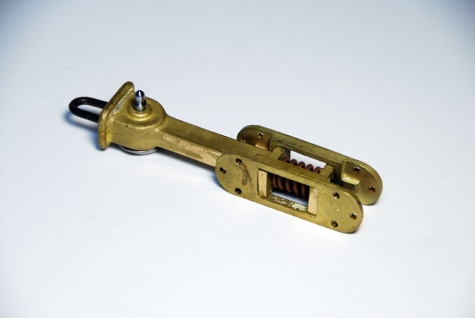
As promised, it included a complete Hartland motor block. No pictures, and instructions that referred to parts by number (e.g. part 11) but no parts list!

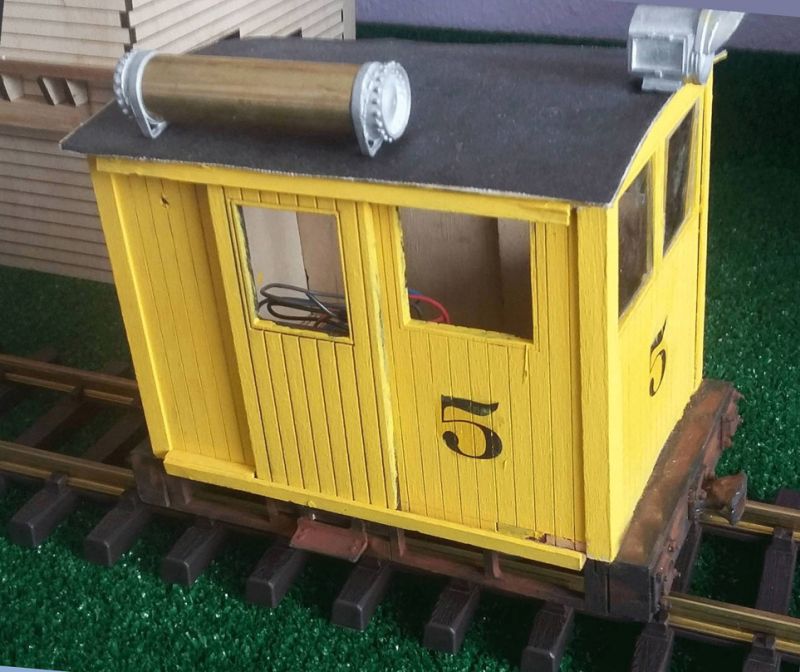
I remembered seeing the photos when the kit was announced in 2018, so I googled again and found the photos.

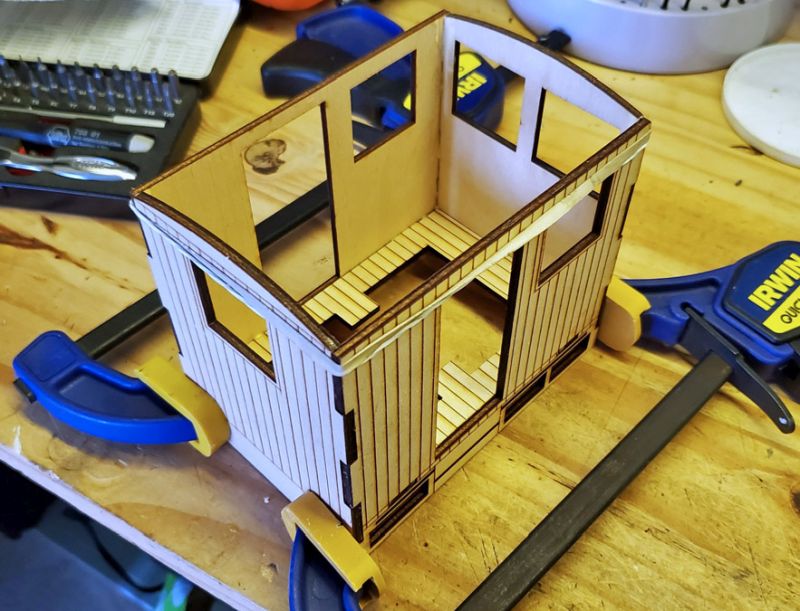
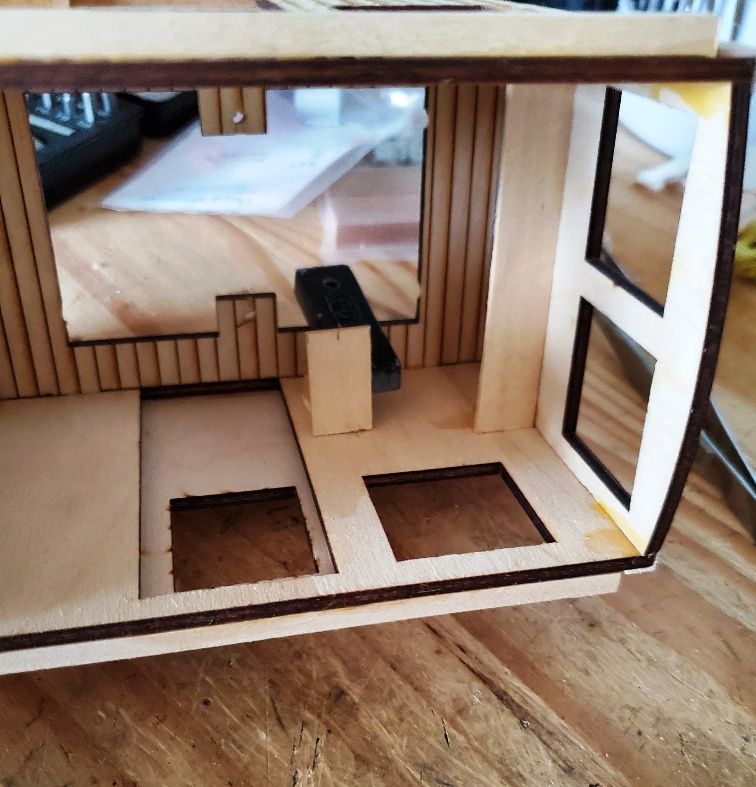
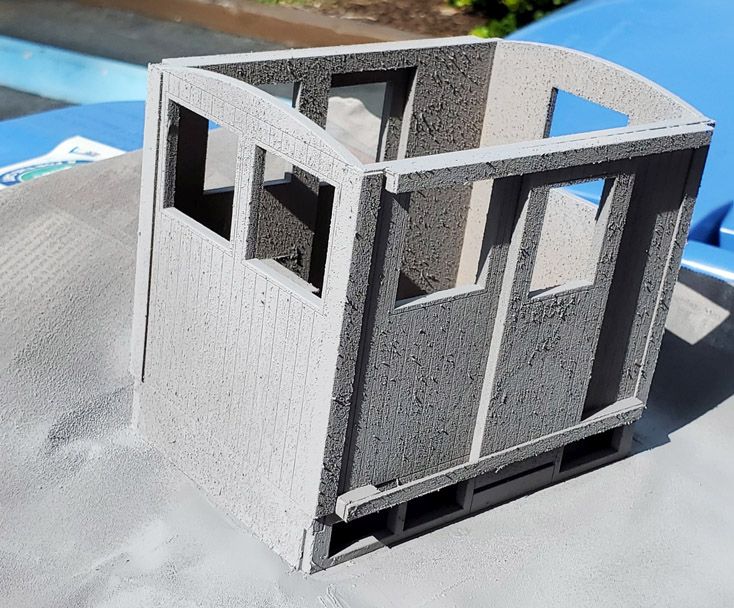
Then I got tied up with some other non-train projects so I doubted I’d have time for before I leave. I had a little time this afternoon to re-inspect the kit, and found it really is very simple - insert tab A in slot B. This was a trial run after I figured out I only had the floor, 4 sides, roof, trim for all the sides and a few whitemetal detail bits. Piece of cake.

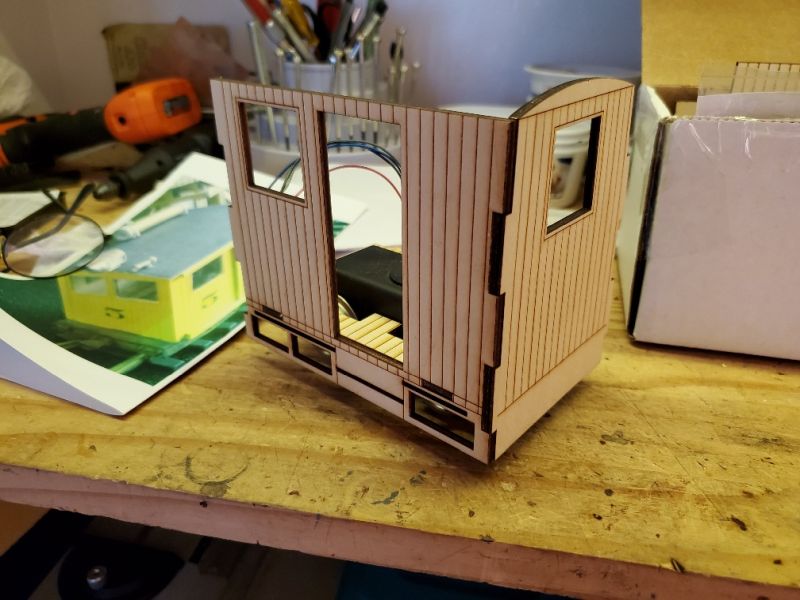
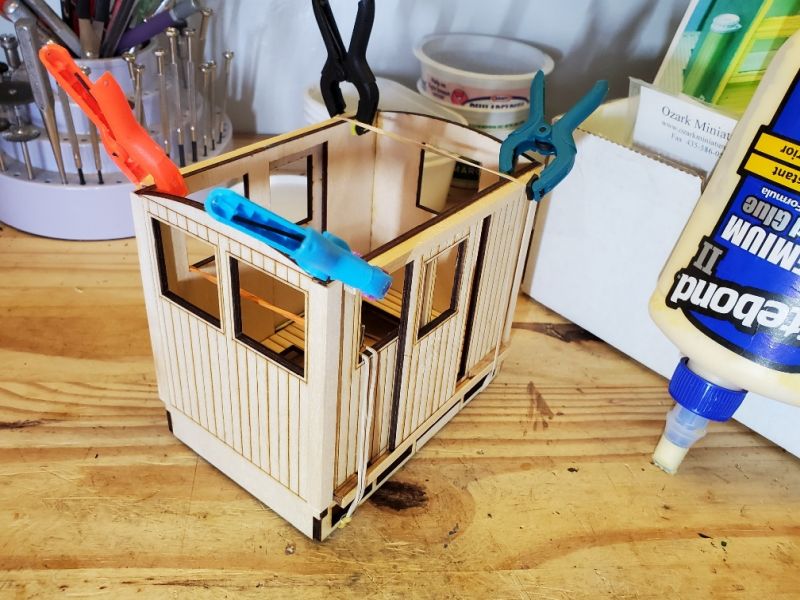
What is really nice is that I can glue it all together and then paint the inside and outside without too much trouble, which will make things go much faster. If the weather this weekend continues to be horrible there may be more progress.

Nice kit Pete.

What a fun little kit!

Looks good! Looks like it would be a great candidate for battery power, put it on the track and let it run.

Ric Golding said:

Looks good! Looks like it would be a great candidate for battery power, put it on the track and let it run.

Well, guess what. I already dug through the “train electronics” box for my little speed control.

https://www.aliexpress.com/item/32843923964.html?spm=a2g0s.9042311.0.0.27424c4drueImA

Not a lot of room for batteries, and I can’t decide whether 3 or 4 18650 LiIons would do the job. Either will partly block the back window unless I put them in the middle and let them be very visible. Anyone know how a Hartland motor runs on 12V?
The speed control (I already have one in Butch, the steel Boxcab,) can go in the roof and get disguised as an exhaust stack.

The instructions for the headlight mention drilling a hole for a bulb, so I remembered my 3mm 12V LEDs. Guess it’s going to be 3 cells, 11.1 +/- volts.

It does need sound, but that may have to wait until next Fall, as I am not taking this kit back to MD for the summer. The MyLocoSound "lite diesel’ seems perfect. They are AUD$89 from RCS or $89 in the US - but the AUD$ is currently cheap so they are $59 from RCS.

Take a listen hear: https://youtu.be/sJA2DFjRpJo

I think Hartland uses 12v motors, My Jupiter (4-4-0) is.

Today I ran off to Bokeelia to look at an estate sale (came back with 20 pairs of USAT wheels for $30!) Before I left, I glued the box together. This evening, before I sit down for dinner, I will glue on the corner L pieces. The doors and tracks can wait until tomorrow.

This morning the last glue operation was done. It is ready to paint, and to adorn with bits and pieces.

(The glue bottle has to be upside down - there is so little left it takes f-o-r-e-v-e-r to drain down to the spout.)

Talking of bits - this is supposed to be a diesel. Wouldn’t it have a radiator somewhere? Center front would seem an obvious place. Anyone know where I can get a truck radiator? Maybe I just take some soft copper wire and wind it into a “core” ? Any thoughts?

While checking the fit to the chassis when the glue was dried, I noticed the wheels were a bit close to the floor. I filed a groove and now the body rocks on the chassis, so the 4 wheels are not touching. I also drilled holes in the floor so screws can go through into the tabs on the chassis.

I also looked at my ‘figure’ stash to find a driver, and realized I would need a seat for him/her. Then I decided that a shelf across the front, with dials, levers, and space for a cup of tea would be needed.

This, of course, raises the question of what instruments would be in a backwoods homemade boxcab. Presumably the same ones as were in the truck that made the ultimate sacrifice. Engine tach? Throttle? Brake? Gear shift? A couple of electrical switches, for ignition and lights, etc.?

Maybe they just put the truck dash in whole, including the radio? (if truck was from suitable time period)

EDIT: got curious so looked up some info,

A little history on the car radio: The first one was introduced in 1922 by Chevrolet. It cost a whopping $200, and with an antenna that covered the car’s entire roof, batteries that barely fit under the front seat and two mammoth speakers attached behind the seat, it was about as convenient as taking a live orchestra along for a ride.

By the early 1930s, the less cumbersome built-in Motorola radios were standard features in cars. Later in the decade, push-button tuning and presets helped drivers to select stations without taking their eyes off the road. By 1946, 9 million cars had radios. Thanks to the transistor, both size and price came way down, so that by 1963, 50 million cars – over 60 percent – were outfitted with radios. By then, over one third of America’s radio listening occurred in the car.

https://www.mentalfloss.com/article/29631/when-car-radio-was-introduced-people-freaked-out

Pete Thornton said:

This morning the last glue operation was done. It is ready to paint, and to adorn with bits and pieces.

(The glue bottle has to be upside down - there is so little left it takes f-o-r-e-v-e-r to drain down to the spout.)

Talking of bits - this is supposed to be a diesel. Wouldn’t it have a radiator somewhere? Center front would seem an obvious place. Anyone know where I can get a truck radiator? Maybe I just take some soft copper wire and wind it into a “core” ? Any thoughts?

https://www.megahobby.com/products/radiator-face-photo-etch-1-24-ka-models.html

re: radiator: Something on the roof?

https://en.wikipedia.org/wiki/GE_boxcab#/media/File:Erie_Railroad_GE-Ingersoll_Rand_diesel-electric_locomotive_25.jpg

https://i.pinimg.com/originals/71/f2/bd/71f2bdc954c355fe87cf0d09c865e24c.jpg

I like this one

http://www.northeast.railfan.net/images/ageir_demo.jpg

Forrest, I don’t think it would have had a car/truck radio in the 1920s/30s. (Mine won’t anyway - though I have a small bluetooth speaker that could go inside and play from internet radio . . )

David - good catch. However, at that price it occurs to me I could buy a plastic kit and just use the radiator! In fact, I have a Hubley Model A ford kit somewhere.

Jerry, the roof ‘cooler’ is a bit too complicated? A simple truck/car radiator would seem the simple solution. Or even a tractor, depending on where you think the diesel engine came from!

Not much progress, but as the body is ready to paint I figured I should be prepping the metal bits. This is all there is - I like this kit. Definitely not much work involved. The round box is pins - note the poling pockets have no bolt-heads. In the plastic bag are 2 big end beams, and I am going to leave them unpainted. I filed off a few bits of flash, drilled a hole in the base of the headlight for my LED, and gave them all a good wash.

I then remembered I had acquired some link-and-pin couplers with working draft gear. So I emptied a bag:

The side plates have lots of details, but whether anyone would ever see them after they are installed behind the beams (in any piece of rolling stock,) doesn’t seem too likely. I haven’t figured out why there are some plastic NBWs in the bag, or why there is only 1 nut. So this nut is wondering if he really is daft enough to put working draft gear on this beast.

If the side plates were trimmed it would fit. As I only have 1 nut, I can only install one coupler, which is a relief. So those plates have joined the other parts being dried ready for paint.

Finally had to check the wood before the painting - there was one little area needing sanding.

The way that draft gear assembles looks odd. Can’t totally define how/why beyond that it seems to render the spring irrelevant, but something else strikes me as odd too.

Forrest Scott Wood said:

The way that draft gear assembles looks odd. Can’t totally define how/why beyond that it seems to render the spring irrelevant, but something else strikes me as odd too.

Yes, me too.

The spring goes over the brass tube which slides in the hole of the 2 squarish pieces, which are thus held apart by the spring, which does not go through the holes. The squarish pieces slide in the rectangle of the side plates. With one quick google I found this, which is how mine goes together, in theory. (My side plates are not open - they are against the wood draft beams.)

Ah - this photo shows it sorta together. The other side plate goes on top.

(What is really weird is that the instructions tell you to use the plastic NBWs on the other side of the draft beams opposite the bolts in the side plates. Would you really use a long threaded rod with a nut on each end instead of a long bolt with a washer?)

Onward and upward. I gave the body a quick spray of primer this morning and the wood is much worse than I suspected. It will take a lot of sanding - though I guess a Backwoods loco would be made from rough-sawn wood. (As a digression, this wood effect is my only complaint about laser-cut wooden parts. they destroy the illusion that each plank is a separate piece of wood!)

Maybe it’s that new can of spray paint. . .

On the wood finish… I would beat it up more rather than sanding. Scratches, dings, dents, gouges will all work to hide the fuzz. “make it old and dirty” as Mac said.

Pete Thornton said: The squarish pieces slide in the rectangle of the side plates.

Hey, thanks! Knowing that, I get what’s happening.
That the other side plate was omitted for the picture I had gathered, but that the square bits slide, I had not understood.

Pete Thornton said:

Maybe it’s that new can of spray paint. . .

Looking at overspray on surface cab is sitting on, it ain’t the cab, it’s the paint.
Have had similar happen twice, and not on wood, within the 12 years I’ve lived at this address but do not remember the details.

Looking at overspray on surface cab is sitting on, it ain’t the cab, it’s the paint.

Good catch Forrest. I just got home and went to see what state it was in, and as you deduced, the paint didn’t like the 80 degrees, 90 % humidity typical of FL in the early summer.

On the wood finish… I would beat it up more rather than sanding.

Jon, I did wonder about that. I’m planning to sand the worst off, but as it is paint I can spray it with my baby blue and we’ll see what will happen. Then carve and dent it, maybe. (I’m good at dirtying wagons, not so much at bashing them into submission. Maybe I need more practice.)