Large Scale Central

Kit-bashing: Hall class Locomotive

Hello all. Since I have lots of time on my hands these days I am back into railroading.

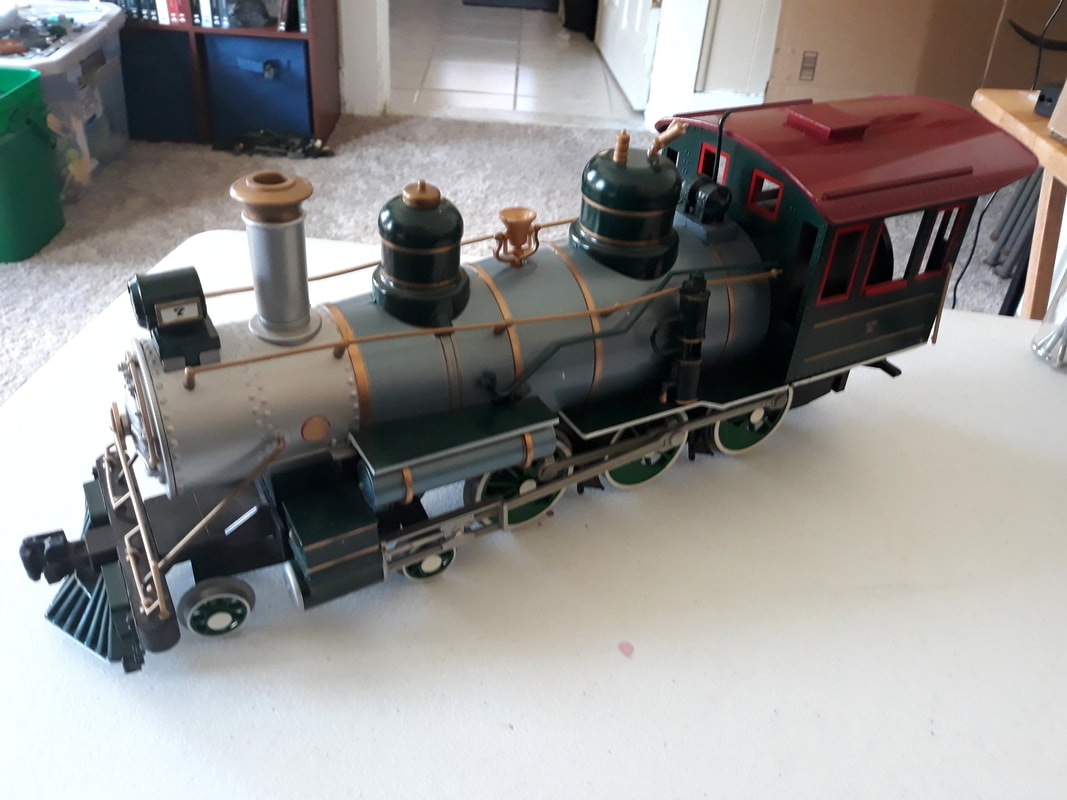
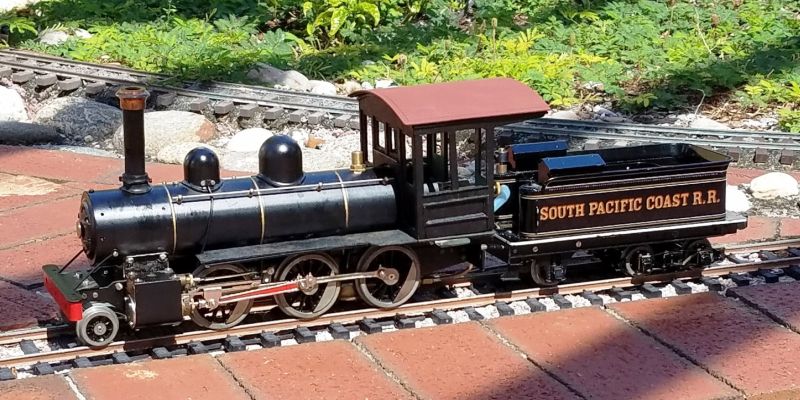
This project is to kitbash a Bachmann Big Hauler 4-6-0 into a Hall class “Olton Hall” (ie. Hogwarts Express). The engine came in today. I immediately took it all apart.

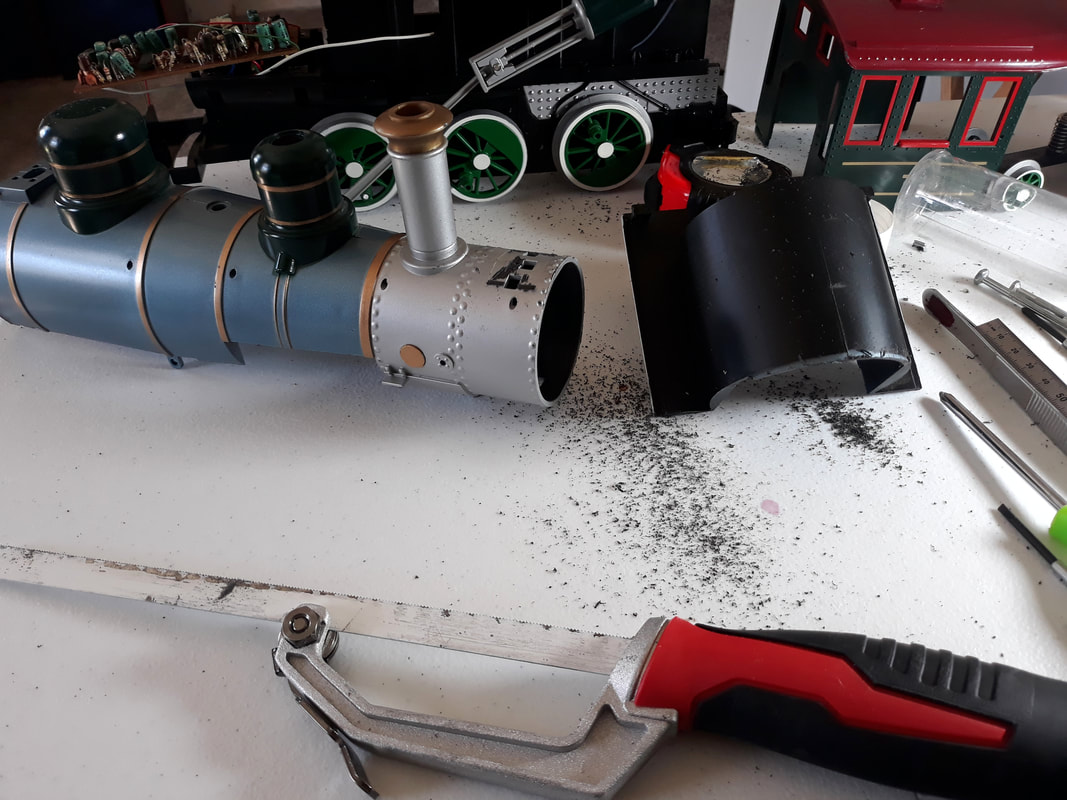
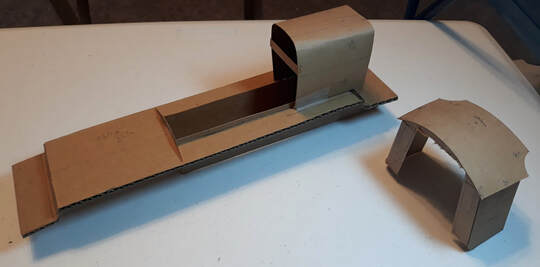
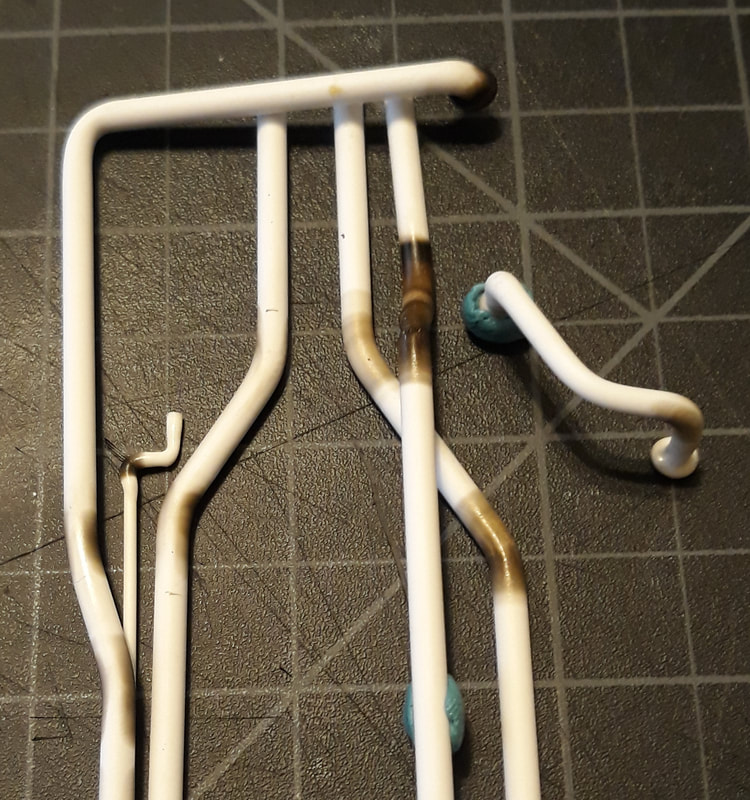
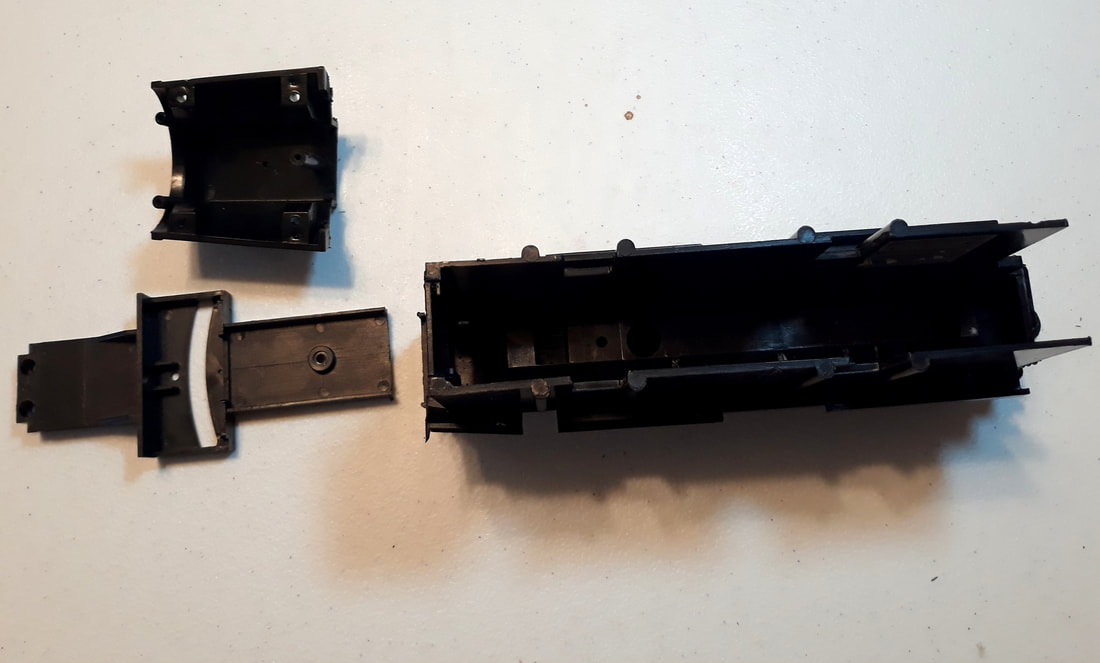
First, I took all the small details off the engine, including handrails, the bell, the light, generator, etc. Next, I unscrewed every screw I could find. That allowed me to remove running boards, cowcatcher, and eventually the whole shell of the locomotive.

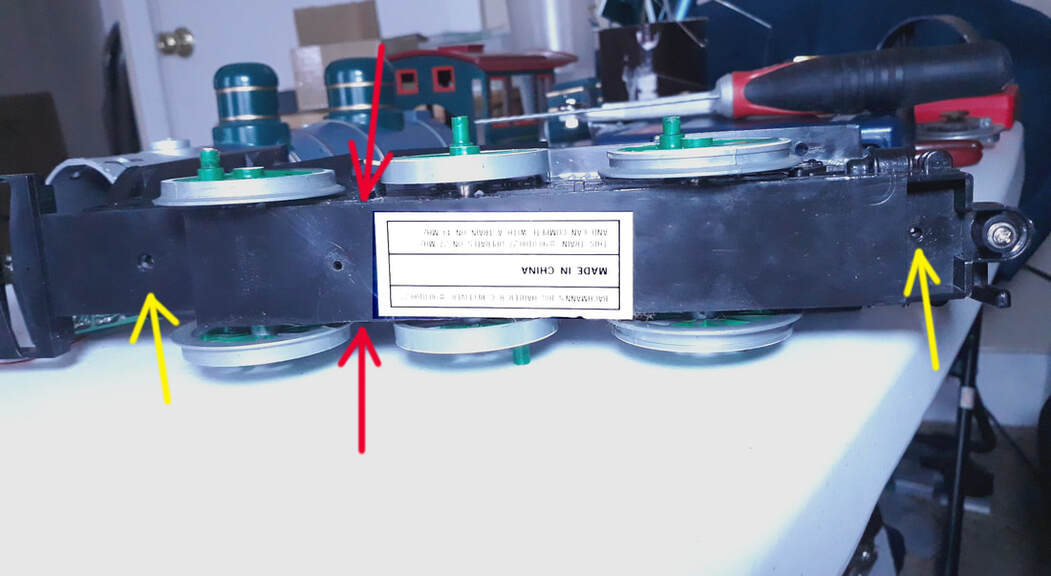
I tried to remove the electronics next. But, I cannot figure out how to get the bottom of the gearbox off. [Does anyone know how to get it off? the screws are off, but it seems stuck under the front driver.] Instead, I was able to remove the cylinders/rod assembly, smokebox door, and cab. This left me with the smokebox/boiler/firebox shell.

I bought this particular locomotive because the boiler is tapered just like the Hall boiler. So, I know I want to use this shell, but it needs a lot of work. I have to remove basically everything, sand it down, paint, and apply the details. I got as far as cutting off the firebox portion, removing the bits of plastic from the light fixture, and cutting down the chimney.

Next, I will cut off the domes and ‘seat’ for the generator. Then I will sand the whole thing smooth, cut the smokebox down about 1cm, then begin to rebuild. ​​

The rebuild will include a custom-built chimney, handrails, steam exhaust, nameplates, and smokebox door (which may open). I will use brass strips for the boiler instead of painted sections of plastic. I am hoping that I can do a simple modification on the existing chimney cap and fit it in place on the stub I left. Although, the base will need to be contoured.

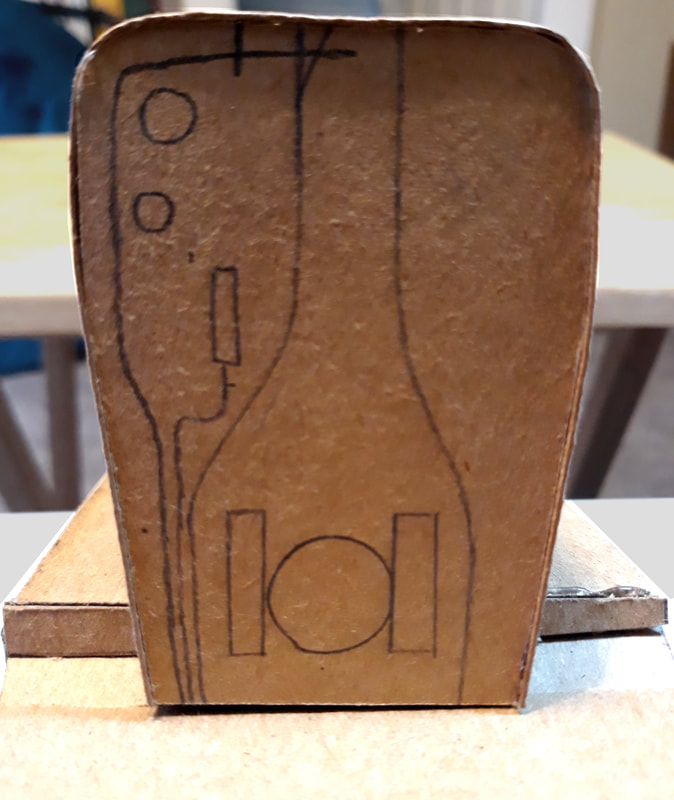
Once I know what the boiler and smokebox is going to be like I will proceed with the firebox and cab. They will both be custom builds most likely made from thick styrene.

John, I will be watching this one, it should show some new techniques. (https://www.largescalecentral.com/externals/tinymce/plugins/emoticons/img/smiley-cool.gif)

I love me a good 10 wheeler bash

You may be familiar with all this info John, but just in case you are not. An interesting project, which I am sure, will be watched with great interest.

http://www.greatwestern.org.uk/m_in_hal.htm

The photo shown the earlier and modified versions. There are lots of photos, especially of those preserved.

(https://www.railadvent.co.uk/wp-content/uploads/2018/09/5900-Hinderton-Hall-and-6998-Burton-Agnes-Hall-at-DRC-Credit-Peter-Brabham-e1536352312757-696x391.jpg)

David Marconi,FOGCH said:

John, I will be watching this one, it should show some new techniques. (https://www.largescalecentral.com/externals/tinymce/plugins/emoticons/img/smiley-cool.gif)

Yep

I don’t even like steam locomotives !

I cannot figure out how to get the bottom of the gearbox off. [Does anyone know how to get it off? the screws are off, but it seems stuck under the front driver.]

The only thing I recall is that the front screw holding the pilot truck is through the chassis under-plate that keeps the axles from falling off.It also holds the smokebox onto the front frame.

There is no real gearbox- it’s all on the back axle. with the motor.

P.S. Roundhouse Engineering in the UK, who make live steam locs, also sell inexpensive parts, including a very nice brass chimney cap. I’ve used a couple on my locos.

Rooster ’ said:

I don’t even like steam locomotives !

I thought Amtrak was steam. . . oh wait that is just fire and smoke. . . m bad

John as for taring it apart I am kinda lost. I have taken several of them apart and there is no trick to it. two screws on the bottom plate and one up on the pilot. That should remove the entire bottom cover and from there you should have access to all three axles, the motor , and gear box. There is a metal pin holding the driver/motor/gears into the chassis. Pull the pin and the motor/gear/driver assembly drops out. That also allows the boiler shell and cab to come off

Devon Sinsley said:

John as for taring it apart I am kinda lost. I have taken several of them apart and there is no trick to it. two screws on the bottom plate and one up on the pilot. That should remove the entire bottom cover and from there you should have access to all three axles, the motor , and gear box. There is a metal pin holding the driver/motor/gears into the chassis. Pull the pin and the motor/gear/driver assembly drops out. That also allows the boiler shell and cab to come off

From the research I’ve done, it seems this one may be the original model of Big Haulers. It is different from every manual and video I’ve found on the locomotive. There are only two screws on the bottom of mine, not three.

EDIT: Heres a photo. The red arrows are where it’s stuck. The yellow are the two screw holes. The hole at the red arrows is one I drilled. It seems to have helped but it still won’t let go.

John, Have you checked under the white label for a hidden screw?

Dan DeVoto said:

John, Have you checked under the white label for a hidden screw?

… Who puts a sticker over a screw!!!

I feel like an idiot now. Thank you, Dan.

Wow, that takes me back. I once called Bachmann asking if they had spare driving wheels for a similar loco, and they mailed me 3 sets of drivers, complete with rods, etc. Had to be back in the 1990s.

John I have used the top of the Big Hauler stack on several conversions, as it is a nice shape. But if you want some serious metal, this loco has the Darjeeling B chimney top from Roundhouse. Cost me $5 plus mail.

1 Like

John glad you got it solved. You may proceed.

A bit more work has been done on this project. After figuring out where that damn screw was hiding, I was able to open up the locomotive and pull out all the wiring.

After that, I determined that I need to build a cardboard mock-up of this loco since it’s looking more like it’s going to be scratch-built. (The boiler, which I was planning to use, is too big. I have to custom build that too.) Doing this allows me to correct mistakes in measurements and other such errors before using plastic or metal.

After that I took a small detour and did some detail work: pipes for the cab! I found a photo online of a Hall cab, so that was referenced a lot. Gauges will be purchased in scale.

Then I went back to the chassis and figured out exactly what I am cutting off to keep this locomotive as flexible as possible. I haven’t finished cutting it yet, but I’ve started…

I’m not sure I should have cut off that lead from the chassis. I could have used it. But, I can build something, I suppose.

Thoughts, comments, suggestions, and criticisms are always appreciated.

John, I hate to say this but your chassis is the early battery version produced in the 1980s with plastic wheels. Those wheels are known to shred as the brass rails grind them on corners. Bachmann sells replacement chassis with better gears and metal wheels at a discount (the current version seems to be reliable, so Stan tells us they are selling off the spares.) The Anniversary chassis even has fluted metal rods.
https://estore.bachmanntrains.com/index.php?main_page=index&cPath=69

While i am a believer in bashing what you got I have to agree with Pete on this one. The Annie chassis is much nicer. My 2-6-0 was built of the non Annie version with metal wheels. My current 2-4-0 is built off the Annie. Just better all around from its construction to its looks.

Here is my 2 cents. Continue as you are making it so that it comes apart from the chassis. As much as you can make detachable the better. Then use this chassis. When and if you wear it out or the gear breaks you can either get new metal wheels from Bachmann or an entirely new chassis and all your stuff should fit. There basic construction is the same.

Thank you both for that input. I am, however, going to be replacing the Bachmann wheels. They are slightly too small to match the Hall. I’ll be using metal Piko drivers!

John Wilda said:

Thank you both for that input. I am, however, going to be replacing the Bachmann wheels. They are slightly too small to match the Hall. I’ll be using metal Piko drivers!

This is going to be one of those “conversions” where the only original parts will be the number plates. (http://www.largescalecentral.com/externals/tinymce/plugins/emoticons/img/smiley-cool.gif)(http://www.largescalecentral.com/externals/tinymce/plugins/emoticons/img/smiley-cool.gif)

Isn’t that how its done Pete? That’s why I try and be careful when calling mine a kit bash versus a scratch build. While it does use some radically modified pieces of the original not much is left but can you really call it a scratch build when you are using the the main guts. Its all semantics I suppose. The important part is that you have a working loco when its done. Something I failed at on my first try whatever you call it.