Large Scale Central

Virginia City Flats

My wife has been really patient with my model building making, which has been dreadfully slow. The area representing Virginia City on my layout (which is pretty much half the layout) has been bare forever, and last summer, Linda reminded me that I needed to do something about it. So, here goes.

The area involved is long and very narrow, and I’ve always planned to use a series of facades or “flats” (in theatrical terms) to represent some of Virginia City’s buildings. Here’s the plan view of the area, with the flats represented in blue lines. Track is purple, future 3d buildings are in green.

The red arrow is pointing out the first row of flats I’m taking on. Other rows will come later (maybe). This will be a multi-year project. But my push has been to develop a way to crank these things out, as the opportunity arises.

Here’s the first flat assembly.

From left to right, they are supposed to represent the following structures still standing in Virginia City today. All are on B Street, except for the second from the left which was stolen from C Street (to fill a lot which has stood vacant for maybe a hundred years, but vacant lots are a bore to model). First on the left is Piper’s Opera House.

After the vacant lot / stolen building is Knights of Pythias Hall,

Then the E Clampus Vitus building,

… and finally the Miner’s Union Hall.

In the next post I’ll describe how I’m making these. Not in high detail, but enough for a series of facades.

===:>Cliffy

Multi-year project, crank these out. Why do I find those conflicting? Following…

OH BOY another one of Cliffs marvelous long lasting full of detailed very interesting and fun filled threads.

Dennis

Well, I’ll certainly be following along. But remember, if I catch this virus its all on you since you are the one forcing me to go out and stock up on popcorn and coke (https://www.largescalecentral.com/externals/tinymce/plugins/emoticons/img/smiley-tongue-out.gif)“Not high in detail”, hmm, does that mean you are simply not going to count the brick in each facade or what (https://www.largescalecentral.com/externals/tinymce/plugins/emoticons/img/smiley-wink.gif)This will be a fun build to watch, can’t wait to see you get started.

$900 of foam sheet … yes of course you’ll crank them out faster than many of us could program them!

I’ll have you know, my expectations are high!(https://www.largescalecentral.com/externals/tinymce/plugins/emoticons/img/smiley-tongue-out.gif) Very high!(https://www.largescalecentral.com/externals/tinymce/plugins/emoticons/img/smiley-money-mouth.gif)

Jim Rowson said:

Multi-year project, crank these out. Why do I find those conflicting? Following…

You’re right Jim, I’ll clarify. For each batch, I need to spend 1 or 2 months max, to be able to do other stuff. Otherwise, it would be just too much, and I’d bail out. So I’m thinking maybe 12-15 feet per year, and that’ll take 5 years.

Not sure if I’ll hang in there that long with it, but at least it’s a plan that has a chance of succeeding. (https://www.largescalecentral.com/externals/tinymce/plugins/emoticons/img/smiley-laughing.gif)

John Caughey said:

$900 of foam sheet … yes of course you’ll crank them out faster than many of us could program them!

I’ll have you know, my expectations are high!(https://www.largescalecentral.com/externals/tinymce/plugins/emoticons/img/smiley-tongue-out.gif) Very high!(https://www.largescalecentral.com/externals/tinymce/plugins/emoticons/img/smiley-money-mouth.gif)

Thanks John! It was $700 though… for the first half… but I’ll try to not let ya down buddy!

Dennis Rayon said:

OH BOY another one of Cliffs marvelous long lasting full of detailed very interesting and fun filled threads.

Dennis

Thanks Dennis, haha!

I think I’ve got the long-lasting thing covered, and hopefully it’ll all work out.

Thanks for all your help along the way!

Dan Hilyer said:

Well, I’ll certainly be following along. But remember, if I catch this virus its all on you since you are the one forcing me to go out and stock up on popcorn and coke (https://www.largescalecentral.com/externals/tinymce/plugins/emoticons/img/smiley-tongue-out.gif)“Not high in detail”, hmm, does that mean you are simply not going to count the brick in each facade or what (https://www.largescalecentral.com/externals/tinymce/plugins/emoticons/img/smiley-wink.gif)This will be a fun build to watch, can’t wait to see you get started.

Dan, ya kill me, haha!!

I’m doing all the foam lasering today, and will post pics a little later.

Thanks Brutha!

Here’s some on the design & build plan.

Because of the quantity involved, in both linear feet of facade, and also doors & windows, I wanted a method where all the detail could be lasered in and just painted.

Acrylic can be fragile, if left unsupported (as with a facade). Lightly engraved details are possible, but not with depth (like mortar lines). Engraved lines also act as nice score lines for breaking in the wind.

So I’ve wanted to use foam board for the flats. Ain’t cheap; but tolerable, over time. I experimented a bit, and discussed with Dennis, to come up with a good set of numbers for cutting and engraving the material, and that thread can be found here.

Something I was hung up on in that thread’s beginning was wanting to use the laser to make larger depressed areas, say, for door and window jambs, to give some depth. Turned out that though this is certainly possible (say, 1/8" deep), it caused two problems. First, it took a long time (and the results were rough). Second, with only 1 layer of material, I was concerned about structural integrity. All that was solved by going with 2 layers of material, which gives a needed strength improvement, but also opportunity for recessing (by just removing the first foam layer).

The other things I cared about were:

  • Remove individual buildings for repair
  • Some (but not all) window details & lighting
  • Ability to add in stages
  • Some balcony & sign details
  • Paintability, and avoiding the pretty huge costs of colored engravable acrylic for big areas
  • Layering sheets to give some depth

The experimenting led me to the material decision of SignFoam 15 lb, 1/2", in 2 layers. A third layer could be used for smaller details, but the 2 base layers were the basis of area calcs and ordering.

About the foam board: though it looks like insulation board, it’s not; this is far higher density, and designed to be left outdoors indefinitely as a sign product. Cheaper brands are out there (e.g., Dura/Corafoam) which are less expensive, but flammable (I tested samples with a lighter, and they don’t want to go out). Only two brands are self-extinguishing and laserable, and don’t torch up during the lasering: Precision Board and SignFoam. I went with the latter, purely based on shipping & delivery (free, vs. ~ $250, with no local delivery).

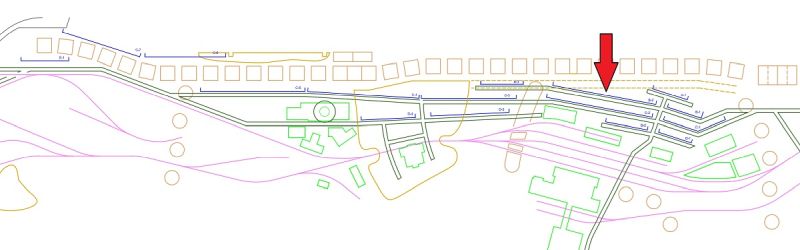
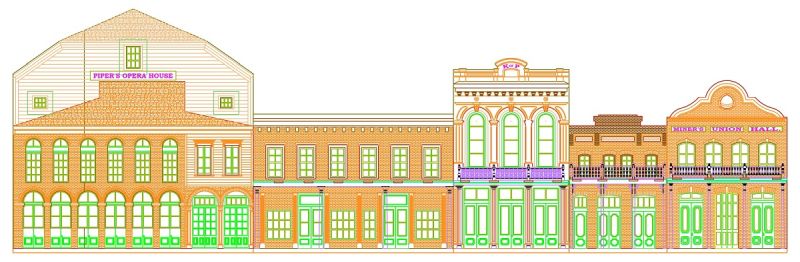
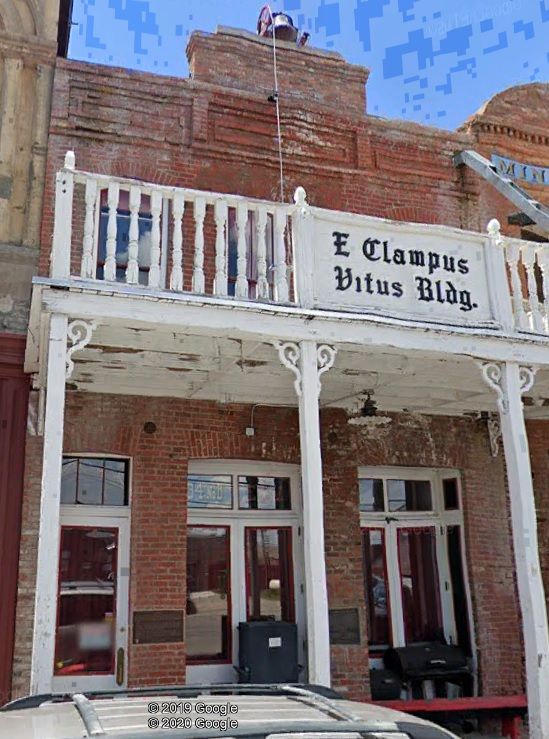
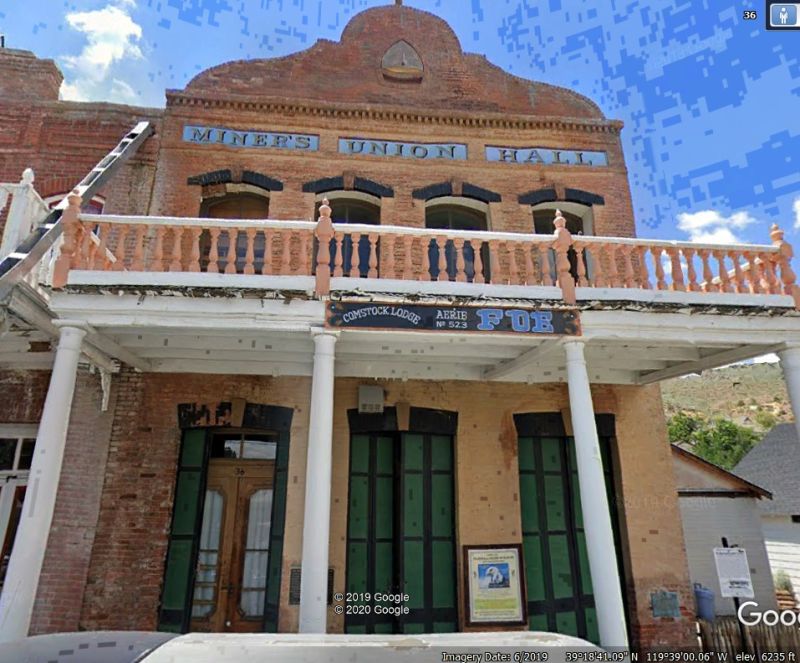
I did almost all of the design work in 2D CAD, because of all those details of brick / boards / signs / etc. I’ve been pecking away on that for maybe 2 months here and there, for just this set of buildings… After the outlines were firmed up, I brought those into 3D CAD to design the more 3D-ish things.

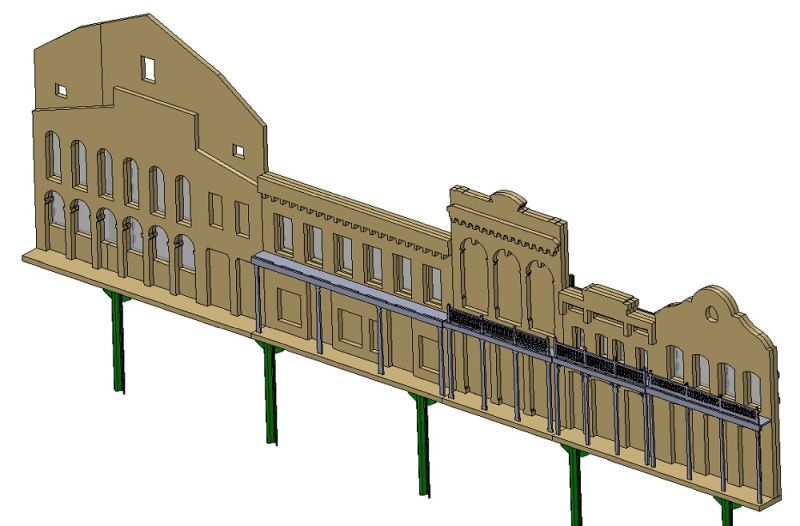
The gray areas are acrylic, and all the tan is foam.

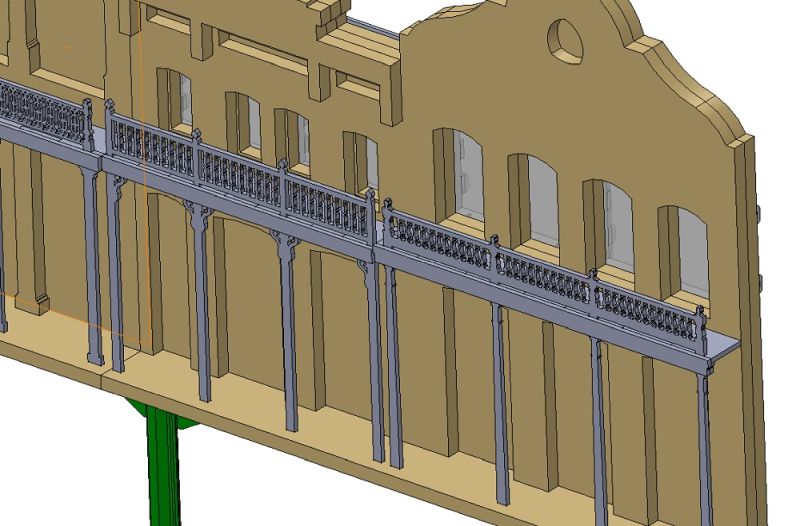
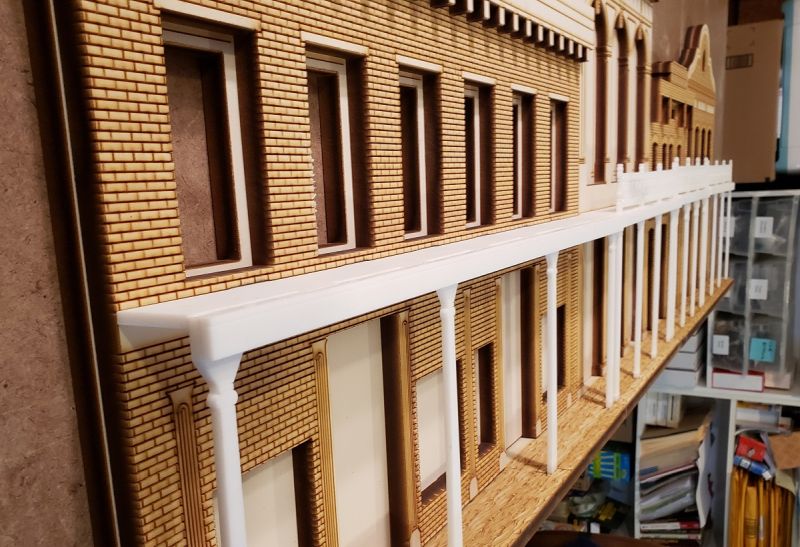
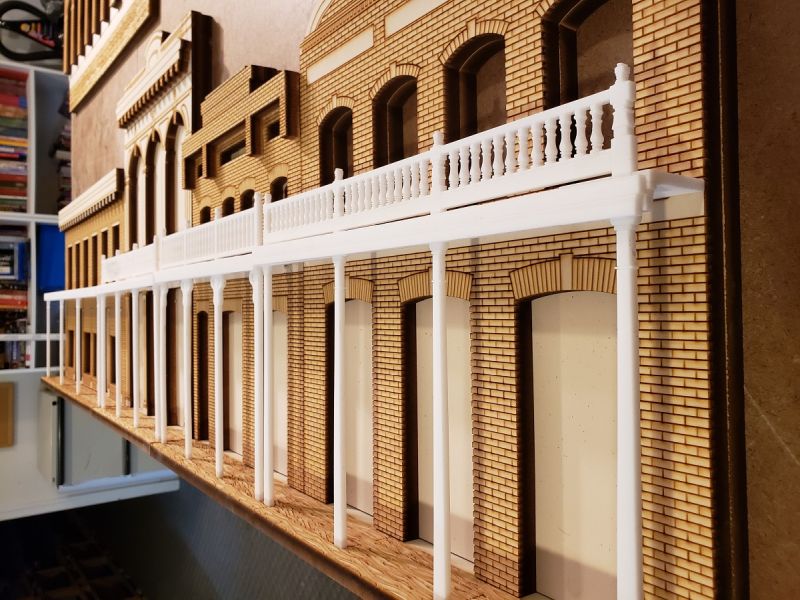
Balconies will mainly be white, so I’ll use the acrylic that Hollywood was kind enough to give me (which originally came from Jon, I believe). So thanks again to both of you guys!

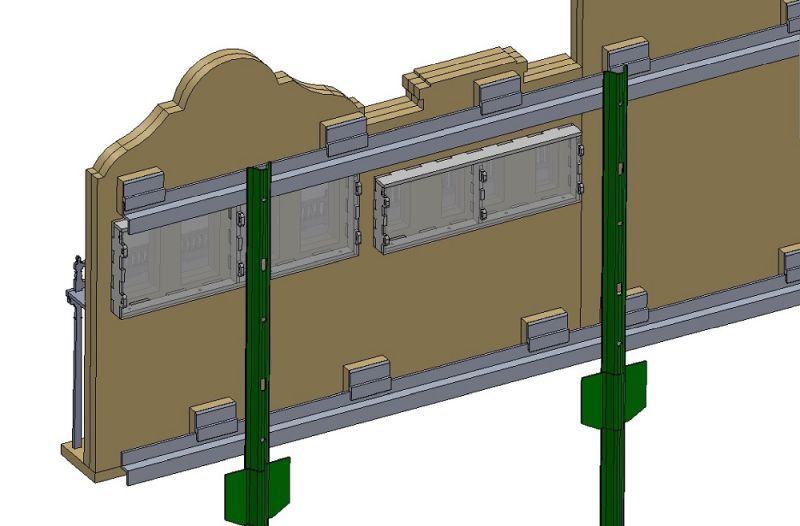
The individual building panels will have z-clips bonded to them, which will clip onto a 3/4" aluminum Z-bar. Clip stock and Z bar all came from Orange Aluminum, with is in CA. I bought all I’d need for the entire project. They gave me a great price, no sales tax and free shipping.

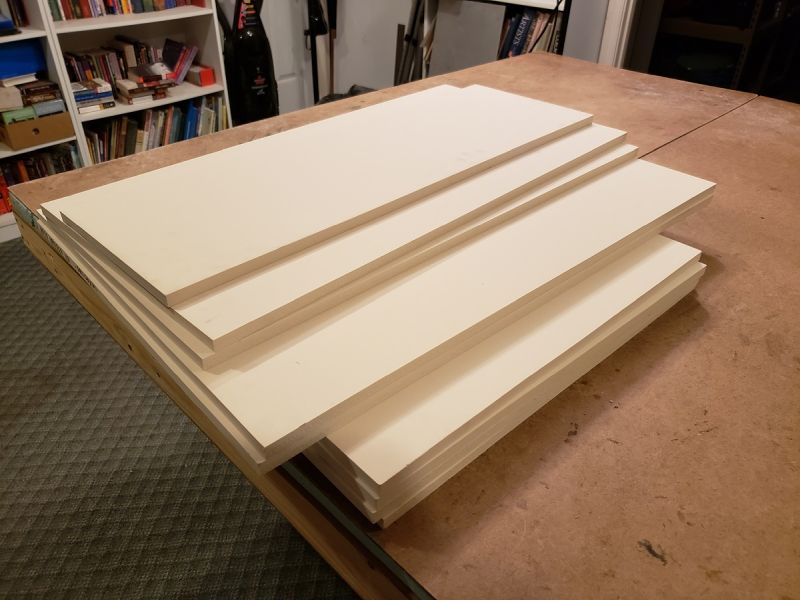
I received the foam (from Harbor Sales) within 18 hours of ordering. Free delivery! And they also sell acrylic. I had them cut 5 4x8 sheets into 20" and 28" widths, all 8’ long. Given my panel dimensions, this gave me flexibility in nesting the parts to reduce waste.

Fabrication officially began yesterday, with cutting the raw stock into blanks for each building. I was really relieved and please that I didn’t have to use a circular saw for this (would be pretty dusty). I made 4 or 5 passes with a box cutter on the cut line, which went about 1/4" deep. The panel then snapped cleanly on that line.

I did a couple hours of foam lasering yesterday, and am finishing it now. It’ll be maybe 8 hours total for this row. Here’s the first building:

Unlike the acrylic cutting, where my vacuum system doesn’t handle 100 of the the fumes, I’m not detecting any fumes at all from this, nor is my wife, so that’s a big relief!

BTW, this is one of the el cheapo Chinese lasers (~$2k) I bought a few years back. My software is RD works, and I import dxf files from Autocad (actually, it’s a cheaper version of that called BricsCad). If you ever find yourself in the same circumstances, the settings I found to work best are as follows:

  • Nozzle height above material: ~.45"
  • Cutting speed: 6mm /sec
  • Cutting power: 70%
  • Engraving speed: 50mm / sec
  • Engraving power: 70%

===:>Cliffy

popcorn - soda - first row seat - impatience…

Is it done yet?

Pretty cool Master Cliff. Almost makes me want to find a spot for some flats. Hmmmm…

Cliff, The first parts are coming out really GREAT, looks like your brick layout has turned out fabulous. I like your multi layers,

I have checked with Harbor Sales, it looks like I will be buying the product from them. It looks to be the exact same as PB but a little

more economical. Thanks for the lead.

What windows and doors are you going to use? Are you planning to Laser Them?

Dennis

Dennis Rayon said:

Cliff, The first parts are coming out really GREAT, looks like your brick layout has turned out fabulous. I like your multi layers,

I have checked with Harbor Sales, it looks like I will be buying the product from them. It looks to be the exact same as PB but a little

more economical. Thanks for the lead.

What windows and doors are you going to use? Are you planning to Laser Them?

Dennis

Thanks very much Dennis! I’m glad ya like it so far. And I’m pleased I could give you a lead on a product!

I’m planning out lasering window jambs into the foam; and in back, there will be acrylic. Either a dark gray for windows not cut all the way through, or an acrylic light box for those that are. Either way, I’m planning on gluing on a thin layer (tbd material) in front of that to represent window frames & muntins.

Test fitting the balcony pieces… These were tough shots, 'cause I had to turn the room sideways to get 'em.

This is all pretty fragile, so I’ll add a second acrylic layer to the posts to give them a little better chance.

Cliff

Wow, those look great, Cliff. I think your off the hook on the virus, Momma already had me stocked up on the popcorn and coke. Carry on.

Wow Cliff that is looking super,

Looking at that first Google Earth photo of the Piper’s Opera house made me think “How will he re-create that “digital camouflage” look?” Then I noticed the sky. Duh.

Have you thought about putting images behind the doors/windows to add more detail?