Large Scale Central

Home brew turnouts losing gauge

I’ve puzzled over this for a while, and I’ve arrived at the conclusion that my home brew turnouts are losing their gauge because the curved point is relaxing its curve over a very short time. being out in the sun will hasten that process.

Has anyone else noticed this?

Does anyone have a fix?

Are you talking about the stock rail, or the point rail? What code track? Turnout size? What type of rail? Are you prebending the rail. Or. letting it curve naturally?

Steve,

I live in Florida where my track gets very hot. I have noticed that the curved point rail on some of my FACTORY turnouts tries to straighten out some over time too. These are code 332 R1 brass from several manufacturers. I bend them again by hand and go on my merry way. I guess this is something we have to live with and I’m glad you brought it up. Now I know it’s not only me! (http://largescalecentral.com/externals/tinymce/plugins/emoticons/img/smiley-wink.gif)

You could alter the ‘memory’ by using a leather or plastic faced mallet and an anvil with the curved tongue. Striking on the anvil will slightly change the shape of the metal and help hold the curve.

John

I just put in 2 Piko curved switches and I am concerned that given time and the heat of the sun that the curved points that were out of gauge then fixed will go back to where they were. I’m thinking I might make a little device to place on the switch to keep the track in gauge and where it is now when not running.

You could spread out some spare plastic wheels and use those as “gappers”

Craig Townsend said:
Are you talking about the stock rail, or the point rail? What code track? Turnout size? What type of rail? Are you prebending the rail. Or. letting it curve naturally?

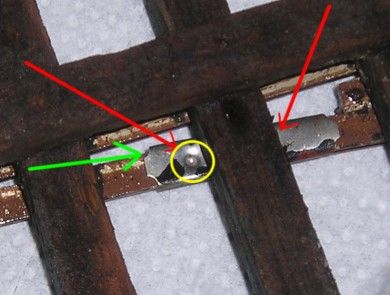
Are you talking about the stock rail, or the point rail? Both, though the point rail seems to be the worst.

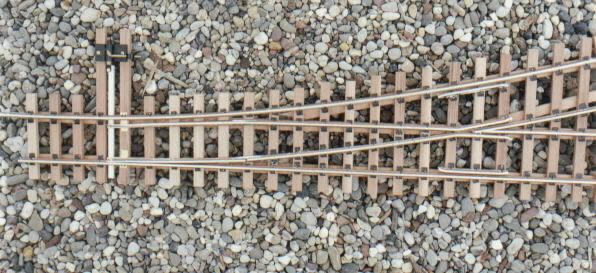
What code track? Code 332, both brass (Aristo) and Aluminum (Aristo and Switch Crafters) Brass does not seem be bee affected, my earliest turnouts were brass, and they’ve been out for years, without problem. Curiously, the Aristo Aluminum seems to be doing well. The Switch Crafters rail was out of gauge in a week. I’m sure that it is my fault, something that I missed, hense the query.

Turnout size? # 6, roughly 2.5 feet long.

What type of rail? See above

Are you prebending the rail. Or. letting it curve naturally? Not sure how to answer this. I bend the rail to match the template, then install. The bending occurs after shaping and filing.

Do you bend beyond what you want and then relax it to fit?

Try it.(http://www.largescalecentral.com/externals/tinymce/plugins/emoticons/img/smiley-wink.gif)

I am wondering if the bend then relax method would work. Or, maybe, the aluminum needs to be annealed a bit before its formed. You know, to make it a bit more malleable.

The process of bending any metal is to bend the part past the elastic limit so it will stay. Once removed from the bending tool (what ever that might be) there will be some spring back. In the case of turnout rails, the bend being rather gradual additional spring back may occur over time. If you are using a rail bender, controlling the ‘over bend’ so the spring back puts the finished product where you want it is more controllable than the ‘beer gut’ method.

Both brass and aluminum are metals that work harden, so John’s suggestion above might add some stability to a completed part. I have taken one Aristo switch apart and had one devil of a time getting the radiused rails back in position as they had relaxed some. It is my opinion that shaping the points would be better done after the rail is bent and stabilized. Assuming you have the time and additional material, it might be a suggestion to make extra curved rails and allow them to ‘age’ in the heat for a season and check them later.

David Maynard said:

I am wondering if the bend then relax method would work. Or, maybe, the aluminum needs to be annealed a bit before its formed. You know, to make it a bit more malleable.

Heck no. I’d beat it into submission. Because it’s thin, I’d avoid annealing the tip. It will wear fast enough.

John

I’ve never had a gauge problem with my hand built turnouts. Two things I do that might make a difference; one on the diverging stock rail I make a small bend where the points touch, and than run the diverging rail through a rail bender. The second thing is that I try is too keep the point rail and the diverging rail as separate pieces. Traditionally you would use one piece of rail from the frog to the points. I use 2 pieces. The point rail and than the closure rail. The point rail flexes with a rail joined, but keeps the curved closure rail from moving at all.

Can you send a pic of what you are describing, Craig? Thanks.

Here’s the reply that I got from Bruce at Switchcrafters:

Hi Steve,

No, I have not heard of that problem before. The only thing that comes to mind is that if the switch is orientated in the east-west direction, the south side of the switch would be exposed to direct sunlight and the north side would never see it. I know that you can bend aluminum a very small amount just by applying heat to one side.

Generally, a rail bender actually over bends the rail ever so slightly and then it springs back to the shape that is desired. I do not know how hand bend affects that process.

The stock rail should be held in place by the spikes holding it to the ties. The bending after shaping should not be a problem. However, how did you shape the points? If they were sanded or ground, the heat build up can cause some internal metal stresses that can be released later. I use a vertical mill to machine the points and if the end mills are getting dull, I notice that the points are a little distorted when I take them out of the machining jigs. My solution is keep my end mills very sharp and that solves the problem.

One way you can fix the problem is to take a 6" piece of wood dowel about 1/2" to 3/4" diameter and cut a slot in the end with a chop saw or table saw and then put the dowel down on the rail that needs to be bent and gently twist it until you get the desired curve back. Just do little bends all along the rail and continue to gauge it.

Let me know if that helps.

Steve
I will try to get a picture for you but its really simple. On the diverging stock rail where the end of the point is, make a small bend with a pair of pliers. What this does is make a little recess for the point rail to slip into. This also might relieve some of the springyness that you are seeing.
Let’s see if this photo works from my phone. The rail on the right has a ever so slight bend right in front of the tip of the point.
https://scontent-sea1-1.xx.fbcdn.net/v/t31.0-8/fr/cp0/e15/q65/468523_10150802183631912_619987615_o.jpg?efg=eyJpIjoidCJ9&oh=066cec7d0df2520e64b142df3737650b&oe=59D024BA

https://scontent-sea1-1.xx.fbcdn.net/v/t31.0-8/fr/cp0/e15/q65/464009_10150888058681912_1240705135_o.jpg?efg=eyJpIjoidCJ9&oh=11a53dd4f4e62d4f1a9a08c67378d42c&oe=59D79B3A

The prototype has this same problem. Their solution? Rail clamps. The ties, because of the pressure of the rail, tend to creep towards the points, which alters the gauge . Check your tie location, and see if pushing them slightly away from the points toward the frog corrects the problem. If so, the best solution (that I’ve found) is to drill a small hole on the rail flange and put in a small spike to keep the ties from moving.

Robert

Steve Featherkile said:

I’ve puzzled over this for a while, and I’ve arrived at the conclusion that my home brew turnouts are losing their gauge because the curved point is relaxing its curve over a very short time. being out in the sun will hasten that process.

Has anyone else noticed this?

Does anyone have a fix?

Bet Gary Buchanan knows

(http://www.largescalecentral.com/externals/tinymce/plugins/emoticons/img/smiley-wink.gif)

Craig’s pictures show his point rails spiked to the ties quite close to the pointy end. Which is how I would keep them in gauge. On a hunch, I checked Switchcrafters website photos and noticed they only show spikes a short way along the point rail, leaving a lot of aluminum to bend any how it likes. [I also noted Switchcrafters has closed up shop.]

This photo shows an old switch I built and photographed for GR 20 years ago. Note the points are spiked more than 1/2 along, thus keeping them in gauge.

If the points don’t exhibit much flexibility, I cut and pivot them using connectors (fishplates) - barely visible above. I pre-drill a dimple in the underside of the rail (red arrows below) with a large drill, then push the connector (green arrow) home and tap it with a center punch to hold it in place (yellow circle.)

Pete, I think your solution would be to use the small ME spikes, drill a hole in the flange on those single sided spiked areas, and drive the spike into the tie to hold the rail from moving. You could also use a good solid glue to hold them, but for important things, I prefer mechanical methods of fastening.

Robert