Large Scale Central

Hale & Norcross

John Caughey said:

David Maynard said:

Gee, the more I look at it, the more it looks like blue ice to me.

You mean like carved from a chunk that fell from an air plane?(http://www.largescalecentral.com/externals/tinymce/plugins/emoticons/img/smiley-wink.gif)

Ah, I wasn’t thinking that kind of blue ice.

Cliff Jennings said:

Chris Kieffer said:

Ozark Miniatures has them. I plan on drilling bullet holes in mine. (http://largescalecentral.com/externals/tinymce/plugins/emoticons/img/smiley-sealed.gif)

Chris, I couldn’t find it. What does Ozark call it?

[edit] OK, I found it finally:

http://www.ozarkminiatures.com/scripts/prodView.asp?idproduct=330

That’s a terrible idea Cliff as they are so out of fashion these days!

Today was a big day, because I got the laser running again, and all seems fine. I’m also getting my materials orders done (and the finances squared away for them), and am very relieved on both those fronts.

I completed the lasering of all the bits and pieces representing “timbers” for the ore bin, water tank and the two platforms / decks. Here’s that pile.

These will need to be lightly sanded, primed and painted. I know, it would have been fun to stick-build out of cedar, but I’m trying to see this laser-cutting approach through to its end.

The catwalks will be another pile, but in 1/8" brown. Maybe next weekend for that, the plastic won’t be here for a few days, and I’m still working on the patterns.

Sheathing and shingles are the big order. I found a source for 1/32 ABS, but the samples seem brittle, and colors are very limited. I’ll be doing some engraving tests with that though, maybe it’ll be fine. But for this project I’ll stick with the 1/32" acrylic, and eat the higher prices.

===>Cliffy

Today, I started with cleaning my shop area and trying to get a handle on what I’ve done and not done. And, I re-lasered several parts that I’d messed up on or forgot before. Then I hauled out the modules and did a test fit “on site.”

Doesn’t look so big anymore! Sure did on the bench, and felt big hauling the pieces out though. Anyway, it fit fairly well. But now it’s evident that I’m not so hot with the concrete, and will have to squirt or trowel in something for final leveling. But that’s small potatoes at this point, and I’m just glad that the modules were transportable and fittable and generally happy with the site situation.

Back to the part assessment. Here’s the current overall pile,

From left to right, the foreground groups are:

  • PVC pipe for the main stacks
  • Tank parts
  • Ore bin parts
  • Cupola & fascia parts
  • Doors & windows
  • Platforms

These represent maybe 2/3 of what’s needed. I’m still working on laser patterns, or am awaiting material, for the following:

  • All the sheathing (4 modules, ore bin, tank, cupolas)
  • Shingles
  • Roof trim
  • Wall trim
  • Catwalks / roof stairs / ladders

Then there’s the 3D printed parts…

So all is on schedule for my 2-year plan for this project!! (http://www.largescalecentral.com/externals/tinymce/plugins/emoticons/img/smiley-foot-in-mouth.gif)Seriously though, I’m happy with the progress. Thanks again for viewing, I sure appreciate being able to share the process with you friends.

===>Cliffy

Thank you back, Rooster!

That looks great, almost like you measured and stuff!

One question: there’s a track on the uphill side of the structure that doesn’t appear to have any corresponding dock or other mechanism associated with it. Did I just not see it?

Thanks Jim, and wow, you have a good eye. Thanks for asking. And since you made me do it, I have to confess the following:

  • The complex rose another level, to that rear track you refer to
  • There was more distance between the back of the building and that rear track
  • The rear track delivered wood and supplies to the mine
  • A tramway ferried wood from a trackside stockpile to the mine’s uppermost level.

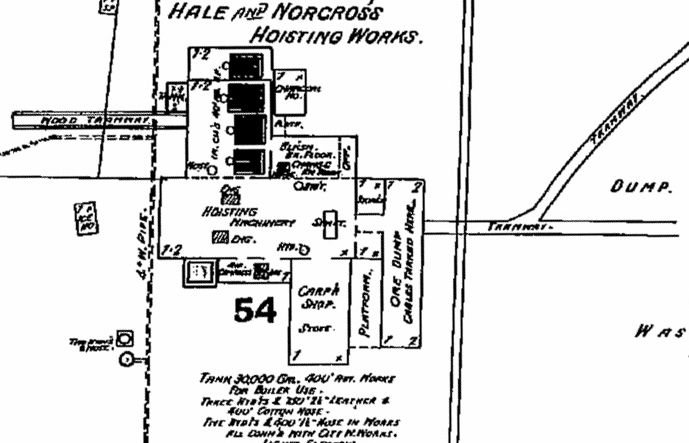
Maybe the best way to explain this arrangement is via the Sanborn map:

The uphill delivery track was just to the left of the “wood tramway,” running vertically here. Unfortunately, my layout didn’t have the space for the lateral distance, nor the elevation opportunity for the highest level of the works. Sadly, creative butchery had to take place, in this and many other areas…

Bottom line, I’m going to have to cob-job that entire uphill delivery area, and I haven’t figured it out yet.

Thanks again for asking.

Cliff

Oh look! It looks like some kind of alien structure. All neon translucent blue like that. Does it glow in the dark? Does it have mystical powers? If I stand near it too long will my future children have 2 heads?

Just kidding. Its looking good.

Edit bacause Microsoft kant spell.

David my friend, thanks, and I’m relieved that my color choice helped you pick it out from the background. (http://www.largescalecentral.com/externals/tinymce/plugins/emoticons/img/smiley-laughing.gif)

However, don’t underestimate the Tardis factor at work here… Sorry, I’m not allowed to talk about that. But yeah, if you’re still in the “begetting” stage of life, maybe you should put off your visit to my layout…

About that lack of dock… just have big beams project from above the 2 top floor windows and use block and tackle to haul timbers/supplies up and in.

John

Good thoughts John, as always.

But… they were hauling in cordwood for the boilers, as well as timbers for the mine, from that upper track. So I’ll have to do some creative pretending and ignoring, as well as butchering.

My main recourse has been to put the lumber / cordwood yard on the other side of the track, and allow the tram to cross the track at grade level (as it did at the Chollar mine, just south of this operation).

Non-proto sigh. But not sweating it too much, I don’t have to re-create everything.

C

Cord wood in one doorway and the square cut timbers through the other. The delivery car makes the distinction.

Now no more ‘yeahbuts’ and adjust as you see fit.

John

Thanks John, and roger all that.

“Non-proto sigh. But not sweating it too much, I don’t have to re-create everything.”

I’m shocked and dismayed.(http://www.largescalecentral.com/externals/tinymce/plugins/emoticons/img/smiley-yell.gif) After such a promising start, you had the right number of rivets, until those words, those dastardly words of defeat, oh woe.

OK, I’m over it.

John

(http://www.largescalecentral.com/externals/tinymce/plugins/emoticons/img/smiley-laughing.gif)(http://www.largescalecentral.com/externals/tinymce/plugins/emoticons/img/smiley-laughing.gif)(http://www.largescalecentral.com/externals/tinymce/plugins/emoticons/img/smiley-laughing.gif)

Cliff Jennings said:

Non-proto sigh. But not sweating it too much, I don’t have to re-create everything.

I bet those vents aren’t either. (http://largescalecentral.com/externals/tinymce/plugins/emoticons/img/smiley-sealed.gif)

In all seriousness, looks great on the RR Cliffy. Bet that gets you jazzed up a bit.

Chris

Hey Chris, thanks. Yeah, it was pretty neat seeing how the size and shape fit in with the surroundings.

A belated congrats on the ‘good’ fit to the bases. How many years ago did you pour them? I know from experience that so much can shift from plan to finishing.

For the final fitting; I’d suggest an hydraulic cement, I like CementAll, y’know. Todd B favors another brand, but the reason is they are low shrinkage and can give the best fit.

Carry on.

John

That was four years ago John, glad you remembered. And yes, we did talk about that product when I was making those concrete mountains. You recommended it for my outcropping experiments; I bought a bag and used some. Seemed to flow nicely, is hard as nails when set. I was trying to remember the name yesterday, so thanks for the confirmation buddy.

Patterns.

The final materials are coming tomorrow and Thursday, and between work hours and the all-important family time, I’m trying to gradually position myself to use them over the next indefinite number of weekends.

So I think I’m finished with this pattern making, and wanted to elaborate in case someone is wanting to go down this path, or is curios. I don’t want to scare anyone off from buying a laser or learning the software tools; but I think it’s only fair to show more on what has been involved here. Having said that, this is a big building, and I don’t expect many people will want to attempt this right out of the gate with their laser (like I sort of did – it’s funny reading the humorous wisdom in some of those first posts!).

The following is a series of snapshots of the patterns involved, with brief comments. If you’d like further info, please ask.

Completed, #1: .17 acrylic, 29x19, ~25 sheets (23 needed, but two were total screwups), mainly transparent blue. Core wall, base and roof components. Cupola / window glazing sheet being clear, and all else the bargain transparent blue that I’m kicking myself for buying (should have been opaque black).

Completed, #2: .25 acrylic, 29x19, 3 sheets, opaque black. “Timbers” for ore bin, water tank, decks. The parts shown in blue were half the needed size, which I belatedly saw, and had to repeat properly on sheet 3. I acquired this material for free, via Freecycle, about 5 years ago. So I’m glad to use it.

So, now for what remains. The big item is the sheathing, but here’s the blow by blow.

Pending #1: .03 modified acrylic, 24x16, 9 sheets, burgundy. All sheathing, including main building, ore bin, tank, cupolas. I just realized I ordered and paid for 3 panels too many (long story, don’t ask), but only need 9.

But let’s say you asked. Let this be a lesson: the pattern-making is directly involved with what you can acquire. In this case, I thought I was buying a 4x8 sheet cut into 12 pieces, but during the ordering cycle found that I could only buy 4’x2’ sheets as a max size, and didn’t reduce my expected mandatory quantity (I thought I had to get a full 4x8 stock sheet) to what I really needed (9 panels). I’m preaching to myself here to drill it into my head that, just as in my workplace situations, the patterning stage must be given proper time to iterate with product availability. On the bright side: I now have 3 spare panels to practice my grain-engraving on.

Pending #2: .03 modified acrylic, 24x12, 12 sheets, forest green. All shingles. As with the sheathing image above, I’ve turned off the engraving-graining lines, because it would just be black. The challenge with these and the sheathing panels will be warping while lasering: all the engraving lines make the sheet rise up, and that means the laser gets out of focus and won’t cut right, or – really bad – the moving head catches on the material.

Pending #3: .12 acrylic, 24x12, 2 sheets, opaque brown. The large rectangular pieces will be “grained,” but otherwise this is straightforward – no warping challenges, due to the thickness. Just lots of pieces to keep track of, and which particular catwalk each piece goes with. I have a CAD layer that helps with that organization, but it’s turned off here.

Pending #4: .03 modified acrylic, 24x12, 1 sheet, antique white. These are all the trim bits for wall corners, roof eaves and cupola windows. Some of the lines are run out to the left, to make the laser cut scrap strips to have on hand.

Well, that’s about it. Except for the 3d printed parts.

Thanks for viewing, and experiencing all this with me,

===>Cliffy