Large Scale Central

Traveling and Storage Cases

Looking at Bruce’s Case for his Mallet on page 16 of his modeling log brought to mind what requirements I want and like in a carrying case. I’ve got many styles, some universal, some specific to a unit.

http://largescalecentral.com/LSCForums/viewtopic.php?id=11198&p=16

My first requirement is that it must be stackable. Bruce, why do you build a “bump up” for the handle instead of making it flat topped, only taller, so it could be stacked? Not criticism, just curiosity. The Bachmann “Ten Wheeler”, I just purchased, came with a case and had a suitcase handle on the top, I removed that for the same reason, stack ability.

I like the idea of being able to drive unit in and out of the carrying case, but I’ve got both styles and this is probably a stronger requirement for units with tenders or multiple units that are MU’d together. Tom Ruby and I spoke of this at Marty’s and the length of his Mallet was the major subject of the conversation with its requirements.

What else is important or something you find a desirable item?

Just to save clicking… Here’s what Ric is talking about.

(http://www.jbrr.com/Pics/Locomotives/EBT/IMG_6759.JPG)

One of the reasons I don’t make them stackable is because that’s NOT a requirement for me. :wink: I never even thought about it, to tell you the truth. I store them on some shelves in my workshop.
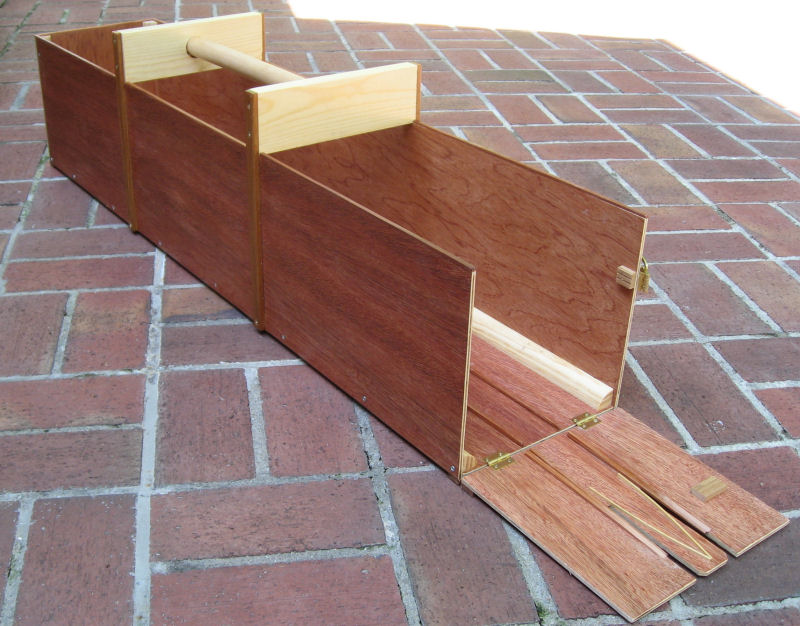
(http://www.jbrr.com/Pics/Locomotives/IMG_6773.JPG)

So, I usually just bring one or two out to operate on my layout. Now, when it comes to traveling, it MIGHT be nice to have them stackable, but I usually just put them directly on the floor of the minivan. If they were stackable, I’d have to make sure that they stayed stacked, and didn’t fall over. I usually don’t bring enough to make that happen. My rolling stock carriers ARE stackable, but I usually don’t stack them. Again, I’m more worried about them falling over.

(http://www.jbrr.com/assets/images/IMG_1251s.JPG)

(http://www.jbrr.com/assets/images/IMG_1345.jpg)

While at Marty’s, I was thinking of your “Rolling Stock” carrying cases. I have a variety of containers I use to carry my rolling stock with depending on how much and which equipment it is. I wrap each individual piece in bubble wrap. Has worked okay, but is somewhat unorganized. Equipment I travel with varies depending on where I’m going. At Fred’s this year we had both standard gauge and narrow gauge operating sessions and that made it twice as difficult because I had to bring both scales of engines and complimentary rolling stock. Sometimes the pressure of this hobby is just too much. :wink:

One thing on the loco carrier is that I’ve gone to a handle that’s parallel to the case, instead of perpendicular. My earlier cases have perpendicular handles. It’s not too bad with a small loco, but when you have a heavy loco in there it’s harder to control; thus the switch.

It’s a bit harder to make, but a lot easier to carry…which is probably why suitcases are made that way. :wink:

I like how Jan’s loco carrier has a coupler mounted in it.

I’ll try to shoot some pictures later this evening.

Okay, traveling cases and storage boxes. Well, the simplest is a box. If you’ve ever had any of their equipment, HLW (Hartland) sells everything with great boxes. I always save them for other usage.

(http://www.lscdata.com/users/rgolding/091002%20061.jpg)

Notice the strap (I use a lot of them). They could save an embarassing and costly mistake.

(http://www.lscdata.com/users/rgolding/091002%20062.jpg)

A little foam and you have a good storage box or carrying box.

(http://www.lscdata.com/users/rgolding/091002%20063.jpg)

(http://www.lscdata.com/users/rgolding/091002%20064.jpg)

And then there are tool boxes. It carrys all that stuff you need when taking your toys some place else to run.

(http://www.lscdata.com/users/rgolding/091002%20051.jpg)

A little bubble wrap and some of your smaller stuff will fit right in with all the other stuff.

(http://www.lscdata.com/users/rgolding/091002%20052.jpg)

There are some great plastic storage bins on the market. The commercial ones are far stronger than those from the big box stores. (Get it? Boxes from the big box store. Never mind)

(http://www.lscdata.com/users/rgolding/091002%20055.jpg)

They come in many sizes. A little foam and/or bubble wrap and they are very versatile.

(http://www.lscdata.com/users/rgolding/091002%20053.jpg)

Sometimes your profession has left you with equipment you can use. This is my old Coast Guard Boarding Bag.

(http://www.lscdata.com/users/rgolding/091002%20056.jpg)

It holds a couple freight cars real well. Once again a little bubble wrap -

(http://www.lscdata.com/users/rgolding/091002%20057.jpg)

protects things from rubbing or moving.

(http://www.lscdata.com/users/rgolding/091002%20059.jpg)

Closed cell foam keeps things seperated.

(http://www.lscdata.com/users/rgolding/091002%20060.jpg)

But for some items you can’t find a box or container, so you have to build or adapt. For years, I used an under bed plastic storage container for large engines or rolling stock like a Passenger Car, Doodlebug, RDC or even Andy C’s Auto Carriers with some bubblewrap. Great for a bunch of equipment, but what about one car or your favorite Doodlebug. As I said, you can build it. Those suckers are long. Requirements? Stackable - just a flat wooden box, with some added wooden cleats on the ends for handles.

(http://www.lscdata.com/users/rgolding/091002%20007.jpg)

Too keep it closed, you make it fit together and use a strap.

(http://www.lscdata.com/users/rgolding/091002%20001.jpg)

(http://www.lscdata.com/users/rgolding/091002%20002.jpg)

Closed cell foam will hold it steady.

(http://www.lscdata.com/users/rgolding/091002%20006.jpg)

Grooves that are the width of the trucks will keep the unit in position.

(http://www.lscdata.com/users/rgolding/091002%20011.jpg)

and a coupler keeps things from moving.

(http://www.lscdata.com/users/rgolding/091002%20012.jpg)

I purchased an engine from a friend and it came with a storage and carrying box. It was neat to see another person’s ideas at work on the same subject.

(http://www.lscdata.com/users/rgolding/091002%20013.jpg)

There were a couple things I had to change immediately to meet my requirements. It had to be stackable, so the suitcase handle came off the top.

(http://www.lscdata.com/users/rgolding/091002%20018.jpg)

and grab handles were cut in to the ends.

(http://www.lscdata.com/users/rgolding/091002%20014.jpg)

It is heavy but has some neat ideas. If you open a hinged and latched side (both sides open this way), there is an inner board with padding on it to keep the engine from moving.

(http://www.lscdata.com/users/rgolding/091002%20015.jpg)

The inner padded boards come out on both sides.

(http://www.lscdata.com/users/rgolding/091002%20016.jpg)

You can see that the engine is protected while traveling.

(http://www.lscdata.com/users/rgolding/091002%20017.jpg)

The case that came with what eventually became a combination of his Bachmann “Ten Wheeler” and my Bachmann “Annie” has some interesting features.

(http://www.lscdata.com/users/rgolding/091002%20020.jpg)

You can unload the engine right on to the track, because the one end opens just like the sides.

(http://www.lscdata.com/users/rgolding/091002%20019.jpg)

You start by alligning the case on to the track.

(http://www.lscdata.com/users/rgolding/091002%20021.jpg)

There are grooves cut in to the bottom of the case for it to set right on 45 mm track.

(http://www.lscdata.com/users/rgolding/091002%20022.jpg)

You can see the engine is ready to just run out the end.

(http://www.lscdata.com/users/rgolding/091002%20023.jpg)

There is a piece of hollow Bachmann track with only a couple of ties left on it, that was made to allow the engine to just run out under its own battery power.

(http://www.lscdata.com/users/rgolding/091002%20024.jpg)

The EBT 10 can just run out the end of the storage case.

(http://www.lscdata.com/users/rgolding/091002%20026.jpg)

It works it’s way down the grooves of the inside of the case end drop gate.

(http://www.lscdata.com/users/rgolding/091002%20027.jpg)

Aligns on to the Bachmann track.

(http://www.lscdata.com/users/rgolding/091002%20029.jpg)

And on to the 45 mm layout track.

(http://www.lscdata.com/users/rgolding/091002%20028.jpg)

The piece of Bachmann track stores by wedging between the base and the top of the case in front of the engine.

(http://www.lscdata.com/users/rgolding/091002%20030.jpg)

And a battery charger is even built into the other end of the case. Pretty much a complete package.

(http://www.lscdata.com/users/rgolding/091002%20025.jpg)

Pretty cool Ric !

Jon,

It is a great case, but it has some drawbacks. It is heavy. It is also bulky and we found at Marty’s it was hard to find a place large enough to allow it to function correctly. Those sides that fold down take a lot of room. Tom Ruby have been discussing what it would take for a case big enough to hold his Mallet. The case that I converted to carry Jan’s small Bachmann Industrial Mogul “Indy”, allows the loading of the engine and tender without the bulk of the Bachmann “Annie” case.

The case that Tom referenced and I spoke of in the above comment is the only one where we actually have gone looking for a specific tool box to use to create a case. The requirements included a flat top for stacking and a length long enough to allow the engien and tender to stay connected while traveling. The reason for that is that we know eventually we will be breaking wires or connections if we are constantly taking the engine and tender apart. We found this box at Home Depot or Lowe’s.

(http://www.lscdata.com/users/rgolding/091002%20032.jpg)

It is called a “Stanley Fat Max”.

(http://www.lscdata.com/users/rgolding/091002%20033.jpg)

Right off the bat, it met one of the requirements we needed. It was stackable because the handle folded flat into an indention in the lid. This box is so strong, it can also be used as a stepping stool. I’ve used it for that purpose.

(http://www.lscdata.com/users/rgolding/091002%20034.jpg)

This is the carriage, I built to carry Jan’s “Indy” and a coach inside the “Fat Max”.

(http://www.lscdata.com/users/rgolding/091002%20047.jpg)

(http://www.lscdata.com/users/rgolding/091002%20036.jpg)

The carriage had to fit the indentions and conform to the shape of the bottom of the case.

(http://www.lscdata.com/users/rgolding/091002%20035.jpg)

The carriage that goes in the “Fat Max” tool box uses a set of grooves for the wheels of the engine, tender and coach to sit in.

(http://www.lscdata.com/users/rgolding/091002%20037.jpg)

The equipment is also held in place with straps and couplers.

(http://www.lscdata.com/users/rgolding/091002%20039.jpg)

(http://www.lscdata.com/users/rgolding/091002%20038.jpg)

The coach is removed by hand.

(http://www.lscdata.com/users/rgolding/091002%20040.jpg)

An LGB re-railing ramp is used to load and off-load the “Indy” and tender as one unit.

(http://www.lscdata.com/users/rgolding/091002%20041.jpg)

(http://www.lscdata.com/users/rgolding/091002%20043.jpg)

Here you can see how the “Indy” and tender is aligned and loaded on the carriage.

(http://www.lscdata.com/users/rgolding/091002%20050.jpg)

(http://www.lscdata.com/users/rgolding/091002%20045.jpg)

(http://www.lscdata.com/users/rgolding/091002%20046.jpg)

(http://www.lscdata.com/users/rgolding/091002%20044.jpg)

Equipment like an uncoupling screwdriver and turnout brush are carried in one end.

(http://www.lscdata.com/users/rgolding/091002%20048.jpg)

And the RCS transmitter in the other end. This so you don’t forget the essential parts.

(http://www.lscdata.com/users/rgolding/091002%20049.jpg)

Don’t ask me how I know that you need to remember all the parts. :wink:

I wrote an article about how I built the one’s I use many moons ago. Fred and the gang at OVGRS used it and adapted it a bit for their club. http://www.largescalecentral.com/articles/view.php?id=37 I’ve since built a few more and while they’re not pretty they work well.

(http://www.geocities.com/kenbrunt/carrier001.jpg)

I run the loco’s in nose first to keep the charging jack easily accessible.

(http://www.geocities.com/kenbrunt/carrier007.jpg)

The front holds the TX and has a b’mann coupler to keep the loco from moving. For the cars I use what Ric calls a big box from the big box stores. It’ll hold 6 cars (more if they’re smaller cars)and has lots of foam padding inside.

(http://www.geocities.com/kenbrunt/carrier004.jpg)

They are kind of large and bulky but they work for me. I’ve left them outside at Fred’s while it was raining with no problem. And they can be stacked.

(http://www.geocities.com/kenbrunt/carrier005.jpg)

For the chargers it’s just a couple cardboard boxes with a ganged outlet and all the wires inside. A fast charger and 2 RS wall chargers.

(http://www.geocities.com/kenbrunt/carrier008.jpg)

Again, nothing fancy and it works for me. I’ve traveled to Ric’s and Fred’s quite a few times with this arrangement and never had any problems.

Maybe it goes back to the times that I had classes or exams where you had a dissassembled box or structure and you had to imagine what it would like assembled. Or creating a drawing before CAD drawings and creating a drawing of the top, side and end view of an object. One of my favorite carrying cases achievements is the case I created for my live steam Accucraft 2 cylinder Shay. I adapted a tool box I had left over from when Jan and I ran a tour boat. The box was purchased as a tool chest for that purpose and had to be long to hold a pipe wrench and crow bar. I don’t remember where I purchased it.

(http://www.lscdata.com/users/rgolding/091002%20065.jpg)

Once again, it has some of the needed requirements, stackable and a handle that goes flat into the lid.

(http://www.lscdata.com/users/rgolding/091002%20066.jpg)

Inside the tray is used as the top of the lift out carriage, that fits in the case.

(http://www.lscdata.com/users/rgolding/091002%20068.jpg)

Here you can see the Shay in the carriage removed from the case.

(http://www.lscdata.com/users/rgolding/091002%20069.jpg)

and with the top tray removed.

(http://www.lscdata.com/users/rgolding/091002%20073.jpg)

(http://www.lscdata.com/users/rgolding/091002%20074.jpg)

All thread rod was used to hold the carriage to the upper tray.

(http://www.lscdata.com/users/rgolding/091002%20070.jpg)

The all thread rod has nuts and washers to keep the tray brace/handle for the lower carriage at the proper height.

(http://www.lscdata.com/users/rgolding/091002%20075.jpg)

(http://www.lscdata.com/users/rgolding/091002%20077.jpg)

Note the grooves in the base plate to hold the trucks in place. Part of the fun was deciding where to cut the holes for the top part of the Shay.

(http://www.lscdata.com/users/rgolding/091002%20071.jpg)

(http://www.lscdata.com/users/rgolding/091002%20072.jpg)

(http://www.lscdata.com/users/rgolding/091002%20082.jpg)