Large Scale Central

scratch built saw mill using palymobil building parts

long view

carriage back view

Playmobil Sawmill part #1

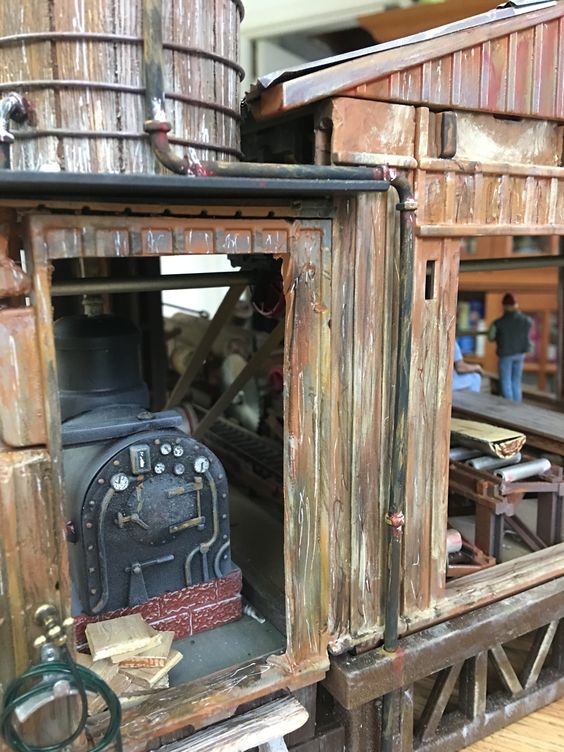
Posted this a while back in the gallery but never explained the build. Some time ago I started a project using playmobil building parts, really like using them as they are so adaptable and at 1 time fairly inexpensive. I decided on a sawmill, which I know nothing about but then again that never stopped me before. I had several different wall sections and a kit that playmobil had produced several years ago to expand their safari set. It included base parts for lifting the building off the ground. Didn’t want mine to be too high so I cut the sections in half from left to right. Used the lower section for the base of the building and the upper for the rafters joining wall sections together.
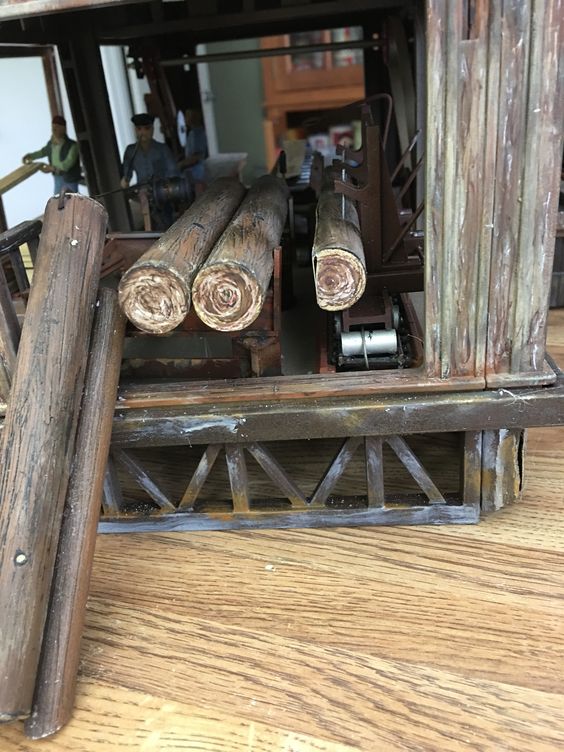
Came up with a design that fit the parts, and with a few minor adjustments 4 walls + side shed were up. Bonus find of a covered awning section and I was able to expand a loading area to the other side. As things began to come together I discovered that I had build the building backwards and needed a mirror image to make things work. Had already glued the building together and it was too late to change. More research, found I would have to pull logs in rather than dumping them in the carriage, more research. Found a article in GRW magazine entitled out fitting a sawmill by Don Parker, it was from Oct 2000 in where he had taken a garden texture sawmill by Bob Kelley and built a very detailed to scale model. The model was a little beyond my ability and scope, Don had built a master piece and I was trying to build one that uses left over pieces. I know when I’m trumped. Rene Schweitzer of GRW was very helpful and sent me copies of the article which I found invaluable. Thanks Rene!!! Started with the log carriage and made it out of the ore tipper cradles from HLW ore tipper cars, brass rod and paper clip parts, Used HO wheels placed on a plastruct “I” beam. Secured the HO track to sections of aristo-craft hi-tension transmission tower “X” frame girder parts. Also used the same parts for the lumber roller table. Passed a small cable from one end of the carriage track to the other to give the looks of the cable that transports the log carriage to and fro. The roller table I placed small cut pieces of 1/4"aluminum tubing to simulate transport rollers and placed the assy on table legs made with 1/4" evergreen styrene installing cross bracing using smaller evergreen. Saw blade and operation pieces to come later.
carriage front viewroller table and carriage

3 beltsboiler

boiler room to right

Sawmill part # 2

Starting to look like something, but noticed that the inside was getting crowed, good thing for the side shed. Turning my attention to powering the mill, I have always been fascinated with belt driven factories and the boiler from a stanza provided the start. Shortened the boiler and placed it on a LGB bridge pillar, it gave a nice look when painted looking like fire proof brick. Use the side rod and cylinder from a Lionel gold rush 0-6-0. Made a governor from styrene then turned my attention to the drive system. Unable to find suitable pulleys I made them out of Tim Holtz gears and wheels kit. Cut close to size PVC pipe and glued the wheels to them, and after a little red and silver paint I had some rather decent looking pulleys. Had 2 different sizes to work with so it gave it a little variety. As I moved along with the pulley system I found I needed some thing different, and tried to logically figure out how power got from one place to another. Ah below the floor, out of site out of mind. The first one I tackled was the log puller and found a gear looking wheel in the kit that small chain would fit on the cogs and figured I would let the ends drop below the floor. Added a drum and cable. Second one was the cutoff saw which I had to turn the table sideways cause I was running out of room which I use again wheels with a much smaller piece of PVC pipe then used a girls pony tail elastic holder for the belt. Last 2 were the same idea transferring the power from wide pulley to small width. Unable to get the pony tail holder below the floor with out cutting and trying to secure, I used small styrene tubing with a paper clip straightened and inserted in it then bent to the curvature of the pulley and dropped thru appropriate placed holes in the deck. used this in 2 places 1 being the saw blade drive. The wide pulleys I used elastic banding used for sewing in waist bands of slips and such. main blade and log pullercut off saw

loading end of boilerlog end

Sawmill part # 3

| |
Playmobil Sawmill part # 3


Attentions turned to painting and roof section. The main roof is a factory Playmobil with crinkled aluminum can glued on top. Used a Friskers paper crimper to make the corrugated metal roof. The roof over the boiler is Kydex plastic and is heat resistant, smooth on 1 side and pebbly on the other, using the pebbly side I painted it white and let dry for a couple of days, then painted black. After drying I block sanded it to expose dots of white but leaving overall black, giving the look of a gravel roof. Used several different colors of Krylon rattle can and then went over with several coats of brushed acrylic paints and some colored ink pens. everything is sealed with Krylon matt finish. Although Playmobil is plastic and rot proof, one of my main requirements, it’s not UV proof so it is important to paint areas exposed to the sun.
Turned to detail parts, made the logs from the tubes that the LED solar powered lights that I use to light my buildings with, scoring the sides with a saw blade and sealing the ends with styrene, remember 10’ rule. Smaller logs used for log chute were made from window blind wand detailed the same way as the other. Table legs and flat surfaces, if wood, are all scored the same way. The lumber was made with window blind painted to look scored by saw blade, and like most thinks I do, if unseen, don’t look for finished. Another words don’t turn the board over. Smaller detail parts were most likely purchased like the saw blades and the hose, faucet and nozzle by he boiler room. Got all done with the water tank on top of the roof and was unsure where to put the intake for the for the boiler, had the faucet hose assy left over from doll house project for granddaughter and figured that it was a low dollar operation and they just used a garden hose. Water tank is a PVC coupling, again no rot, covered with widow blind pieces and secured with PVC glue. Again painter with acrylates, bands are copper solid strand wire. The water pipes are 1/4" styrene tube with small 1/8" brass wire inserted then bent, pipe joints are 2/56" nut, drilled out to fit over the tubing and cemented into place. loading lumberpulling a logback side

|
| - | - |

wigwam

Playmobil sawmill part # 4

Thinking back about this project, what have I learned? A little more advanced planning would have probably been a good idea. Building should have been larger, if one had to work in there someone was going to get cut. Could have made it bigger but only had so much playmobil parts and wanted to save enough to build a Florida cracker house. While the project is not correct to operation it is probably close enough for most people and most important to me is it is pretty much weather proof. The wigwam or sawdust burner is still go a little work to do yet but the idea is there, it is made from a canning strainer designed to separate seeds from juice and pulp, covered it with metal furnace tape and will have a small jewelry ultrasonic basket on the top to catch the embers. Had to cut some of the figures in order to have them do things like carry lumber, the sawyer (main blade guy) is a space man figure from probably star wars that I painted bib overhauls on. Still have to spread around some sawdust and accent pieces but all and all pretty much done. Learned a lot about old sawmills and the project took a little longer than expected, but that is what happens when you plan as you go. Thanks for looking Bill loading sidemain bladeroller tablelog loading end air shot

Now that is a cool little saw mill! Well done!

good idea

well made

fine result

congratulations!

John Bouck said:

Now that is a cool little saw mill! Well done!

Thanks John

Korm Kormsen said:

good idea

well made

fine result

congratulations!

Thanks much, Bill

Wow, you packed a lot of activity in that sawmill and it looks awesome. Great job, Bill.

Dan Hilyer said:

Wow, you packed a lot of activity in that sawmill and it looks awesome. Great job, Bill.

thanks Dan, still working on the mason bogie, Bill

Nice job, Bill!

Bill,

I’ve said it via e-mail, but, again, this is a great project! It really shows the potential of left-over parts!

Eric

Great project, quite inventive. The canning strainer repurposed to slash burner works magnificently.

wow great use of parts. The strainer for wood burner is a great idea. I might have to steal that one.

Very nice model and a great write up. Perhaps Garden Railway magazine might be interested in an article, as your version sure looks like something that will last outside!

So creative! Well done!

Thanks Bruce, and yes I have already sent it to Kent at GRW also posted on their forum, and had a couple written up for their one page project, easy money. They are paying for gallery pictures so have at it, Bill

screen

Shawn Viggiano said:

wow great use of parts. The strainer for wood burner is a great idea. I might have to steal that one.

You are more than welcome to it got a jewelry ultra sonic basket for the top just haven’t got around to installing it yet

Jim Rowson said:

Nice job, Bill!

Thanks much

Bill that is outstanding. You showed a little teaser of this when talking about plumbing. But seeing the entire saw mill is awe inspiring. I need to build one myself (actually two) and this will be a great help in doing it.

What they all said… Fantastic model and build… (http://www.largescalecentral.com/externals/tinymce/plugins/emoticons/img/smiley-cool.gif)