Large Scale Central

First laser building project

Now that the laser cutter seems to be working ok, I need to get moving on a “real” project. Since I’m mainly in need of buildings, I’m starting with a sort of sample one, just simple shed or cabin to get familiarized with the tools & materials & whatever.

My rough objectives here are as follows.

  • Structural core (base & sub-walls): laser-cut 3/16" clear acrylic
  • Removable roof structure (same materials)
  • Tabbed & glued
  • Windows & doors: 3D printed PLA or laser-cut 1/8" white acrylic, glued onto the core
  • Sheathing & shingle strips: laser-cut 1/16th styrene, hopefully with engraved details, not sure
  • Details: 3D printed PLA or laser-cut

Here’s the start of the model,

As usual, this will take me a while…

CJ

Neat. Cant wait to see your results. Ive been working on CAD drawings for coal camp houses. Been using the City Classics Company House as a guideline.

http://www.cityclassics.biz/c_house3.html

I want to be able to assemble a dozen or so for the coal patch at Majestic. This thread has a build of them showing various options for them.

http://www.railroad-line.com/forum/pop_printer_friendly.asp?TOPIC_ID=29442

Thanks Bob, and that’s a great project. That will be so fun, making them slightly different and yet be in mass-production mode. How will you be handling the clapboard? Engraved, or cut precision board, or…?

I should have mentioned my reasoning for the acrylic (vs. wood). I’m working towards fairly large models which will require erring on the side of structural integrity, vs. realism. I won’t be able to take them in each winter, because I won’t have that kind of storage space. Delicate parts like trestles and mini-scenes / dioramas, yes, but not the main buildings.

Having said that, I want the different sections of each building (if complicated enough) to be easily maneuverable, and separable.

Here’s an example, probably the first major one on the list.

So, there’s my long-term goal, and that’s my reasoning. This small shed will therefore be a sort of test bed for materials & methods, or at least a start at it. It’s probably going to look like one seriously over-built shed, but now you know why.

===>Cliffy

It will be interesting to see how the acrylic holds up in the real world. I’ve been considering re-making my 14-foot long trestle in acrylic, but am concerned about such things as long-term brittleness, UV damage, possible warpage, etc. I would just cut all the sticks, with the screw holes for the bent pieces, and use brass screws. Certainly the bents could be done as a “single piece” but because of the necessary waste, it would be far more costly than cutting the sticks.

Also, when I made the gallows I found that the edges chip very easily if subject to a sharp rap on a hard surface, and in the real world of the garden, caca occurs.

Paint only covers so much and lasts so long and you don’t want to repaint a trestle after installation.

Hi Ken, good points. I’m not expecting to paint much of the acrylic directly, but sheath most of it it in .04 styrene. Along those lines, I’m wondering if acrylic paint adheres well to arylic sheet?

My trestles are a ways out, and I’ve assumed I’d make those from cedar. But you raise interesting ideas, and I’ll eventually want to test some alternatives like 3d printing them from brown PLA, or lasering them from brown plastic (maybe poly pro sheet, screwed together).

For now I’ll be focusing on the basic building materials, and learning how to work with them. I have a long way to go on that score.

Cliffy,

Consider putting some screw holes in the corners and placing a piece of 1/2"sq (cedar or plastic) in the corners so you can back up your glue with mechanical joints.

Chris

When I did the gallows, I found that is was difficult to get good coverage and took several coats using the acrylic patio paints, as well as spray cans of enamel. The saving grace, which is also the downfall, was that when the part is clear, you see the paint on the back side, through the piece, so it looks painted, even if it isn’t. Of course, this acrylic then has no UV protection and will yellow/brittle in the sunlight over time.

After cutting, you can sand blast the acrylic to get a better “bite.”

Chris, that’s why I have all those interlocking tabs, both for better mechanical overlap and also self-fixturing. But I agree, backing strips of the same material would be additional reinforcement and weatherproofing, especially with the larger buildings. Good idea.

Todd, like I mentioned, I hope to do the painting mainly on the styrene, which I’ve assumed will take the paint better. But maybe not, I have no proof. For the exposed acrylic edges (eaves, for example), roughing up is a great idea, though I’d just use sandpaper at this point.

So good points guys, thanks.

I just added a dormer, because it looked too boring.

Now I need to export & arrange the patterns and get it cut before messing too much further. Maybe this weekend, we’ll see. For adhesive I’ll start with SciGrip 16, since it’s better for gap filling. I’m looking forward to seeing how the fits work out, since I’ve been going line-to-line on the various tabs & etc., expecting (and needing) the laser’s kerf to provide the clearance.

[edit] OK, I couldn’t wait till Saturday, so I went ahead and made the patterns and here they are. I have a mix of clear and blue-ish plex (which I got much cheaper), so the top sheet is blue and the bottom one (with the walls, where windows will be) is clear.

Gotta take care of other priorities now, but I’m so looking forward to cutting these and seeing if they fit together as hoped.

Cliffy,

Your joints are very good. I’m thinking of that backup more for a glue failure. At least you would have a mechanical backup, especially on the big structures.

Anyway, feel free to send me one of everything for verification. I will send you burrito money.

Chris

I agree with you Chris, thanks. Backup’s are good!

Are your “overlapping/shared” lines one line or two lines?

They need to be one line or it will cut that section twice and those pieces will have a slightly different tollerance than those pieces with single cuts.

Didn’t know that Todd, thanks. They’re 2 lines. So it sounds like both lines, even though they precisely overlap, will send their own instructions to the cutter, doubling the burn… hmm, don’t want that. So I’ll move the pieces away from each other a bit. Good catch!

The beam has a bit of width that manifests itself on the second pass, but also consider that your machine also has tolerances so even if the line is in exactly same place, the machine may not be and this leads to a wider cut.

You want to move them away anyway and probably avoid the practice of shared lines for interlocking pieces because…,

You may find that both the “mohel” and “gyn” are a bit over zealous in their jobs and end up with a bunch of “unsatisfied” females. As separate pieces you can trim the males a bit wider than the females and keep everyone happy.

This male was cut to 9.4 mm wide while the female opening is 9.35mm so it should be a nice tight fit… right??? The fatter the acrylic, the sloppier it will be.

Always try your cuts on a scrap piece of the same thickness first before you waste a nice sheet.

Cliff many times i share a line in a same size of part, but i only have one line, it saves time, if 2 boxes, one has 4 sides one has 3 sides, works great and quicker.

Dennis

Thanks Todd and Dennis, I always value your insights. Todd, I did do a test joint pair of pieces, and here’s a pic of that. The fit was loose…

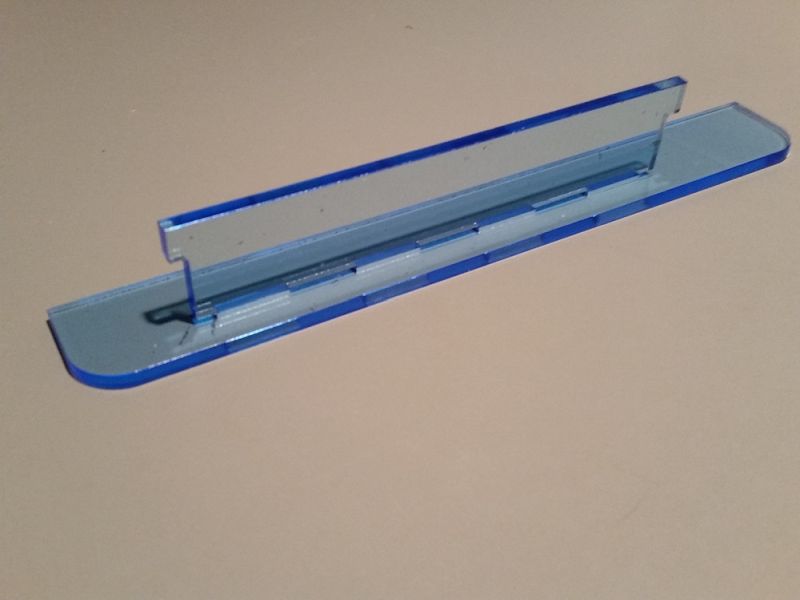
… however, it was loose because I didn’t account for the paper thickness when doing the design! So, .006 thinner in the cad model. It will still be loose, but not so much.

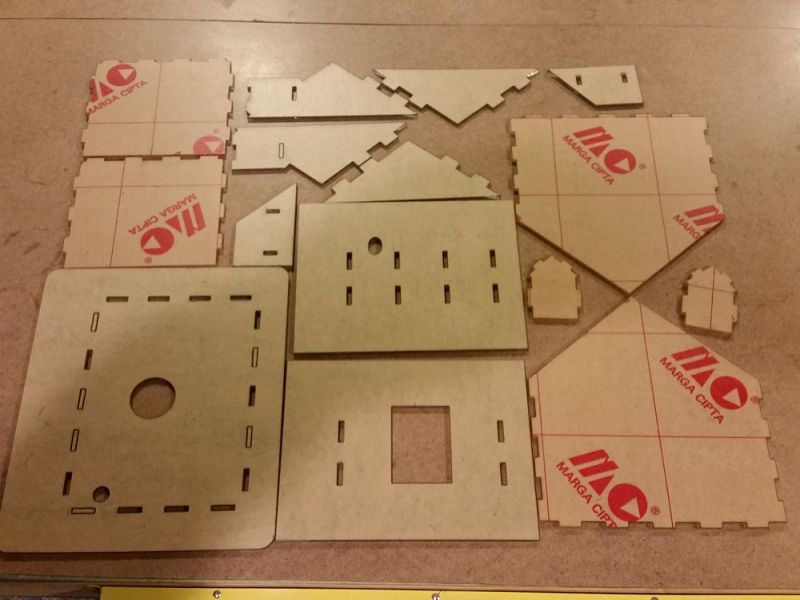
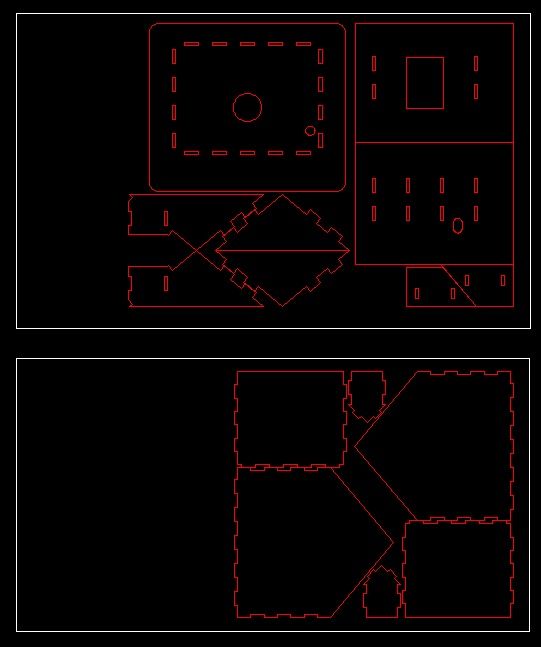
Here’s the parts all cut out. It took about 50 minutes to do this, at 4.5mm/sec.

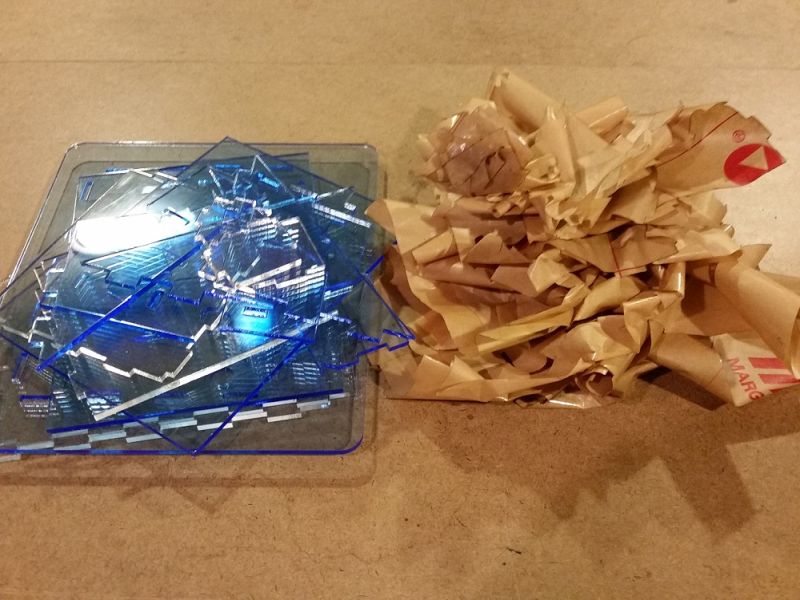
It took quite a while to peel off the paper, maybe 45 minutes. I’m not posting this as a gripe, I’m only informing people who may be interested in getting into the process. I found the paper peeling, with the radio on, to be quite enjoyable. (http://www.largescalecentral.com/externals/tinymce/plugins/emoticons/img/smiley-laughing.gif)

Just as a reminder, the blue plex is stock I got cheaply, and don’t need to be transparent. How I got it is this. I called the local plastics place, and asked for sales. And I asked if there was any stock of acrylic in the 1/8 to 1/4 range that they needed to get rid of. The answer was a very enthusiastic “Yes!” In slight blue, .160, 5 4x8 sheets, half price. I took it all, and had them cut the sheets to a size my cutter could handle. And I got a sheet of clear, for windows. So that’s my story.

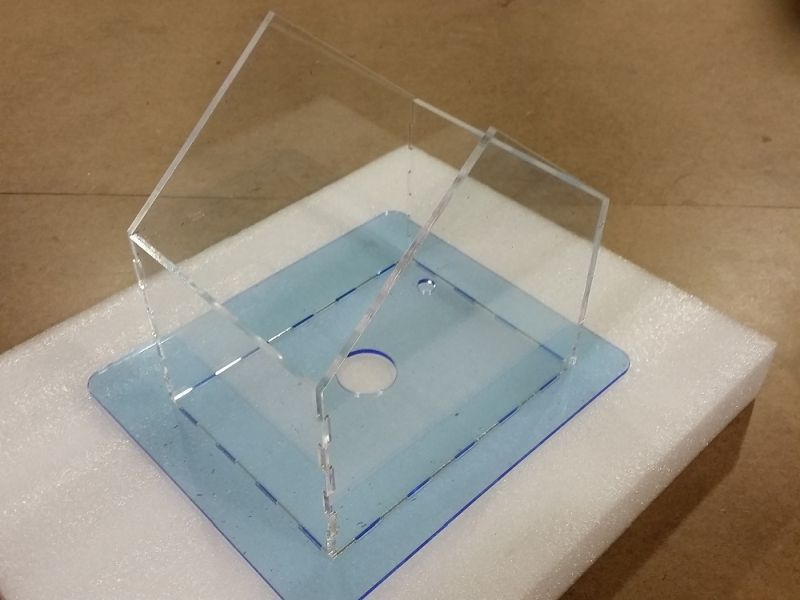
Anyway, I couldn’t wait to see if the parts fit together. And for the main structure, they did just fine.

To clarify, I’m using the line-to-line method, where you expect the laser to cut on the line for both male and female features. Just as Todd was saying, though with different vocabulary (http://www.largescalecentral.com/externals/tinymce/plugins/emoticons/img/smiley-laughing.gif). The other method, which I’ve used in the past to prep files for our plasma and water-jet cutters at work, involves taking into account the kerf (width) of the cut. That makes the 3D modeling way more difficult, and I’ll settle for line-to-line any day. [edit: What I’m trying to say here is that, with the line-to-line method, the width of the laser’s cut is your clearance between parts. Anything else requires a lot more labor on the computer end.]

The question in my mind was how well the wall and base parts would index, and if the result was ok for just solvent-welding in place via self-fixturing of the tabs. The answer is: emphatically Yes. There was plenty of clearance for the base / wall assembly parts to fit together. It wasn’t overly tight though, and they will require taping or clamping together when I do the adhering later.

For all these joints, I’m intending to use the thicker gap-filling solvent cement, Sci-Grip (Weld-On) #16. #4, the usual, is just too viscous.

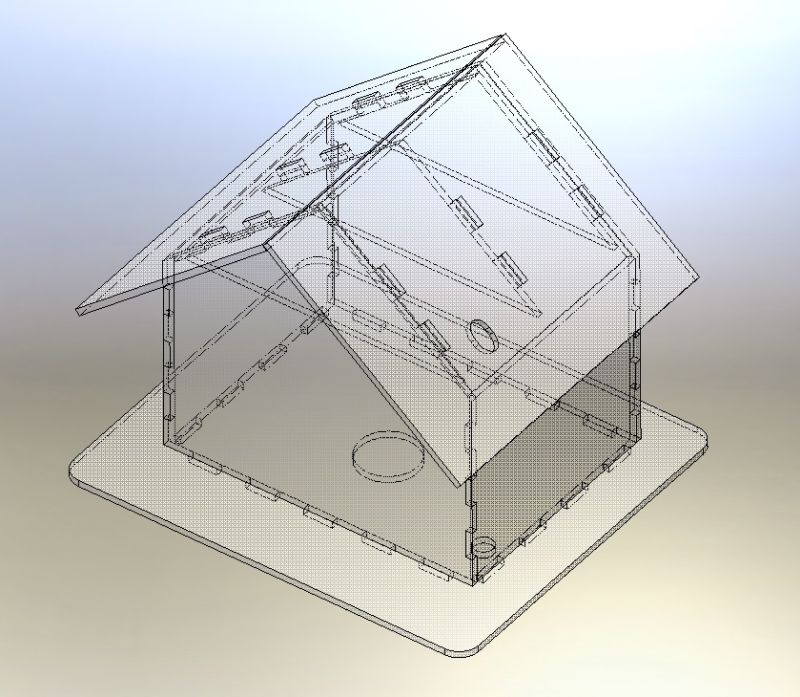
The removable roof situation was more difficult. For starters, I’d forgotten to “print” a sub-layer to the roof, and screwed up on a dimension on the roof ribs that also formed the dormer side walls, making them not fit thru the roof openings. So I had to cut 4 more parts: 2 new, 2 re-do’s. After that, with some forcefulness, the roof assembly fit together.

The stacked tolerances on all these fits quickly eats up the nominal clearances. In other words, with all these fitted parts, I really had to work to get them clicked together. Moral of the story: The more the parts involved with the fit, the looser the fits should be. E.g., in complex multi-part joints, the kerf of the laser may not provide enough clearance. One or more parts may need breathing room, and additional bit removed from the joint. Maybe in the cutting pattern, or maybe just with a file. Literal file.

Dennis, by the way, on that last run of parts, I allowed the lines to coincide. And you’re right, it didn’t make a difference (that I could notice). The second-time beam just shot through where it had been before.

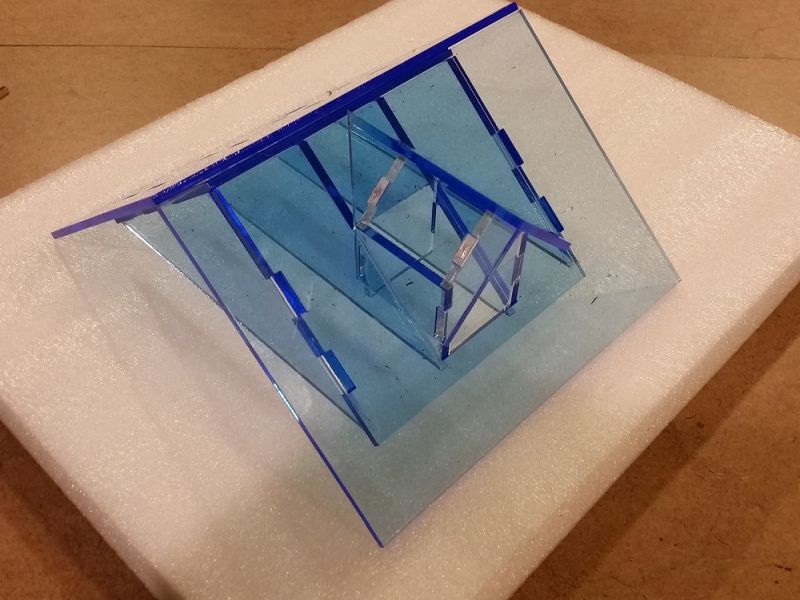
That sub-layer of roof was supposed to help index the roof assembly to the walls. But additional geometry on the roof ribs would obviate that. So, shed V2, if there is one, should have only 1 roof layer of plex, and not have that lower layer. Stupid idea in the first place. I was excited by all this I guess.

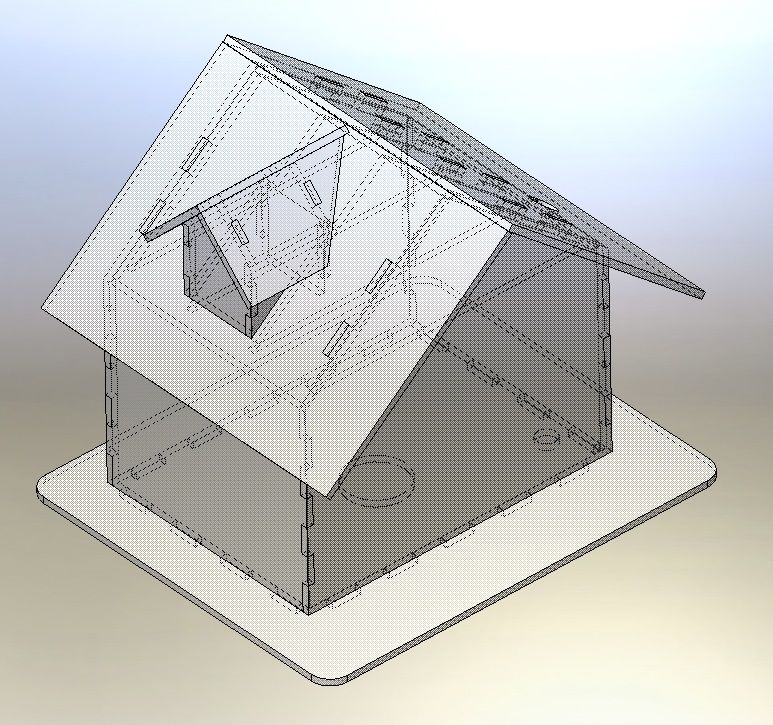
Here’s the building put together.

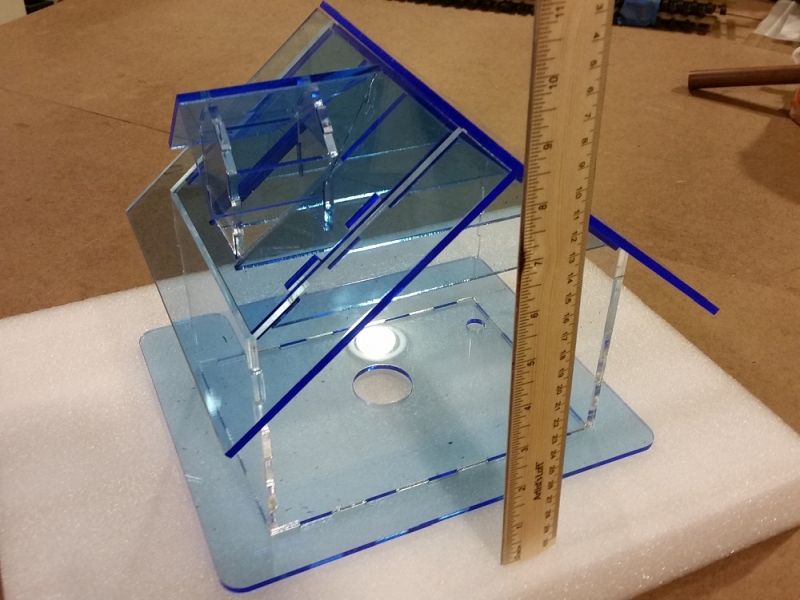
Chris, I can sure see how your recommended backup strips can help, especially at the base and main corner joints. Very easily cut with the rest of the parts, and just as easily adhered.

The next step will be to develop the sheathing…

===>Cliffy

Looks like it worked out very nice.

Nicely done, Cliff – If you run it again you can add shingles and siding to the model - If you remove the paper first you can paint the back of the building sides grey (for mortar) and the front red (for brick) and get a nice effect.

Keep up the good work!

dave

Very nicely done Cliffy, but you got to excited and forgot door and window openings. (http://largescalecentral.com/externals/tinymce/plugins/emoticons/img/smiley-tongue-out.gif)Are you going to finish that out, or is it just a test piece?

Chris

Chris Kieffer said:

Very nicely done Cliffy, but you got to excited and forgot door and window openings. (http://largescalecentral.com/externals/tinymce/plugins/emoticons/img/smiley-tongue-out.gif)Are you going to finish that out, or is it just a test piece?

Chris

Looks very nice, Cliff. But I’m sure you don’t need openings for windows and doors. I NEVER put them in and just use the acrylic wall for glazing. However, you may want to allow for some ventilation to let hot air out…